mNo edit summary |
(added mini icons) Tag: Source edit |
||
| (48 intermediate revisions by 6 users not shown) | |||
| Line 1: | Line 1: | ||
{{For|the keep located in this region|Griffon Wing Keep}} |
{{For|the keep located in this region|Griffon Wing Keep}} |
||
| − | |||
<onlyinclude>{{LocationTransformer |
<onlyinclude>{{LocationTransformer |
||
| − | |style = {{{style|}}} |
+ | |style = {{{style|}}} |
| + | |supertitle = |
||
| − | |name = [[Western Approach]] |
||
| − | | |
+ | |name = [[Western Approach]] |
| − | | |
+ | |icon = Western Approach icon (Inquisition).png |
| − | | |
+ | |image = Western approach 2.png |
| − | | |
+ | |px = 270x360px |
| + | |type = Desert |
||
| ⚫ | |||
| − | |terrain = |
+ | |terrain = Canyon |
| ⚫ | |||
| − | |inhabitants = |
||
| + | |sections = |
||
| ⚫ | |||
| + | |inhabitants = [[Grey Wardens]] <small>(formerly)</small> <br> [[White Claws]] <br> [[Venatori]] |
||
| ⚫ | |||
| ⚫ | |||
| + | |factions = |
||
| + | |quests = |
||
| + | |exits = |
||
| + | |caption = |
||
| + | |description = |
||
| + | |area map name = |
||
| ⚫ | |||
}}</onlyinclude> |
}}</onlyinclude> |
||
| Line 21: | Line 28: | ||
The wastes in The Approach were once a land of plenty. The rain came north over the Gamordan Peaks, turning the plains green and verdant for several months of the year. However, eight hundred years ago, that all changed.<ref>Taken from [[Codex entry: The Western Approach]]</ref> The Approach became the site of a major battle during the [[Second Blight]]. The [[darkspawn]] swarmed out of the Abyssal Rift, a great chasm to the south, and corrupted it with their foul blood never allowing for the land beyond to recover... even after the darkspawn were all driven back underground.<ref>Expanded from [[Codex entry: The Western Approach]]</ref> |
The wastes in The Approach were once a land of plenty. The rain came north over the Gamordan Peaks, turning the plains green and verdant for several months of the year. However, eight hundred years ago, that all changed.<ref>Taken from [[Codex entry: The Western Approach]]</ref> The Approach became the site of a major battle during the [[Second Blight]]. The [[darkspawn]] swarmed out of the Abyssal Rift, a great chasm to the south, and corrupted it with their foul blood never allowing for the land beyond to recover... even after the darkspawn were all driven back underground.<ref>Expanded from [[Codex entry: The Western Approach]]</ref> |
||
| − | The [[Grey Wardens]] had [[Adamant Fortress]] erected to stand watch over the chasm. The region however became a stark and sad place with unstable purple sands looted with desolate rocky pillars engulfed in steep ridges. At night the air grows still and the sky is alight with shimmering auroras— the time when darkspawn still come out of hiding.<ref>Excerpt from [[Codex entry: The Western Approach]]</ref> |
+ | The [[Grey Wardens]] had [[Adamant Fortress]] erected by the [[Dwarf|dwarves]] to stand watch over the chasm. The region however became a stark and sad place with unstable purple sands looted with desolate rocky pillars engulfed in steep ridges. At night, the air grows still and the sky is alight with shimmering auroras— the time when darkspawn still come out of hiding.<ref>Excerpt from [[Codex entry: The Western Approach]]</ref> |
| − | The Orlesians at one point had iron towers built, over hundred feet high, to mark a path in the badlands allowing for travelers to see the next when one is reached. The towers, now old, rusted and barely visible no longer pave a clear path to Adamant Fortress |
+ | The Orlesians at one point had iron towers built, over a hundred feet high, to mark a path in the badlands allowing for travelers to see the next when one is reached. The towers, now old, rusted and barely visible no longer pave a clear path to Adamant Fortress which stands on the lip of the chasm towering at the end of the path.<ref>[http://www.dragonage.com/#!/en_US/news/the-fortress-of-adamant The Fortress of Adamant]. Dragon Age</ref> Adamant eventually lay vacant by the Wardens due to the ever encroaching sands and intense howling winds. |
{{Blockquote|''The desolate badlands known as the Western Approach are as massive as they are barren. Bordered to the west by steps and crawling with monsters, The Approach is a place from which few explorers return and most avoid. The Grey Warden Fortress Adamant sits on the edge of a great chasm on The Approach's southern reaches, one of the few remaining signs that the greatest battles of the second Blight were fought here.''|Excerpt from the quest journal}} |
{{Blockquote|''The desolate badlands known as the Western Approach are as massive as they are barren. Bordered to the west by steps and crawling with monsters, The Approach is a place from which few explorers return and most avoid. The Grey Warden Fortress Adamant sits on the edge of a great chasm on The Approach's southern reaches, one of the few remaining signs that the greatest battles of the second Blight were fought here.''|Excerpt from the quest journal}} |
||
| Line 29: | Line 36: | ||
== Involvement == |
== Involvement == |
||
{{SpoilerDAI| |
{{SpoilerDAI| |
||
| − | During the [[Main quests (Inquisition)|main quest]] [[Here Lies the Abyss]], [[the Inquisitor]] sets out to follow the tracks of the disappearing [[Grey Wardens]]. After meeting [[Hawke]] in [[Skyhold]], and being introduced to their Grey Warden ally in [[Crestwood]], the Inquisitor learns that the Wardens have been gathering in a [[Tevinter]] tower in The Western Approach. While tracking down the Wardens, wildlife, [[White Claws|White Claw Raiders]], and [[Venatori]] will present a variety of threats amidst the sandy dunes, rocky outcrops, and ancient Tevinter ruins. |
+ | During the [[Main quests (Inquisition)|main quest]] [[Here Lies the Abyss]], [[the Inquisitor]] sets out to follow the tracks of the disappearing [[Grey Wardens]]. After meeting [[Hawke]] in [[Skyhold]], and being introduced to their Grey Warden ally in [[Crestwood]], the Inquisitor learns that the Wardens have been gathering in a [[Tevinter]] tower in The Western Approach. While tracking down the Wardens, wildlife, [[White Claws|White Claw Raiders]], and [[Venatori]] will present a variety of threats amidst the sandy dunes, rocky outcrops, old Warden outposts and ancient Tevinter ruins. |
| − | When the Inquisitor finally catches up to the Grey Wardens, |
+ | When the Inquisitor finally catches up to the Grey Wardens, who are intent on performing a ritual that will help them eliminate the remaining [[Old Gods]], they discover that Warden Commander [[Clarel]] is unwittingly being led into a Venatori trap by [[Magister]] [[Livius Erimond]]. Erimond is in fact a member of the Venatori and a servant of [[Corypheus]] who intends to bring the Warden mages to Corypheus' service. The Inquisitor can gain access to The Approach by completing the [[Investigate the Western Approach]] [[war table]] scouting operation in [[Skyhold]]. |
| + | |||
| + | Further investigation reveals that the Venatori are trying to access the [[Still Ruins]], the site of an ancient Tevinter magical experiment, and capture the [[Abyssal High Dragon]], a task which requires them keeping Professor [[Frederic of Serault]] alive. There is also evidence that the [[Red Templars]] have recently abandoned their mining efforts and relocated to [[Emprise du Lion]]. |
||
}} |
}} |
||
| Line 39: | Line 48: | ||
{{Note|The 25 regions below make up the [[Regions|Regions in the Approach]] [[Collections|collection]]. Discovering all of them grants 200 Influence.}} |
{{Note|The 25 regions below make up the [[Regions|Regions in the Approach]] [[Collections|collection]]. Discovering all of them grants 200 Influence.}} |
||
<!-- ****** Please avoid changing this section as this represents the Regions collection ******--> |
<!-- ****** Please avoid changing this section as this represents the Regions collection ******--> |
||
| − | + | :[[File:Ico Area Map.png|20px]] Abyssal Ledge |
|
| − | + | :[[File:Ico Area Map.png|20px]] Blight Overlook |
|
| − | + | :[[File:Ico Area Map.png|20px]] The Canyons |
|
| − | + | :[[File:Ico Area Map.png|20px]] Death Drink Springs |
|
| − | + | :[[File:Ico Area Map.png|20px]] Dust Plains |
|
| − | + | :[[File:Ico Area Map.png|20px]] Dustytop Fort |
|
| − | + | :[[File:Ico Area Map.png|20px]] Echoback Canyon |
|
| − | + | :[[File:Ico Area Map.png|20px]] Echoback Fort |
|
| − | + | :[[File:Ico Area Map.png|20px]] Forgotten Mine |
|
| − | + | :[[File:Ico Area Map.png|20px]] Gates of Andoral |
|
| − | + | :[[File:Ico Area Map.png|20px]] Gates of Toth |
|
| − | + | :[[File:Ico Area Map.png|20px]] Giant's Staircase |
|
| − | + | :{{:Griffon Wing Keep|style=iconmini}} |
|
| − | + | :[[File:Ico Area Map.png|20px]] Iska's Stand |
|
| − | + | :[[File:Ico Area Map.png|20px]] Lost Spring Canyon |
|
| − | + | :[[File:Ico Area Map.png|20px]] Lost Wash Creek |
|
| ⚫ | |||
| − | * Nazaire's Pass |
||
| − | + | :[[File:Ico Area Map.png|20px]] Old Prison Road |
|
| − | + | :[[File:Ico Area Map.png|20px]] Prison Ruins |
|
| − | + | :[[File:Ico Area Map.png|20px]] Sand Flats |
|
| − | + | :[[File:Ico Area Map.png|20px]] Sand Rock Mine |
|
| − | + | :{{:Shimmer Stone Mine|style=iconmini}} |
|
| − | + | :{{:Still Ruins|style=iconmini|name=The Still Ruins}} |
|
| − | + | :[[File:Ico Area Map.png|20px]] Valemont Pass |
|
| − | + | :[[File:Ico Area Map.png|20px]] The Wastes |
|
<!-- ****** Please avoid changing this section as this represents the Regions collection ******--> |
<!-- ****** Please avoid changing this section as this represents the Regions collection ******--> |
||
| + | |||
| − | <br> |
||
=== Additional places === |
=== Additional places === |
||
| − | + | :{{:Adamant Fortress|style=iconmini}} |
|
| − | + | :{{:Coracavus|style=iconmini}} |
|
| + | |||
| − | <br> |
||
| − | === Inquisition |
+ | === [[Inquisition camp]]s === |
| − | + | :[[File:Inquisition Camps icons.png|26px]] Craggy Ridge Camp |
|
| − | + | :[[File:Inquisition Camps icons.png|26px]] Echo Back Canyon Camp |
|
| − | + | :[[File:Inquisition Camps icons.png|26px]] Lost Spring Canyon Camp |
|
| − | + | :[[File:Inquisition Camps icons.png|26px]] Nazaire's Pass Camp |
|
== Characters == |
== Characters == |
||
| + | * '''[[Alistair]]''' <small>(conditional)</small> |
||
| ⚫ | |||
| + | * Warden-Commander '''[[Clarel de Chanson|Clarel]]''' |
||
| ⚫ | |||
| ⚫ | |||
| − | * [[Rylen|Knight-Captain Rylen]] |
||
| ⚫ | |||
| ⚫ | |||
| − | * [[ |
+ | * '''[[Hawke]]''' |
| + | * '''[[Jean-Marc Stroud]]''' <small>(conditional)</small> |
||
| ⚫ | |||
| + | * '''Leo of Lucien Bay'''<ref>Encountered during [[Cassandra Pentaghast]]'s companion queest [[Unfinished Business]].</ref> |
||
| ⚫ | |||
| ⚫ | |||
| + | * '''[[Loghain Mac Tir]]''' <small>(conditional)</small> |
||
| + | * '''[[Lucanus]]''' |
||
| ⚫ | |||
| + | * Commander '''[[Rylen]]''' |
||
| + | |||
| + | === Merchants === |
||
| ⚫ | |||
== Quests == |
== Quests == |
||
| + | :{{:A Manuscript of Some Authority|style=iconmini}} |
||
| ⚫ | |||
| ⚫ | |||
| ⚫ | |||
| − | {{: |
+ | :{{:A Stranger Rift in the Ruins|style=iconmini}} |
| − | {{: |
+ | :{{:A Tevinter Relic Hunt|style=iconmini}} |
| − | {{: |
+ | :{{:Draconology|style=iconmini}} |
| − | {{: |
+ | :{{:Fortress Squatters|style=iconmini}} |
| − | {{: |
+ | :{{:Frederic's Livelihood|style=iconmini}} |
| − | {{:Holding the Western Approach|style=iconmini}} |
+ | :{{:Holding the Western Approach|style=iconmini}} |
| − | {{:How to Lure a Dragon|style=iconmini}} |
+ | :{{:How to Lure a Dragon|style=iconmini}} |
| − | {{:Hunting Patterns|style=iconmini}} |
+ | :{{:Hunting Patterns|style=iconmini}} |
| − | {{:Into the Approach|style=iconmini}} |
+ | :{{:Into the Approach|style=iconmini}} |
| − | {{: |
+ | :{{:On the Chantry Trail|style=iconmini}} |
| − | {{: |
+ | :{{:Sharper White Claws|style=iconmini}} |
| − | {{: |
+ | :{{:The Abyssal High Dragon|style=iconmini}} |
| − | {{: |
+ | :{{:The Heart of the Still Ruins|style=iconmini}} |
| − | {{: |
+ | :{{:The Trouble with Darkspawn|style=iconmini}} |
| − | {{:The |
+ | :{{:The Venatori|style=iconmini}} |
| − | {{: |
+ | :{{:This Water Tastes Funny|style=iconmini}} |
| + | |||
| ⚫ | |||
| − | <br> |
||
=== Rifts === |
=== Rifts === |
||
| − | {{:Rifts in the Canyons|style=iconmini}} |
+ | :{{:Rifts in the Canyons|style=iconmini}} |
| − | {{:Rifts in Echoback|style=iconmini}} |
+ | :{{:Rifts in Echoback|style=iconmini}} |
| − | {{:Rifts in Sand and Dust|style=iconmini}} |
+ | :{{:Rifts in Sand and Dust|style=iconmini}} |
| − | {{:Rifts off the Pass|style=iconmini}} |
+ | :{{:Rifts off the Pass|style=iconmini}} |
| + | |||
| − | <br> |
||
=== Requisitions === |
=== Requisitions === |
||
| − | {{:Code Requisition in the Approach|style=iconmini}} |
+ | :{{:Code Requisition in the Approach|style=iconmini}} |
| − | {{:Fauna Requisition in the Approach|style=iconmini}} |
+ | :{{:Fauna Requisition in the Approach|style=iconmini}} |
| − | {{:Lazurite Survey in the Approach|style=iconmini}} |
+ | :{{:Lazurite Survey in the Approach|style=iconmini}} |
| − | {{:Luster Survey in the Approach|style=iconmini}} |
+ | :{{:Luster Survey in the Approach|style=iconmini}} |
| + | |||
| − | <br> |
||
| − | === War |
+ | === War table operations === |
| − | {{: |
+ | :{{:All That Glitters|style=iconmini}} |
| − | {{: |
+ | :{{:Crossing the Sulphur Pits|style=iconmini}} |
| − | {{: |
+ | :{{:Deal with the Angry Varghests|style=iconmini}} |
| − | {{: |
+ | :{{:Find the Source of Darkspawn|style=iconmini}} |
| − | {{: |
+ | :{{:Gather Metals|style=iconmini}} |
| − | {{:Improving Morale|style=iconmini}} |
+ | :{{:Improving Morale|style=iconmini}} |
| − | {{: |
+ | :{{:Investigate Ancient Laboratory|style=iconmini}} |
| − | {{: |
+ | :{{:Investigate the Western Approach|style=iconmini}} |
| − | {{: |
+ | :{{:Judgment: Recover Sold Artifacts|style=iconmini}} |
| + | :{{:Secure a Source of Water for Outpost|style=iconmini}} |
||
| ⚫ | |||
| ⚫ | |||
== Creatures == |
== Creatures == |
||
| − | + | :[[Fennec]] |
|
| − | + | :[[Gurn]] |
|
| + | |||
| + | == Hostile creatures == |
||
| ⚫ | |||
| ⚫ | |||
| ⚫ | |||
| ⚫ | |||
| ⚫ | |||
| + | :[[Varghest]] |
||
| ⚫ | |||
| ⚫ | |||
== Enemies == |
== Enemies == |
||
| ⚫ | |||
| ⚫ | |||
| ⚫ | |||
| ⚫ | |||
| ⚫ | |||
| − | ** [[Ghoul]] |
||
| ⚫ | |||
| ⚫ | |||
| + | :[[Venatori]] |
||
| ⚫ | |||
| ⚫ | |||
| − | ** [[Hurlock archer]] |
||
| ⚫ | |||
| ⚫ | |||
| ⚫ | |||
| ⚫ | |||
| + | :* Venatori Stalker ([[Rogue (Inquisition)|Rogue]] - [[Double Daggers abilities|Double Daggers]]) |
||
| ⚫ | |||
| ⚫ | |||
| ⚫ | |||
| ⚫ | |||
| − | * [[Spider]]s |
||
| ⚫ | |||
| ⚫ | |||
| ⚫ | |||
| ⚫ | |||
| − | * [[ |
+ | :* [[Ghoul]] |
| − | * [[ |
+ | :* [[Hurlock]] |
| ⚫ | |||
| ⚫ | |||
| ⚫ | |||
| ⚫ | |||
| ⚫ | |||
| ⚫ | |||
| ⚫ | |||
| ⚫ | |||
| ⚫ | |||
| ⚫ | |||
| ⚫ | |||
| ⚫ | |||
| − | ** White Claw Raider Footpads ([[Double Daggers abilities|Double Dagger]] [[Rogue (Inquisition)|rogue]]) |
||
== [[Collections]] == |
== [[Collections]] == |
||
=== [[Astrarium|Astrariums]] === |
=== [[Astrarium|Astrariums]] === |
||
| − | {{:Astrariums in the Approach|style=iconmini}} |
+ | :{{:Astrariums in the Approach|style=iconmini}} |
| + | |||
| − | <br> |
||
=== [[Bottles on the Wall]] === |
=== [[Bottles on the Wall]] === |
||
| − | [[File:Bottles On The Wall icon.png|16px]] Vintage: Warden Jairn - |
+ | :[[File:Bottles On The Wall icon.png|16px]] Vintage: Warden Jairn - search inside ''Dustytop Fort''. |
| − | [[File:Bottles On The Wall icon.png|16px]] Vintage: Warden Eval'lal - |
+ | :[[File:Bottles On The Wall icon.png|16px]] Vintage: Warden Eval'lal - search inside the ''Ritual Tower''. |
| − | [[File:Bottles On The Wall icon.png|16px]] West Hill Brandy - |
+ | :[[File:Bottles On The Wall icon.png|16px]] West Hill Brandy - search the top of the tower directly above the Astrarium cave; climb the southern half of the east rubble slope and then traverse up the ladder. |
| + | |||
| − | <br> |
||
=== [[Dragon Hunter]] === |
=== [[Dragon Hunter]] === |
||
| ⚫ | |||
| ⚫ | |||
| + | |||
| ⚫ | |||
| − | <br> |
||
=== [[Landmarks]] === |
=== [[Landmarks]] === |
||
| − | {{:Landmarks in the Approach|style=iconmini}} |
+ | :{{:Landmarks in the Approach|style=iconmini}} |
| + | |||
| − | <br> |
||
=== [[Mosaics]] === |
=== [[Mosaics]] === |
||
| + | [[File:Archdemon numbers.jpg|thumb|right|200px|''The Archdemon'' numbering]] |
||
| − | {{:The Archdemon (Mosaic)|style=iconmini}} 12/12 pieces:<br> |
||
| − | + | :{{:The Archdemon (Mosaic)|style=iconmini}} (12 pieces) - see the [[The Archdemon (Mosaic)|Archdemon]] mosaic for detailed locations. |
|
| + | |||
| − | {{:Freed Are Slaves|style=iconmini}} 2/12 pieces:<br> |
||
| + | [[File:Freed are Slaves.jpg|thumb|right|200px|''Freed are Slaves'' numbering]] |
||
| − | * In [[Coracavus]], behind a locked door in the Records Room.<br> |
||
| − | + | :{{:Freed Are Slaves|style=iconmini}} (piece #8) - found in the [[Still Ruins]], in the locked room, just to the right of the first hall encountered. |
|
| + | :{{:Freed Are Slaves|style=iconmini}} (piece #9) - found in [[Coracavus]], behind a locked door in the ''Records Room''.{{Note|Requires [[Deft Hands, Fine Tools]] Inquisition [[Inquisition perks|perk]].}} |
||
| − | <br> |
||
| + | |||
=== [[Shards]] === |
=== [[Shards]] === |
||
| − | {{:Shards in the Approach|style=iconmini}} |
+ | :{{:Shards in the Approach|style=iconmini}} |
| + | |||
| − | <br> |
||
=== [[Skyhold Customizations]] === |
=== [[Skyhold Customizations]] === |
||
| − | {{: |
+ | :{{:Grey Warden Banner|style=iconmini}} - found in a chest at the second siege point, where [[Hawke]] is encountered in [[Adamant Fortress]]; see main quest [[Here Lies the Abyss]]. |
| + | :{{:Tevinter Banner|style=iconmini}} - found in a chest located in a room off of the left side of the ''Main Chamber'' of the [[Still Ruins]].{{Note|Requires [[Deft Hands, Fine Tools]] Inquisition [[Inquisition perks|perk]].}} |
||
| − | {{:Inquisition Banner|style=iconmini}} - [[Assault on Griffon Wing Keep|Capture Griffon Wing Keep]] (conditional: awarded after [[the Inquisitor]] captures their first keep)<br> |
||
| − | {{:Inquisition Banner |
+ | :{{:Inquisition Banner|style=iconmini}} - [[Assault on Griffon Wing Keep|capture Griffon Wing Keep]] (conditional: awarded after [[the Inquisitor]] captures their first keep) |
| + | :{{:Inquisition Banner Crown|style=iconmini}} - capture all three keeps: [[Caer Bronach]], [[Griffon Wing Keep]], and [[Suledin Keep]]. |
||
== [[Crafting materials|Resources]] == |
== [[Crafting materials|Resources]] == |
||
| − | [[File:Echoback Fort.png|thumb| |
+ | [[File:Echoback Fort.png|thumb|400px|Echoback Fort]] |
=== Herbs === |
=== Herbs === |
||
| − | {{:Amrita Vein|style=iconmini}} |
+ | :{{:Amrita Vein|style=iconmini}} |
| − | {{:Blood Lotus (Inquisition)|style=iconmini}} |
+ | :{{:Blood Lotus (Inquisition)|style=iconmini}} |
| − | {{:Deathroot (Inquisition)|style=iconmini}} |
+ | :{{:Deathroot (Inquisition)|style=iconmini}} |
| − | {{:Deep Mushroom (Inquisition)|style=iconmini}} |
+ | :{{:Deep Mushroom (Inquisition)|style=iconmini}} |
| − | {{:Dragonthorn (Inquisition)|style=iconmini}} |
+ | :{{:Dragonthorn (Inquisition)|style=iconmini}} |
| − | {{:Elfroot (Inquisition)|style=iconmini}} |
+ | :{{:Elfroot (Inquisition)|style=iconmini}} |
| − | {{:Ghoul's Beard|style=iconmini}} |
+ | :{{:Ghoul's Beard|style=iconmini}} |
| − | {{:Spindleweed (Inquisition)|style=iconmini}} |
+ | :{{:Spindleweed (Inquisition)|style=iconmini}} |
| − | {{: |
+ | :{{:Vandal Aria|style=iconmini}} <small>''(only found in Coracavus)''</small> |
| ⚫ | |||
| − | <br> |
||
| + | |||
=== Leather === |
=== Leather === |
||
| − | {{:Canine Leather|style=iconmini}} |
+ | :{{:Canine Leather|style=iconmini}} |
| − | {{:Fennec Fur|style=iconmini}} |
+ | :{{:Fennec Fur|style=iconmini}} |
| − | {{:Phoenix Scales|style=iconmini}} |
+ | :{{:Phoenix Scales|style=iconmini}} |
| − | {{:Quillback Leather|style=iconmini}} |
+ | :{{:Quillback Leather|style=iconmini}} |
| − | {{:Rough Hide|style=iconmini}} |
+ | :{{:Rough Hide|style=iconmini}} |
| + | |||
| − | <br> |
||
=== Metals === |
=== Metals === |
||
| − | {{:Lazurite|style=iconmini}} |
+ | :{{:Lazurite|style=iconmini}} |
| − | {{:Paragon's Luster|style=iconmini}} |
+ | :{{:Paragon's Luster|style=iconmini}} |
| − | {{:Serpentstone|style=iconmini}} |
+ | :{{:Serpentstone|style=iconmini}} |
== Notable items == |
== Notable items == |
||
=== [[Elven artifact (Inquisition)|Elven artifacts]] === |
=== [[Elven artifact (Inquisition)|Elven artifacts]] === |
||
| − | * In the Main Chamber of the [[Still Ruins]]. |
+ | * In the ''Main Chamber'' of the [[Still Ruins]]. |
| − | * In the far western corner of the hidden |
+ | * In the far western corner of the hidden ''[[Astrariums in the Approach|astrarium]] room''. |
| − | * In [[Griffon Wing Keep]] |
+ | * In [[Griffon Wing Keep]]; head up the stairway located directly to the right of keep's main gate. |
| + | |||
| − | <br> |
||
=== [[Logging stand]]s === |
=== [[Logging stand]]s === |
||
| − | * Northeast of Lost Spring Canyon Camp. |
+ | * Northeast of the Lost Spring Canyon Inquisition Camp. |
| − | * East of Craggy Ridge Camp, |
+ | * East by southeast of the Craggy Ridge Inquisition Camp, or directly northwest from [[Landmarks in the Approach|The Lost Idol]] [[Landmarks|landmark]] and head up the tiny slope from the riverbank. |
| + | |||
| − | <br> |
||
| ⚫ | |||
| ⚫ | |||
| + | * ''Vial of [[Archdemon]] Blood'' - found in ''Echoback Fort''; see [[Side quests (Inquisition)|side quest]] [[The Trouble with Darkspawn]]. |
||
| + | |||
=== [[Quarry|Quarries]] === |
=== [[Quarry|Quarries]] === |
||
| − | * |
+ | * At [[Shimmer Stone Mine]] |
| − | * Southwest of Echoback Fort |
+ | * Southwest of ''Echoback Fort'' |
| − | * Southwest of Sand Rock Mine |
+ | * Southwest of ''Sand Rock Mine'' |
| + | |||
| − | <br> |
||
| + | === [[Seeing Red|Red lyrium veins]] === |
||
| + | * Inside ''Sand Rock Mine'' |
||
| + | * Inside the ''Forgotten Mine'' |
||
| + | * Inside [[Shimmer Stone Mine]] |
||
| + | |||
=== [[Veilfire|Veilfire glyphs]] === |
=== [[Veilfire|Veilfire glyphs]] === |
||
| − | {{:Fire Rune Schematic|style=iconmini}} - |
+ | :{{:Fire Rune Schematic|style=iconmini}} - acquired in the cave revealed from unlocking [[Astrariums in the Approach]]. |
| − | {{:Frost Rune Schematic|style=iconmini}} - |
+ | :{{:Frost Rune Schematic|style=iconmini}} - in a small cave accessible from the center of ''Echoback Fort''. |
| − | {{:Spirit Rune Schematic|style=iconmini}} - |
+ | :{{:Spirit Rune Schematic|style=iconmini}} - in [[Coracavus]]' ''Holding Cells''; found in the cell containing the hanged man. |
| − | {{:Spirit Rune Schematic|style=iconmini}} - |
+ | :{{:Spirit Rune Schematic|style=iconmini}} - in the ''Inner Sanctum'' of the [[Still Ruins]], on a plaque behind the magic staff; see [[Side quests (Inquisition)|side quest]] [[The Heart of the Still Ruins]]. |
| + | |||
| − | <br> |
||
=== Loot === |
=== Loot === |
||
| − | + | :{{:Aegis of the Order|style=iconmini}} - looted from within the same cave as [[Landmarks in the Approach|the Thing in the Dark]] [[Landmarks|landmark]].{{Note|Requires the completion of the [[war table]] operation [[Crossing the Sulphur Pits]].}} |
|
| − | + | :{{:Blizzard's Path|style=iconmini}} - looted from a chest in ''Echoback Fort''; see [[Side quests (Inquisition)|side quest]] [[The Trouble with Darkspawn]]. |
|
| − | + | :{{:Cowl of the Overseer (Inquisition)|style=iconmini}} - looted from [[Macrinus]]; see [[Side quests (Inquisition)|side quest]] [[Assault on Griffon Wing Keep]]. |
|
| − | + | :{{:Griffon Plate|style=iconmini}} - acquired in the cave revealed from [[Astrariums in the Approach]].{{Note|[[Trespasser]] required.}} |
|
| − | + | :{{:Kitty's Collar|style=iconmini}} - looted from [[Macrinus]]; see side quest [[Assault on Griffon Wing Keep]].{{Note|Requires installation of [[Patches (Inquisition)|Patch 10]].}} |
|
| − | + | :{{:Master Cleansing Rune Schematic|style=iconmini}} - looted from [[Lucanus]] in the [[Still Ruins]]; see side quest [[A Tevinter Relic Hunt]]. |
|
| − | + | :{{:Master Corrupting Rune Schematic|style=iconmini}} - looted from a chest in ''Echoback Fort''; see side quest [[The Trouble with Darkspawn]]. |
|
| − | + | :{{:Masterwork Enchanter Mail|style=iconmini}} - acquired in the cave revealed from unlocking [[Astrariums in the Approach]]. |
|
| − | + | :{{:Masterwork Vanguard Mail|style=iconmini}} - looted from a chest at the top of [[Shimmer Stone Mine]]. |
|
| − | + | :{{:Nameless Blade|style=iconmini}} - looted from the [[Abyssal High Dragon]]. |
|
| − | + | :{{:Pyre of the Forgotten|style=iconmini}} - randomly available at the [[Merchant (Griffon Wing Keep)|Griffon Wing Keep Merchant]] for {{CurrencyInquisition|21433}}.{{Note|Requires [[The Short List]] Inquisition [[Inquisition perks|perk]]}} |
|
| − | + | :{{:Sad Splinters|style=iconmini}} - looted after destroying the keep gate during the side quest [[Assault on Griffon Wing Keep]]. |
|
| − | + | :{{:Superb Amulet of Magic|style=iconmini}} - randomly available at the [[Merchant (Griffon Wing Keep)|Griffon Wing Keep Merchant]] for {{CurrencyInquisition|14495}}.{{Note|Requires [[The Short List]] Inquisition [[Inquisition perks|perk]]}} |
|
| − | + | :{{:Superb Belt of Magic Defense|style=iconmini}} - randomly available at the [[Merchant (Griffon Wing Keep)|Griffon Wing Keep Merchant]] for {{CurrencyInquisition|14495}}.{{Note|Requires [[The Short List]] Inquisition [[Inquisition perks|perk]]}} |
|
| − | + | :{{:Superb Ring of Armor Penetration|style=iconmini}} - looted from the Abyssal High Dragon. |
|
| − | + | :{{:Superb Ring of Critical Damage|style=iconmini}} - looted from a chest behind a locked door in [[Coracavus]]' ''Records Room''; see [[Side quests (Inquisition)|side quest]] [[The Trouble with Darkspawn]].{{Note|Requires [[Deft Hands, Fine Tools]] Inquisition [[Inquisition perks|perk]].}} |
|
| − | + | :{{:Tempest (staff)|style=iconmini}} - looted from the ''Inner Sanctum'' of the [[Still Ruins]]; see side side quest [[A Stranger Rift in the Ruins]]. |
|
| − | <br> |
||
| ⚫ | |||
| ⚫ | |||
| − | * ''Vial of [[Archdemon]] Blood'' – Found in Echoback Fort. |
||
== Codex entries == |
== Codex entries == |
||
| − | {{:Codex entry: |
+ | :{{:Codex entry: Constellation: Fenrir|style=iconminiDAI}} |
| − | {{:Codex entry: |
+ | :{{:Codex entry: Constellation: Satinalis|style=iconminiDAI}} |
| − | {{:Codex entry: Constellation: |
+ | :{{:Codex entry: Constellation: Toth|style=iconminiDAI}} |
| − | {{:Codex entry: |
+ | :{{:Codex entry: The Creation of a Phylactery|style=iconminiDAI}} |
| − | {{:Codex entry: |
+ | :{{:Codex entry: The Gate Guardians |style=iconminiDAI}} |
| − | {{:Codex entry: |
+ | :{{:Codex entry: Magister Erimond|style=iconminiDAI}} |
| − | {{:Codex entry: |
+ | :{{:Codex entry: Old Chantry Trail Signs|style=iconminiDAI}} |
| − | {{:Codex entry: |
+ | :{{:Codex entry: Our Lady of the Anderfels |style=iconminiDAI}} |
| − | {{:Codex entry: |
+ | :{{:Codex entry: Professor Frederic of Serault|style=iconminiDAI}} |
| − | {{:Codex entry: |
+ | :{{:Codex entry: Ritual Tower|style=iconminiDAI}} |
| − | {{:Codex entry: |
+ | :{{:Codex entry: Surviving the Western Approach|style=iconminiDAI}} |
| − | {{:Codex entry: |
+ | :{{:Codex entry: The Western Approach|style=iconmini}} |
| + | |||
| ⚫ | |||
| + | === Adamant Fortress === |
||
| ⚫ | |||
| − | {{:Codex entry: |
+ | :{{:Codex entry: Adamant Fortress|style=iconmini}} |
| − | {{:Codex entry: |
+ | :{{:Codex entry: A Letter from Warden-Commander Clarel|style=iconmini}} |
| + | |||
| ⚫ | |||
| + | === Coracavus === |
||
| ⚫ | |||
| ⚫ | |||
| ⚫ | |||
| + | :{{:Codex entry: The Secret Tongue of Slaves|style=iconminiDAI}} |
||
| + | |||
| + | === Still Ruins === |
||
| + | :{{:Codex entry: Responsible Blood Magic|style=iconminiDAI}} |
||
| ⚫ | |||
== Note texts == |
== Note texts == |
||
| − | {{:Note: A |
+ | :{{:Note: A Letter Found on a Grey Warden Mage|style=iconmini}} |
| − | {{:Note: |
+ | :{{:Note: Almost Illegible Note|style=iconmini}} |
| − | {{:Note: |
+ | :{{:Note: Ancient Tevinter|style=iconmini}} |
| − | {{:Note: Ancient |
+ | :{{:Note: Ancient Warden Logbook|style=iconmini}} |
| − | {{:Note: |
+ | :{{:Note: A Preserved Note|style=iconmini}} |
| − | {{:Note: |
+ | :{{:Note: Barely Readable Unsent Letter|style=iconmini}} |
| − | {{:Note: |
+ | :{{:Note: Chantry Logbook|style=iconmini}} |
| − | {{:Note: |
+ | :{{:Note: Elegantly Penned Note|style=iconmini}} |
| − | {{:Note: |
+ | :{{:Note: Elegantly Written Letter|style=iconmini}} |
| − | {{:Note: |
+ | :{{:Note: Elegantly Written Note (about research team)|style=iconmini}} |
| − | {{:Note: Elegantly |
+ | :{{:Note: Elegantly Written Note (about Wardens)|style=iconmini}} |
| − | {{:Note: |
+ | :{{:Note: Faded Journal|style=iconmini}} |
| − | {{:Note: |
+ | :{{:Note: Griffon Wing Keep (from Servis)|style=iconmini}} |
| − | {{:Note: |
+ | :{{:Note: Griffon Wing Keep (to Servis)|style=iconmini}} |
| − | {{:Note: |
+ | :{{:Note: Intercepted Venatori Message|style=iconmini}} |
| − | {{:Note: |
+ | :{{:Note: Manifest|style=iconmini}} |
| − | {{:Note: |
+ | :{{:Note: Memorial|style=iconmini}} |
| − | {{:Note: |
+ | :{{:Note: Note from a Templar|style=iconmini}} |
| − | {{:Note: |
+ | :{{:Note: Note of Slight Jealousy|style=iconmini}} |
| − | {{:Note: |
+ | :{{:Note: Rebel Mage's Note|style=iconmini}} |
| − | {{:Note: |
+ | :{{:Note: A Scrawled Note|style=iconmini}} |
| − | {{:Note: |
+ | :{{:Note: Scrawled Raider Note|style=iconmini}} |
| − | {{:Note: |
+ | :{{:Note: Stern Note of Warning|style=iconmini}} |
| − | {{:Note: |
+ | :{{:Note: Venatori Orders (to Cassius)|style=iconmini}} |
| − | {{:Note: |
+ | :{{:Note: Written Note|style=iconmini}} |
| + | |||
| ⚫ | |||
| + | === Adamant Fortress === |
||
| ⚫ | |||
| − | {{:Note: |
+ | :{{:Note: Inscription Upon a Trebuchet Stone|style=iconmini}} |
| − | {{:Note: |
+ | :{{:Note: An Unsigned Letter (Adamant)|style=iconmini}} |
| + | |||
| ⚫ | |||
| + | === Coracavus === |
||
| ⚫ | |||
| − | {{:Note: |
+ | :{{:Note: Ancient List of Prisoners|style=iconmini}} |
| ⚫ | |||
| ⚫ | |||
| + | :{{:Note: Faded Interrogation Notes|style=iconmini}} |
||
| ⚫ | |||
| + | |||
| + | === Still Ruins === |
||
| + | :{{:Note: Journal on Certain Experiments|style=iconmini}} |
||
| + | :{{:Note: Research Notes|style=iconmini}} |
||
| ⚫ | |||
== Notes == |
== Notes == |
||
| − | * There are two gates in the Approach: |
+ | * There are two gates in the Approach: the ''Gate of [[Toth]]'' and the ''Gate of [[Andoral]]'', both can be opened from the northern side; however, this requires completion of the [[war table]] operation [[Find the Source of Darkspawn]]. |
| − | * There is a sizeable stash of |
+ | * There is a sizeable stash of gold next to a skeleton situated directly above the Echo Back Canyon Inquisition Camp. In order to reach the cache (see [[:File:Secret stash - Echo Back Canyon Camp.png|here]]) use a [[Mounts|mount]] to traverse to the top of the mountain edge via the eastern side. There is small nook in the foundation that can be used to access the area. Jumping on the cracked edge with a mount will allow for the player to reach the platform after several successful jumps. Missing the crack while attempting to jump will simply result in falling to desert floor. |
| + | |||
| + | == Trivia == |
||
| ⚫ | |||
== Gallery == |
== Gallery == |
||
| − | <gallery widths=" |
+ | <gallery widths="250" spacing="small" position="center" captionalign="center" orientation="landscape"> |
| − | western approach 4.jpg| |
+ | western approach 4.jpg|[[Adamant Fortress]] |
| − | Adamant 2.png|Another view of |
+ | Adamant 2.png|Another view of [[Adamant fortress]] |
| − | Coracavus Exterior.png|Coracavus Exterior |
+ | Coracavus Exterior.png|[[Coracavus]] Exterior |
Western approach 1.png|Grey Warden Keep |
Western approach 1.png|Grey Warden Keep |
||
| − | Tevinter Ritual Tower.png|Tevinter Ritual Tower |
+ | Tevinter Ritual Tower.png|Tevinter ''Ritual Tower'' |
The Gate Guardians.png|The Gate Guardians |
The Gate Guardians.png|The Gate Guardians |
||
| − | Shimmer Stone Mine.png|Shimmer Stone Mine |
+ | Shimmer Stone Mine.png|[[Shimmer Stone Mine]] |
western approach 6.jpg|Poisonous gas from the Sulphur Pits |
western approach 6.jpg|Poisonous gas from the Sulphur Pits |
||
</gallery> |
</gallery> |
||
| − | == |
+ | == References == |
| ⚫ | |||
| ⚫ | * In several published maps of Thedas, |
||
| + | <!--Categories--> |
||
| − | == References == |
||
| ⚫ | |||
| ⚫ | |||
[[Category:Locations]] |
[[Category:Locations]] |
||
[[Category:Dragon Age: Asunder locations]] |
[[Category:Dragon Age: Asunder locations]] |
||
[[Category:Dragon Age: Inquisition locations]] |
[[Category:Dragon Age: Inquisition locations]] |
||
[[Category:Orlais]] |
[[Category:Orlais]] |
||
| + | <!--Interwiki links--> |
||
| ⚫ | |||
| + | [[de:Die Westgrate]] |
||
Latest revision as of 23:53, 19 January 2024
- For the keep located in this region, see Griffon Wing Keep.
The Western Approach is a large, arid expanse in southwestern Orlais.[1] Farther west lie the Hunterhorn Mountains and uninhabited steppes and forests.
Background[]
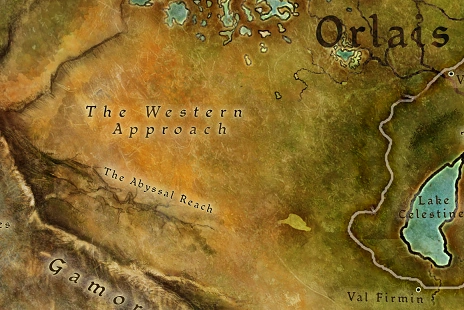
The wastes in The Approach were once a land of plenty. The rain came north over the Gamordan Peaks, turning the plains green and verdant for several months of the year. However, eight hundred years ago, that all changed.[2] The Approach became the site of a major battle during the Second Blight. The darkspawn swarmed out of the Abyssal Rift, a great chasm to the south, and corrupted it with their foul blood never allowing for the land beyond to recover... even after the darkspawn were all driven back underground.[3]
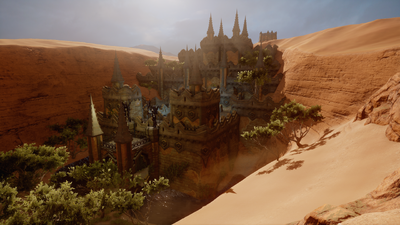
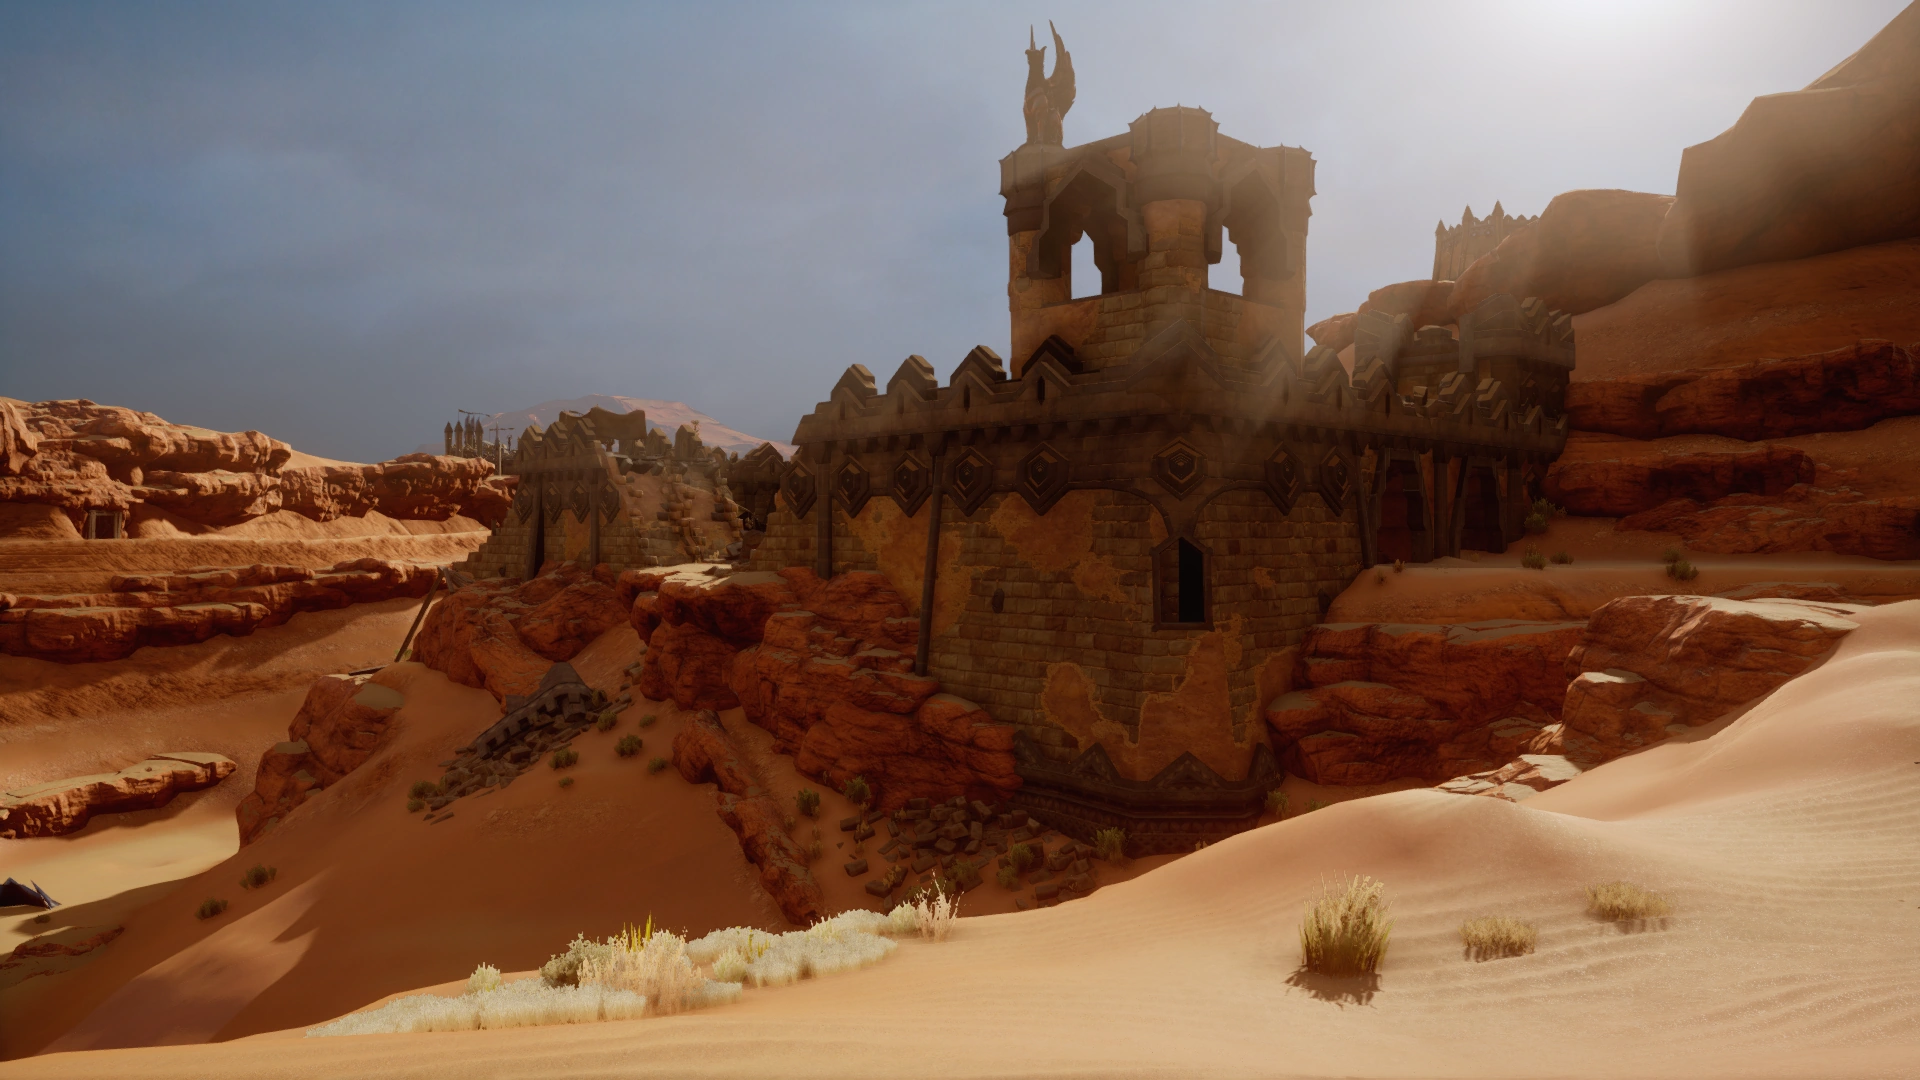
The Grey Wardens had Adamant Fortress erected by the dwarves to stand watch over the chasm. The region however became a stark and sad place with unstable purple sands looted with desolate rocky pillars engulfed in steep ridges. At night, the air grows still and the sky is alight with shimmering auroras— the time when darkspawn still come out of hiding.[4]
The Orlesians at one point had iron towers built, over a hundred feet high, to mark a path in the badlands allowing for travelers to see the next when one is reached. The towers, now old, rusted and barely visible no longer pave a clear path to Adamant Fortress which stands on the lip of the chasm towering at the end of the path.[5] Adamant eventually lay vacant by the Wardens due to the ever encroaching sands and intense howling winds.
The desolate badlands known as the Western Approach are as massive as they are barren. Bordered to the west by steps and crawling with monsters, The Approach is a place from which few explorers return and most avoid. The Grey Warden Fortress Adamant sits on the edge of a great chasm on The Approach's southern reaches, one of the few remaining signs that the greatest battles of the second Blight were fought here.
—Excerpt from the quest journal
Involvement[]
During the main quest Here Lies the Abyss, the Inquisitor sets out to follow the tracks of the disappearing Grey Wardens. After meeting Hawke in Skyhold, and being introduced to their Grey Warden ally in Crestwood, the Inquisitor learns that the Wardens have been gathering in a Tevinter tower in The Western Approach. While tracking down the Wardens, wildlife, White Claw Raiders, and Venatori will present a variety of threats amidst the sandy dunes, rocky outcrops, old Warden outposts and ancient Tevinter ruins.
When the Inquisitor finally catches up to the Grey Wardens, who are intent on performing a ritual that will help them eliminate the remaining Old Gods, they discover that Warden Commander Clarel is unwittingly being led into a Venatori trap by Magister Livius Erimond. Erimond is in fact a member of the Venatori and a servant of Corypheus who intends to bring the Warden mages to Corypheus' service. The Inquisitor can gain access to The Approach by completing the Investigate the Western Approach war table scouting operation in Skyhold.
Further investigation reveals that the Venatori are trying to access the Still Ruins, the site of an ancient Tevinter magical experiment, and capture the Abyssal High Dragon, a task which requires them keeping Professor Frederic of Serault alive. There is also evidence that the Red Templars have recently abandoned their mining efforts and relocated to Emprise du Lion.
Places[]
Regions[]


Map of the Western Approach
 Abyssal Ledge
- Blight Overlook
- The Canyons
- Death Drink Springs
- Dust Plains
- Dustytop Fort
- Echoback Canyon
- Echoback Fort
- Forgotten Mine
- Gates of Andoral
- Gates of Toth
- Giant's Staircase
- Griffon Wing Keep
- Iska's Stand
- Lost Spring Canyon
- Lost Wash Creek
- Nazaire's Pass
Still Ruins overview
- Old Prison Road
- Prison Ruins
- Sand Flats
- Sand Rock Mine
- Shimmer Stone Mine
- The Still Ruins
- Valemont Pass
- The Wastes

Additional places[]
Inquisition camps[]
- Craggy Ridge Camp
- Echo Back Canyon Camp
- Lost Spring Canyon Camp
- Nazaire's Pass Camp
Characters[]
- Alistair (conditional)
- Warden-Commander Clarel
- Overseer Crassius Servis
- Professor Frederic of Serault
- Hawke
- Jean-Marc Stroud (conditional)
- Leo of Lucien Bay[6]
- Magister Livius Erimond
- Loghain Mac Tir (conditional)
- Lucanus
- Prelate Macrinus
- Commander Rylen
Merchants[]
Quests[]
- A Manuscript of Some Authority
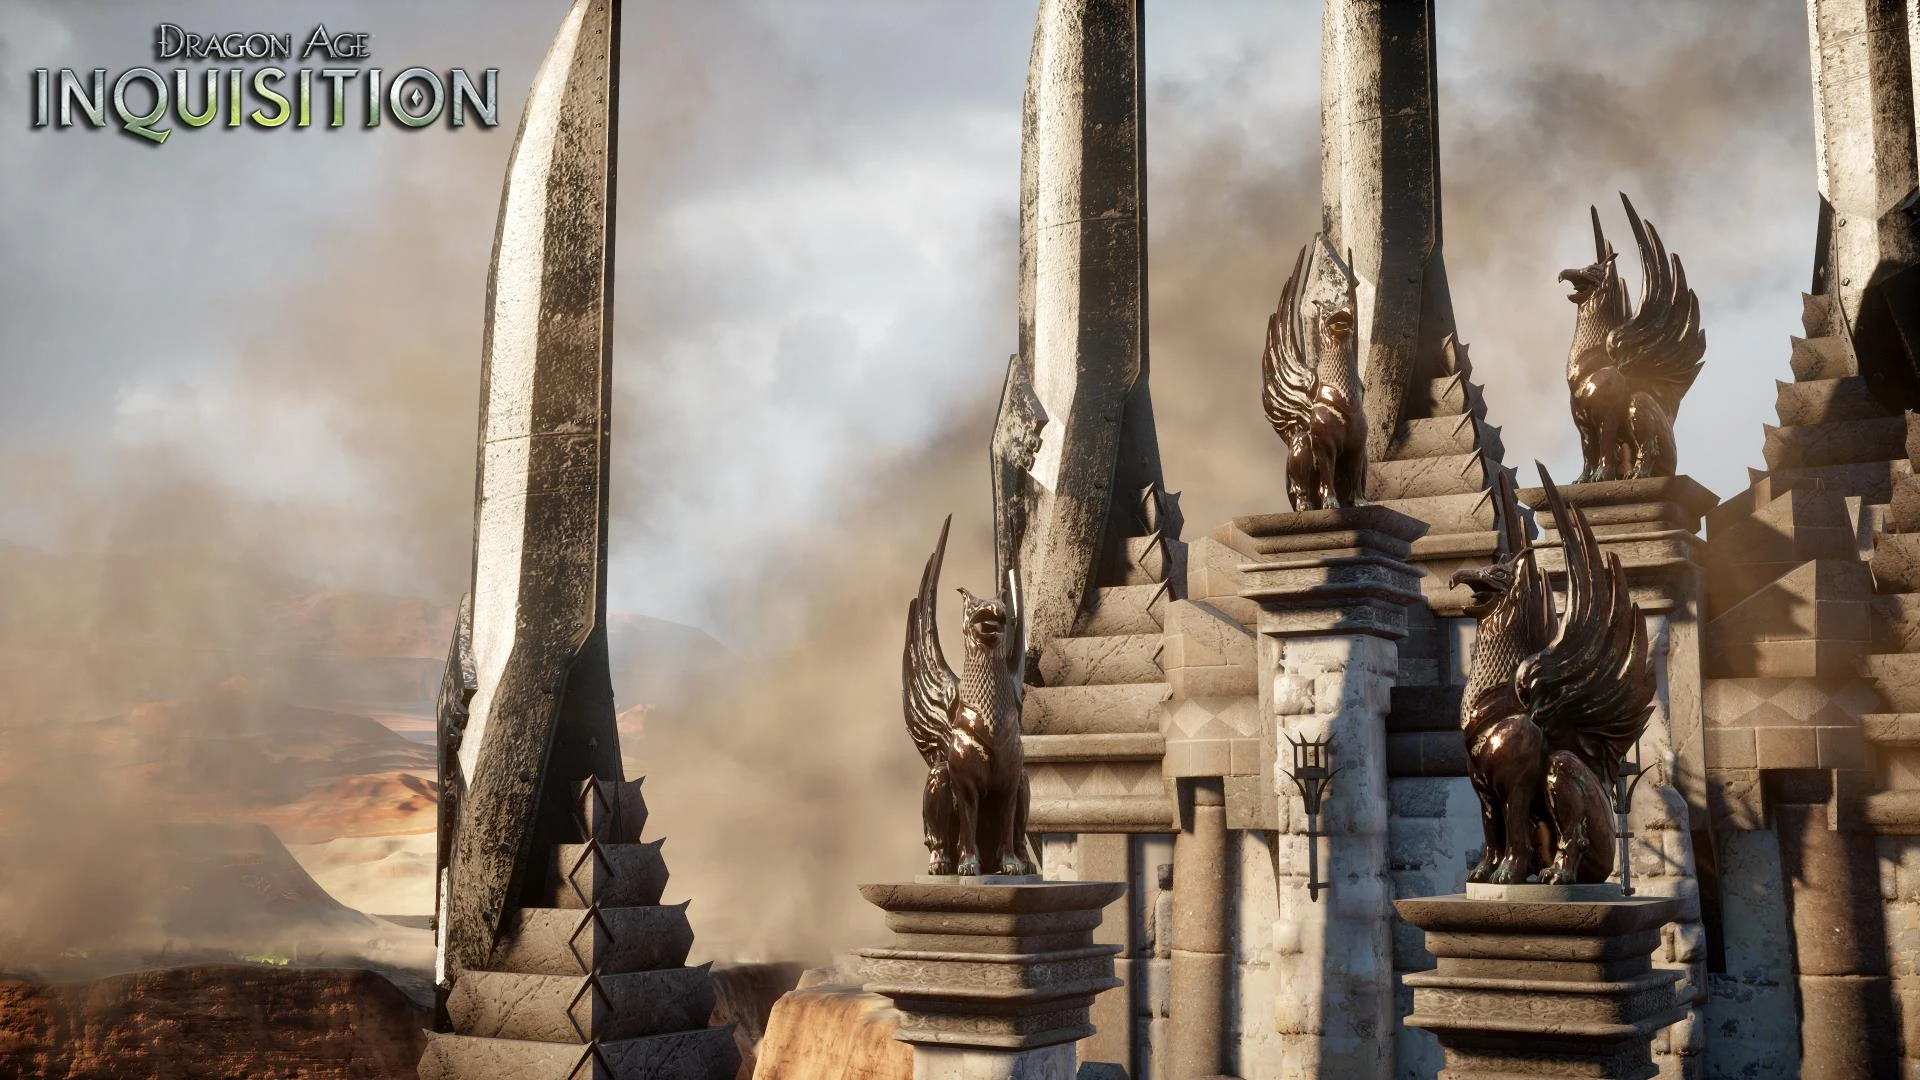
- Assault on Griffon Wing Keep

Griffon statues
- A Stranger Rift in the Ruins
- A Tevinter Relic Hunt
- Draconology
- Fortress Squatters
- Frederic's Livelihood
- Holding the Western Approach
- How to Lure a Dragon
- Hunting Patterns
- Into the Approach
- On the Chantry Trail
- Sharper White Claws
- The Abyssal High Dragon
- The Heart of the Still Ruins
- The Trouble with Darkspawn
- The Venatori
- This Water Tastes Funny
Rifts[]
Requisitions[]
- Code Requisition in the Approach
- Fauna Requisition in the Approach
- Lazurite Survey in the Approach
- Luster Survey in the Approach
War table operations[]
- All That Glitters
- Crossing the Sulphur Pits
- Deal with the Angry Varghests
- Find the Source of Darkspawn
- Gather Metals
- Improving Morale
- Investigate Ancient Laboratory
- Investigate the Western Approach
- Judgment: Recover Sold Artifacts
- Secure a Source of Water for Outpost
- Translate the Dragon Text
- Western Approach Resources
Creatures[]
Hostile creatures[]
Enemies[]
- White Claws
- White Claw Raiders (Rogue - Archer)
- White Claw Raider Escorts (Warrior - One-Handed Sword)
- White Claw Raider Footpads (Rogue - Double Daggers)
- Venatori
- Venatori Mage (Mage)
- Venatori Spellbinder (Mage)
- Venatori Marksman (Rogue - Archer)
- Venatori Stalker (Rogue - Double Daggers)
- Venatori Zealot (Warrior - One-Handed Sword)
- Venatori Gladiator (Warrior - Mace and Tower Shield)
- Venatori Brute (Warrior - Two-Handed Great Axe)
- Darkspawn
Collections[]
Astrariums[]
Bottles on the Wall[]
- Vintage: Warden Jairn - search inside Dustytop Fort.
- Vintage: Warden Eval'lal - search inside the Ritual Tower.
- West Hill Brandy - search the top of the tower directly above the Astrarium cave; climb the southern half of the east rubble slope and then traverse up the ladder.
Dragon Hunter[]
Landmarks[]
Mosaics[]
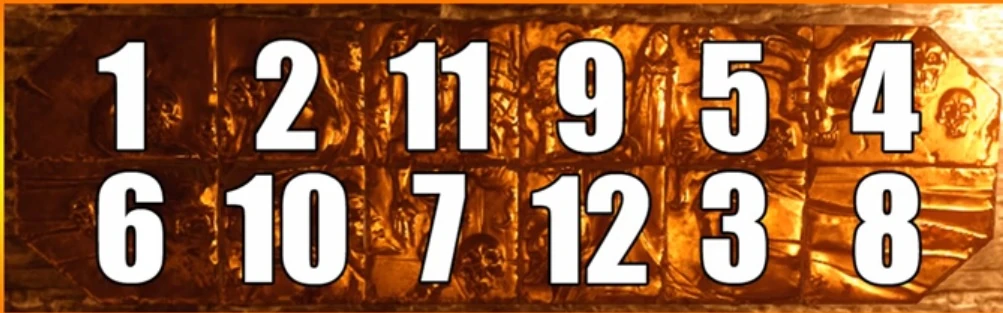

The Archdemon numbering
- The Archdemon (12 pieces) - see the Archdemon mosaic for detailed locations.


Freed are Slaves numbering
- Freed Are Slaves (piece #8) - found in the Still Ruins, in the locked room, just to the right of the first hall encountered.
- Freed Are Slaves (piece #9) - found in Coracavus, behind a locked door in the Records Room.Note: Requires Deft Hands, Fine Tools Inquisition perk.
Shards[]
Skyhold Customizations[]
- Grey Warden Banner - found in a chest at the second siege point, where Hawke is encountered in Adamant Fortress; see main quest Here Lies the Abyss.
- Tevinter Banner - found in a chest located in a room off of the left side of the Main Chamber of the Still Ruins.Note: Requires Deft Hands, Fine Tools Inquisition perk.
- Inquisition Banner - capture Griffon Wing Keep (conditional: awarded after the Inquisitor captures their first keep)
- Inquisition Banner Crown - capture all three keeps: Caer Bronach, Griffon Wing Keep, and Suledin Keep.
Resources[]

Echoback Fort
Herbs[]
- Amrita Vein
- Blood Lotus
- Deathroot
- Deep Mushroom
- Dragonthorn
- Elfroot
- Ghoul's Beard
- Spindleweed
- Vandal Aria (only found in Coracavus)
- Witherstalk
Leather[]
Metals[]
Notable items[]
Elven artifacts[]
- In the Main Chamber of the Still Ruins.
- In the far western corner of the hidden astrarium room.
- In Griffon Wing Keep; head up the stairway located directly to the right of keep's main gate.
Logging stands[]
- Northeast of the Lost Spring Canyon Inquisition Camp.
- East by southeast of the Craggy Ridge Inquisition Camp, or directly northwest from The Lost Idol landmark and head up the tiny slope from the riverbank.
Memories of the Grey[]
- Grey Warden Sword - found atop a wooden tower inside Dustytop Fort; southwest of the Nazaire's Pass Inquisition Camp, near one of the rifts off the pass.
- Vial of Archdemon Blood - found in Echoback Fort; see side quest The Trouble with Darkspawn.
Quarries[]
- At Shimmer Stone Mine
- Southwest of Echoback Fort
- Southwest of Sand Rock Mine
Red lyrium veins[]
- Inside Sand Rock Mine
- Inside the Forgotten Mine
- Inside Shimmer Stone Mine
Veilfire glyphs[]
- Fire Rune Schematic - acquired in the cave revealed from unlocking Astrariums in the Approach.
- Frost Rune Schematic - in a small cave accessible from the center of Echoback Fort.
- Spirit Rune Schematic - in Coracavus' Holding Cells; found in the cell containing the hanged man.
- Spirit Rune Schematic - in the Inner Sanctum of the Still Ruins, on a plaque behind the magic staff; see side quest The Heart of the Still Ruins.
Loot[]
- Aegis of the Order - looted from within the same cave as the Thing in the Dark landmark.Note: Requires the completion of the war table operation Crossing the Sulphur Pits.
- Blizzard's Path - looted from a chest in Echoback Fort; see side quest The Trouble with Darkspawn.
- Cowl of the Overseer - looted from Macrinus; see side quest Assault on Griffon Wing Keep.
- Griffon Plate - acquired in the cave revealed from Astrariums in the Approach.Note: Trespasser required.
- Kitty's Collar - looted from Macrinus; see side quest Assault on Griffon Wing Keep.Note: Requires installation of Patch 10.
- Master Cleansing Rune Schematic - looted from Lucanus in the Still Ruins; see side quest A Tevinter Relic Hunt.
- Master Corrupting Rune Schematic - looted from a chest in Echoback Fort; see side quest The Trouble with Darkspawn.
- Masterwork Enchanter Mail - acquired in the cave revealed from unlocking Astrariums in the Approach.
- Masterwork Vanguard Mail - looted from a chest at the top of Shimmer Stone Mine.
- Nameless Blade - looted from the Abyssal High Dragon.
- Pyre of the Forgotten - randomly available at the Griffon Wing Keep Merchant for 21433 .Note: Requires The Short List Inquisition perk
- Sad Splinters - looted after destroying the keep gate during the side quest Assault on Griffon Wing Keep.
- Superb Amulet of Magic - randomly available at the Griffon Wing Keep Merchant for 14495 .Note: Requires The Short List Inquisition perk
- Superb Belt of Magic Defense - randomly available at the Griffon Wing Keep Merchant for 14495 .Note: Requires The Short List Inquisition perk
- Superb Ring of Armor Penetration - looted from the Abyssal High Dragon.
- Superb Ring of Critical Damage - looted from a chest behind a locked door in Coracavus' Records Room; see side quest The Trouble with Darkspawn.Note: Requires Deft Hands, Fine Tools Inquisition perk.
- Tempest - looted from the Inner Sanctum of the Still Ruins; see side side quest A Stranger Rift in the Ruins.
Codex entries[]
- Codex entry: Constellation: Fenrir
- Codex entry: Constellation: Satinalis
- Codex entry: Constellation: Toth
- Codex entry: The Creation of a Phylactery
- Codex entry: The Gate Guardians
- Codex entry: Magister Erimond
- Codex entry: Old Chantry Trail Signs
- Codex entry: Our Lady of the Anderfels
- Codex entry: Professor Frederic of Serault
- Codex entry: Ritual Tower
- Codex entry: Surviving the Western Approach
- Codex entry: The Western Approach
Adamant Fortress[]
Coracavus[]
Still Ruins[]
Note texts[]
- A Letter Found on a Grey Warden Mage
- Almost Illegible Note
- Ancient Tevinter
- Ancient Warden Logbook
- A Preserved Note
- Barely Readable Unsent Letter
- Chantry Logbook
- Elegantly Penned Note
- Elegantly Written Letter
- Elegantly Written Note (about research team)
- Elegantly Written Note (about Wardens)
- Faded Journal
- Griffon Wing Keep (from Servis)
- Griffon Wing Keep (to Servis)
- Intercepted Venatori Message
- Manifest
- Memorial
- Note from a Templar
- Note of Slight Jealousy
- Rebel Mage's Note
- A Scrawled Note
- Scrawled Raider Note
- Stern Note of Warning
- Venatori Orders (to Cassius)
- Written Note
Adamant Fortress[]
Coracavus[]
- Ancient List of Prisoners
- A Blood-Spattered Note
- A Crumpled Note
- Faded Interrogation Notes
- Venatori Plans
Still Ruins[]
Notes[]
- There are two gates in the Approach: the Gate of Toth and the Gate of Andoral, both can be opened from the northern side; however, this requires completion of the war table operation Find the Source of Darkspawn.
- There is a sizeable stash of gold next to a skeleton situated directly above the Echo Back Canyon Inquisition Camp. In order to reach the cache (see here) use a mount to traverse to the top of the mountain edge via the eastern side. There is small nook in the foundation that can be used to access the area. Jumping on the cracked edge with a mount will allow for the player to reach the platform after several successful jumps. Missing the crack while attempting to jump will simply result in falling to desert floor.
Trivia[]
- In several published maps of Thedas, "the Abyssal Rift" is erroneously labeled "the Abyssal Reach"; however; the former label is correct.[7]
Gallery[]
")
")
")
")
")
")
")
")
References[]
- ↑ Dragon Age: The World of Thedas, vol. 1, p. 182
- ↑ Taken from Codex entry: The Western Approach
- ↑ Expanded from Codex entry: The Western Approach
- ↑ Excerpt from Codex entry: The Western Approach
- ↑ The Fortress of Adamant. Dragon Age
- ↑ Encountered during Cassandra Pentaghast's companion queest Unfinished Business.
- ↑ Dragon Age: The World of Thedas, vol. 2, p. 305, "A list of errata by Brother Genitivi"