m (→Ruined Temple) |
(Undo revision 817141 by 134.6.56.115 (talk)) |
||
| (357 intermediate revisions by more than 100 users not shown) | |||
| Line 1: | Line 1: | ||
| + | {{Quote|All of us stumble through the darkness before being found and shown the light.|[[Kolgrim|Father Kolgrim]]}} |
||
| + | {{for|the relic|Urn of Andraste}} |
||
| + | |||
<onlyinclude>{{QuestTransformer |
<onlyinclude>{{QuestTransformer |
||
| − | |style={{{style|}}} |
+ | |style = {{{style|}}} |
| − | |name = [[The Urn of Sacred Ashes]] |
+ | |name = [[The Urn of Sacred Ashes]] |
| − | |image = Urn of Andraste.jpg |
+ | |image = Urn of Andraste.jpg |
| − | |px = 200px |
+ | |px = 200px |
| − | |caption = The Urn of Andraste |
+ | |caption = The Urn of Andraste |
| + | |location = [[Denerim Market District]] <br> [[Lake Calenhad Docks]] <br> [[Village of Haven]] <br> [[Ruined Temple]] |
||
| − | |qcat = main quest |
||
| + | |start = [[Weylon]] or Bann [[Teagan Guerrin|Teagan]] |
||
| − | |location = [[Denerim Market District]], [[Haven]] and [[Ruined Temple]] |
||
| − | | |
+ | |end = [[Eamon Guerrin|Arl Eamon]] |
| − | |end = [[Arl Eamon]] |
||
| − | |rewards = [[Pinch_of_Sacred_Ash|Andraste's Ashes]], [[Champion]] specialization and/or [[Reaver|Reaver]] specialization |
||
| − | |previous = [[Nature of the Beast]] |
||
| − | |next = [[A Paragon of Her Kind]] |
||
|appearances = [[Dragon Age: Origins]] |
|appearances = [[Dragon Age: Origins]] |
||
}}</onlyinclude> |
}}</onlyinclude> |
||
| + | '''The Urn of Sacred Ashes''' is a [[Main quests (Origins)|main quest]] in ''[[Dragon Age: Origins]]'' that is required for completing [[The Arl of Redcliffe]] quest line and advancing to the final part of the game. It is told to make the lame dance, and the blind able to see. |
||
| − | :''This page is about the main quest; for the item, please see [[Urn of Andraste]].'' |
||
| + | == Background == |
||
| − | '''The Urn of Sacred Ashes''' is a main quest in [[Dragon Age: Origins]] that is required for completing the [[Arl of Redcliffe]] quest line and advancing to the final part of the game. |
||
| + | [[Eamon Guerrin|Arl Eamon]] of [[Redcliffe Castle|Redcliffe]] is dying, poisoned by the [[Blood magic|blood mage]] [[Jowan]], and the only way to save him is to find the [[Urn of Andraste]]. You can begin this quest by either finishing Arl of Redcliffe or by heading to [[Denerim]] and speaking with [[Ferdinand Genitivi|Brother Genitivi]]'s apprentice. If you completed the quest [[A Fallen Templar]], you can read [[Codex entry: A Note from Ser Henric|Ser Henric's note]] for clues on where to start the search: Brother Genitivi's residence in Denerim. |
||
| − | == |
+ | == Walkthrough == |
| + | There is more than one way to begin this quest, depending upon the order in which the Warden does the other main plotline quests, and whether the Warden spoke with [[Donall|Ser Donall]] in [[Lothering]] regarding [[A Fallen Templar]]. Ser Donall's information is the first opportunity for the Warden to learn about the Urn of Sacred Ashes and get the initial clue that starts the Warden on this quest. Failing this, the Warden can learn of it upon completion of the story quest to reach the [[Arl of Redcliffe]]. In either case, the Warden's trail starts in [[Denerim]]. |
||
| − | [[Arl Eamon Guerrein|Arl Eamon]] of Redcliffe is dying, and the only way to save him is to find the [[Urn of Andraste]]. You can begin this quest by either finishing [[Arl of Redcliffe]] or by heading to [[Denerim]] and speaking with [[Brother Genitivi]]'s apprentice. |
||
| + | === Brother Genitivi's House === |
||
| − | ==Walkthrough== |
||
| + | [[The Warden]] should travel to [[Genitivi's Home]] in the [[Denerim Market District]] to find him. Within, the Warden will meet [[Weylon]], who nervously reports that Genitivi has gone missing. Using [[Coercion]] the Warden may acquire more information about Brother Genitivi's (last known) location: [[Lake Calenhad Docks|Lake Calenhad]]. |
||
| − | {{Spoiler}} |
||
| + | High [[Attributes (Origins)#Cunning|Cunning]] will tip you off to Weylon's suspicious behavior. At this point the Warden can: |
||
| − | Brother Genitivi's apprentice [[Weylon]] seems nervous when you enter the house. With a high enough Coercion skill, the Warden can trip up Weylon, who attempts to send him erroneously to Lake Calenhad. The Warden has the choice of heading there immediately, or investigating Genitivi's house further. |
||
| + | *Travel to [[Lake Calenhad Docks]]: |
||
| − | {{Note|If the Warden travels to Lake Calenhad before heading to Haven (even after uncovering the fake Weylon), the Warden can talk to the innkeeper at the Spoiled Princess to trigger a small plot event. Mentioning Genitivi will open a dialogue path where the Warden can intimidate or persuade the innkeeper to tell him why he is nervous. The innkeeper will reveal that "they" are watching and "they" are waiting for anyone who comes looking for Genitivi. Upon leaving the inn, the Warden will be ambushed by a small group of cultists. After defeating them, the Warden can reassure the innkeeper that he has resolved the issue, giving the innkeeper a much more"upbeat" personality.}} |
||
| + | **The [[Innkeeper]] of [[The Spoiled Princess]] seems a bit jumpy, especially if you ask about Brother Genitivi. He can be coerced to reveal a bit more: "they" have been keeping the inn under observation, looking for anyone who asks about Genitivi. Upon leaving the inn after this conversation, the party will be ambushed by [[Cultist]]s. |
||
| + | ***The Cultist Leader has a chance to drop [[Ceremonial Armor]]. |
||
| + | **Returning to Weylon, a confrontation ensues. |
||
| + | *Investigate the rest of Brother Genitivi's House: |
||
| + | **If you approach the back room, Weylon will try to stop the party. The Warden can back off, or fight him. |
||
| + | *(Either through sufficient Cunning or after following up the Lake Calenhad 'lead') Accuse Weylon of hiding something: |
||
| + | **This leads to a confrontation that Weylon is unlikely to survive. |
||
| + | **Now you can investigate the house |
||
| + | **After this you can travel to Lake Calenhad Docks for the above described events. |
||
| + | The house of Brother Genitivi contains a corpse (described as the ''real'' Weylon) and Brother [[Genitivi's Research]], which indicates he was headed for the [[Village of Haven]] in search of Andraste's Ashes. You can see this village now on your [[World map (Origins)|world map]], in the [[Frostback Mountains]]. |
||
| − | Attempting to search the backroom, or making Weylon aware you think he's hiding something, will force a confrontation. Once he has been killed and you do investigate the house, you will discover a corpse in one of the rooms which turns out to be the real Weylon. You will also find Brother Genetivi's notes and learn that he has actually gone to [[the Village of Haven]] in search of the Ashes of Andraste. |
||
| + | === Reach Haven === |
||
| − | Upon reaching Haven, The Warden will be confronted by a guard. He is not eager to let The Warden pass; he can be either persuaded to allow an exception or killed. |
||
| + | {{Main|Haven}} |
||
| + | Upon reaching the village, The Warden will be confronted by a [[Haven Village Guard|guard]]. He insists that the party leave, but will answer some questions and allow trading at the shop. |
||
| + | At this point, if [[Sten]] is in the party, he will question the decision to come to Haven. |
||
| − | {{Note|If Sten is in the party, he will question the decision to come to Haven. If the dialogue goes badly, he will attack; defeating him will calm him down, and he can be told either to get back in line or to leave the party. Sten's approval goes down if he attacks, but defeating him will net +7 approval points, effectively making the exchange favorable. If you want to defeat Sten easily, unequip his weapons and armor in advance.}} |
||
| + | *If you ask him what is he talking about then he says you haven’t thought this through. |
||
| + | **If you say he’ll just have to trust you, or there’s nothing else you can do, then no matter what else you say {{Approval|-6}} |
||
| + | **If you say this is a feint and you have a plan, or that he should consider this training for what’s to come, then no matter what else you say {{Approval|-1}} |
||
| + | *If you say that the Archdemon will never see it coming he says it would surprise him if his enemy counter-attacked by running away and climbing a mountain. If you say this will help to stop Loghain then he will eventually ask why you fear Loghain; if you say “he killed Duncan” then {{Approval|+2}} |
||
| + | **If you say he’ll just have to trust you, or there’s nothing else you can do then no matter what else you say {{Approval|-1}} |
||
| + | **If you say this is a feint and you have a plan, or that he should consider this training for what’s to come, then no matter what else you say {{Approval|+4}} |
||
| + | *If you say this is necessary then he says you are climbing a mountain in the middle of nowhere on a frivolous whim. He eventually says you haven’t thought this through. |
||
| + | **If you say that he has to trust me, or there’s nothing else you can do, then no matter what else you say {{Approval|-3}} |
||
| + | **If you say this is a feint, or he should consider this training for what’s to come, then no matter what else you say {{Approval|+2}} |
||
| + | **Note - The previous choices are only available if you finish Sten's [[The Sword of the Beresaad|Personal quest]]. |
||
| + | *If you tell him not to argue with you right now then eventually he says he will not simply follow in your shadow as you run from battle. {{Approval|-5}} no matter what you say: |
||
| + | **[[Coercion|Persuade]] him that you’re not running. |
||
| + | **[[Coercion|Intimidate]] him to get back in line. |
||
| + | **If you tell him he’s free to leave, or that you’re in charge, then he tells you he’s taking command. No matter what you say he attacks. |
||
| + | If Sten attacks you the fight is one-on-one; the rest of your party do not participate. When you defeat Sten he says he was wrong and that you are strong enough. {{Approval|+7}} |
||
| − | ===Shopping in Haven=== |
||
| + | *If you tell him to leave then he leaves forever (taking his equipment with him). |
||
| − | When you enter the house with a bloody altar, you will get a cutscene in which your companions comment that the village is obviously not what it seems (if Zevran is in your active party, he will add a comment about rituals of the [[Antivan Crows]]). If this dialogue occurs prior to your visiting the village shop, the entire village will attack you once you leave this house, meaning shopping in Haven is now impossible. Also make sure not to mention what you've seen to the guard who initially questions you as you enter Haven. To ensure you get the option to shop if you need to, go to the village store first and then make your way back to the abandoned house. You can look in the storekeeper's back room to trigger the villager attack. The [[Antivan Leather Boots]] and the [[Mage's Eye]] are in the village store in an iron chest which you can lockpick, or you can wait until after you have retrieved the ashes, at which point the chest will be unlocked. |
||
| + | *Otherwise no matter what you say he rejoins the party. |
||
| + | |||
| + | {{Note|For more information see [[Sten#Dissatisfaction with the Warden|here]].}} |
||
| + | |||
| + | === Exploring Haven === |
||
| + | The population of Haven can turn hostile if you do one of the following: |
||
| + | #Approach the altar in the [[Villager House]] (close to the village's entrance) with [[Wynne]] in the party. |
||
| + | #*'''''Note:''' Only Wynne causes the villagers to turn hostile if you approach the altar; if she is not in the party then they won't attack.'' |
||
| + | #Enter the back room of the [[Village Store]]. |
||
| + | #Kill Father [[Eirik]]. |
||
| + | |||
| + | When the villagers turn hostile, the villagers, and some [[Disciples of Andraste|cultists]], will attack. |
||
| + | |||
| + | If you enter the villager's house with the hearth and bloody altar inside, there will be a cut scene in which some companions will comment on the disturbing discovery: |
||
| + | *If [[Zevran Arainai|Zevran]] is in the party then he will add a comment about rituals of the [[Antivan Crows]]. |
||
| + | *If [[Morrigan]] is in the party she will confirm that it is ''human'' blood. |
||
| + | *[[Dog]] will lick the blood on the altar in an attempt to find out what kind of blood it is. |
||
| + | *[[Alistair]] will comment on the blood. |
||
| + | *[[Wynne]] will say that the village is not what it seems. |
||
| + | {{Note|The villagers are now hostile if Wynne is in the party when you approach the altar.}} |
||
| + | |||
| + | In a locked chest inside the house, the Warden can also find one of the [[Love Letter]]s for the [[Correspondence Interruptus]] quest. |
||
| + | |||
| + | You can talk to a [[Child (Haven)|child]] in the middle of the village at this point, who may show you a finger bone if you can persuade him. |
||
| + | |||
| + | In the [[Village Store]] you can trade with the shopkeeper. If the Warden attempts to explore the back room, the shopkeeper will attack the group to try and prevent them from finding the remains of a knight from [[Redcliffe]]. The store also holds a pair of {{GiftLink|Antivan Leather Boots}}, {{GiftLink|Locket}}, and the [[Mage's Eye]] bow in a locked chest, near the front of the shop. This chest will be unlocked if you return later. Be warned, if the shopkeeper is attacked, villagers and cultists become hostile. |
||
| + | |||
| + | {{Note|Look carefully around the village to pick up two books and unlock [[Codex entry: Death of a Templar]] and [[Codex entry: The Avvars]].}} |
||
=== Finding Brother Genitivi === |
=== Finding Brother Genitivi === |
||
| + | After clearing the road uphill, the Warden will reach [[Haven Chantry|Haven's Chantry]]. Entering will trigger a cut scene, during which [[Eirik]], apparent leader of the congregation, makes his hatred of foreigners quite clear, leading to a fight with Eirik and the Guards in the room. Eirik's body will yield a [[Cultist Medallion]], necessary to enter the [[Ruined Temple]] (Note: if you raise Eirik as a skeleton before the fight is over, there is a chance that you won't be able to find the medallion). The side room of the Chantry holds an Inscribed Chest, with a {{GiftLink|Small Silver Bar}} and a [[Ring of Faith]] inside. |
||
| − | After this event, however it has been triggered, the entire village will have turned hostile, and you will need to fight your way up to the Village Chantry. There will be a short cutscene and dialog, after which the people inside the Chantry will attack. Once they are dispatched go to the body of Eirik, the main priest and loot him for a medallion. You can then search the remainder of the chantry to pick up a few items before heading towards the hidden door where you will find Brother Genitivi. He will tell The Warden that the Urn of Andraste is located in a temple ruin in the mountains nearby. Here you can choose to take him along or send him back to Denerim to recover. If you do take him along, he will open the door and then remain at the temple entrance researching, you do not have to protect Brother Genitivi if you allow him to accompany you to the temple. Although you have an option to tell him to wait that you need to make sure it's safe outside, there is no walking with Brother Genitivi, there is simply a loading screen and then you arrive at the temple. Any forgotten village stragglers will not be there to attack the Brother when you leave the Chantry. |
||
| + | |||
| + | Behind the Brick Wall, which is really a poorly concealed secret door, the Warden will find Brother Genitivi himself. He will tell the Warden that the Urn of Andraste is located in a temple ruin in the mountains nearby, and will answer some questions about the village and his research into the urn. Here you can choose to take him along or send him back to Denerim to recover. |
||
| + | |||
| + | If you tell him there was an imposter Weylon at his house and that you found the real Weylon stuffed in a box, and [[Leliana]] is in the party, {{Approval|-1}} |
||
| + | |||
| + | Genitivi wants to go with you to the temple: |
||
| + | *If you agree then you are automatically taken to the Ruined Temple. |
||
| + | *If you tell him you want to make sure it’s safe outside first then you can leave him here while you exit the Chantry and encounter the hostile villagers (if you haven’t already fought them). You can return and talk to Genitivi later to go to the Temple. |
||
| + | *If you refuse to let him come with you: |
||
| + | **If [[Leliana]] is in the party she says we would never have found this place without him: |
||
| + | ***[[Coercion|Persuade]] her that he can see it when he is well. |
||
| + | ***If you say you’re trying to keep him alive, or that he’s just going to slow you down, then she says she will look after him herself. |
||
| + | ****Change your mind and let Genitivi come. {{Approval|+2}} |
||
| + | ****Otherwise then no matter what you say Genitivi agrees to go back to Denerim. {{Approval|-3}} |
||
| + | ***If you say he’s not coming then Genitivi agrees to go back to Denerim. {{Approval|-3}} |
||
| + | **Otherwise he returns to Denerim. You are automatically taken to the Ruined Temple. |
||
| + | |||
| + | If Genitivi agreed to return to Denerim then he will show you how to use the Medallion to open the Temple door. |
||
| − | + | If you are automatically taken to the Ruined Temple then you avoid fighting the rest of the villagers (if you haven’t already fought them). After completing the quest, if you return to Haven, the storekeeper will have disappeared, but the rest of the villagers will still be standing around and will not attack you. This has no significance to the rest of the quest or the plot as a whole, however, since with no active shop and no remaining dialogue options there will be no point to ever returning to Haven in any case. |
|
=== Ruined Temple === |
=== Ruined Temple === |
||
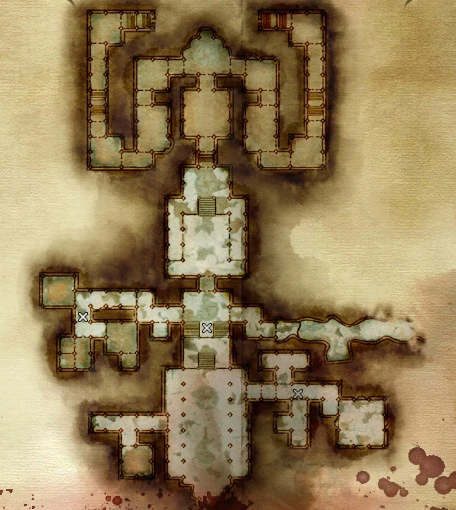
| + | [[File:Ruinedtempmap.jpg|thumb|270px|Ruined Temple Map]] |
||
| − | {{See Also|[[Ruined Temple]] for more details.}} |
||
| + | {{Main|Ruined Temple}} |
||
| − | The temple ruins have a fairly straightforward layout, although keys are required to progress. There are many Cultists in the halls. |
||
| + | If you took [[Ferdinand Genitivi|Brother Genitivi]] with you, he will open the temple door and remain at the temple entrance doing research, so you do not have to protect him. |
||
| + | The temple ruins have a fairly straightforward layout, although keys are required to progress. There are many Cultists in the halls, some of them mages. The first passage to the left (west) leads to a small group of unarmed Cultists. In a {{TextContainer|cabinet}} in this room, the Warden will find a [[Taper]] that will be necessary later on. An Adventurer's {{TextContainer|corpse}} in the same passage yields a letter for the [[Unbound]] quest, while the {{TextContainer|bookshelf}} in the same room yields the {{GiftLink|Discovering Dragon's Blood: Potions, Tinctures, and Spicy Sauces}} tome. |
||
| − | In one of the cabinets in a room down the hallway to the left in the entry way you will find a taper. Collect the taper for use later along with other random loot as necessary. The cultists in this room do not have any weapons so they aren't very difficult to take down. Go up the stairs and enter the door on your left. It is in this area that you will find your first key. Return down the stairs and go into the hallway on your left. This is where you will find the Main Hall Key opening the door to the rest of the ruins. Down one of the dead end hallways you will find the [http://dragonage.wikia.com/wiki/Armor_of_Diligence Armor of Diligence] on a fallen knight. Once you have entered the main hall, you will see more stairs and at the top you will find a large fire pit. If you have the taper with you, you can light the fire and get a codex entry for doing so. Continue on through the ruins and you will reach a room with only a right and left door which has shelves and several items on them. The Ancient Elven Gloves are in the chest to your right. Whatever path you choose, right or left, the layout is the same on both sides and each lead to the same place, the Wyrmling Lair. For experience and loot, it doesn't take long to traverse both sides of the building but having a rogue with you is a good idea. The cultists use many traps throughout the Temple including a room set up with Ballista pointing towards Leghold Traps. When you are ready to, enter the door at the top of the stairs leading to the next section of the map, the [[Wyrmling Lair]]. |
||
| + | The passage to the right (east, marked on the map as ''South Eastern Chamber'') leads to a locked room (requires a key, see below), and a square room holding a [[Scroll of Banastor|scroll]] for [[The Scrolls of Banastor]] quest, and a set of [[Ancient Encrypted Scrolls]] for the [[Forgotten Verses]] quest. |
||
| − | === Mountainside Caverns === |
||
| − | {{See Also|[[Mountainside Caverns]] for more details.}} |
||
| − | Once you reach the Wyrmling Lair, you have effectively left the temple and are walking through several underground caverns. Expect to encounter drakes and dragonlings here as well as cultists. If you go through all the different chambers before reaching Kolgrim, you can find several unique items on your way. There is the Life Drinker Amulet (a Blood Mage item), the Spellweaver (a sword for use by Arcane Warrriors only), a gift for Alistair and other random loot including Drake Scales from the Drakes you have fought along the way. If these are your first drake scales acquired you will get Codex and a new Quest regarding the Drake Scale Armour which you can visit [[Wade]] in [[Denerim]] about. |
||
| + | To find the key that opens the locked door in the South Eastern Chamber, the Warden should head up the first flight of stairs (guarded by Cultists), open the door to the left (West - watch out for [[Bronto]] just past this door), and reach the ''Cultist Chambers''. A large number of Cultists awaits the group in this area (watch out for [[Tripwire|traps]] as well), so it is recommended to proceed with caution, trying to pull small groups to the companions. Another [[Scroll of Banastor|scroll]] for [[The Scrolls of Banastor]] quest is found in the first room of the Cultist Chambers. The last room in these Chambers yields the ''[[South-East Chamber Key]]'' (which will unlock the matching door), a [[Black Pearl]] (which, together with the Taper mentioned above, will be required to progress), and {{GiftLink|Chasind Sack Mead}}. |
||
| − | When you are leaving the Ruined Temple you will see three men standing in a large room. This is [[Kolgrim]] and he has a proposition for you. Unfortunately he's also quick to anger so choose your words carefully as it doesn't take much for him to attack your party. Avoid mentioning that the real Andraste is dead and that the dragon they worship is a fraud if that is your goal. If you do choose to fight him, he drops [[Faith's Edge]], a nice battle axe. If you choose to side with him, you have the opportunity to learn the [[Reaver]] specialisation but what he asks you to do could cost you two team members (see below for more information). You also have the opportunity to kill him and still get [[Faith's Edge]] and Kolgrim's Horn if you side with him. This can be done by talking to him after he gives you the Reaver specialization. Agreeing with him and avoiding the battle does not compel you to follow through with his wishes. Shale and Morrigan will disapprove of refusing Kolgrim's offer but this can be avoided by picking a fight quickly and avoiding questions about the nature of his offer. It can also be reduced by persuasion speech checks if the conversation is allowed to progress far enough for Morrigan or Shale to voice their concerns. Zevran will request you at least hear Kolgrim out and saying you will defile the ashes, whether or not you plan to or not, results in +2 approval from him. You can persuade him that killing Kolgrim is a better option and then his approval doesn't change - Zevran's persuade reply to this is calling Kolgrim 'shifty' which will cause the cultists to attack. |
||
| + | Once the key is acquired, the group can return downstairs to unlock the South-East Chamber (a new group of Cultists will stand in the way). Within that Chamber, a chest holds the ''[[Main Hall Key]]'' (which will unlock the door at the top of the stairs). Back in the entrance hall, check the eastward door (that leads to a wavy corridor) at the top of the stairs to find the [[Armor of Diligence]] on the {{TextContainer|corpse}} of a fallen knight. |
||
| − | {{Note|Defiling the Ashes is the only way to obtain the Reaver specialization, so avoid killing Kolgrim if you wish to unlock it. If you do plan to side with Kolgrim, ensure that neither Wynne nor Leliana are in your party. Note that you can get the Reaver specialization and then simply reload your game.}} |
||
| + | Beyond the Main Hall door lies a large room with more stairs. A Cultist mage and a couple of Cultist archers are guarding the area. The mage can be pulled by himself (or simply use [[Rogue talents (Origins)#Stealth mechanics|stealth]] to get near him and [[Combat mechanics (Origins)#Backstab|backstab]] him) but once the party approaches the stairs or attacks the archers, a pair of [[ash wraith]]s appear on the sides. At the top of the stairs, the party will find a Brazier and a door. Lighting the Brazier requires the [[Taper]] and the [[Black Pearl]] and yields [[Codex entry: The Holy Brazier]]. Beyond the door lies a room with archers and many [[Ruined Temple#Special objects|traps]]. One point of [[Stealth (Origins)|Stealth]] is enough to safely disarm all the traps without being seen by the enemy, so the Warden's party can take on the archers without any obstacles. |
||
| − | If you choose to side with Kolgrim, you receive: |
||
| − | *Approval from Morrigan ({{ColorPositiveStat|+3}}), Shale ({{ColorPositiveStat|+2}}) and Zevran ({{ColorPositiveStat|+2}}) |
||
| − | *Disapproval from Sten ({{ColorNegativeStat|-3}}), Alistair ({{ColorNegativeStat|-5}}) and Oghren ({{ColorNegativeStat|-5}}) |
||
| − | *You can persuade Alistair to avoid disapproval (with a high Coercion skill) |
||
| − | *Wynne will attack you, and you will have to kill her (not avoidable with Coercion) |
||
| + | The next door is locked until the Brazier is lit. Opening the door leads to a room with a circular platform in the middle, and a statue along the North wall. An Auto-Save will take place upon entering this room, and shortly thereafter a Lieutenant-grade [[ash wraith]] will appear. The spirit also gets some help from two pairs of Cultists awaiting right outside the room (a [[reaver]] and a [[mage]] on one side, a reaver and an archer on the other). After the fight, the Warden can open the {{TextContainer|Iron Chest}} to find a pair of [[Ancient Elven Gloves]]. |
||
| − | If you choose to fight with Kolgrim, you receive: |
||
| − | *Disapproval from Morrigan and Shale (can be avoided as mentioned above) |
||
| + | The party can continue along the eastern or western wings at this point (they lead to the same location), or clear them both for loot and experience. Both wings include Cultists and traps. The west wing can be tougher if the Warden opens a collection of chests, releasing ash wraiths. If Alistair, Leliana, Morrigan, Oghren, Shale, Sten, Wynne, or Zevran are in the party, one will comment on the statue in the topmost chamber on either side just before the stairs. |
||
| − | {{Note|This is incomplete. Please add in ratings for other approval members when they are known.}} |
||
| + | Eventually, the group will reach stairs leading up to the Wyrmling Lair. |
||
| − | Whatever decision you have made, going straight will lead you to the Mountaintop and one step closer to reaching the Urn of Andraste. |
||
| + | === Wyrmling Lair/Mountainside Caverns === |
||
| − | The Caverns lead to a wide open field with some chests by a ruined arch to the right and a gong in the middle (Console version only). Hitting the gong summons a [[High Dragon]]. This is entirely skippable, but it will get you a large amount of high level loot. To summon the High Dragon in the PC version, you must kill Kolgrim and loot the [[Kolgrim's Horn]] from him though it is also possible to pull the dragon using the spell [[Blizzard]] see the exploits below for more information. Also note that unlike when you were inside the Caverns, now it's possible to switch party members. So if you choose to fight the dragon you have a chance to reconfigure your team. The High Dragon is a tough enemy; if the battle turns out to be too difficult, it is possible to come back and fight it at a later point. Regardless of whether you choose to fight the Dragon or not, you will be required to continue on to the next section of the Temple. |
||
| + | [[File:Map-Caverns.jpg|thumb|260px|Map of the Caverns]] |
||
| − | {{See Also|[[Talk:The Urn of Sacred Ashes|discussion]].}} |
||
| + | {{Main|Mountainside Caverns}} |
||
| + | Once you reach the Wyrmling Lair, you have effectively left the temple and are now walking through several underground caverns. In addition to more Cultists and their [[Leghold Trap|trap]]s, there are [[drake]]s and [[dragonling]]s (which sometimes spawn behind, or all-around the party) here in this area. |
||
| + | From the second room in the cavern portion (the first place where there is a choice of directions), the party can follow an eastward path that leads to a room with cages for pigs and goats, sometimes referred to as ''The Feeding Chamber''. Two drakes on PS3 and Xbox, or three drakes on PC, will spawn and attack once the group is inside the area. They will drop a [[Drake Scale]] each, valid for the [[Drake Scale Armor]] quest. This will be a very tough fight, as each of them is lieutenant level and they possess the extremely dangerous [[Overwhelm]] ability. In the same room, the Warden can find a {{GiftLink|Stone Warrior Statuette}} in a {{TextContainer|Pile of Dragon Filth}}. |
||
| − | ===Guardian's Questions=== |
||
| − | {{See Also|[[Guardian]] for more details.}} |
||
| + | The other path (headed north) from the second room leads to a farther split. The party can follow a northeast or a northwest direction. |
||
| − | The Guardian will ask a question to The Warden and his companions depending on their origin and the Companions that were brought with him. The Guardian is able to see all the choices and life of the characters. |
||
| + | The northeast path leads to a couple of rooms sometimes referred to as the ''Hatchery'', due to the various dragon eggs lying around. First, the party will enter a large room with columns, and a flight of stairs. On top of the stairs, a [[Disciples of Andraste#Cultist overseer|Cultist overseer]] awaits. Before the stairs, Cultist reavers and archers stand guard, and just to add a bit of spice, there are a couple of traps just at the bottom of the stairs. The party may try and pull the groups at the bottom of the stairs before engaging the overseer. Once the overseer enters the fight, two pairs of [[drake]]s will spawn and join the fray accompanied by a couple of [[dragonling]]s. The drakes will drop [[Drake Scale]]s, and the overseer will drop a [[Spellweaver]]. Note that one pair of drakes will only spawn if you go up the stairs. You can thus make the fight easier by pulling the overseer down, wiping out the forces, then fighting the last two drakes separately. One more room lies to the northeast of this encounter, where another drake awaits, aided by a Cultist mage, an archer, and a hidden assassin. A {{TextContainer|book}} on one of the tables in this room yields the [[Codex entry: The First Blight: Chapter 3]] and a {{TextContainer|Dragon Egg}} yields [[Lifedrinker]] and the matching [[Codex entry: The Life Drinker]]. |
||
| − | === The Gauntlet === |
||
| − | {{See Also|[[The Gauntlet]] for more details and [[A Test of Faith]] for walkthrough.}} |
||
| − | At this point, a spiritual guardian of the Urn will decide to test The Warden's worthiness. The Gauntlet has 4 tests for the group that must be completed before you can gain access to the Urn. |
||
| − | Once the Gauntlet has been completed, the Urn of Andraste will be in sight. There are two choices: |
||
| − | *Taking only a pinch of the Ashes |
||
| − | *Defiling the Ashes (only if you did not kill Kolgrim) -- doing so unlocks the Reaver [[Specializations|specialization]] |
||
| − | Even if you plan on defiling the ashes, you must take a pinch of the ashes as well. This pinch of ashes is necessary to complete the [[Arl of Redcliffe]] quest. |
||
| + | An easy way to get through the caverns is to bring a character that has the [[Stealth (Origins)|stealth]] ability, and sneak past every enemy, and then speak to [[Kolgrim]]. Doing so warps your party to the end of the cavern, though you still need to fight the enemies should you ever return, even if you side with Kolgrim. Oddly enough, there seems to be no negative reaction from the cult if you kill cultists after joining them. |
||
| − | {{Note|If you decide to defile the Ashes, Leliana and Wynne will attack you if they are in the party. If Leliana is not in the party, she will ask about the Urn in camp. You can either Persuade (Lie) to her and tell her that the Ashes are safe, or tell her the truth. Telling her the truth will cause her to leave the party. It should also be noted that if Wynne is the one to confront you in camp then Leliana won't leave (the topic will never even come up again with Leliana) and Wynne will instead.}} |
||
| + | === Kolgrim's Offer === |
||
| − | There is no way to keep Wynne if you have defiled the ashes except through the exploit listed below, she will still approach you in camp even if [[Broken Circle]] was not completed prior to [[The Urn of Sacred Ashes]]. Level 3 coercion should convince Leliana the ashes are safe, provided she is not in your active party. You can lie to her back at the camp when she questions you. |
||
| + | [[File:NPC-Kolgrim.jpg|thumb|Father Kolgrim]] |
||
| + | The northwest path leads to a room with a few Cultists (and their [[Tripwire|traps]]), and eventually a large cavern where the leader of the cult, [[Kolgrim|Father Kolgrim]], awaits. As the Warden approaches, he will initiate a dialogue, revealing more details about the Cult that the party has been fighting since entering Haven. The Disciples of Andraste originally used to guard her ashes - however, they claim the prophet has since risen from the dead and the cult acts as her guard. |
||
| − | If Leliana is in your party when you defile the ashes you can use intimidate and she will remain in your party but with a -10 approval hit. |
||
| + | If, during the conversation, the Warden mentions that the real Andraste is dead and/or that the one the Cult is following now is a fraud, Kolgrim and his aides will attack the party. Otherwise, the dialogue may lead to Kolgrim offering a task for the Warden to make up for all the damage inflicted so far to the Cult (and to become a brother/sister to the Cult): take a [[Vial of Dragons Blood|vial of ''Andraste's'' blood]], find a way around the [[Guardian (character)|Guardian]] protecting the ashes, and pour the blood into the ashes. |
||
| − | You can unlock the Reaver specialization without losing any party members. Take a pinch of the ashes, loot chests and bodies and then leave the temple. Before you get to Kolgrim, save the game. Change your party members to anyone else other then Leliana, Wynne or Alistair. Go outside to the mountaintop and you can change your party. After you change your party members, head back into the temple, pour the blood on the ashes, defeat the Guardian and other mobs. Go outside, talk to Kolgrim and drink the blood to unlock the Reaver specialization. Then reload the game from when you first exited the temple, and kill Kolgrim this time. You will still have the Reaver Specialization available, without having defiled the Ashes in the active storyline. |
||
| + | Accepting Kolgrim's task and defiling the ashes is the only way to unlock the [[Reaver (Origins)|Reaver]] specialization and obtain the [[Achievements (Origins)#Quest Achievements|Sacrilegious]] achievement. But if you have saved before you initiate the conversation, you can unlock the achievement and specialization and then revert to the save. Your rewards will be preserved even if you then choose another course of action. |
||
| − | {{Note |
||
| − | |1 = This is an exploit/bug in the game and it is possible that it will be fixed with a patch. As the game is currently played (console and computer) learning a specialization in one playthrough unlocks it for every future playthrough making it unnecessary to acquire the specialisation more than once, which according to forums on the official Bioware site, is an exploit. As the XP exploit existing with the darkspawn blood vials was recently fixed, it is possible this will be removed as well, forcing you make a permanent choice about whether or not you want to destroy the ashes or preserve them. |
||
| − | }}</onlyinclude> |
||
| − | Once you have done what you came to do, you can take a shortcut from the open field where the Dragon may be encountered back to the Ruined Temple. Simply take the path leading down on the right and exit through the door. Using this door will clear up a shortcut back to the mountaintop from the Temple in a passage which was previously blocked. If you have taken Brother Genitivi along, he will be extremely excited about your findings, and declare that he will share the news with the entire world. Alistair will express concern that there would not be enough ashes to go around if lots of pilgrims were to arrive, but there is no way to dissuade Genitivi from spreading the word except to kill him. There is no actual battle, just a cut-scene of your character killing Genitivi. Genitivi is a good NPC, a well traveled and learned scholar who has written many of your Codex entries, and killing him lowers Alistair and Wynne's approval by 3 points, Leliana by 5 points. Zevran, Morrigan, Shale, Sten, and Oghren's approval does not change. |
||
| + | Whether the Warden refuses to listen to Kolgrim's proposition, or accepts the task, or even if the Warden accepts the task verbally but does not follow through with it, the companions in the party (and some even if they are not in the active party) will react accordingly: |
||
| − | If you let Genitivi live, he will return to his home in Denerim, asking you to visit him later. If you go to his home after he returns, he will give you a Master Dweomer Rune. If you instead kill Genitivi in the Temple, you will not get the Rune and one section of the epilogue will change. |
||
| + | *'''If the Warden sides with Kolgrim:''' |
||
| − | === Experience Points Exploit === |
||
| + | **{{Approval|Morrigan|+2}} or {{Approval|Morrigan|+3}} |
||
| − | There is a bug (confirmed on PC, not available/patched on Xbox, patched for PS3) when the player exits to the Mountain Top from the area of The Gauntlet where the Urn is located. The player can repeatedly transition from the Gauntlet to the Mountain Top to gain 750 experience each time back out to the Mountain Top; however, this does not work if the player chose to defile the ashes. |
||
| + | **{{Approval|Shale|+2}} or {{Approval|Shale|+4}}, or {{Approval|Shale|+11}} if you let her talk you into it. Note that this approval takes place immediately when you accept the blood from Kolgrim. |
||
| + | ***To get {{Approval|Shale|+11}}, refuse Kolgrim's offer, refuse it again when he says, "I will not make this offer again," then when Shale says, "Is there a reason it refuses?", choose "You really think I should go along with it?" followed by "Maybe you're right." |
||
| + | **{{Approval|Zevran|+2}} |
||
| + | **{{Approval|Sten|-3}} |
||
| + | **{{Approval|Alistair|-5}} |
||
| + | ***May be avoided through Persuasion |
||
| + | **{{Approval|Oghren|-5}} |
||
| + | **[[Leliana]] is, of course, opposed to the defiling, but will not react until the deed is actually done. Her reaction depends on various parameters, although it is not immediate when you accept Kolgrim's task. An unhardened Leliana will attack you immediately if she witnesses the defiling. Even a [[Leliana's Past#Hardening Leliana|hardened]] Leliana will still object to the defiling of the Urn, but if the following conditions are met, she may be present at the defiling and, instead of reaching her [[Leliana#The Urn of Sacred Ashes|crisis]], simply {{Approval|Leliana|-10}}: |
||
| + | **#Leliana must be hardened; |
||
| + | **#The Warden must have a high intimidate skill (Coercion + Strength bonus = 75 or higher, where each point in Coercion is equal to 25 intimidation points. Thus 3 points in coercion should do the trick regardless of what your character's strength score is); |
||
| + | **#The Warden must have passed through the flames after leaving all items at the alter. If the Warden fails this test and kills The Guardian before defiling the urn, the following dialogue option to intimidate Leliana won't appear; |
||
| + | **#The player must select the ''"Before you do anything stupid, remember who I am."'' dialogue option when she calls the Warden a "fiend". |
||
| + | ***If she is not present at the defiling, Leliana will confront the Warden at the Camp. Unless the Warden passes a persuasion check to convince her the Ashes are safe she will leave. |
||
| + | **[[Wynne]] will turn hostile and attack if the ashes are defiled and she is present in the party, although she will not react until the deed is actually done. |
||
| + | ***If she is not present, she will initiate a conversation the next time the Warden enters the Party Camp and leave. '''Note:''' It is suggested that Wynne's crisis point can be avoided if she is not acquired until later on, after defiling the ashes - However, others have reported she will leave the party the first time the Warden returns to Camp even if she joined the team after the ashes were defiled. On PS3 Wynne will leave regardless of when she is recruited. however, her cutscene can be pushed down the queue by some cutscenes such as Alistair's cutscene which occurs after delivering the ashes allowing the Warden to return to camp under certain conditions. |
||
| + | ***If Leliana was also absent from the defiling, her cutscene will override Wynne's. If Leliana is convinced the Ashes are safe by passing a persuasion check, Wynne's confrontation will not happen. (It may also happen that Leliana's conversation wil be overridden by Wynne's). On PS3, the cutscene still occurs the next time the Warden returns to camp. |
||
| + | **{{Approval|Zevran|+2}} if the Warden listens to Kolgrim's offer and accepts it (even if the Warden won't follow through with the defiling); |
||
| + | ***[[Zevran Arainai|Zevran]] can be persuaded that killing Kolgrim is a better option and his approval rating won't change ('''Note''' the dialogue option to persuade Zevran calls Kolgrim 'shifty' and will trigger the cultists to attack) |
||
| + | *'''If the Warden fights Kolgrim:''' |
||
| + | *The fight can be tricky at first, but try to kill the Cultist mages and have someone keep the melee attackers on them (someone with a lot of health) |
||
| + | *{{Approval|Oghren|+2}} if "shut up, Oghren" and then "I'll take my chances with the arrows" is selected after Kolgrim warns of a "rain of arrows" awaiting the Warden if they so dared attack "Andraste" |
||
| + | **{{Approval|Shale|-10}} but if you declare to Shale directly "It is my decision" she will answer that there is nothing to say against this logic and there is no approval lost; |
||
| + | **[[Morrigan]] disapproves; |
||
| + | ***[[Morrigan]]'s and [[Shale]]'s negative reaction can be avoided by picking a fight with Kolgrim early on in the dialogue, without asking about his offer; alternatively, if the dialogue leads them to express their opinion, a successful Persuasion check may reduce their loss of approval ({{Approval|Shale|-5}}, [[Morrigan]] 0 if started within the first two dialogues). If [[Sten]] is in the party, and you let Kolgrim explain his plan, Sten will comment negatively - if in the ensuing dialogue option you change your mind, [[Morrigan]] won't disapprove. |
||
| + | **[[Wynne]], [[Leliana]] and [[Alistair]] voice their opposition to defliling the urn, but fighting Kolgrim does not result in a change of approval rating. |
||
| + | {{Note|This list is incomplete - the reaction of other companions to either option has not been reported yet. Please add the approval changes you experience.}} |
||
| + | If/when you fight Kolgrim, he will drop his axe, [[Faith's Edge]], and (depending on the time when the fight took place) [[Kolgrim's Horn]] ({{Platforms|PC}}only). |
||
| − | Another such bug (confirmed on PC) is to enter and exit repeatedly from the Mountain Top and the Caverns, which gives 750 experience points. This works if you have defiled the ashes. The mages and reavers remaining in the cavern will not attack the party even if The Warden has chosen to double-cross Kolgrim and kill him. |
||
| + | {{Note|Kolgrim can be slightly easier to fight if tricked into thinking you will help because on the mountaintop he has fewer allies.}} |
||
| − | {{Note |
||
| − | |If you have [[Memory Band]] on, you will get 757 experience points each time. |
||
| − | This bug is fixed by the 1.02 patch. |
||
| − | }} |
||
| + | If you want to fight Kolgrim outside without losing any approval on the above-mentioned dialog choices simply choose the dialog option that you want to see the risen Andraste yourself, which will take you outside where you meet Kolgrim again. He will have some help there too which includes another drake and will earn you a 7th drake scale. |
||
| − | === High Dragon Exploits === |
||
| − | {{See|[http://dragonage.wikia.com/wiki/High_Dragon#Exploits High Dragon]}} |
||
| + | === The Mountain Top === |
||
| − | ==Result== |
||
| + | {{Main|Mountain Top}} |
||
| − | {{Spoiler}} |
||
| + | {{Note|While in this area, the Warden can re-configure the party composition.}} |
||
| + | After the encounter with Kolgrim, the party will reach the Mountain Top. A cutscene occurs as the cult's "Andraste", which is actually a [[high dragon]], flies over and lands to rest on a cliff. If Kolgrim was killed, the Warden and their team will dive for cover. |
||
| + | If you accepted Kolgrim's task ('to pour the dragon's blood into the Urn, allowing the risen ''Andraste'' to reclaim the power held in the Ashes'), he will speak to her to let you pass unharmed. You can continue into [[The Gauntlet]] or attack him here. He will be aided by his Disciples and a drake. |
||
| − | Aside from the pinch of ashes you receive and the EXP, the following unusual items can be found within the ruined temple and the Urn Temple itself: |
||
| − | *[[Spellweaver]] |
||
| − | *Chests (3 outside in the broken temple and 2 inside the temple, one on either side of the staircase) |
||
| − | *An Unfortunate Adventurer in the temple carries an accessory. |
||
| − | *Drake Scales (which are used to make [[Drake Scale Armor]]) |
||
| − | *[[Faith's Edge]] |
||
| − | *[[Lifedrinker]] |
||
| − | *[[Ancient Elven Gloves]] |
||
| − | *[[Reflection]] (amulet given to the PC by the spirit from their past) |
||
| − | *[[Reaver]] Specialization (from Kolgrim only if you agree to defile the ashes) |
||
| − | *[[Champion]] Specialization (you can still get this even if you defile the ashes by taking a pinch of the ashes before pouring the dragon blood and then accept the reward from Arl Eamon) |
||
| + | At this point, the party may engage the false ''Andraste'' by using [[Kolgrim's Horn]] (if you killed him), by casting an area of effect spell like [[Blizzard (Origins)|Blizzard]] or cast [[Drain Life]] below the cliff as its range can reach the high dragon above, or (on consoles) by using the gong in this area. The high dragon is a formidable opponent; see [[High dragon (strategy)|high dragon battle strategy]]. If the dragon is slain, she will drop a [[High Dragon#Loot|considerable number of items]], among which is a [[Dragon Scale]] for the [[Dragon Scale Armor]] quest. There is no need to fight the dragon immediately — this area can be returned to later in the game whenever the Warden feels it is more appropriate. |
||
| + | === The Gauntlet === |
||
| − | Once you have taken a pinch of the ashes, you can take these back to Arl Eamon to cure him of his poisoning. |
||
| + | {{Main|The Gauntlet}} |
||
| + | Whether the party elects to fight the High Dragon on the Mountain Top or not, their next stop is a separate temple, known as [[The Gauntlet]]. In the first room, the Warden will find x30 [[Andraste's Arrows]], a book unlocking the [[Codex entry: The Maker's First Children]], and the next step in the quest line, in the form of a [[Guardian (character)|Guardian]] knight. Approaching him will trigger a conversation revealing more background history about the Disciples of Andraste and the Urn of Sacred Ashes. The Guardian will ask one question to each party member, related to their own past, and unlock the [[A Test of Faith]] quest. To reach the Urn, the party has to pass the trials of the Gauntlet. See [[A Test of Faith]] page for details about the tests. |
||
| + | === The Ashes === |
||
| − | Additionally once Arl Eamon is cured you will receive {{ColorPositiveStat|+1 spell/talent and +1 attribute point}} if his offer of a reward is accepted. This will show as a level up, but will not increase your level. |
||
| + | [[File:DAO Leliana near the Urn of Sacred Ashes.jpg|thumb|right|256px|[[Leliana]] stands near the [[Urn of Andraste]].]] |
||
| + | Once the Gauntlet has been completed, the Urn of Andraste will be in sight. Among the Warden's choices: |
||
| + | *''Take a pinch of the Ashes'' |
||
| + | *''Defile the Ashes'' - Only available if the Warden did not kill Kolgrim; doing so unlocks the [[Reaver (Origins)|Reaver]] specialization. |
||
| + | Note that the Warden will take a pinch from the Ashes automatically, regardless of the choice to defile them or not. Taking only a pinch of the ashes, in other words choosing '''not''' to defile them, will also unlock the [[Achievements (Origins)#Quest Achievements|Ceremonialist]] achievement. Regardless of any promise made to Kolgrim, the Warden is under no obligation to actually defile the ashes. |
||
| + | See [[Leliana]] and [[Wynne]] for details on their reactions in case you chose to defile the ashes - as well as the [[#Kolgrim's Offer|Kolgrim's Offer]] section above. Before leaving the room, unlock the {{TextContainer|chests}} and loot the Adventurer's {{TextContainer|corpse}} for a [[Belt of the Magister Lords]] and a {{GiftLink|Golden Demon Pendant}}. |
||
| − | If you do not want to kill Brother Genitivi, you can warn him that if anything bad comes of him opening the temple to others, it is his responsibility. This does not garner approval or disapproval points from any companions and leaves Brother Genitivi alive. But if you kill him, then Wynne, Leliana and Alistar will disapprove if they are in your party. |
||
| + | Once the Warden has finished all intended business here, it is time for the party to exit (via either door in the Urn room). If the ashes were defiled, then Kolgrim will be waiting outside to reward the Warden, or to take vengeance if a deal was struck but the Warden reneged. Even if you defiled the ashes, you still have the option of attacking Kolgrim as you leave. Note that the fight against Kolgrim is considerably easier here than if he's attacked back in the caverns as he has fewer allies supporting him. A cultist mage and a drake are encountered further down the hill. |
||
| − | Should the High Dragon be defeated on this or a subsequent occasion, the player may collect the unique Dragon Scales, which can be used to create certain types of armor (see below). |
||
| + | A gong (for consoles) or [[Kolgrim's Horn]] (for {{Platforms|PC}}) can be activated in the area. ''Do not do so'' if you are not ready to engage a high dragon in combat. Fighting the dragon is not mandatory to exit the area; the Warden can return at a later date if the player isn't strong enough yet to do battle. |
||
| − | Note : If you defile the ashes, you gain approximately 1.5k more xp than if you had simply taken the ashes and fought Kolgrim, and that is before double crossing Kolgrim. |
||
| + | Otherwise the group can proceed from the Mountain Top and follow a shortcut on the way back, in the form of a door to the lower right (while facing the Caverns direction). This will lead directly to the entrance of the Ruined Temple, where Brother Genitivi awaits. (This path will become a two-way shortcut to the mountain top for future visits, e.g. to attack the dragon.) |
||
| − | ==Wade Drake/Dragon Armor(s)== |
||
| + | |||
| − | *The [[Drake Scale]]s and [[Dragon Scale]] can be used to make the [[Drake]] and [[Dragon]] armor(s). For details about this process, see [[Wade]] and his [[Talk:Wade|discussion page]]. |
||
| + | === Conclusion === |
||
| + | As the party returns to the entrance of the [[Ruined Temple]], [[Ferdinand Genitivi|Brother Genitivi]] will be extremely excited about the news, and ready to share them with the entire world. Alistair, if present, will express concern that there would not be enough ashes to go around if lots of pilgrims were to arrive, but there is no way to dissuade Genitivi from spreading the word except to kill him. There is no actual battle, just a cut-scene of the Warden killing Genitivi. Genitivi is a well traveled and learned scholar who has written many of the books (excerpts of them are found in the form of codex entries), so the homicide will trigger some reactions among the companions: |
||
| + | *{{Approval|Alistair|-3}} BUG: Unless Leliana is also in the party, then no change. |
||
| + | *{{Approval|Leliana|-5}} |
||
| + | *{{Approval|Wynne|-3}} |
||
| + | *Unaffected: Zevran, Morrigan, Shale, Sten, Oghren. |
||
| + | |||
| + | If Genitivi is not killed, he will return to his home in Denerim, asking the Warden to visit him later. If the Warden does visit him, he will present him/her with a [[Master Dweomer Rune]] as a reward. |
||
| + | |||
| + | == Result == |
||
| + | With the [[Pinch of Sacred Ash]], you may now head to [[Redcliffe Castle]] and heal [[Eamon Guerrin|Arl Eamon]]. If you have not yet been to [[Redcliffe Village]] or [[Redcliffe Castle]], you will need to resolve the troubles there before you can reach Arl Eamon. ''See [[The Arl of Redcliffe]] for details.'' |
||
| + | |||
| + | == Rewards == |
||
| + | *500 XP for passing [[A Test of Faith]] successfully. |
||
| + | *750 XP when exiting onto Mountain Top via the doors in the urn room. |
||
| + | *{{:Master Dweomer Rune|style=iconmini}}, from Brother Genitivi back at his home in Denerim |
||
| + | *{{:Pinch of Sacred Ash|style=iconmini}} |
||
| + | *{{:Reaver (Origins)|style=iconmini}} specialization and 1500XP (from Kolgrim, only if you agree to defile the ashes) |
||
| + | *{{:Reflection|style=iconmini}} (amulet given to the Warden by the spirit from their past) |
||
| + | |||
| + | == Side quests == |
||
| + | *{{:A Test of Faith|style=iconmini}} |
||
| + | *{{:Correspondence Interruptus|style=iconmini}} |
||
| + | *{{:Dragon Scale Armor|style=iconmini}} |
||
| + | *{{:Drake Scale Armor|style=iconmini}} |
||
| + | *{{:Forgotten Verses|style=iconmini}} |
||
| + | *{{:The Scrolls of Banastor|style=iconmini}} |
||
| + | |||
| + | == Notable Items == |
||
| + | *{{:Ancient Elven Gloves|style=iconmini}} |
||
| + | *{{:Andraste's Arrows|style=iconmini}} |
||
| + | *{{:Armor of Diligence|style=iconmini}} |
||
| + | *{{:Belt Of The Magister Lords|style=iconmini}} |
||
| + | *{{:Faith's Edge|style=iconmini}} (if you slay Kolgrim) |
||
| + | *{{:Lifedrinker|style=iconmini}} |
||
| + | *{{:Mage's Eye|style=iconmini}} |
||
| + | *{{:Spellweaver|style=iconmini}} |
||
| + | *[[High dragon#Loot|High dragon loot]] |
||
== Epilogue == |
== Epilogue == |
||
| − | If |
+ | *If the Warden slays the high dragon and does not prevent Brother Genitivi from revealing the location of the Urn to the world, the temple becomes a site of pilgrimage for the faithful. If the high dragon isn't killed, the Urn disappears without a trace by the time the Chantry gains access to the temple. |
| + | *If Brother Genitivi does not come with the main character while killing cultists the Urn will also disappear. |
||
| + | |||
| + | == ''Dragon Age II'' == |
||
| + | If one decides to import an ''[[Dragon Age: Origins|Origins]]'' save to ''[[Dragon Age II]]'', the decision made in ''Origins'' affects a side quest and various comments throughout the game. |
||
| + | |||
| + | If the [[Urn of Andraste|Urn]] was not defiled and Brother [[Ferdinand Genitivi|Genitivi]] was allowed to lead an expedition, enabling the [[Chantry]] to confirm the ruined temple as the resting place of [[Andraste]]'s ashes, then a [[Carta]] swindler can be found in the [[Lowtown]] district of [[Kirkwall]], purporting to be selling a pinch of ashes allegedly verified by Genitivi himself. This will trigger the quest [[Miracle Makers]] given by [[Melindra]]. |
||
== Trivia == |
== Trivia == |
||
| + | *The majority of the Urn of Sacred Ashes quest line was written by [[Sheryl Chee]].<ref>{{BWF|author=[[David Gaider]]|date=January 8, 2010|url=https://web.archive.org/web/20160412045523/http://forum.bioware.com/topic/43582-writers-of-dragon-age/page-6#entry570159|title=Writers of Dragon Age}}</ref> |
||
| − | *The spirit Ealisay's question and one response are references to Monty Python and the Holy Grail. In the movie, it is argued that a swallow, a type of bird, is capable of carrying a coconut, which the cast use openly to simulate the sounds of a horse's hooves. Ealisay asks, "The smallest lark could carry it, while a strong man might not," which couples with an incorrect response, "a coconut." |
||
| + | |||
| + | == Exploits/bugs == |
||
| + | {{See also|High dragon (strategy)#Exploits / bugs|l1=High Dragon Exploits}} |
||
| + | *{{Platforms|PC}} As the Warden exits to the Mountain Top from The Gauntlet, 750 XP are awarded. The party can repeat the transition from The Gauntlet to the Mountain Top to gain 750 XP each time. |
||
| + | *{{Platforms|PC}} Repeat the transition between Mountain Top and the Caverns, which gives 750 experience points. This works if you have defiled the ashes. The mages and reavers remaining in the caverns will not attack the party even if the Warden has chosen to double-cross Kolgrim and kill him. |
||
| + | **Bug is still active in v.1.04 |
||
| + | *{{Platforms|PC}} It is possible for the high dragon to become stuck off to the left side of Mountain Top. The location is just to the left of the main path as you are walking down to the flat area below. To be more precise, the ditch is between the main path and the path leading toward the Ruined Temple. |
||
| + | *{{Platforms|Xbox360}} If pulled over to the gong to where the dragon lands on it, it may become stuck. Making it easier to kill with mages and archers, but it is able to pull in warriors. |
||
| + | *{{Platforms|Xbox360}} If a rogue with combat stealth, you can leave your team stationary and go all the way through the caverns without fighting anyone. When you come to the climax, they will appear with you. |
||
| + | *{{Platforms|PS3}} There is a possible glitch when fighting the high dragon herself. If your fight lasts over 30 minutes, the high dragon will seemingly fall over dead. You will NOT be awarded ANY Exp points and will NOT be awarded the trophy for killing her. It will also NOT reflect in your Heroic Accomplishments that you have slain her. |
||
| + | *{{Platforms|PC}} If you choose to slay Brother Genitivi after getting the Ashes, you will find under his codex entry that he still returned to Denerim and was granted funds to mount an expedition. |
||
| + | *{{Platforms|PC}} If you proceed to complete the quest without ever going to The Spoiled Princess and questioning the Innkeeper about Genitivi, the plot point arrow will still show above the Innkeeper, but the option to question him about Genitivi will no longer be available. |
||
| + | |||
| + | == References == |
||
| + | <references/> |
||
| + | {{DEFAULTSORT:Urn of Sacred Ashes, The}} |
||
| − | == See Also== |
||
| + | [[Category:Dragon Age: Origins quests]] |
||
| − | *[http://dragonage.wikia.com/wiki/Andraste Andraste] |
||
| − | *[[Brother Genitivi]] |
||
| − | *[[Eirik]] |
||
| − | *[[The Village of Haven]] |
||
| − | *[[Haven Chantry]] |
||
| − | *[[Ruined Temple]] |
||
| − | *[[The Gauntlet]] |
||
| − | *[[A Test of Faith]] |
||
| − | *[[Arl Eamon Guerrin]] |
||
| − | *[[Kolgrim]] |
||
| − | *[[Kolgrim's Horn]] |
||
| − | {{DEFAULTSORT:Urn of Sacred Ashes}} |
||
| − | [[Category:Quests]] |
||
| − | [[Category:Walkthroughs]] |
||
Revision as of 03:26, 31 July 2019
“All of us stumble through the darkness before being found and shown the light.” ―Father Kolgrim
- For the relic, see Urn of Andraste.
The Urn of Sacred Ashes is a main quest in Dragon Age: Origins that is required for completing The Arl of Redcliffe quest line and advancing to the final part of the game. It is told to make the lame dance, and the blind able to see.
Background
Arl Eamon of Redcliffe is dying, poisoned by the blood mage Jowan, and the only way to save him is to find the Urn of Andraste. You can begin this quest by either finishing Arl of Redcliffe or by heading to Denerim and speaking with Brother Genitivi's apprentice. If you completed the quest A Fallen Templar, you can read Ser Henric's note for clues on where to start the search: Brother Genitivi's residence in Denerim.
Walkthrough
There is more than one way to begin this quest, depending upon the order in which the Warden does the other main plotline quests, and whether the Warden spoke with Ser Donall in Lothering regarding A Fallen Templar. Ser Donall's information is the first opportunity for the Warden to learn about the Urn of Sacred Ashes and get the initial clue that starts the Warden on this quest. Failing this, the Warden can learn of it upon completion of the story quest to reach the Arl of Redcliffe. In either case, the Warden's trail starts in Denerim.
Brother Genitivi's House
The Warden should travel to Genitivi's Home in the Denerim Market District to find him. Within, the Warden will meet Weylon, who nervously reports that Genitivi has gone missing. Using Coercion the Warden may acquire more information about Brother Genitivi's (last known) location: Lake Calenhad.
High Cunning will tip you off to Weylon's suspicious behavior. At this point the Warden can:
- Travel to Lake Calenhad Docks:
- The Innkeeper of The Spoiled Princess seems a bit jumpy, especially if you ask about Brother Genitivi. He can be coerced to reveal a bit more: "they" have been keeping the inn under observation, looking for anyone who asks about Genitivi. Upon leaving the inn after this conversation, the party will be ambushed by Cultists.
- The Cultist Leader has a chance to drop Ceremonial Armor.
- Returning to Weylon, a confrontation ensues.
- The Innkeeper of The Spoiled Princess seems a bit jumpy, especially if you ask about Brother Genitivi. He can be coerced to reveal a bit more: "they" have been keeping the inn under observation, looking for anyone who asks about Genitivi. Upon leaving the inn after this conversation, the party will be ambushed by Cultists.
- Investigate the rest of Brother Genitivi's House:
- If you approach the back room, Weylon will try to stop the party. The Warden can back off, or fight him.
- (Either through sufficient Cunning or after following up the Lake Calenhad 'lead') Accuse Weylon of hiding something:
- This leads to a confrontation that Weylon is unlikely to survive.
- Now you can investigate the house
- After this you can travel to Lake Calenhad Docks for the above described events.
The house of Brother Genitivi contains a corpse (described as the real Weylon) and Brother Genitivi's Research, which indicates he was headed for the Village of Haven in search of Andraste's Ashes. You can see this village now on your world map, in the Frostback Mountains.
Reach Haven
- Main article: Haven
Upon reaching the village, The Warden will be confronted by a guard. He insists that the party leave, but will answer some questions and allow trading at the shop.
At this point, if Sten is in the party, he will question the decision to come to Haven.
- If you ask him what is he talking about then he says you haven’t thought this through.
- If you say he’ll just have to trust you, or there’s nothing else you can do, then no matter what else you say
 (-6)
(-6) - If you say this is a feint and you have a plan, or that he should consider this training for what’s to come, then no matter what else you say (-1)
- If you say he’ll just have to trust you, or there’s nothing else you can do, then no matter what else you say
- If you say that the Archdemon will never see it coming he says it would surprise him if his enemy counter-attacked by running away and climbing a mountain. If you say this will help to stop Loghain then he will eventually ask why you fear Loghain; if you say “he killed Duncan” then
 (+2)
(+2)
- If you say he’ll just have to trust you, or there’s nothing else you can do then no matter what else you say (-1)
- If you say this is a feint and you have a plan, or that he should consider this training for what’s to come, then no matter what else you say (+4)
- If you say he’ll just have to trust you, or there’s nothing else you can do then no matter what else you say
- If you say this is necessary then he says you are climbing a mountain in the middle of nowhere on a frivolous whim. He eventually says you haven’t thought this through.
- If you say that he has to trust me, or there’s nothing else you can do, then no matter what else you say (-3)
- If you say this is a feint, or he should consider this training for what’s to come, then no matter what else you say (+2)
- Note - The previous choices are only available if you finish Sten's Personal quest.
- If you say that he has to trust me, or there’s nothing else you can do, then no matter what else you say
- If you tell him not to argue with you right now then eventually he says he will not simply follow in your shadow as you run from battle. (-5) no matter what you say:
- Persuade him that you’re not running.
- Intimidate him to get back in line.
- If you tell him he’s free to leave, or that you’re in charge, then he tells you he’s taking command. No matter what you say he attacks.
If Sten attacks you the fight is one-on-one; the rest of your party do not participate. When you defeat Sten he says he was wrong and that you are strong enough. ![]() (+7)
(+7)
- If you tell him to leave then he leaves forever (taking his equipment with him).
- Otherwise no matter what you say he rejoins the party.
Exploring Haven
The population of Haven can turn hostile if you do one of the following:
- Approach the altar in the Villager House (close to the village's entrance) with Wynne in the party.
- Note: Only Wynne causes the villagers to turn hostile if you approach the altar; if she is not in the party then they won't attack.
- Enter the back room of the Village Store.
- Kill Father Eirik.
When the villagers turn hostile, the villagers, and some cultists, will attack.
If you enter the villager's house with the hearth and bloody altar inside, there will be a cut scene in which some companions will comment on the disturbing discovery:
- If Zevran is in the party then he will add a comment about rituals of the Antivan Crows.
- If Morrigan is in the party she will confirm that it is human blood.
- Dog will lick the blood on the altar in an attempt to find out what kind of blood it is.
- Alistair will comment on the blood.
- Wynne will say that the village is not what it seems.
In a locked chest inside the house, the Warden can also find one of the Love Letters for the Correspondence Interruptus quest.
You can talk to a child in the middle of the village at this point, who may show you a finger bone if you can persuade him.
In the Village Store you can trade with the shopkeeper. If the Warden attempts to explore the back room, the shopkeeper will attack the group to try and prevent them from finding the remains of a knight from Redcliffe. The store also holds a pair of Antivan Leather Boots, Locket, and the Mage's Eye bow in a locked chest, near the front of the shop. This chest will be unlocked if you return later. Be warned, if the shopkeeper is attacked, villagers and cultists become hostile.
Finding Brother Genitivi
After clearing the road uphill, the Warden will reach Haven's Chantry. Entering will trigger a cut scene, during which Eirik, apparent leader of the congregation, makes his hatred of foreigners quite clear, leading to a fight with Eirik and the Guards in the room. Eirik's body will yield a Cultist Medallion, necessary to enter the Ruined Temple (Note: if you raise Eirik as a skeleton before the fight is over, there is a chance that you won't be able to find the medallion). The side room of the Chantry holds an Inscribed Chest, with a Small Silver Bar and a Ring of Faith inside.
Behind the Brick Wall, which is really a poorly concealed secret door, the Warden will find Brother Genitivi himself. He will tell the Warden that the Urn of Andraste is located in a temple ruin in the mountains nearby, and will answer some questions about the village and his research into the urn. Here you can choose to take him along or send him back to Denerim to recover.
If you tell him there was an imposter Weylon at his house and that you found the real Weylon stuffed in a box, and Leliana is in the party, ![]() (-1)
(-1)
Genitivi wants to go with you to the temple:
- If you agree then you are automatically taken to the Ruined Temple.
- If you tell him you want to make sure it’s safe outside first then you can leave him here while you exit the Chantry and encounter the hostile villagers (if you haven’t already fought them). You can return and talk to Genitivi later to go to the Temple.
- If you refuse to let him come with you:
- If Leliana is in the party she says we would never have found this place without him:
- Persuade her that he can see it when he is well.
- If you say you’re trying to keep him alive, or that he’s just going to slow you down, then she says she will look after him herself.
- Change your mind and let Genitivi come. (+2)
- Otherwise then no matter what you say Genitivi agrees to go back to Denerim. (-3)
- Change your mind and let Genitivi come.
- If you say he’s not coming then Genitivi agrees to go back to Denerim. (-3)
- Otherwise he returns to Denerim. You are automatically taken to the Ruined Temple.
- If Leliana is in the party she says we would never have found this place without him:
If Genitivi agreed to return to Denerim then he will show you how to use the Medallion to open the Temple door.
If you are automatically taken to the Ruined Temple then you avoid fighting the rest of the villagers (if you haven’t already fought them). After completing the quest, if you return to Haven, the storekeeper will have disappeared, but the rest of the villagers will still be standing around and will not attack you. This has no significance to the rest of the quest or the plot as a whole, however, since with no active shop and no remaining dialogue options there will be no point to ever returning to Haven in any case.
Ruined Temple

Ruined Temple Map
- Main article: Ruined Temple
If you took Brother Genitivi with you, he will open the temple door and remain at the temple entrance doing research, so you do not have to protect him.
The temple ruins have a fairly straightforward layout, although keys are required to progress. There are many Cultists in the halls, some of them mages. The first passage to the left (west) leads to a small group of unarmed Cultists. In a cabinet in this room, the Warden will find a Taper that will be necessary later on. An Adventurer's corpse in the same passage yields a letter for the Unbound quest, while the bookshelf in the same room yields the Discovering Dragon's Blood: Potions, Tinctures, and Spicy Sauces tome.
The passage to the right (east, marked on the map as South Eastern Chamber) leads to a locked room (requires a key, see below), and a square room holding a scroll for The Scrolls of Banastor quest, and a set of Ancient Encrypted Scrolls for the Forgotten Verses quest.
To find the key that opens the locked door in the South Eastern Chamber, the Warden should head up the first flight of stairs (guarded by Cultists), open the door to the left (West - watch out for Bronto just past this door), and reach the Cultist Chambers. A large number of Cultists awaits the group in this area (watch out for traps as well), so it is recommended to proceed with caution, trying to pull small groups to the companions. Another scroll for The Scrolls of Banastor quest is found in the first room of the Cultist Chambers. The last room in these Chambers yields the South-East Chamber Key (which will unlock the matching door), a Black Pearl (which, together with the Taper mentioned above, will be required to progress), and Chasind Sack Mead.
Once the key is acquired, the group can return downstairs to unlock the South-East Chamber (a new group of Cultists will stand in the way). Within that Chamber, a chest holds the Main Hall Key (which will unlock the door at the top of the stairs). Back in the entrance hall, check the eastward door (that leads to a wavy corridor) at the top of the stairs to find the Armor of Diligence on the corpse of a fallen knight.
Beyond the Main Hall door lies a large room with more stairs. A Cultist mage and a couple of Cultist archers are guarding the area. The mage can be pulled by himself (or simply use stealth to get near him and backstab him) but once the party approaches the stairs or attacks the archers, a pair of ash wraiths appear on the sides. At the top of the stairs, the party will find a Brazier and a door. Lighting the Brazier requires the Taper and the Black Pearl and yields Codex entry: The Holy Brazier. Beyond the door lies a room with archers and many traps. One point of Stealth is enough to safely disarm all the traps without being seen by the enemy, so the Warden's party can take on the archers without any obstacles.
The next door is locked until the Brazier is lit. Opening the door leads to a room with a circular platform in the middle, and a statue along the North wall. An Auto-Save will take place upon entering this room, and shortly thereafter a Lieutenant-grade ash wraith will appear. The spirit also gets some help from two pairs of Cultists awaiting right outside the room (a reaver and a mage on one side, a reaver and an archer on the other). After the fight, the Warden can open the Iron Chest to find a pair of Ancient Elven Gloves.
The party can continue along the eastern or western wings at this point (they lead to the same location), or clear them both for loot and experience. Both wings include Cultists and traps. The west wing can be tougher if the Warden opens a collection of chests, releasing ash wraiths. If Alistair, Leliana, Morrigan, Oghren, Shale, Sten, Wynne, or Zevran are in the party, one will comment on the statue in the topmost chamber on either side just before the stairs.
Eventually, the group will reach stairs leading up to the Wyrmling Lair.
Wyrmling Lair/Mountainside Caverns
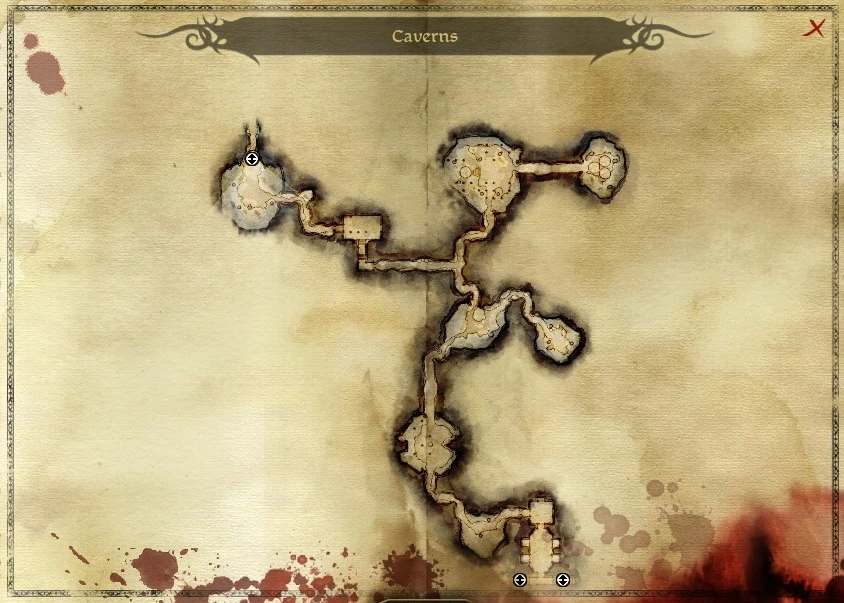

Map of the Caverns
- Main article: Mountainside Caverns
Once you reach the Wyrmling Lair, you have effectively left the temple and are now walking through several underground caverns. In addition to more Cultists and their traps, there are drakes and dragonlings (which sometimes spawn behind, or all-around the party) here in this area.
From the second room in the cavern portion (the first place where there is a choice of directions), the party can follow an eastward path that leads to a room with cages for pigs and goats, sometimes referred to as The Feeding Chamber. Two drakes on PS3 and Xbox, or three drakes on PC, will spawn and attack once the group is inside the area. They will drop a Drake Scale each, valid for the Drake Scale Armor quest. This will be a very tough fight, as each of them is lieutenant level and they possess the extremely dangerous Overwhelm ability. In the same room, the Warden can find a Stone Warrior Statuette in a Pile of Dragon Filth.
The other path (headed north) from the second room leads to a farther split. The party can follow a northeast or a northwest direction.
The northeast path leads to a couple of rooms sometimes referred to as the Hatchery, due to the various dragon eggs lying around. First, the party will enter a large room with columns, and a flight of stairs. On top of the stairs, a Cultist overseer awaits. Before the stairs, Cultist reavers and archers stand guard, and just to add a bit of spice, there are a couple of traps just at the bottom of the stairs. The party may try and pull the groups at the bottom of the stairs before engaging the overseer. Once the overseer enters the fight, two pairs of drakes will spawn and join the fray accompanied by a couple of dragonlings. The drakes will drop Drake Scales, and the overseer will drop a Spellweaver. Note that one pair of drakes will only spawn if you go up the stairs. You can thus make the fight easier by pulling the overseer down, wiping out the forces, then fighting the last two drakes separately. One more room lies to the northeast of this encounter, where another drake awaits, aided by a Cultist mage, an archer, and a hidden assassin. A book on one of the tables in this room yields the Codex entry: The First Blight: Chapter 3 and a Dragon Egg yields Lifedrinker and the matching Codex entry: The Life Drinker.
An easy way to get through the caverns is to bring a character that has the stealth ability, and sneak past every enemy, and then speak to Kolgrim. Doing so warps your party to the end of the cavern, though you still need to fight the enemies should you ever return, even if you side with Kolgrim. Oddly enough, there seems to be no negative reaction from the cult if you kill cultists after joining them.
Kolgrim's Offer


Father Kolgrim
The northwest path leads to a room with a few Cultists (and their traps), and eventually a large cavern where the leader of the cult, Father Kolgrim, awaits. As the Warden approaches, he will initiate a dialogue, revealing more details about the Cult that the party has been fighting since entering Haven. The Disciples of Andraste originally used to guard her ashes - however, they claim the prophet has since risen from the dead and the cult acts as her guard.
If, during the conversation, the Warden mentions that the real Andraste is dead and/or that the one the Cult is following now is a fraud, Kolgrim and his aides will attack the party. Otherwise, the dialogue may lead to Kolgrim offering a task for the Warden to make up for all the damage inflicted so far to the Cult (and to become a brother/sister to the Cult): take a vial of Andraste's blood, find a way around the Guardian protecting the ashes, and pour the blood into the ashes.
Accepting Kolgrim's task and defiling the ashes is the only way to unlock the Reaver specialization and obtain the Sacrilegious achievement. But if you have saved before you initiate the conversation, you can unlock the achievement and specialization and then revert to the save. Your rewards will be preserved even if you then choose another course of action.
Whether the Warden refuses to listen to Kolgrim's proposition, or accepts the task, or even if the Warden accepts the task verbally but does not follow through with it, the companions in the party (and some even if they are not in the active party) will react accordingly:
- If the Warden sides with Kolgrim:
- Morrigan approves (+2) or Morrigan approves (+3)
- Shale approves (+2) or Shale approves (+4), or Shale approves (+11) if you let her talk you into it. Note that this approval takes place immediately when you accept the blood from Kolgrim.
- To get Shale approves (+11), refuse Kolgrim's offer, refuse it again when he says, "I will not make this offer again," then when Shale says, "Is there a reason it refuses?", choose "You really think I should go along with it?" followed by "Maybe you're right."
- To get
- Zevran approves (+2)
- Sten disapproves (-3)
- Alistair disapproves (-5)
- May be avoided through Persuasion
- Oghren disapproves (-5)
- Leliana is, of course, opposed to the defiling, but will not react until the deed is actually done. Her reaction depends on various parameters, although it is not immediate when you accept Kolgrim's task. An unhardened Leliana will attack you immediately if she witnesses the defiling. Even a hardened Leliana will still object to the defiling of the Urn, but if the following conditions are met, she may be present at the defiling and, instead of reaching her crisis, simply Leliana disapproves (-10):
- Leliana must be hardened;
- The Warden must have a high intimidate skill (Coercion + Strength bonus = 75 or higher, where each point in Coercion is equal to 25 intimidation points. Thus 3 points in coercion should do the trick regardless of what your character's strength score is);
- The Warden must have passed through the flames after leaving all items at the alter. If the Warden fails this test and kills The Guardian before defiling the urn, the following dialogue option to intimidate Leliana won't appear;
- The player must select the "Before you do anything stupid, remember who I am." dialogue option when she calls the Warden a "fiend".
- If she is not present at the defiling, Leliana will confront the Warden at the Camp. Unless the Warden passes a persuasion check to convince her the Ashes are safe she will leave.
- Wynne will turn hostile and attack if the ashes are defiled and she is present in the party, although she will not react until the deed is actually done.
- If she is not present, she will initiate a conversation the next time the Warden enters the Party Camp and leave. Note: It is suggested that Wynne's crisis point can be avoided if she is not acquired until later on, after defiling the ashes - However, others have reported she will leave the party the first time the Warden returns to Camp even if she joined the team after the ashes were defiled. On PS3 Wynne will leave regardless of when she is recruited. however, her cutscene can be pushed down the queue by some cutscenes such as Alistair's cutscene which occurs after delivering the ashes allowing the Warden to return to camp under certain conditions.
- If Leliana was also absent from the defiling, her cutscene will override Wynne's. If Leliana is convinced the Ashes are safe by passing a persuasion check, Wynne's confrontation will not happen. (It may also happen that Leliana's conversation wil be overridden by Wynne's). On PS3, the cutscene still occurs the next time the Warden returns to camp.
- Zevran approves (+2) if the Warden listens to Kolgrim's offer and accepts it (even if the Warden won't follow through with the defiling);
- Zevran can be persuaded that killing Kolgrim is a better option and his approval rating won't change (Note the dialogue option to persuade Zevran calls Kolgrim 'shifty' and will trigger the cultists to attack)
- If the Warden fights Kolgrim:
- The fight can be tricky at first, but try to kill the Cultist mages and have someone keep the melee attackers on them (someone with a lot of health)
- Oghren approves (+2) if "shut up, Oghren" and then "I'll take my chances with the arrows" is selected after Kolgrim warns of a "rain of arrows" awaiting the Warden if they so dared attack "Andraste"
- Shale disapproves (-10) but if you declare to Shale directly "It is my decision" she will answer that there is nothing to say against this logic and there is no approval lost;
- Morrigan disapproves;
- Morrigan's and Shale's negative reaction can be avoided by picking a fight with Kolgrim early on in the dialogue, without asking about his offer; alternatively, if the dialogue leads them to express their opinion, a successful Persuasion check may reduce their loss of approval ( Shale disapproves (-5), Morrigan 0 if started within the first two dialogues). If Sten is in the party, and you let Kolgrim explain his plan, Sten will comment negatively - if in the ensuing dialogue option you change your mind, Morrigan won't disapprove.
- Morrigan's and Shale's negative reaction can be avoided by picking a fight with Kolgrim early on in the dialogue, without asking about his offer; alternatively, if the dialogue leads them to express their opinion, a successful Persuasion check may reduce their loss of approval (
- Wynne, Leliana and Alistair voice their opposition to defliling the urn, but fighting Kolgrim does not result in a change of approval rating.
If/when you fight Kolgrim, he will drop his axe, Faith's Edge, and (depending on the time when the fight took place) Kolgrim's Horn (![]() only).
only).
If you want to fight Kolgrim outside without losing any approval on the above-mentioned dialog choices simply choose the dialog option that you want to see the risen Andraste yourself, which will take you outside where you meet Kolgrim again. He will have some help there too which includes another drake and will earn you a 7th drake scale.
The Mountain Top
- Main article: Mountain Top
After the encounter with Kolgrim, the party will reach the Mountain Top. A cutscene occurs as the cult's "Andraste", which is actually a high dragon, flies over and lands to rest on a cliff. If Kolgrim was killed, the Warden and their team will dive for cover.
If you accepted Kolgrim's task ('to pour the dragon's blood into the Urn, allowing the risen Andraste to reclaim the power held in the Ashes'), he will speak to her to let you pass unharmed. You can continue into The Gauntlet or attack him here. He will be aided by his Disciples and a drake.
At this point, the party may engage the false Andraste by using Kolgrim's Horn (if you killed him), by casting an area of effect spell like Blizzard or cast Drain Life below the cliff as its range can reach the high dragon above, or (on consoles) by using the gong in this area. The high dragon is a formidable opponent; see high dragon battle strategy. If the dragon is slain, she will drop a considerable number of items, among which is a Dragon Scale for the Dragon Scale Armor quest. There is no need to fight the dragon immediately — this area can be returned to later in the game whenever the Warden feels it is more appropriate.
The Gauntlet
- Main article: The Gauntlet
Whether the party elects to fight the High Dragon on the Mountain Top or not, their next stop is a separate temple, known as The Gauntlet. In the first room, the Warden will find x30 Andraste's Arrows, a book unlocking the Codex entry: The Maker's First Children, and the next step in the quest line, in the form of a Guardian knight. Approaching him will trigger a conversation revealing more background history about the Disciples of Andraste and the Urn of Sacred Ashes. The Guardian will ask one question to each party member, related to their own past, and unlock the A Test of Faith quest. To reach the Urn, the party has to pass the trials of the Gauntlet. See A Test of Faith page for details about the tests.
The Ashes
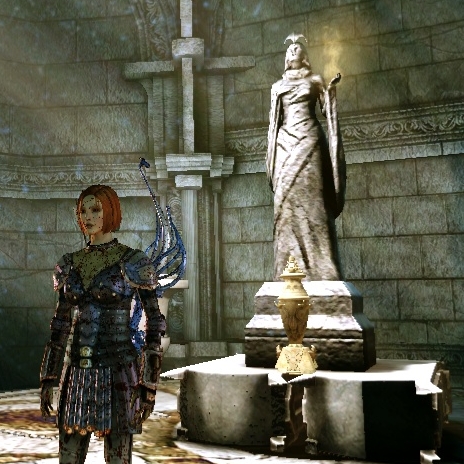
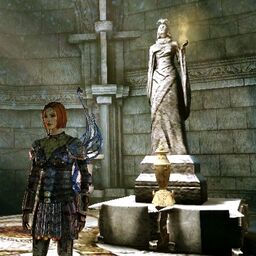
Leliana stands near the Urn of Andraste.
Once the Gauntlet has been completed, the Urn of Andraste will be in sight. Among the Warden's choices:
- Take a pinch of the Ashes
- Defile the Ashes - Only available if the Warden did not kill Kolgrim; doing so unlocks the Reaver specialization.
Note that the Warden will take a pinch from the Ashes automatically, regardless of the choice to defile them or not. Taking only a pinch of the ashes, in other words choosing not to defile them, will also unlock the Ceremonialist achievement. Regardless of any promise made to Kolgrim, the Warden is under no obligation to actually defile the ashes.
See Leliana and Wynne for details on their reactions in case you chose to defile the ashes - as well as the Kolgrim's Offer section above. Before leaving the room, unlock the chests and loot the Adventurer's corpse for a Belt of the Magister Lords and a Golden Demon Pendant.
Once the Warden has finished all intended business here, it is time for the party to exit (via either door in the Urn room). If the ashes were defiled, then Kolgrim will be waiting outside to reward the Warden, or to take vengeance if a deal was struck but the Warden reneged. Even if you defiled the ashes, you still have the option of attacking Kolgrim as you leave. Note that the fight against Kolgrim is considerably easier here than if he's attacked back in the caverns as he has fewer allies supporting him. A cultist mage and a drake are encountered further down the hill.
A gong (for consoles) or Kolgrim's Horn (for ![]() ) can be activated in the area. Do not do so if you are not ready to engage a high dragon in combat. Fighting the dragon is not mandatory to exit the area; the Warden can return at a later date if the player isn't strong enough yet to do battle.
) can be activated in the area. Do not do so if you are not ready to engage a high dragon in combat. Fighting the dragon is not mandatory to exit the area; the Warden can return at a later date if the player isn't strong enough yet to do battle.
Otherwise the group can proceed from the Mountain Top and follow a shortcut on the way back, in the form of a door to the lower right (while facing the Caverns direction). This will lead directly to the entrance of the Ruined Temple, where Brother Genitivi awaits. (This path will become a two-way shortcut to the mountain top for future visits, e.g. to attack the dragon.)
Conclusion
As the party returns to the entrance of the Ruined Temple, Brother Genitivi will be extremely excited about the news, and ready to share them with the entire world. Alistair, if present, will express concern that there would not be enough ashes to go around if lots of pilgrims were to arrive, but there is no way to dissuade Genitivi from spreading the word except to kill him. There is no actual battle, just a cut-scene of the Warden killing Genitivi. Genitivi is a well traveled and learned scholar who has written many of the books (excerpts of them are found in the form of codex entries), so the homicide will trigger some reactions among the companions:
- Alistair disapproves (-3) BUG: Unless Leliana is also in the party, then no change.
- Leliana disapproves (-5)
- Wynne disapproves (-3)
- Unaffected: Zevran, Morrigan, Shale, Sten, Oghren.
If Genitivi is not killed, he will return to his home in Denerim, asking the Warden to visit him later. If the Warden does visit him, he will present him/her with a Master Dweomer Rune as a reward.
Result
With the Pinch of Sacred Ash, you may now head to Redcliffe Castle and heal Arl Eamon. If you have not yet been to Redcliffe Village or Redcliffe Castle, you will need to resolve the troubles there before you can reach Arl Eamon. See The Arl of Redcliffe for details.
Rewards
- 500 XP for passing A Test of Faith successfully.
- 750 XP when exiting onto Mountain Top via the doors in the urn room.
- Master Dweomer Rune, from Brother Genitivi back at his home in Denerim
- Pinch of Sacred Ash
- Reaver specialization and 1500XP (from Kolgrim, only if you agree to defile the ashes)
- Reflection (amulet given to the Warden by the spirit from their past)
Side quests
- A Test of Faith
- Correspondence Interruptus
- Dragon Scale Armor
- Drake Scale Armor
- Forgotten Verses
- The Scrolls of Banastor
Notable Items
- Ancient Elven Gloves
- Andraste's Arrows
- Armor of Diligence
- Belt of the Magister Lords
- Faith's Edge (if you slay Kolgrim)
- Lifedrinker
- Mage's Eye
- Spellweaver
- High dragon loot
Epilogue
- If the Warden slays the high dragon and does not prevent Brother Genitivi from revealing the location of the Urn to the world, the temple becomes a site of pilgrimage for the faithful. If the high dragon isn't killed, the Urn disappears without a trace by the time the Chantry gains access to the temple.
- If Brother Genitivi does not come with the main character while killing cultists the Urn will also disappear.
Dragon Age II
If one decides to import an Origins save to Dragon Age II, the decision made in Origins affects a side quest and various comments throughout the game.
If the Urn was not defiled and Brother Genitivi was allowed to lead an expedition, enabling the Chantry to confirm the ruined temple as the resting place of Andraste's ashes, then a Carta swindler can be found in the Lowtown district of Kirkwall, purporting to be selling a pinch of ashes allegedly verified by Genitivi himself. This will trigger the quest Miracle Makers given by Melindra.
Trivia
- The majority of the Urn of Sacred Ashes quest line was written by Sheryl Chee.[1]
Exploits/bugs
- See also: High Dragon Exploits
- As the Warden exits to the Mountain Top from The Gauntlet, 750 XP are awarded. The party can repeat the transition from The Gauntlet to the Mountain Top to gain 750 XP each time.
- Repeat the transition between Mountain Top and the Caverns, which gives 750 experience points. This works if you have defiled the ashes. The mages and reavers remaining in the caverns will not attack the party even if the Warden has chosen to double-cross Kolgrim and kill him.
- Bug is still active in v.1.04
- It is possible for the high dragon to become stuck off to the left side of Mountain Top. The location is just to the left of the main path as you are walking down to the flat area below. To be more precise, the ditch is between the main path and the path leading toward the Ruined Temple.
- If pulled over to the gong to where the dragon lands on it, it may become stuck. Making it easier to kill with mages and archers, but it is able to pull in warriors.
- If a rogue with combat stealth, you can leave your team stationary and go all the way through the caverns without fighting anyone. When you come to the climax, they will appear with you.
- There is a possible glitch when fighting the high dragon herself. If your fight lasts over 30 minutes, the high dragon will seemingly fall over dead. You will NOT be awarded ANY Exp points and will NOT be awarded the trophy for killing her. It will also NOT reflect in your Heroic Accomplishments that you have slain her.
- If you choose to slay Brother Genitivi after getting the Ashes, you will find under his codex entry that he still returned to Denerim and was granted funds to mount an expedition.
- If you proceed to complete the quest without ever going to The Spoiled Princess and questioning the Innkeeper about Genitivi, the plot point arrow will still show above the Innkeeper, but the option to question him about Genitivi will no longer be available.
References
- ↑
 David Gaider (January 8, 2010). "Writers of Dragon Age" . The BioWare Forum.