m (interlanguage link DE) |
Tag: Visual edit |
||
| Line 78: | Line 78: | ||
''And with his sons' help, he ensured the [[Kal Repartha|thaig]] prospered and grew.<br> |
''And with his sons' help, he ensured the [[Kal Repartha|thaig]] prospered and grew.<br> |
||
| − | Once all of the key fragments have been collected, head to the [[Codex entry: Map of Tomb of Fairel|Tomb of Fairel]] which is east of Sand Crags Camp, just before the edge of the map and through two pillars, at the back of a crater. You will come across the [[Sandy Howler]] [[High dragon|high dragon]] in the same area, which you can avoid if you wish by sticking to the edges of the crater. Once inside the tomb, loot the chest to complete the quest. The [[Codex entry: Dwarven Inscriptions: Hissing Wastes]] will update once |
+ | Once all of the key fragments have been collected, head to the [[Codex entry: Map of Tomb of Fairel|Tomb of Fairel]] which is east of Sand Crags Camp, just before the edge of the map and through two pillars, at the back of a crater. You will come across the [[Sandy Howler]] [[High dragon|high dragon]] in the same area, which you can avoid if you wish by sticking to the edges of the crater. Once inside the tomb, loot the chest to complete the quest. The [[Codex entry: Dwarven Inscriptions: Hissing Wastes]] will update once you do. |
== Rewards == |
== Rewards == |
||
Revision as of 05:20, 20 June 2020
The Tomb of Fairel is a side quest in Dragon Age: Inquisition.
Rumors tell of a grand treasure buried in a tomb in the Hissing Wastes. Explore the Wastes, using any available clues and maps to find it.
Acquisition
Obtained after arriving in the Hissing Wastes.
Walkthrough
The maps
You must find five maps which will each lead you to a tomb that holds a key fragment. The key fragments, once all are collected, will give you access to your ultimate destination, the tomb of Paragon Fairel. The maps are:
- Sketch of Four Pillar Tomb - Given by Scout Harding when you first enter the Hissing Wastes
- Sketch of Canyon Tomb - at the Venatori Canyon Camp, north-west of the Inquisition's Logging Camp
- Sketch of Burial Grounds Tomb - at the Venatori Canyon Camp, south-east of the Inquisition's Logging Camp
- Sketch of Colossus Tomb - found in Sunstop Mountain Camp.
- Sketch of Sunstop Mountain Tomb - found inside the Four Pillar tomb.
The Map of Tomb of Fairel itself is found inside the chest in the Four Pillar Tomb.

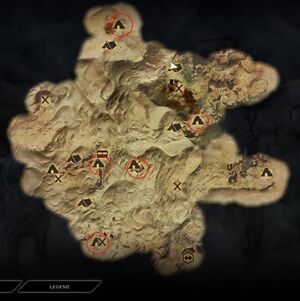
Tomb location map
The tombs
A puzzle must be solved inside each tomb in order to unlock the final chamber which holds a chest full of loot plus the key fragment. The puzzle involves lighting braziers with Veilfire in the correct order. The order is established by reading the four nearby stone tablets about the story of Fairel. Arrange the phrases into a coherent verse and light the braziers in that order.
All the verses can be found in Codex entry: Dwarven Inscriptions: Hissing Wastes which will update each time you solve a puzzle. If an incorrect brazier is lit, Ancient tomb guardians and Burning tomb guardians are released from the walls, and Cole comments on them about these gangues: "They were Dwarves. They think they still are. They sound like dust tastes."
Four Pillar Tomb
The Four Pillar Tomb is located near Sand Crags Camp. Enter the tomb, light the braziers in the correct order and loot the large chest for the quest key fragment. The order is as follows:
This is the tale of Fairel, Paragon among Paragons, father of two sons,
who, against their father's wishes, fought from foolish words and foolish pride.
For pride these halls were made -- to honor a father's deeds, and grieve his loss.
And for loss these halls were made, to honor a brother mourned.
Codex entry: Demons of the Stone is also found in this tomb.
Canyon Tomb
The Canyon Tomb is located in the canyon north-east of Logging Camp. Defeat the spiders in the canyon and enter the tomb. Light the braziers in the correct order and loot the large chest for the quest key fragment. The order is as follows:
After many years Fairel, greatest of Paragons, could not bear life's burden.
And with the burden growing, he called his sons to his bedside.
He bade each son swear he would take care of his brother,
and the brothers swore, and mourned when their father returned to the Stone.
Burial Grounds Tomb
The Burial Grounds Tomb is located south of Logging Camp. Light the braziers in the correct order:
Fairel's sons built monuments to their father, locking away his great works,
and worked together, for a time, side by side. Each ruled half the thaig,
but each ruled differently. They argued, and heated words made the brothers duel,
And where one brother fell, the others raised bloodied axe in hand, alone.
Colossus Tomb
The Colossus Tomb is located north of Statue Camp. Defeat the spiders swarming the tomb and light the braziers in the correct order:
Fairel, Paragon, fled from the strife his brilliance created,
The strife that destroyed thaigs, sundered houses, from weapons that clan used against clan.
His own clan and his two sons followed Fairel to the pitiless surface,
The surface where they would hide from the war that took their home.
Sunstop Mountain Tomb
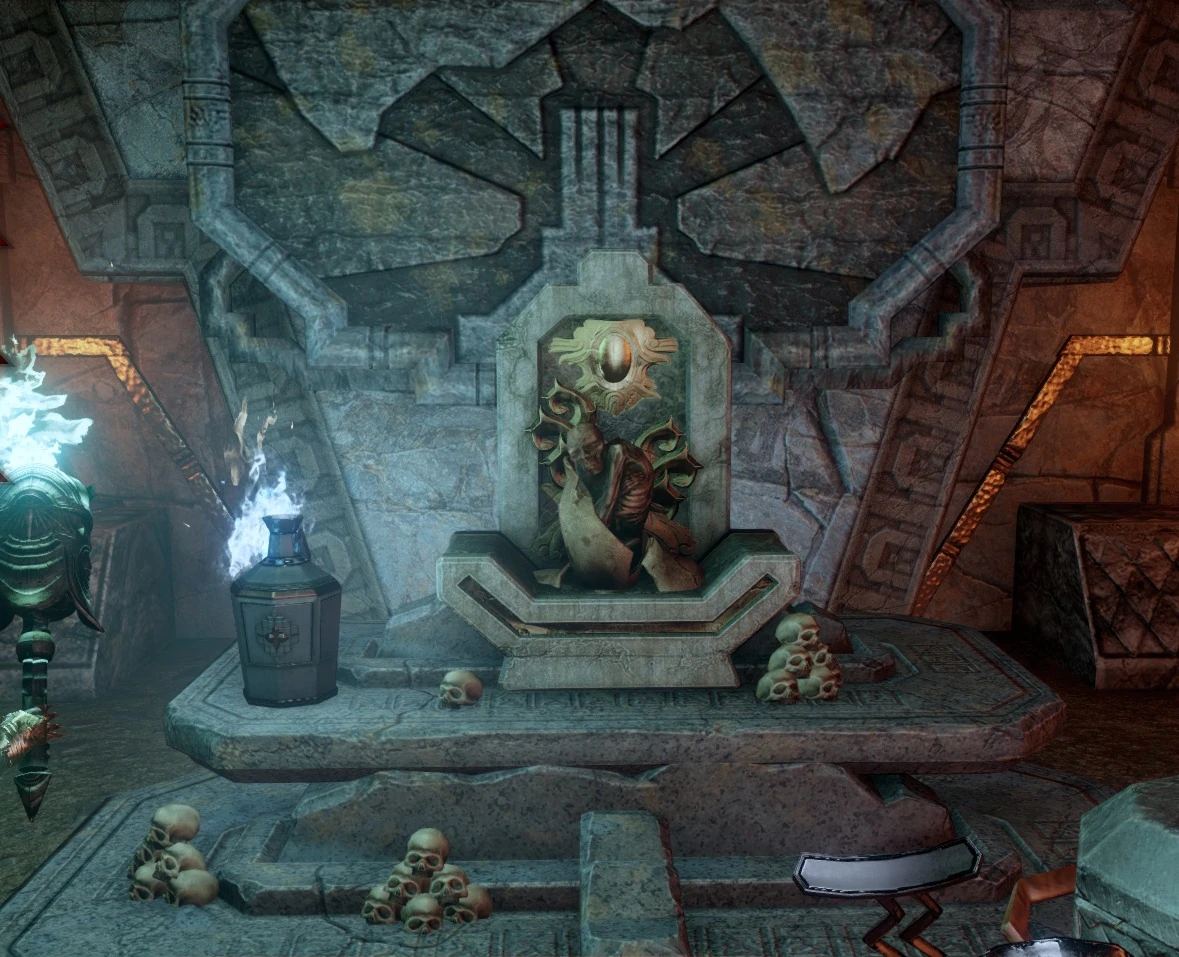
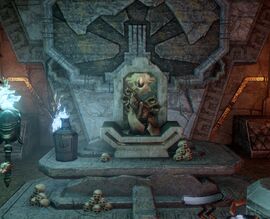
Inside the Sunstop Mountain Tomb
The Sunstop Mountain Tomb is located east of Mountain Fortress Camp (take the path north-east), near the Mountain Fortress Camp Ocularum. Climb down the ladders to enter the tomb and light the braziers in the correct order. Superb Fire Rune Schematic will be found about halfway down, which can be revealed with veilfire. The correct order of phrases is as follows:
The sun burned above oceans of sand,
but in the sand was Stone, strong and true.
Fairel hewed the Stone, and built──as great as any thaig in the deep.
And with his sons' help, he ensured the thaig prospered and grew.
Once all of the key fragments have been collected, head to the Tomb of Fairel which is east of Sand Crags Camp, just before the edge of the map and through two pillars, at the back of a crater. You will come across the Sandy Howler high dragon in the same area, which you can avoid if you wish by sticking to the edges of the crater. Once inside the tomb, loot the chest to complete the quest. The Codex entry: Dwarven Inscriptions: Hissing Wastes will update once you do.
Rewards
- 10,152 XP
- 2,000 Influence
- 3 Power
Notes
- Each tomb holds a mosaic piece for the Sacrifice mosaic. However, the Sunstop Mountain Tomb has two mosaic pieces, thus a total of seven can be found throughout the quest.
- The Four Pillar Tomb chest holds:
- Random amount of gold (~124)
 Bianca Arms III (Enhanced) Schematic
- Masterwork Spiked Longbow Schematic
- Superb Ring of Attack
- The Canyon Tomb chest holds:
- Random amount of gold (~128)
- Dwarven Banner
- Masterwork Serrated Greatsword Schematic
- Superb Ring of Guard Penetration
- The Burial Grounds Tomb chest holds:
- Random amount of gold (~125)
- Dwarven Banner Crown
- Masterwork Dual Curved Blade Schematic
- Superb Ring of Critical Damage
- The Colossus Tomb chest holds:
- Random amount of gold (~144)
- Serpent's Rage Schematic
- Superb Ring of Sundering
- The Sunstop Mountain Tomb chest holds:
- Random amount of gold (~140)
- Legion of the Dead Armor Schematic
- Superb Belt of Melee Defense
- Superb Fire Rune Schematic (requires finding with veilfire)
- The Tomb of Fairel chest holds:
- Random amount of gold (~121)
- Superb Demon-Slaying Rune Schematic
- Bianca Aiming III (Enhanced) Schematic
- Promise of the Storm
- Superb Ring of Barrier Penetration
Trivia
- When opening the second through final tombs (including the Tomb of Fairel itself), Blackwall, Iron Bull, and Varric will have unique dialogue with the Inquisitor:
- Blackwall recounts a five-part story of a mission out to the Silent Plains (dialogue slightly changes before and after Revelations), warning the party that the desert is not to be trifled with, and Sera will make a comment about the ghasts.
- Iron Bull notes the construction of the tombs, and Dorian will comment on his quip about Tevinter's use of magic to lift blocks. At the Tomb of Fairel, he will remark that the tombs are not rigged with traps to ward off tomb robbers, the builders instead reasoning that "this guy was so important they thought no one would rob him," which Cole does not understand.
- Varric speaks of dwarven history and culture (much to his chagrin) and the anomalous nature of a dwarven surface colony as a result (dialogue changes with a dwarven Inquisitor), and Cassandra will be surprised that a dwarven tomb "gives him the creeps" despite everything they'd seen up to that point (and his lack of belief in dwarven Ancestors inhabiting the Stone).
- Dialogue with Blackwall will adjust depending on which parts of the tale he has mentioned, but not bringing him to a tomb will not prevent him from telling subsequent pieces. However, he will only tell the final part of his tale if he is brought to the third tomb (mentions the flood in the desert). Likewise, Iron Bull will only tell the final part of his tale if he was brought to the fifth tomb (mentions "something missing" from the tombs). Varric will always have his final exchange, even if he has not been brought to any of the tombs.
- A statue bearing the likeness of Mythal overlooks the Tomb of Fairel.
- If the Inquisitor skirts the Sandy Howler as suggested above and then later returns to kill the dragon, there will still be party banter about the dragon being in between them and the tomb.
Exploits
- It's possible to complete this quest without finding all 5 tombs. Use the Exploits (Inquisition)#Loot Chest Farming exploit by leaving one item and going to another location on the world map, then going back to the tomb; the key and the ring will always reset. Thus, just do the Four Pillar Tomb, which is next to the Sand Crags camp, and go back to it 4 more time to get all 5 key parts and 5 rings. Then head to the Tomb of Fairel to complete.
Codex entries
![]() Codex entry: Sketch of Four Pillar Tomb
Codex entry: Sketch of Four Pillar Tomb
![]() Codex entry: Sketch of Canyon Tomb
Codex entry: Sketch of Canyon Tomb
![]() Codex entry: Sketch of Burial Grounds Tomb
Codex entry: Sketch of Burial Grounds Tomb
![]() Codex entry: Sketch of Colossus Tomb
Codex entry: Sketch of Colossus Tomb
![]() Codex entry: Sketch of Sunstop Mountain Tomb
Codex entry: Sketch of Sunstop Mountain Tomb
![]() Codex entry: Map of Tomb of Fairel
Codex entry: Map of Tomb of Fairel
![]() Codex entry: Dwarven Inscriptions: Hissing Wastes
Codex entry: Dwarven Inscriptions: Hissing Wastes
![]() Codex entry: Demons of the Stone
Codex entry: Demons of the Stone
Gallery
")
")
")
")
")
")