(uhh o,o) |
DaBarkspawn (talk | contribs) |
||
| (28 intermediate revisions by 22 users not shown) | |||
| Line 1: | Line 1: | ||
| − | {{Pictures wanted}} |
||
| − | {{Missing info|more pictures}} |
||
| − | {{Cleanup|Too much text for a walkthrough that is quite simple and does not require any strategy, too much excess info (the readers are not five year olds, hopefully)}} |
||
<onlyinclude>{{QuestTransformer |
<onlyinclude>{{QuestTransformer |
||
|style = {{{style|}}} |
|style = {{{style|}}} |
||
| Line 18: | Line 15: | ||
}}</onlyinclude> |
}}</onlyinclude> |
||
| − | '''The Threat Remains''' is a [[Quests (Inquisition)|main quest]] in ''[[Dragon Age: Inquisition]]''. |
+ | '''The Threat Remains''' is a [[Quests (Inquisition)|main quest]] in ''[[Dragon Age: Inquisition]]''. It chronicles the rebirth of the [[Inquisition]] and the initial reforging of alliances to face the Inquisition's enemies and restore order in Thedas. |
{{Blockquote|The Breach is calmed but the trouble is only beginning.}} |
{{Blockquote|The Breach is calmed but the trouble is only beginning.}} |
||
== Acquisition == |
== Acquisition == |
||
| − | This quest is automatically triggered after [[The Wrath of Heaven]] is completed. |
+ | This quest is automatically triggered after [[The Wrath of Heaven]] is completed. You awaken in a room in [[Haven]], where a young elven girl bringing medical supplies will walk in. After apologizing profusely she will explain that [[Cassandra]] wanted to be made aware of when the Inquisitor woke up and will immediately run off. |
| + | |||
| + | The house is almost bare of anything noteworthy, bar a [[Codex entry: Patient Observations|note]] with some details about your recovery after sealing the Breach. If the [[Flames of the Inquisition]] DLC has been installed, there is a box of 'special deliveries' containing a class specific [[Flames of the Inquisition Weapons Arsenal|weapon]] and [[Flames of the Inquisition Armor|armor]] 'of the Dragon'. |
||
==Walkthrough== |
==Walkthrough== |
||
| − | [[Codex entry: Haven]] will unlock as soon as you gain control of your character. |
||
| − | |||
| ⚫ | |||
| − | On the desk is a note containing the [[Codex entry: Patient Observations|Codex entry: Patient Observations (Day One)]]. If the player has bought either the [[Dragon Age: Inquisition Deluxe Edition]] or [[Dragon Age: Inquisition Inquisitor's Edition|Inquisitor's Edition]], the [[Flames of the Inquisition Armor|bonus content]] will be in a chest nearby. Additionally, the box of supplies that the elf dropped contains some healing items. |
||
| − | |||
| − | Outside, a large crowd of people ranging from soldiers to village peasants and Chantry members will obstruct most paths, save for one leading to the [[Haven Chantry]]. None of the merchants will be willing to do business and will instead inform the Inquisitor that Cassandra wishes to speak with them, but behind the first building to the left is a basket with loot, and behind the cottage to the right is a chest. Elfroot grows behind the buildings here as well. |
||
| − | |||
| − | Past the crowd, on the left at the top of the stairs you can find [[Codex entry: Andraste's Mabari]] attached to a pole. This song is part of the [[Patron of the Arts]] [[Collections|collection]]. If you turn right, you can loot a sack next to the Singing Maiden and find [[Codex entry: The Singing Maiden]] attached to the front of the tavern. There is another sack and a chest among the tents in front of the chantry, and a basket to the left beyond the chantry entrance. If you head to the right of the chantry, you can bypass the crowd blocking the stairs and gain access to a group of cottages. The cottage where you find the apothecary Adan has a chest and [[Codex entry: Patient Observations|Codex entry: Patient Observations (Day Two)]], and in another you will find [[Codex entry: The Randy Dowager Quarterly]]. |
||
| − | |||
| − | Inside the chantry, there are more codex entries: |
||
| − | *[[Codex entry: The Fade]] in the main hall on a desk in the left-side alcove |
||
| − | *[[Codex entry: A Chant for the Departed]] in the main hall on a barrel beside the door that leads to the dungeon |
||
| − | *[[Codex entry: The Children of Andraste]] in the room on the left, before you enter the room to speak with Cassandra |
||
| − | *[[Codex entry: Researcher]] will also unlock in this room if you approach the research table |
||
| − | *[[Codex entry: The Maker]] in the bedroom on the right, before you enter the room to speak with Cassandra |
||
| − | |||
| − | Lootable containers include one basket at the end of the main hall to the right and another down the stairs off the anteroom to the left. In this same passage you will find [[Codex entry: Founding of the Chantry]] and [[Codex entry: Chantry Hierarchy]]. There is also a door you can unlock (if you are a [[Rogue (Inquisition)|rogue]]) with three more books and a small chest, and a small jail area. There's a chest and a codex entry here, and another small chest inside one cell and a letter inside another. |
||
| ⚫ | |||
| − | |||
===Meet Cassandra in the chantry=== |
===Meet Cassandra in the chantry=== |
||
| + | When you leave the house you are greeted by an honor guard that leads towards the chantry. It is possible to explore most of Haven at this point, but it is advisable to wait until after you have met Cassandra when the crowds will have dispersed and the whole area is available to explore. |
||
| − | Inside the chantry Cassandra along with her friend [[Leliana]] will be arguing with Grand Chancellor [[Roderick (Inquisition)|Roderick]]. A rumor has spread through the people of Haven that the Inquisitor is the Herald of [[Andraste]], which Cassandra supports based on providence, the fact that they were exactly who the people needed when and where they were needed. |
||
| − | |||
| − | The Inquisitor can agree to her assessment for slight approval from Cassandra or dismiss it for negative approval. After more arguing with Roderick, Cassandra, acting on Divine Justinia's final orders, declares the Inquisition reborn. Roderick storms out, and the Inquisitor can show willingness or unwillingness to help the two Hands, which results in approval gains and losses with Cassandra respectively. |
||
| − | |||
| − | Scenes will play as Leliana sends forth messenger birds, Cullen nails a charter to the chantry door, and people begin taking up arms. Standing before their following, the Inquisitor is adorned in new armor and turns to face the Breach above. The title "Dragon Age Inquisition" appears on a blank screen as the prologue comes to a close. |
||
| − | |||
| − | {{Note|''Now is a good time to pick up any [[Haven#Dragon_Age:_Inquisition_3|side quests in Haven]].'' |
||
| − | |||
| − | ''You may also wish to find the other codex scattered around Haven and its surroundings. A complete list can be found [[Haven#Codex entries|here]].'' |
||
| + | Proceed to the chantry where you will hear Cassandra along with [[Leliana]] arguing with Grand Chancellor [[Roderick (Inquisition)|Roderick]]. You can have your say in the argument but after more arguing with Roderick, Cassandra, acting on [[Divine Justinia V|Divine Justinia]]'s final orders, declares the Inquisition reborn. [[Codex entry: The First Inquisition]] is unlocked. |
||
| − | ''At this point, you can enter the tavern to discover more songs for the [[Patron of the Arts]] collection. Each time you enter you have the chance of discovering a new song by listening to [[Maryden Halewell|Maryden]] the bard.''}} |
||
===Rebirth of the Inquisition=== |
===Rebirth of the Inquisition=== |
||
| ⚫ | |||
| − | After the cut-scene you can decide to continue explore Haven, or go to the chantry once more to advance the story. Here, Cassandra introduces the Inquisitor to [[Cullen]], commander of the Inquisition's Forces, [[Josephine]], its ambassador and overseer of Connections, and [[Leliana]], the spymaster and purveyor of Secrets. |
||
| + | After a cutscene you are placed outside the chantry and obtain the quest [[Haven's Best and Brightest]]. It is now possible to explore all of Haven, speak to the npc's and complete several tutorial-type side quests there. |
||
| + | To proceed with the main quest, re-enter the chantry. In the following cutscene Cassandra introduces you to the three advisors: [[Cullen]], commander of the Inquisition's Forces, [[Josephine]], its ambassador and overseer of Connections, and Leliana, the spymaster and purveyor of Secrets. When discussing the next objectives for the Inquisition, you are given a quick tutorial of how to use the [[war table]] with the operation to [[Scout the Hinterlands]]. You are given the option of traveling immediately to the [[Hinterlands]] and following up on the quests there or exiting back to Haven. Leliana suggests visiting [[Giselle|Mother Giselle]], a Mother of the Chantry operating in the Hinterlands near [[Redcliffe]], to begin laying the groundwork for approaching the remaining members of the Chantry. |
||
| − | Cassandra surmises that the Herald's Mark needs more power to close the Breach. Leliana states that they should seek out the rebel mages to boost the Mark's power. Cullen disagrees, stating they should appeal to the [[Templar Order]], to suppress the Breach's output and weaken it so the Inquisitor can close it, before Leliana cuts him off stating it is "pure speculation." Regardless, Josephine notes that the Chantry has denounced the Inquisition and specifically the Herald of Andraste. As such, they lack the political power to approach either group for help. |
||
| + | Additionally, you are given a number of quests aimed towards gaining allies, agents, power and influence - [[Lost Souls]] and [[Vigilance on the Coast]], the war table operations [[Hard in Hightown 3: Varric's Revenge]], [[Address a Nobleman's Concerns]], [[The Teyrn of Highever]], [[Scout the Storm Coast]], [[Deal with Relatives of the Trevelyans]] (human Herald only), [[Contact Clan Lavellan]] (elf Herald only), [[The Carta Gets Its Cut]] (dwarf Herald only), [[Contact with the Valo-Kas Mercenaries]] (Qunari Herald only), [[Gather Coin (Haven)]], [[Rescue Soldiers Missing in Ferelden]] and [[Investigate Serault]] if you have completed [[Dragon Age: The Last Court]]. Numerous codex entries are unlocked (see the list below). |
||
| − | Leliana suggests visiting [[Giselle|Mother Giselle]], a Mother operating in the [[Hinterlands]] near Redcliffe, to begin laying the groundwork for approaching the remaining members of the Chantry. The Inquisitor must go there and relieve the refugees chafing under the reignited [[Mage-Templar War]] and prevent anything bad happening to Giselle. |
||
| − | |||
| − | ===The war table=== |
||
| − | In order to unlock the [[Hinterlands]] the Inquisitor must learn how to issue mission directives from the [[war table]]. At first only [[Scout the Hinterlands]] is available, which requires 1 Power. Selecting the operation will trigger a cutscene and unlock the Hinterlands for exploration. At this point you can travel to the Hinterlands directly or choose to go there later and instead return to the war table to start any other operations that have unlocked. |
||
===The Hinterlands=== |
===The Hinterlands=== |
||
| − | Arriving at the camp, [[Harding]] will brief the Inquisitor on Mother Giselle, as well as [[Dennet]], Redcliffe's old horsemaster. |
+ | Arriving at the camp, Chief Scout [[Lace Harding]] will brief the Inquisitor on Mother Giselle, as well as [[Dennet]], Redcliffe's old horsemaster. |
| − | |||
| − | Following the path down the hill from the camp, the Inquisitor will have to clear the area of the two warring factions: mages, consisting of a Spellbinder and some sellswords; and the Templars who show up after. Both groups have four members, and the templars have a Templar Defender and two Archers. Take down the ranged fighters with Winter's Grasp and Long Shot while Cassandra draws the ire of the melee fighters. Don't be shy about using healing potions, as you can restock them by returning to the camp after the battle. |
||
| + | Following the path down the hill from the camp, you will have to clear the area of the two warring factions, the mages and the templars. Once the crossroads are cleared you will have acquired several codexes (see the list below). Next, Mother Giselle will talk to you and suggest that you visit [[Val Royeaux]]. Following this conversation, you must speak with Corporal [[Vale]] and aid him in securing the crossroads. Fully speaking to him will give you markers towards the quests [[Hunger Pangs]], [[In the Elements]], and [[Shallow Breaths]], as well as a tutorial on Power and its related [[codex entry: The Inquisition]]. The Inquisitor can then proceed to the refugee hunter to obtain Hunger Pangs and to [[Whittle]] to get In The Elements. |
||
| − | With the Crossroads secure, Mother Giselle will talk to you. She will state that many of the clerics are simply grandstanding when they denounce the Inquisition, and that others are simply going along with it. She suggests to go to [[Val Royeaux]] and face their accusations head-on. While it will not win their support immediately, she states that all the Inquisitor has to do is to make even a few of them doubt their unanimous assertion, to weaken their unified voice against the Inquisitor and peel support away from the grandstanders. |
||
| + | To progress the quest from this point, you require 4 Power which can be earned in ways as described in the codex — seal [[Fade]] rifts, complete quests and establish camps in the Hinterlands. |
||
| − | To progress the quest further, you require 4 Power. Therefore, explore the Hinterlands, complete quests and recruit [[agents]] to increase the Inquisition's influence. The easiest way to do this is to follow Harding's suggestion and make your way to Dennet, at the Redcliffe Farms in the northwest of the map, avoiding the fighting as best you can and establishing new camps along the way to rest and resupply. Talking to Dennet will secure your first mount, a Ferelden Forder. Corporal Vale at the Crossroads also provides a number of suggestions for tasks you may want to complete. |
||
===Val Royeaux=== |
===Val Royeaux=== |
||
| + | [[File:Lucius-and-Barris-at-Val-Royeaux.png|thumb|300px|Lord Seeker Lucius and Ser Barris confront the Inquisition.]] |
||
| ⚫ | |||
| + | Once you have the required power travel back to Haven. Outside the chantry is an angry mob, they are harassing some mages and blaming them for causing the Breach. Cullen intercedes and tells the mob to get back to work. Talk to Cullen and High Chancellor Roderick about the situation, then head on into the war room to unlock Val Royeaux. |
||
| ⚫ | |||
| − | + | and approach Revered Mother [[Hevara]]. Lord Seeker [[Lucius Corin|Lucius]] appears, taunting the Chantry and the Inquisition. He dismisses any idea of allying with the Inquisition against the Breach and withdraws all Templar forces from Val Royeaux, leaving it defenseless. The war table operation [[The Chantry Remains]] becomes available at this point. |
|
| + | Taking a few steps when you have control again will result in an arrow being fired into the ground from a hidden source. Investigating the arrow unlocks the companion quest [[A Friend of Red Jenny]]. On the other side of the square by the exit is a messenger, who gives you an invitation that unlocks the companion quest [[The Imperial Enchanter]]. |
||
| − | When you regain control, you'll be able to explore Val Royeaux and interact with merchants. |
||
| − | {{ |
+ | {{Blockquote|'''Important''': ''If you are attempting to recruit all possible agents, [[Belle]] is available beside the stage. She will disappear if you leave without talking to her.''}} |
| − | + | When you exit the city, you'll be met by the rebel mage leader Grand Enchanter [[Fiona]] who invites you to [[Redcliffe Castle]]. The visit to Val Royeaux unlocks several codex entries, see the list below. |
|
| ⚫ | |||
| − | Returning to Haven, the Inquisitor consults with the advisors. [[Josephine]] recommends approaching the mages, while Cullen insists on approaching the templars in spite of the Lord Seeker's denunciation. He does acknowledge that the Inquisition lacks the power to approach them safely, and should build its influence. Finally, [[Leliana]] mentions that the Grey Wardens of Ferelden and Orlais have disappeared without a trace, and the timing is curious with all that has happened. She directs you to a Warden named [[Blackwall]], sighted in the Hinterlands near Lake Luthias. The quest completes as new options become available. |
||
| + | Return to Haven to discuss the outcome of the visit to Val Royeaux with the advisers. It is clear that with regards to alliances, you now have two options: either to approach the [[In Hushed Whispers|mages]] or the [[Champions of the Just|templars]]. The war table operation [[The Cult of Andraste]] unlocks at this point. |
||
| + | Before you can get away Leliana approaches you and reveals that her spies have located a [[Grey Warden]] in the Hinterlands, going by the name [[Blackwall]]. She asks that you attempt to contact the Warden, which unlocks the companion quest [[The Lone Warden]] and the codex entry [[codex entry: The Grey Wardens (Inquisition)|The Grey Wardens]]. Another companion quest, [[The Captain of the Chargers]], is given, which rounds off all the available companion recruitments up to this point. Finally, the codex entry [[codex entry: The Wrath of Heaven|The Wrath of Heaven]] is obtained as the quest ends. |
||
| − | ==Rewards== |
||
| ⚫ | |||
| − | *400 Influence for completing the quest |
||
| − | *2 Power for completing the quest |
||
| − | == |
+ | ==Rewards== |
| ⚫ | |||
| ⚫ | |||
| + | *40 Influence |
||
| ⚫ | |||
| + | Speaking with Corporal Vale yields |
||
| ⚫ | |||
| + | *40 Influence |
||
| ⚫ | |||
| + | *44 XP |
||
| ⚫ | |||
| + | Completing the quest yields |
||
| ⚫ | |||
| + | *1,359 XP |
||
| + | *400 Influence |
||
| + | *2 Power |
||
| + | |||
| + | ==Results== |
||
| ⚫ | |||
| ⚫ | |||
| ⚫ | |||
| ⚫ | |||
| ⚫ | |||
| ⚫ | |||
==Approval== |
==Approval== |
||
| Line 111: | Line 90: | ||
'''Cassandra: Providence. The maker sent him/her to us in our darkest hour.''' |
'''Cassandra: Providence. The maker sent him/her to us in our darkest hour.''' |
||
| − | :*Blessed be the maker. / Are you sure? |
+ | :*Blessed be the maker. / Are you sure? |
| + | :**Human Inquisitor - {{Approval3|Cassandra Approves}} |
||
| + | :**Elf, dwarf, or qunari Inquisitor - {{Approval3|Cassandra Slightly Approves}} |
||
:*You believe I'm innocent. - ''(No effect)'' |
:*You believe I'm innocent. - ''(No effect)'' |
||
:*I am not a "chosen one." - {{Approval3|Cassandra Slightly Disapproves}} |
:*I am not a "chosen one." - {{Approval3|Cassandra Slightly Disapproves}} |
||
| Line 123: | Line 104: | ||
===Rebirth of the Inquisition=== |
===Rebirth of the Inquisition=== |
||
| − | |||
''If "The Herald of Andraste?" dialogue option is chosen:''<br> |
''If "The Herald of Andraste?" dialogue option is chosen:''<br> |
||
'''Cullen: How do you feel about that?''' |
'''Cullen: How do you feel about that?''' |
||
| − | + | *It's unnerving. - ''(No effect)'' |
|
| − | + | *They're wrong. - {{Approval3|Cassandra Disapproves}} |
|
| − | + | *I like it. |
|
| + | **Human Inquisitor - {{Approval3|Cassandra Approves}} |
||
| ⚫ | |||
| + | **Elf, dwarf, or qunari Inquisitor - ''(No effect)'' |
||
| ⚫ | |||
===After Val Royeaux=== |
===After Val Royeaux=== |
||
| Line 137: | Line 119: | ||
:*You must choose soon - {{Approval3|Cassandra Approves}} |
:*You must choose soon - {{Approval3|Cassandra Approves}} |
||
| − | == |
+ | ==Codex entries== |
| − | {{: |
+ | {{:Codex entry: The First Inquisition|style=iconmini}}<br> |
| + | ''Return to the chantry''<br> |
||
| ⚫ | |||
| ⚫ | |||
| ⚫ | |||
| ⚫ | |||
| ⚫ | |||
| ⚫ | |||
| ⚫ | |||
| − | |||
| − | == Codex Entries == |
||
| ⚫ | |||
| ⚫ | |||
| ⚫ | |||
| ⚫ | |||
| ⚫ | |||
| ⚫ | |||
| − | {{:Codex entry: The Children of Andraste|style=iconmini}}<br> |
||
| − | {{:Codex entry: The Maker|style=iconmini}}<br> |
||
| − | {{:Codex entry: Founding of the Chantry|style=iconmini}}<br> |
||
| − | {{:Codex entry: Chantry Hierarchy|style=iconmini}}<br> |
||
| ⚫ | |||
{{:Codex entry: Cullen|style=iconmini}}<br> |
{{:Codex entry: Cullen|style=iconmini}}<br> |
||
| ⚫ | |||
{{:Codex entry: Josephine Montilyet|style=iconmini}}<br> |
{{:Codex entry: Josephine Montilyet|style=iconmini}}<br> |
||
{{:Codex entry: Leliana (Inquisition)|style=iconmini}}<br> |
{{:Codex entry: Leliana (Inquisition)|style=iconmini}}<br> |
||
{{:Codex entry: Rebel Mages|style=iconmini}}<br> |
{{:Codex entry: Rebel Mages|style=iconmini}}<br> |
||
| − | {{:Codex entry: The Hinterlands|style=iconmini}}<br> |
||
{{:Codex entry: The Templar Order: End of an Accord|style=iconmini}}<br> |
{{:Codex entry: The Templar Order: End of an Accord|style=iconmini}}<br> |
||
| − | {{:Codex entry: The Templar Order: Traditional Role|style= |
+ | {{:Codex entry: The Templar Order: Traditional Role|style=iconminiDAI}}<br> |
{{:Codex entry: War Table|style=iconmini}}<br> |
{{:Codex entry: War Table|style=iconmini}}<br> |
||
{{:Codex entry: World Travel|style=iconmini}}<br> |
{{:Codex entry: World Travel|style=iconmini}}<br> |
||
| ⚫ | |||
| ⚫ | |||
| ⚫ | |||
| ⚫ | |||
| ⚫ | |||
| ⚫ | |||
| ⚫ | |||
| + | ''Val Royeaux''<br> |
||
| ⚫ | |||
| ⚫ | |||
| ⚫ | |||
| ⚫ | |||
| + | ''At the end of the quest''<br> |
||
| ⚫ | |||
| ⚫ | |||
| + | |||
| + | {{DEFAULTSORT:Threat Remains, The}} |
||
[[pl:Nieustające zagrożenie]] |
[[pl:Nieustające zagrożenie]] |
||
[[Category:Dragon Age: Inquisition quests]] |
[[Category:Dragon Age: Inquisition quests]] |
||
Revision as of 00:02, 7 January 2019
The Threat Remains is a main quest in Dragon Age: Inquisition. It chronicles the rebirth of the Inquisition and the initial reforging of alliances to face the Inquisition's enemies and restore order in Thedas.
The Breach is calmed but the trouble is only beginning.
Acquisition
This quest is automatically triggered after The Wrath of Heaven is completed. You awaken in a room in Haven, where a young elven girl bringing medical supplies will walk in. After apologizing profusely she will explain that Cassandra wanted to be made aware of when the Inquisitor woke up and will immediately run off.
The house is almost bare of anything noteworthy, bar a note with some details about your recovery after sealing the Breach. If the Flames of the Inquisition DLC has been installed, there is a box of 'special deliveries' containing a class specific weapon and armor 'of the Dragon'.
Walkthrough
Meet Cassandra in the chantry
When you leave the house you are greeted by an honor guard that leads towards the chantry. It is possible to explore most of Haven at this point, but it is advisable to wait until after you have met Cassandra when the crowds will have dispersed and the whole area is available to explore.
Proceed to the chantry where you will hear Cassandra along with Leliana arguing with Grand Chancellor Roderick. You can have your say in the argument but after more arguing with Roderick, Cassandra, acting on Divine Justinia's final orders, declares the Inquisition reborn. Codex entry: The First Inquisition is unlocked.
Rebirth of the Inquisition
The Inquisition is reborn - the charter nailed on the door of Haven Chantry
After a cutscene you are placed outside the chantry and obtain the quest Haven's Best and Brightest. It is now possible to explore all of Haven, speak to the npc's and complete several tutorial-type side quests there.
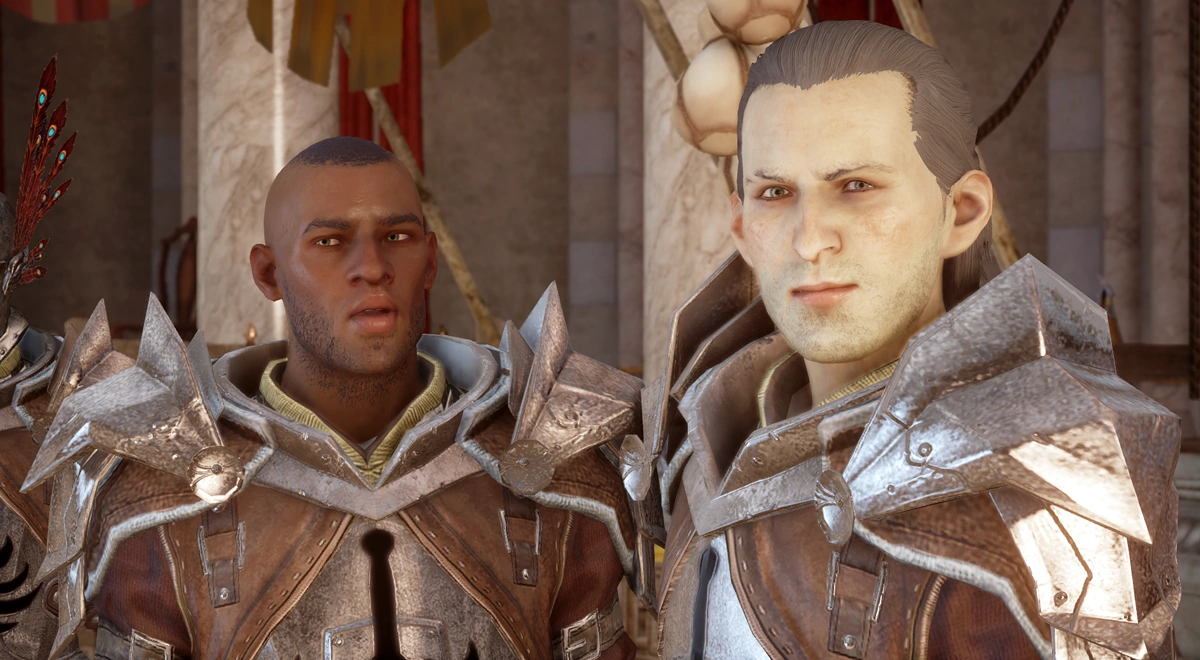
To proceed with the main quest, re-enter the chantry. In the following cutscene Cassandra introduces you to the three advisors: Cullen, commander of the Inquisition's Forces, Josephine, its ambassador and overseer of Connections, and Leliana, the spymaster and purveyor of Secrets. When discussing the next objectives for the Inquisition, you are given a quick tutorial of how to use the war table with the operation to Scout the Hinterlands. You are given the option of traveling immediately to the Hinterlands and following up on the quests there or exiting back to Haven. Leliana suggests visiting Mother Giselle, a Mother of the Chantry operating in the Hinterlands near Redcliffe, to begin laying the groundwork for approaching the remaining members of the Chantry.
Additionally, you are given a number of quests aimed towards gaining allies, agents, power and influence - Lost Souls and Vigilance on the Coast, the war table operations Hard in Hightown 3: Varric's Revenge, Address a Nobleman's Concerns, The Teyrn of Highever, Scout the Storm Coast, Deal with Relatives of the Trevelyans (human Herald only), Contact Clan Lavellan (elf Herald only), The Carta Gets Its Cut (dwarf Herald only), Contact with the Valo-Kas Mercenaries (Qunari Herald only), Gather Coin (Haven), Rescue Soldiers Missing in Ferelden and Investigate Serault if you have completed Dragon Age: The Last Court. Numerous codex entries are unlocked (see the list below).
The Hinterlands
Arriving at the camp, Chief Scout Lace Harding will brief the Inquisitor on Mother Giselle, as well as Dennet, Redcliffe's old horsemaster.
Following the path down the hill from the camp, you will have to clear the area of the two warring factions, the mages and the templars. Once the crossroads are cleared you will have acquired several codexes (see the list below). Next, Mother Giselle will talk to you and suggest that you visit Val Royeaux. Following this conversation, you must speak with Corporal Vale and aid him in securing the crossroads. Fully speaking to him will give you markers towards the quests Hunger Pangs, In the Elements, and Shallow Breaths, as well as a tutorial on Power and its related codex entry: The Inquisition. The Inquisitor can then proceed to the refugee hunter to obtain Hunger Pangs and to Whittle to get In The Elements.
To progress the quest from this point, you require 4 Power which can be earned in ways as described in the codex — seal Fade rifts, complete quests and establish camps in the Hinterlands.
Val Royeaux
Lord Seeker Lucius and Ser Barris confront the Inquisition.
Once you have the required power travel back to Haven. Outside the chantry is an angry mob, they are harassing some mages and blaming them for causing the Breach. Cullen intercedes and tells the mob to get back to work. Talk to Cullen and High Chancellor Roderick about the situation, then head on into the war room to unlock Val Royeaux.
Travel to Val Royeaux and speak to the Inquisition scout who informs you that the templars are waiting for you, then continue on to the main square of the Summer Bazaar and approach Revered Mother Hevara. Lord Seeker Lucius appears, taunting the Chantry and the Inquisition. He dismisses any idea of allying with the Inquisition against the Breach and withdraws all Templar forces from Val Royeaux, leaving it defenseless. The war table operation The Chantry Remains becomes available at this point.
Taking a few steps when you have control again will result in an arrow being fired into the ground from a hidden source. Investigating the arrow unlocks the companion quest A Friend of Red Jenny. On the other side of the square by the exit is a messenger, who gives you an invitation that unlocks the companion quest The Imperial Enchanter.
Important: If you are attempting to recruit all possible agents, Belle is available beside the stage. She will disappear if you leave without talking to her.
When you exit the city, you'll be met by the rebel mage leader Grand Enchanter Fiona who invites you to Redcliffe Castle. The visit to Val Royeaux unlocks several codex entries, see the list below.
Back in Haven
Return to Haven to discuss the outcome of the visit to Val Royeaux with the advisers. It is clear that with regards to alliances, you now have two options: either to approach the mages or the templars. The war table operation The Cult of Andraste unlocks at this point.
Before you can get away Leliana approaches you and reveals that her spies have located a Grey Warden in the Hinterlands, going by the name Blackwall. She asks that you attempt to contact the Warden, which unlocks the companion quest The Lone Warden and the codex entry The Grey Wardens. Another companion quest, The Captain of the Chargers, is given, which rounds off all the available companion recruitments up to this point. Finally, the codex entry The Wrath of Heaven is obtained as the quest ends.
Rewards
At the end of the prologue you receive
- 40 Influence
Speaking with Corporal Vale yields
- 40 Influence
- 44 XP
Completing the quest yields
- 1,359 XP
- 400 Influence
- 2 Power
Results
- The new Inquisition is formed to close the Breach
- Mother Giselle joins the Inquisition
- The templars withdraw from Val Royeaux and garrison in Therinfal Redoubt
- The mages approach the Inquisition, inviting them to come to Redcliffe
- The Hinterlands and Val Royeaux become available for exploration
- Access to the recruitment quests for Sera, Vivienne, Blackwall, and Iron Bull
Approval
Three Days Later
Cassandra: The breach is stable, but it is still a threat. I will not ignore it.
- I did what I could. -
 Cassandra Slightly Approves
 - I'm still a suspect? - (No effect)
- You want my help. Again. - (No effect)
- I did what I could. -
Cassandra: Providence. The maker sent him/her to us in our darkest hour.
- Blessed be the maker. / Are you sure?
- Human Inquisitor -
 Cassandra Approves
 - Elf, dwarf, or qunari Inquisitor - Cassandra Slightly Approves
- Human Inquisitor -
- You believe I'm innocent. - (No effect)
- I am not a "chosen one." - Cassandra Slightly Disapproves
- What more do you want? - (No effect)
- Are you serious? - Cassandra Slightly Disapproves
- Blessed be the maker. / Are you sure?
Cassandra: We must act now. With you at our side.
- I want to help. - Cassandra Slightly Approves
- This is rather strange. - (No effect)
- I agree. For now. - (No effect)
- I want to help. -
Rebirth of the Inquisition
If "The Herald of Andraste?" dialogue option is chosen:
Cullen: How do you feel about that?
- It's unnerving. - (No effect)
- They're wrong. - Cassandra Disapproves
- I like it.
- Human Inquisitor - Cassandra Approves
- Elf, dwarf, or qunari Inquisitor - (No effect)
- Human Inquisitor -
- I don't know. - (No effect)
After Val Royeaux
Cullen: You think the mage rebellion is more united? It could be ten times worse!
- We should meet the mages. - Cassandra Slightly Disapproves
- We should find the templars - Cassandra Slightly Approves
- You must choose soon - Cassandra Approves
- We should meet the mages. -
Codex entries
![]() Codex entry: The First Inquisition
Codex entry: The First Inquisition
Return to the chantry
![]() Codex entry: Cullen
Codex entry: Cullen
![]() Codex entry: The Hinterlands
Codex entry: The Hinterlands
![]() Codex entry: Josephine Montilyet
Codex entry: Josephine Montilyet
![]() Codex entry: Leliana
Codex entry: Leliana
![]() Codex entry: Rebel Mages
Codex entry: Rebel Mages
![]() Codex entry: The Templar Order: End of an Accord
Codex entry: The Templar Order: End of an Accord
![]() Codex entry: Templars
Codex entry: Templars
![]() Codex entry: War Table
Codex entry: War Table
![]() Codex entry: World Travel
Codex entry: World Travel
Hinterlands
![]() Codex entry: Archers
Codex entry: Archers
![]() Codex entry: Ferelden After the Blight
Codex entry: Ferelden After the Blight
![]() Codex entry: Foot Soldier
Codex entry: Foot Soldier
![]() Codex entry: Guardsman
Codex entry: Guardsman
![]() Codex entry: Spellbinder
Codex entry: Spellbinder
![]() Codex entry: The Inquisition
Codex entry: The Inquisition
Val Royeaux
![]() Codex entry: Val Royeaux
Codex entry: Val Royeaux
![]() Codex entry: Lord Seeker Lucius Corin
Codex entry: Lord Seeker Lucius Corin
![]() Codex entry: Grand Enchanter Fiona
Codex entry: Grand Enchanter Fiona
![]() Codex entry: The Summer Bazaar
Codex entry: The Summer Bazaar
At the end of the quest
![]() Codex entry: The Grey Wardens
Codex entry: The Grey Wardens
![]() Codex entry: The Wrath of Heaven
Codex entry: The Wrath of Heaven