(→The Spirit of Rage: 2nd wisp xp tip now listed before it's too late to do it in the guide :p) |
mNo edit summary |
||
| (28 intermediate revisions by 20 users not shown) | |||
| Line 1: | Line 1: | ||
<onlyinclude>{{QuestTransformer |
<onlyinclude>{{QuestTransformer |
||
| − | |style={{{style|}}} |
+ | |style = {{{style|}}} |
| − | |name = [[The Harrowing (quest)|The Harrowing]] |
+ | |name = [[The Harrowing (quest)|The Harrowing]] |
| − | |caption = A mage apprentice prepares to enter the Fade |
||
|qcat = Origin story |
|qcat = Origin story |
||
| − | |start = New game with [[Mage]] class |
+ | |start = New game with [[Mage (Origins)|Mage]] class |
| − | |end = Defeat demon |
+ | |end = Defeat demon |
| − | |prereqs = None |
+ | |prereqs = None |
| − | |image = Harrowing.jpg |
+ | |image = Harrowing.jpg |
| − | |px = 270px |
+ | |px = 270px |
| − | |location = [[Magi Origin]] |
+ | |location = [[Magi Origin]] |
| + | |next = [[A Mage of the Circle]] |
||
| ⚫ | |||
| − | | |
+ | |appearances = [[Dragon Age: Origins]] |
| − | |related = '''[[Mage Origin|Mage origin: In the High Tower of the Mages]]'''<br>-[[The Harrowing (quest)]]<br>-[[A Mage of the Circle]]<br>-[[Bound in Blood and Magic]]<br>-[[Infested Storerooms]] |
||
| − | |appearances= [[Dragon Age: Origins]] |
||
}}</onlyinclude> |
}}</onlyinclude> |
||
{{For|information on the rite|The Harrowing}} |
{{For|information on the rite|The Harrowing}} |
||
| − | '''The Harrowing''' is the first sub-quest of the [[Magi Origin]] story |
+ | '''The Harrowing''' is the first sub-quest of the [[Magi Origin]] story ''In the High Tower of the Mages''. A cinematic starts immediately after the character generation, at the end of which you touch the [[lyrium]] and go into the [[Fade]]. |
| − | ==Walkthrough== |
+ | == Walkthrough == |
| − | ===Enter The Fade=== |
+ | === Enter The Fade === |
[[File:AreaMap_TheHarrowing.jpg|thumb|270px|The Fade: you will start in the area at the top right of the map.]] |
[[File:AreaMap_TheHarrowing.jpg|thumb|270px|The Fade: you will start in the area at the top right of the map.]] |
||
{{Note|Creatures in the Fade do not drop loot, and you cannot take items from the Fade back to the material world. This includes Valor's Staff.}} |
{{Note|Creatures in the Fade do not drop loot, and you cannot take items from the Fade back to the material world. This includes Valor's Staff.}} |
||
| − | You will start at the top right ( |
+ | You will start at the top right (northeast) of the map. To your left, you can find a {{TextContainer|Vase of Healing}} containing [[Shimmering Orb of Light|Shimmering Orbs of Light]]. These can be used to heal yourself whilst in the Fade but will vanish from your inventory once you complete your Harrowing, so don't be afraid to use them. ({{Platforms|ps3}} and {{Platforms|xbox360}}: instead of Orbs there are [[Health Poultice]]s in the Vase; if unused these '''will''' stay in your inventory after you leave the Fade.) Next to the Vase is a Disturbing Statue which will unlock [[Codex entry: Beyond the Veil: Spirits and Demons]]. Progress through the Fade to find a few [[Wisp wraith]]s that attack with lightning. Fortunately they come at you one at a time, and shouldn't require much more than an [[Arcane Bolt]] to kill. |
| − | ===Mouse=== |
+ | === Mouse === |
| − | Along the way, you will meet what appears to be a talking rat, who will introduce himself as [[Mouse]] ( |
+ | Along the way, you will meet what appears to be a talking rat, who will introduce himself as [[Mouse]] (he may explain that he's been in the Fade too long to remember his real name). Mouse tells you he was once an apprentice like you, but that he was murdered by the Templars for failing to complete his Harrowing. He will explain a bit about the Fade and your test, and warn you about other spirits in the area. Further down the path is an open area to the right. Mouse will explain that this is where the demon you are to face will manifest. The Lyrium Vein seen here (which unlocks [[Codex entry: Lyrium (Origins)|Codex entry: Lyrium]]) can be used to recover Mana during combat (and will replenish itself later if used now). |
| − | ===Spirit of Valor=== |
+ | === Spirit of Valor === |
| − | + | To prepare further for the battle, proceed westwards. The path will open up again. Up a slope to your right are another {{TextContainer|vase}} of [[Shimmering Orb of Light|orbs]] and a Twisted Structure (which unlocks [[Codex entry: The Black City]]). To the left is [[Spirit of Valor|Valor]], who may reveal during conversation that he can create weapons with his will alone. If you ask him for a weapon, Valor will challenge you to a duel. To obtain [[Valor's Staff]], you can take him up on this challenge and win the duel. (After winning you can attack and kill him for XP.) Alternatively, you may accuse him of plotting to kill you, then demand he prove his good intentions by helping you. Equip your new staff and progress onwards, and fight a few spirit [[wolf|wolves]]. |
|
| − | {{Note|After |
+ | {{Note|After dealing with the Spirit of Valor, if you travel back to where the Harrowing began, you can fight several more wisps, which are more powerful than those you originally faced and offer more XP.}} |
| − | ===Sloth=== |
+ | === Sloth === |
| − | At the far west of the area, you will meet a [[Sloth |
+ | At the far west of the area, you will fight 3 Spirit Wolves and [further on] meet a [[Sloth demon]] in the shape of a [[bereskarn]]. There are three ways he will agree to teach Mouse to take on his form. You can defeat him in combat or answer his riddles; if one riddle is answered incorrectly, you'll have to fight him. The answers to his riddles are, in order, "a map", "my tongue" and "a dream". Alternatively, if you have 30 [[cunning]] (which is not possible without cheating), you can tell him you would pester him endlessly until he gives in. After you defeat Sloth one way or another, he will teach Mouse to turn into a [[bear]] (though not a bereskarn) and then resume his "rest". Mouse will now join the party as a companion. If you've not done so already, you may have more of a discussion about the Fade and Mouse's memories. |
| − | ===The Spirit of Rage=== |
+ | === The Spirit of Rage === |
| − | {{Note|Before entering the circle and facing the demon, if you travel back to the beginning of the Fade, you can fight several more wisps that are more powerful than those you originally faced and offer |
+ | {{Note|Before entering the circle and facing the demon, if you travel back to the beginning of the Fade, you can fight several more wisps that are more powerful than those you originally faced and offer 82 XP, instead of 27 XP. You can do this again even if you did it after meeting Valor. Both of these extra side-fights are worth it for the very easy XP.}} |
| − | Now your preparations are complete |
+ | Now your preparations are complete; double back toward the middle of the map. More spirit wolves will attack you - but now you have Mouse in bear form on your side. The [[Rage Demon|Spirit of Rage]] now appears in the central area you passed earlier. After some dialogue, battle will ensue. Four Wisp Wraiths will join the fight. You can ignore these and focus on the Spirit of Rage, because once it is defeated the battle will cease. However, it is advisable to take them out for easy XP; usually, Mouse will distract the rage demon while you are attacking the wisps. |
| − | If you have it, [[Winter's Grasp]] is very effective against the fiery Spirit of Rage; conversely [[Flame Blast]] won't help you here. If your mana gets low, remember to use the Lyrium Vein, if you haven't already done so. If not, then Mouse in his bear form should be able to occupy the Spirit of Rage |
+ | If you have it, [[Winter's Grasp (Origins)|Winter's Grasp]] is very effective against the fiery Spirit of Rage; conversely [[Flame Blast]] won't help you here. If your mana gets low, remember to use the Lyrium Vein, if you haven't already done so. If not, then Mouse in his bear form should be able to occupy the Spirit of Rage while you cast spells or use your staff from afar. Don't forget the healing Shimmering Orbs of Light, which will shortly become useless for anything else, and which Mouse can also use. |
| − | ===Completing the test=== |
+ | === Completing the test === |
| − | Once the Spirit of Rage has been defeated, Mouse will want to discuss a proposal ... but it swiftly becomes clear that Mouse isn't the timid little individual he pretended to be. Once you make clear you see through Mouse's ruse, he will shift into his true form (though this is not clearly shown on screen due to camera angle, its implied size and a fair bit of Mouse's dialogue suggest he is really a [[Pride Demon]]). |
+ | Once the Spirit of Rage has been defeated, Mouse will want to discuss a proposal ... but it swiftly becomes clear that Mouse isn't the timid little individual he pretended to be. Once you make clear you see through Mouse's ruse, he will shift into his true form (though this is not clearly shown on screen due to camera angle, its implied size and a fair bit of Mouse's dialogue suggest he is really a [[Pride Demon]]). Resisting Mouse, it turns out, was the real test, which you have now passed. |
| + | If Mouse dies during the fight against the Spirit of Rage, the dialogue with Mouse still happens but you do not fight the Pride Demon after the cut scene. |
||
| ⚫ | |||
| ⚫ | |||
| − | == Codex Entries == |
||
| + | |||
| ⚫ | |||
{{:Codex entry: First Enchanter Irving|style=iconmini}}{{clrl}} |
{{:Codex entry: First Enchanter Irving|style=iconmini}}{{clrl}} |
||
{{:Codex entry: Knight-Commander Greagoir|style=iconmini}}{{clrl}} |
{{:Codex entry: Knight-Commander Greagoir|style=iconmini}}{{clrl}} |
||
| Line 57: | Line 56: | ||
{{:Codex entry: Sloth Demon|style=iconmini}}{{clrl}} |
{{:Codex entry: Sloth Demon|style=iconmini}}{{clrl}} |
||
{{:Codex entry: Rage Demon|style=iconmini}}{{clrl}} |
{{:Codex entry: Rage Demon|style=iconmini}}{{clrl}} |
||
| − | {{:Codex entry: Lyrium|style=iconmini}}{{clrl}} |
+ | {{:Codex entry: Lyrium (Origins)|style=iconmini}}{{clrl}} |
{{:Codex entry: The Black City|style=iconmini}}{{clrl}} |
{{:Codex entry: The Black City|style=iconmini}}{{clrl}} |
||
* Depending on what actions are taken, various [[Codex: Controls|Controls codex entries]] |
* Depending on what actions are taken, various [[Codex: Controls|Controls codex entries]] |
||
| − | ==Result== |
+ | == Result == |
You wake up in bed the next morning, to find [[Jowan]] hovering over you. You can now become [[A Mage of the Circle]]. |
You wake up in bed the next morning, to find [[Jowan]] hovering over you. You can now become [[A Mage of the Circle]]. |
||
== Gallery == |
== Gallery == |
||
<gallery style="text-align:center;" widths="170px"> |
<gallery style="text-align:center;" widths="170px"> |
||
| − | Harrowing2.jpg|"Your magic is a gift, but it's also a curse." ( |
+ | Harrowing2.jpg|"Your magic is a gift, but it's also a curse." (Knight-Commander [[Greagoir]]) |
NPC-CullenWitnessesTheHarrowing.png|[[Cullen]] and another Templar witness The Warden's Harrowing |
NPC-CullenWitnessesTheHarrowing.png|[[Cullen]] and another Templar witness The Warden's Harrowing |
||
Object-LyriumPodium.png|[[Mage]]s can use [[lyrium]] to enter the [[Fade]], the realm of dreams and spirits |
Object-LyriumPodium.png|[[Mage]]s can use [[lyrium]] to enter the [[Fade]], the realm of dreams and spirits |
||
| Line 74: | Line 73: | ||
Creature-SpiritOfValor.png|A Spirit of Valor can aid The Warden by giving them [[Valor's Staff]] |
Creature-SpiritOfValor.png|A Spirit of Valor can aid The Warden by giving them [[Valor's Staff]] |
||
Creature SlothBereskarn.jpg|Meeting a spirit called [[Sloth Demon|Sloth]] in the Fade |
Creature SlothBereskarn.jpg|Meeting a spirit called [[Sloth Demon|Sloth]] in the Fade |
||
| − | Creature-RageDemon.png|The main opponent of The Warden during their Harrowing appears to be a [[Rage |
+ | Creature-RageDemon.png|The main opponent of The Warden during their Harrowing appears to be a [[Rage demon]] |
</gallery> |
</gallery> |
||
| − | |||
{{DEFAULTSORT:Harrowing (quest)}} |
{{DEFAULTSORT:Harrowing (quest)}} |
||
Revision as of 06:51, 20 January 2019
- For information on the rite, see The Harrowing.
The Harrowing is the first sub-quest of the Magi Origin story In the High Tower of the Mages. A cinematic starts immediately after the character generation, at the end of which you touch the lyrium and go into the Fade.
Walkthrough
Enter The Fade

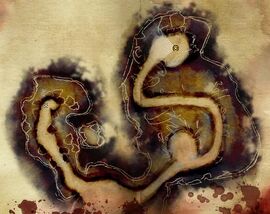
The Fade: you will start in the area at the top right of the map.
You will start at the top right (northeast) of the map. To your left, you can find a Vase of Healing containing Shimmering Orbs of Light. These can be used to heal yourself whilst in the Fade but will vanish from your inventory once you complete your Harrowing, so don't be afraid to use them. (![]() and
and ![]() : instead of Orbs there are Health Poultices in the Vase; if unused these will stay in your inventory after you leave the Fade.) Next to the Vase is a Disturbing Statue which will unlock Codex entry: Beyond the Veil: Spirits and Demons. Progress through the Fade to find a few Wisp wraiths that attack with lightning. Fortunately they come at you one at a time, and shouldn't require much more than an Arcane Bolt to kill.
: instead of Orbs there are Health Poultices in the Vase; if unused these will stay in your inventory after you leave the Fade.) Next to the Vase is a Disturbing Statue which will unlock Codex entry: Beyond the Veil: Spirits and Demons. Progress through the Fade to find a few Wisp wraiths that attack with lightning. Fortunately they come at you one at a time, and shouldn't require much more than an Arcane Bolt to kill.
Mouse
Along the way, you will meet what appears to be a talking rat, who will introduce himself as Mouse (he may explain that he's been in the Fade too long to remember his real name). Mouse tells you he was once an apprentice like you, but that he was murdered by the Templars for failing to complete his Harrowing. He will explain a bit about the Fade and your test, and warn you about other spirits in the area. Further down the path is an open area to the right. Mouse will explain that this is where the demon you are to face will manifest. The Lyrium Vein seen here (which unlocks Codex entry: Lyrium) can be used to recover Mana during combat (and will replenish itself later if used now).
Spirit of Valor
To prepare further for the battle, proceed westwards. The path will open up again. Up a slope to your right are another vase of orbs and a Twisted Structure (which unlocks Codex entry: The Black City). To the left is Valor, who may reveal during conversation that he can create weapons with his will alone. If you ask him for a weapon, Valor will challenge you to a duel. To obtain Valor's Staff, you can take him up on this challenge and win the duel. (After winning you can attack and kill him for XP.) Alternatively, you may accuse him of plotting to kill you, then demand he prove his good intentions by helping you. Equip your new staff and progress onwards, and fight a few spirit wolves.
Sloth
At the far west of the area, you will fight 3 Spirit Wolves and [further on] meet a Sloth demon in the shape of a bereskarn. There are three ways he will agree to teach Mouse to take on his form. You can defeat him in combat or answer his riddles; if one riddle is answered incorrectly, you'll have to fight him. The answers to his riddles are, in order, "a map", "my tongue" and "a dream". Alternatively, if you have 30 cunning (which is not possible without cheating), you can tell him you would pester him endlessly until he gives in. After you defeat Sloth one way or another, he will teach Mouse to turn into a bear (though not a bereskarn) and then resume his "rest". Mouse will now join the party as a companion. If you've not done so already, you may have more of a discussion about the Fade and Mouse's memories.
The Spirit of Rage
Now your preparations are complete; double back toward the middle of the map. More spirit wolves will attack you - but now you have Mouse in bear form on your side. The Spirit of Rage now appears in the central area you passed earlier. After some dialogue, battle will ensue. Four Wisp Wraiths will join the fight. You can ignore these and focus on the Spirit of Rage, because once it is defeated the battle will cease. However, it is advisable to take them out for easy XP; usually, Mouse will distract the rage demon while you are attacking the wisps.
If you have it, Winter's Grasp is very effective against the fiery Spirit of Rage; conversely Flame Blast won't help you here. If your mana gets low, remember to use the Lyrium Vein, if you haven't already done so. If not, then Mouse in his bear form should be able to occupy the Spirit of Rage while you cast spells or use your staff from afar. Don't forget the healing Shimmering Orbs of Light, which will shortly become useless for anything else, and which Mouse can also use.
Completing the test
Once the Spirit of Rage has been defeated, Mouse will want to discuss a proposal ... but it swiftly becomes clear that Mouse isn't the timid little individual he pretended to be. Once you make clear you see through Mouse's ruse, he will shift into his true form (though this is not clearly shown on screen due to camera angle, its implied size and a fair bit of Mouse's dialogue suggest he is really a Pride Demon). Resisting Mouse, it turns out, was the real test, which you have now passed.
If Mouse dies during the fight against the Spirit of Rage, the dialogue with Mouse still happens but you do not fight the Pride Demon after the cut scene.
Codex entries
![]() Codex entry: First Enchanter Irving
Codex entry: First Enchanter Irving
![]() Codex entry: Knight-Commander Greagoir
Codex entry: Knight-Commander Greagoir
![]() Codex entry: Beyond the Veil: Spirits and Demons
Codex entry: Beyond the Veil: Spirits and Demons
- Depending on what actions are taken, various Controls codex entries
Result
You wake up in bed the next morning, to find Jowan hovering over you. You can now become A Mage of the Circle.
Gallery
")
")
")
")
")
")
")
")
")