No edit summary |
(brief, partial cleanup by yeti magi) |
||
| Line 15: | Line 15: | ||
==Walkthrough== |
==Walkthrough== |
||
| − | When you enter the town you will be attacked by Darkspawn. There aren't many and the area is fairly small, with the golem easily noticeable in a circle of stones. After killing all the Darkspawn, head to the golem and try the command phrase the merchant told you. It will not work |
+ | When you enter the town you will be attacked by Darkspawn. There aren't many and the area is fairly small, with the golem easily noticeable in a circle of stones. After killing all the Darkspawn, head to the golem and try the command phrase the merchant told you. It will not work; an update suggests seeking out the previous owner. A villager's corpse near the golem holds a key; this unlocks 'Olaf's chest' on the porch at the end of this area's other path), which contains Olaf's [[Olaf's Cheese Knife|dagger]]. |
| ⚫ | After exploring the village, enter [[Wilhelm's Cellar]]. What was most recently the library level (now a terrible mess) has some Hurlocks and Genlocks to dispatch; the next, bigger room below that area has more of the same, including a Genlock Emissary and Hurlock Alpha. They have been focused on what seems to be an energy barrier; once the darkspawn are defeated you may talk to the refugees behind it. [[Matthias]] can explain that his father Wilhelm was a mage as well as the previous owner of the golem, [[Shale]]. Wilhelm's wife , and as a result she sold the control rod. If you have already tried to activate Shale, you will learn that the activation words that Wilhelm's wife provided were wrong. Matthias will agree to give you the correct words-provided you rescue his daughter Amalia, who wandered deeper into the cellar (which used to be Wilhelm's lab). The (Intimidate) option goes nowhere - he won't deal with someone who won't go after his daughter. |
||
| − | There will be a villager's corpse near the golem that holds a key. This key will unlock Olaf's chest and give you [[Olaf's Cheese Knife]]. |
||
| + | Further into the cellar, [[Lesser Shade]]s and an [[Ash Wraith]] will ambush you; The wraith drops the [[Harvest Festival Ring]]. |
||
| ⚫ | After |
||
| ⚫ | Deeper into the cellar you will discover a dilemma: a [[Desire Demon]] who possessed a cat (named [[Kitty]]) was sealed in the laboratory by a magical puzzle lock. [[Amalia]], Matthias' daughter, has been charmed by the demon and will not leave without her new kitty. Kitty is magically prevented from touching the puzzle and Amalia can't work it out, so it's up to you to resolve the situation. You have several choices: |
||
| − | Further into the cellar, there is an area in which [[Lesser Shade]]s and an [[Ash Wraith]] will ambush you. The Ash Wraith drops the [[Harvest Festival Ring]]. If you use stealth with a rogue, you will cause the enemies to appear without them attacking you. After they appear, you should kill them if you wish to loot the ring. |
||
| − | |||
| ⚫ | |||
* Attempt to kill the demon immediately. Any confrontation without first releasing the seal on the doorway will cause the demon to possess Amalia, forcing you to kill them both. |
* Attempt to kill the demon immediately. Any confrontation without first releasing the seal on the doorway will cause the demon to possess Amalia, forcing you to kill them both. |
||
* Tell the demon you'll think about it and return to Matthias. You can lie and say Amalia is dead, persuade him to abandon her or let him try to save her himself. If Matthias runs into the dungeon, he will be possessed by the demon instead. |
* Tell the demon you'll think about it and return to Matthias. You can lie and say Amalia is dead, persuade him to abandon her or let him try to save her himself. If Matthias runs into the dungeon, he will be possessed by the demon instead. |
||
Revision as of 06:52, 29 September 2012
The Golem in Honnleath is a quest that introduces a new character, a golem named "Shale." After downloading and installing the DLC The Stone Prisoner, you are given a new area to go to, Sulcher's Pass. The merchant in this area will give you a control rod which is supposedly used to operate a golem; all you need to do is hold it up and say the command phrase. If you ask for more information, he will let you know that the last owner was located in the town of Honnleath, and that the town is overrun by Darkspawn.
Walkthrough
When you enter the town you will be attacked by Darkspawn. There aren't many and the area is fairly small, with the golem easily noticeable in a circle of stones. After killing all the Darkspawn, head to the golem and try the command phrase the merchant told you. It will not work; an update suggests seeking out the previous owner. A villager's corpse near the golem holds a key; this unlocks 'Olaf's chest' on the porch at the end of this area's other path), which contains Olaf's dagger.
After exploring the village, enter Wilhelm's Cellar. What was most recently the library level (now a terrible mess) has some Hurlocks and Genlocks to dispatch; the next, bigger room below that area has more of the same, including a Genlock Emissary and Hurlock Alpha. They have been focused on what seems to be an energy barrier; once the darkspawn are defeated you may talk to the refugees behind it. Matthias can explain that his father Wilhelm was a mage as well as the previous owner of the golem, Shale. Wilhelm's wife , and as a result she sold the control rod. If you have already tried to activate Shale, you will learn that the activation words that Wilhelm's wife provided were wrong. Matthias will agree to give you the correct words-provided you rescue his daughter Amalia, who wandered deeper into the cellar (which used to be Wilhelm's lab). The (Intimidate) option goes nowhere - he won't deal with someone who won't go after his daughter.
Further into the cellar, Lesser Shades and an Ash Wraith will ambush you; The wraith drops the Harvest Festival Ring.
Deeper into the cellar you will discover a dilemma: a Desire Demon who possessed a cat (named Kitty) was sealed in the laboratory by a magical puzzle lock. Amalia, Matthias' daughter, has been charmed by the demon and will not leave without her new kitty. Kitty is magically prevented from touching the puzzle and Amalia can't work it out, so it's up to you to resolve the situation. You have several choices:
- Attempt to kill the demon immediately. Any confrontation without first releasing the seal on the doorway will cause the demon to possess Amalia, forcing you to kill them both.
- Tell the demon you'll think about it and return to Matthias. You can lie and say Amalia is dead, persuade him to abandon her or let him try to save her himself. If Matthias runs into the dungeon, he will be possessed by the demon instead.
- You can compromise with Kitty, allowing the demon its freedom but without taking the girl. After solving the puzzle Kitty will attempt to betray you. You can prevent Kitty from possessing the girl, in which case Kitty will attack you while Amalia escapes. Alternatively you can make a further deal and allow Kitty to possess Amalia; this outcome is the only one that obtains the staff.
- You can lie to Kitty (if your Persuade is high enough) and tell her you are going to help her, then after you solve the puzzle, you can say "you're not going to touch the girl". Kitty will of course attack you, and Amalia escapes unpossessed.
- You can simply help Kitty and allow the demon to possess the girl.
If you make a deal to allow the demon to possess Amalia then Matthias will always be fooled by her performance. Based on your choice, you can vary the approval of your companions as well as which quest items you receive. (See Result for approval changes and items for each choice)
After the first dialog with Kitty, you will be ambushed on the wooden bridge as well as in the root room by Lesser Shades. They will always spawn, whether you make a deal with the demon, slay it or leave it.
Regardless of your choices, you will always obtain the command phrase. A ladder on the wall, in the room where you find Matthias, provides a short-cut to the surface. Once top-side, you can now activate Shale.
Items
![]() Cord of Shattered Dreams dropped/given by Kitty
Cord of Shattered Dreams dropped/given by Kitty
![]() Harvest Festival Ring dropped by Dust Wraith
Harvest Festival Ring dropped by Dust Wraith
![]() Helm of Honnleath dropped by Kitty
Helm of Honnleath dropped by Kitty
![]() Olaf's Prized Cheese Knife in Olaf's Chest
Olaf's Prized Cheese Knife in Olaf's Chest
![]() Wilhelm's Magus Staff, bribe from Kitty
Wilhelm's Magus Staff, bribe from Kitty
Codex Entries
![]() Codex entry: A Decades-Old Letter
Codex entry: A Decades-Old Letter
![]() Codex entry: A Note from the Honnleath Village Council
Codex entry: A Note from the Honnleath Village Council
![]() Codex entry: The Journal of Enchanter Wilhelm
Codex entry: The Journal of Enchanter Wilhelm
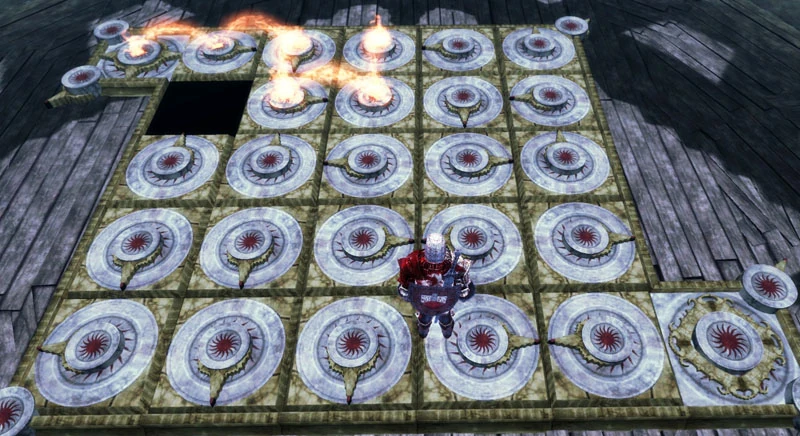
thumb|320px|right|Dragon Age; Origins - Honnleath Puzzle Solution To Free The Little Girl From Kitty
Puzzle

Starting tile positions for the puzzle
The puzzle in the room is a 5 by 5 sliding puzzle with a twist. The objective is to get the flame to travel from one corner of the board to the other by moving the tiles. Each tile has an arrow on it, pointing in the direction the flame will jump. Once the flame has reached the end tile, the seal on the door will be released and the kitty will automatically resume dialog.
From the initial board position, it is possible to solve the puzzle using the following steps.
The steps tell you which way to move a tile, not the tile to move. Therefore, left means you move the only tile that can move left, and not the tile to the left of the gap.
↑ ↑ ← ↓ → ↑ ← ↓ → ↓ ← ↑ ↑ ← ↑ ← ↓ ← ↑ → ↓ ↓ ← ↑ ↑ → ↓
Result
- Regardless of your decisions, Matthias will tell you the correct command phrase, so you can recruit Shale into the party as a companion.
- You will also receive a monetary reward, after Matthias tells you the command phrase. In most cases the reward will be 50
 , with one known exception: If you help Kitty and let her possess the girl (see "Help the Kitty" below), you will receive 1 50
Decision Dependent Results
How you decide to deal with the demon affects some loot possibilities and how your companions react:
Choices Loot Alistair Leliana Morrigan Oghren Sten Wynne Zevran Details Refuse to Negotiate Helm & Cord +100+2+4-50Refuse to deal at all with Kitty, causing the demon to possess Amalia immediately and you must kill them. Lie to Dad -50Tell Kitty you'll think about it and lie to Matthias about her death. Lie to Dad 2 Helm & Cord 0-50-50Tell Kitty you'll think about it and lie to Matthias that you didn't find her. After being possessed, say "No! I didn't mean for this to happen". Persuade Dad -3-5+400Tell Kitty you'll think about it and persuade Matthias that it is of no use. Force Dad's Help Cord -10-15+70-10+2Tell Kitty you'll think about it and force Matthias to attempt to save her. Compromise Helm & Cord +2+7-30+4+4Promise to let Kitty go without Amalia, solve the puzzle, then don't allow Kitty to possess Amalia. Compromise then Help Kitty Staff -10-15+70-3-15+4Promise to let Kitty go without Amalia, solve the puzzle, then make a deal with Kitty to possess Amalia after all. note; You get the belt after talking to her father. Help Kitty Cord & 1
-10-15+70-3-150Solve the puzzle and allow Kitty to possess Amalia. Betray Kitty Helm & Cord +2+7-30+4+4Promise to allow Kitty to possess Amalia, solve the puzzle, but go back on your word. Fail to Betray Helm 0000000Promise to allow Kitty to possess Amalia, solve the puzzle, but go back on your word and fail the persuasion check. Kitty possesses Amalia and you must kill them.
Post Activation Results
After activating Shale, you can choose whether to recruit her. If Alistair is in the party:
- Thank you for stating the completely obvious. — Alistair disapproves (-5)
- (Persuade) Think of it as a portable battering ram. — Alistair disapproves (-1)
- I could tell it to do something else... (then reaffirm the choice to recruit Shale) — Alistair disapproves (-7)
- It's coming with us. No question. — Alistair disapproves (-8)
Result Notes
- Dog, as usual, has no reaction.
- The choice-dependent loot includes the Helm of Honnleath and the Cord of Shattered Dreams, listed above as Helm and Cord.
- Some characters might react differently, if they are hardened.
- Players have not determined all possible reactions from the companions; neutral reactions are marked as 0.
- Successful persuasion requires at least 60 points of Cunning without the Coercion skill or 1 point in Coercion and 35 points of Cunning or 2 points in Coercion.
- Alistair is a little bothered if you ask Shale to attack him as your first command. You get -1 approval from Alistair.
- Oghren has no specific reactions to Golems though he likes the idea of having a Golem fighting aside him. You get +2 Approval from Oghren.
- If Oghren is present, you can ask Shale to dwarf toss to test the control rod.
- If Zevran is Present, you can ask Shale to give Zevran a hug, to which he seems a bit put off but no approval change.
- After deciding to take Shale with you, when you put it in your party and walk outside of the village, you'll see a short cutscene of Shale squashing a chicken.
See also
Bugs
- After defeating the Darkspawn, you may find yourself unable to speak to the villagers on the other side of the energy barrier. Your best bet is to go back to a previous save file, and do it over.