m (updating links) |
Tag: Visual edit |
||
| (46 intermediate revisions by 27 users not shown) | |||
| Line 10: | Line 10: | ||
|prereqs = [[Templar Quarters]] |
|prereqs = [[Templar Quarters]] |
||
|location = [[Circle Tower|Tower of the Circle]] |
|location = [[Circle Tower|Tower of the Circle]] |
||
| − | |previous = Part of Broken Circle |
+ | |previous = Part of [[Broken Circle]] |
|next = Continue finishing [[Broken Circle]] |
|next = Continue finishing [[Broken Circle]] |
||
|appearances = [[Dragon Age: Origins]] |
|appearances = [[Dragon Age: Origins]] |
||
}}</onlyinclude> |
}}</onlyinclude> |
||
| − | '''Lost in Dreams''' is a quest in ''[[Dragon Age: Origins]]'' and part of the [[Broken Circle]] quest line. It also calls on the use of several abilities not available to certain classes. This quest line utilizes the mechanics of [[Shapeshifter| |
+ | '''Lost in Dreams''' is a quest in ''[[Dragon Age: Origins]]'' and part of the [[Broken Circle]] quest line. It also calls on the use of several abilities not available to certain classes. This quest line utilizes the mechanics of [[Shapeshifter|shapeshifting]] and other [[Spells (Origins)|spells]], even if [[the Warden]] is not a [[Mage (Origins)|mage]]. For someone who is yet to play a mage but may do so in the future, it can be considered practice. It is possible, however, to get by with a minimal use of these abilities, as they are only strictly required for small portions of the quest. |
| − | == |
+ | == Acquisition == |
| − | This quest is initiated during the '''Broken Circle''' quest line. After fighting their way through most of the [[Circle Tower]], the party is put to sleep by an [[abomination]] of [[sloth demon|sloth]]. Their conscious selves are thus cast into the [[Fade]], a realm of dreams and |
+ | This quest is initiated during the '''Broken Circle''' quest line. After fighting their way through most of the [[Circle Tower]], the party is put to sleep by an [[abomination]] of [[sloth demon|sloth]]. Their conscious selves are thus cast into the [[Fade]], a realm of dreams and [[spirit]]s, usually consciously accessed only by mages. |
The sloth demon has actually cast the Warden and their companions into its own domain within the Fade. To escape, the Warden will have to travel throughout the domain, acquiring a set of special skills to gain access to specific areas. Ultimately, the Warden must fight a set of mini-bosses to gain access to the Sloth Demon, then defeat it to escape the Fade. |
The sloth demon has actually cast the Warden and their companions into its own domain within the Fade. To escape, the Warden will have to travel throughout the domain, acquiring a set of special skills to gain access to specific areas. Ultimately, the Warden must fight a set of mini-bosses to gain access to the Sloth Demon, then defeat it to escape the Fade. |
||
== Companions == |
== Companions == |
||
| − | The Warden wakes up alone in the sloth demon's domain, and travels alone for the majority of this quest line. Any companions in the Warden's party at this time will also be trapped in dreams individually tailored to their fears, hopes, regrets |
+ | The Warden wakes up alone in the sloth demon's domain, and travels alone for the majority of this quest line. Any companions in the Warden's party at this time will also be trapped in dreams individually tailored to their fears, hopes, regrets. Freeing these prisoners before confronting the sloth demon will hasten its defeat, after which the party will recover control of their physical bodies whether or not they were freed from their nightmares. If you free the companions they will disappear after being freed, only reappearing during the fight with the sloth demon. In some instances, you may be [[#Bugs|forced to free]] your whole party from their nightmares. |
| − | |||
| − | If the Warden is a Rogue with the Ranger specialization, the "no companions" rule extends to the animals the Warden can summon. |
||
| − | |||
| ⚫ | |||
== Walkthrough == |
== Walkthrough == |
||
| Line 32: | Line 28: | ||
[[File:Fade Travel Map.jpg|250px|thumb|A map of the fade]] |
[[File:Fade Travel Map.jpg|250px|thumb|A map of the fade]] |
||
| − | * |
+ | *The Warden will wake up alone in the [[Fade]], a dream-like place; |
| − | * |
+ | *The Warden should travel through different areas of the Fade to gather different [[Shapeshifting (Fade)|forms]] necessary to travel through certain obstacles: |
| − | ** |
+ | **[[Shapeshifting (Fade)#Mouse|Mouse form]] gained in [[The Raw Fade (Origins)|The Raw Fade]]; |
| − | ** |
+ | **[[Shapeshifting (Fade)#Spirit|Spirit form]] gained in the [[Darkspawn Invasion]]; |
| − | ** |
+ | **[[Shapeshifting (Fade)#Burning Man|Burning Man form]] gained in the [[Burning Tower]]; |
| − | ** |
+ | **[[Shapeshifting (Fade)#Golem|Golem form]] gained in the [[Mage Asunder]]; |
| ⚫ | |||
| − | {{Note|Shape shifting may clear any sustained ability in use before the shift. Also, you must be in your original form to use some consumables such as [[Health Poultice]]s}} |
||
| + | **[[Desire demon|Yevena]] in the Raw Fade; |
||
| − | |||
| + | **[[Abomination|Slavren]] in the Mage Asunder; |
||
| ⚫ | |||
| − | ** |
+ | **[[Ogre|Uthkiel the Crusher]] in the Darkspawn Invasion; |
| − | ** |
+ | **[[Rage demon|Rhagos]] in the Burning Tower; |
| − | ** |
+ | **[[Desire demon|Vereveel]] in the [[Templar's Nightmare]]; |
| ⚫ | |||
| − | ** Rhagos in The Burning Tower; |
||
| ⚫ | |||
| − | ** [[Vereveel]] in [[Templar's Nightmare|The Templar's Nightmare]]; |
||
| ⚫ | |||
| ⚫ | |||
| + | *When you arrive in a room, North: Forwards, South: Behind you, East: To your left, West: To your right |
||
| ⚫ | |||
| ⚫ | |||
| − | {{Note|Most of the codex entries in the Fade will be new to a non-mage Warden - or a mage Warden who wasn't thorough about gathering them during |
+ | {{Note|Most of the codex entries in the Fade will be new to a non-mage Warden - or a mage Warden who wasn't thorough about gathering them during their [[Magi Origin|origin]].}} |
=== Weisshaupt === |
=== Weisshaupt === |
||
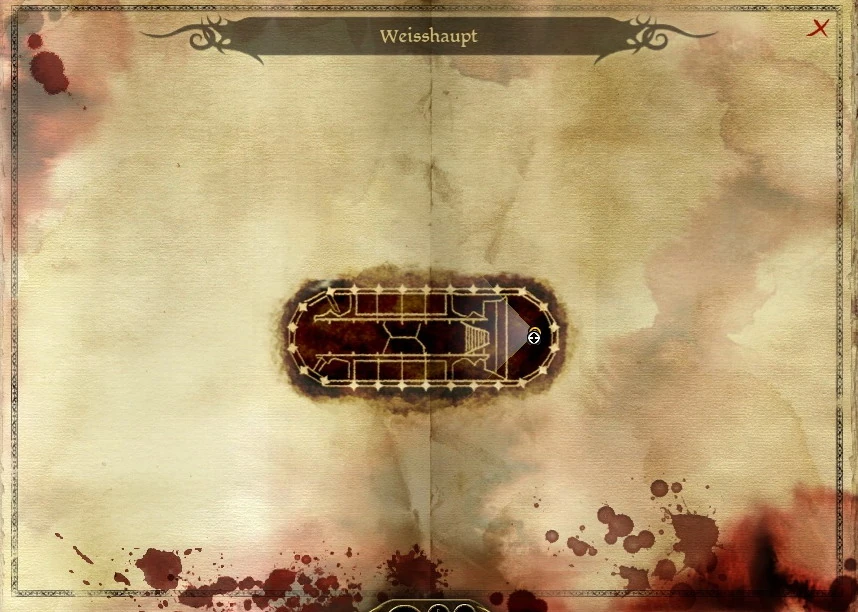
[[File:Map-Weisshaupt.jpg|thumb|280px|Weisshaupt]] |
[[File:Map-Weisshaupt.jpg|thumb|280px|Weisshaupt]] |
||
| − | {{ |
+ | {{Main|Weisshaupt (The Fade)}} |
| − | The Warden wakes up alone in the Fade |
+ | The Warden wakes up alone in the Fade within a large chamber. [[Duncan]] will greet you, explaining that he survived the [[Battle of Ostagar]]. Furthermore, the [[Blight]] was defeated and the [[Grey Wardens]] have retired to [[Weisshaupt]], recording and sharing history instead of preparing for battle. |
| − | The Warden won't fall for this story, and the conversation will eventually become a fight. Duncan will be aided by two allies, while the Warden can only count on his or her own abilities, and a [[Lyrium vein]]. |
+ | The Warden won't fall for this story, and the conversation will eventually become a fight. Duncan will be aided by two allies, while the Warden can only count on his or her own abilities, and a [[Lyrium vein]] which is inaccessible for [[Dwarf|dwarves]]. |
| − | {{Note|Dwarves cannot use Lyrium Veins.}} |
||
| − | Once the Warden has defeated the Duncan impostor and his |
+ | Once the Warden has defeated the Duncan impostor and his allies, a [[Fade Pedestal]] will appear; clicking on it will display the [[Media:Map - Fade.jpg|Travel Map]] for this portion of the Fade. |
=== The Raw Fade === |
=== The Raw Fade === |
||
[[File:Map-The Raw Fade.jpg|thumb|280px|The Raw Fade]] |
[[File:Map-The Raw Fade.jpg|thumb|280px|The Raw Fade]] |
||
| − | {{ |
+ | {{Main|The Raw Fade (Origins){{!}}The Raw Fade}} |
| − | The Warden enters this section of the Fade in the southwest corner. There is a |
+ | The Warden enters this section of the Fade in the southwest corner. There is a spirit door to your right, but you won't be able to interact with it without [[Shapeshifting (Fade)#Spirit|Spirit form]]. There is also an inactive Fade Pedestal. |
| − | Of more immediate interest, you will find [[Niall]], a mage who has been imprisoned in this realm much like the Warden. A mage Warden may remember Niall from [[ |
+ | Of more immediate interest, you will find [[Niall]], a mage who has been imprisoned in this realm much like the Warden. A mage Warden may remember Niall from their [[Magi Origin|origin]]. Niall will share his experiences in the Fade - mostly his failed attempts at escaping it. Amidst the gloom and doom, he'll hint about small passages he could not fit through. That is, in essence, your hint for the first section of this quest line: you need to travel through the areas you can reach, and gather more [[Shapeshifting (Fade)|forms]] in order to access more sections of the [[sloth demon]]'s realm. |
| − | The first form you need is the [[Shapeshifting (Fade)#Mouse|Mouse |
+ | The first form you need is the [[Shapeshifting (Fade)#Mouse|Mouse form]]. Use the fade portal behind Niall to reach the central section of the Raw Fade, which is the largest "island" on the map. While this looks like a large area, you will have access to a limited portion of it for the time being: just a few feet around the south of the island. Here you will find a [[lyrium vein]], a mouse hole, a [[mouse]], and a [[rage demon]]. |
| − | Take care of the demon first. Use the lyrium if necessary, and talk to the mouse after |
+ | Take care of the demon first. Use the lyrium if necessary, and talk to the mouse after the fight. The mouse will grant you the Mouse form. This will give you access to [[Rogue#Stealth Tree|Stealth]], but more importantly, it lets the Warden travel through the mouse holes you'll find on your way. |
| ⚫ | Turn into a mouse and travel through the mouse hole. You will find yourself in the northern corner of the same central island of the Raw Fade. Be prepared to fight more rage demons. Interact with a nearby statue to gain a codex entry. A fade portal will take you from here to the northwest island. You will pass by a shimmering spirit door on your right that you can't use yet until [[The Fade: Lost in Dreams#The Raw Fade (2)|later]], and further on another fade portal that returns you to where you met Niall. |
||
| − | {{Note|Shape shifting may clear any sustained ability in use before the shift. Also, you must be in your original form to use some consumables such as [[Health Poultice]]s}} |
||
| ⚫ | Talking to Niall once again should activate the Fade Pedestal next to him. At this point the Warden can use the pedestal to reach four more sections of the Fade, in any order. The following walkthrough is only one possible sequence, with minimal backtracking. Whether you follow this sequence or devise your own, the objectives are as mentioned above: gather all four forms, kill the five guardians around the Sloth Demon, ''optionally'' free your companions from their nightmares unless you want to take on the sloth demon alone, ''optionally'' grab all possible [[Fade: Essences and Fonts|essences and fonts]], and eventually find and face the sloth demon. |
||
| ⚫ | Turn into a mouse and travel through the |
||
| − | |||
| ⚫ | Talking to Niall once again should activate the Fade Pedestal next to him. At this point the Warden can use the pedestal to reach four more sections of the Fade, in any order. The following walkthrough is only one possible sequence, with minimal backtracking. Whether you follow this sequence or devise your own, the objectives are as mentioned above: gather all four |
||
Until you obtain all of the forms, your path will be blocked by one of these obstacles: |
Until you obtain all of the forms, your path will be blocked by one of these obstacles: |
||
| − | * |
+ | *Mouse holes require the Mouse form |
| − | * |
+ | *Spirit doors require the Spirit form |
| − | * |
+ | *Fire barriers require the Burning Man form |
| − | * |
+ | *Massive doors require the Golem form |
| − | |||
| − | {{Note|The Raw Fade section is not completed yet, but you must acquire [[Shapeshifting (Fade)#Spirit|Spirit Form]] before you can travel through the Spirit Door next to Niall and reach Yevena, one of the guardians of the Sloth Demon. See '''[[The Fade: Lost in Dreams#The Raw Fade (2)|The Raw Fade (2)]]''' below for more details.}} |
||
=== The Darkspawn Invasion === |
=== The Darkspawn Invasion === |
||
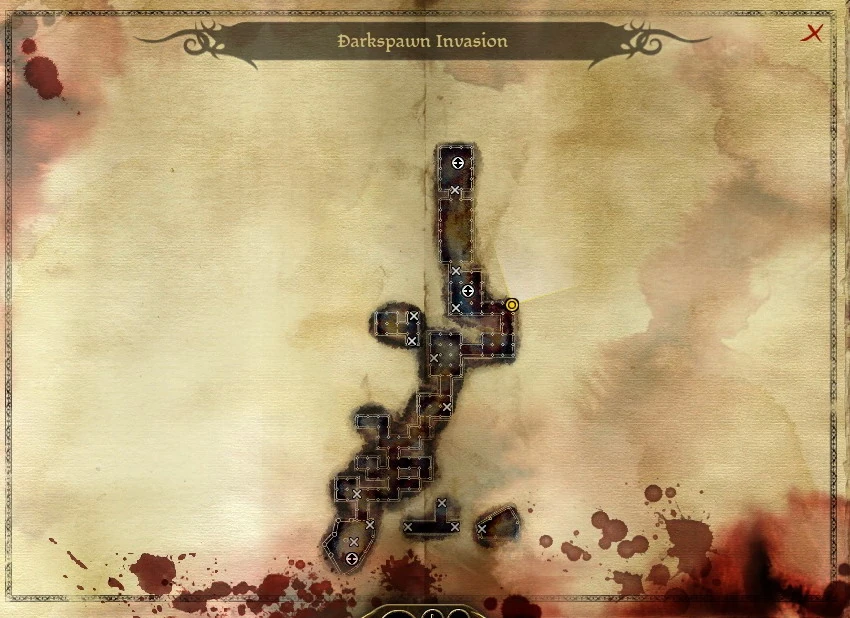
[[File:Map-Darkspawn Invasion.jpg|thumb|280px|The Darkspawn Invasion]] |
[[File:Map-Darkspawn Invasion.jpg|thumb|280px|The Darkspawn Invasion]] |
||
| − | {{ |
+ | {{Main|Darkspawn Invasion}} |
| + | |||
| ⚫ | |||
| ⚫ | Going by this walkthrough, you'll first enter this area with nothing but the [[Shapeshifting (Fade)#Mouse|Mouse form]] at your disposal. Go through the mouse hole in the northeast corner of the entrance room. This will send you to a room with two more mouse holes. Head through the mouse hole straight ahead, and right-click the Essence of Cunning to permanently gain +1 cunning. Head back to the fork and enter the second mouse hole. Here you will be attacked by some darkspawn. Dispatch them quickly, and head through the northern doors. Kill the darkspawn here, and head into the mouse hole on the west side of the room. You can enter the room on the left here and take care of the darkspawn if you wish. Either way, head through the mouse hole at the end of the hall and you'll end up in a room with pillars, a [[Templar Order|templar]] spirit and a group of darkspawn attacking him. Help the spirit of the templar and be rewarded with the [[Shapeshifting (Fade)#Spirit|Spirit form]]. Among other useful abilities, this form gives you access to all spirit doors and certain [[Fade: Essences and Fonts|essences and fonts]] which are inaccessible to all other forms. |
||
| ⚫ | |||
| ⚫ | Because the Warden is traveling alone, it is important to grasp the value of the spirit form's [[Crushing Prison (Origins)|Crushing Prison]] spell. Cast this spell on one of your enemies every time you encounter a new group of enemies. Some will die before the spell ends; others will be imprisoned for enough time to let you finish at least one other in the group. Be mindful that this spell has a long cool-down (60 seconds). |
||
| ⚫ | Going by this |
||
| ⚫ | The spirit templar also leaves behind a new Fade Pedestal. Before using it, grab the Essence of Willpower that is in the same room and requires your new Spirit form. The rest of the area is blocked by a massive door and a fire barrier; for now, use Spirit form to do a bit of backtracking and finish up the areas already visited. |
||
| ⚫ | |||
| ⚫ | The |
||
=== Weisshaupt (2) === |
=== Weisshaupt (2) === |
||
| − | Once you have the Spirit |
+ | Once you have the Spirit form, make a quick trip back to Weisshaupt, since there is an Essence of Willpower you could not interact with until now. |
=== The Raw Fade (2) === |
=== The Raw Fade (2) === |
||
[[File:Map-The Raw Fade.jpg|thumb|280px|The Raw Fade]] |
[[File:Map-The Raw Fade.jpg|thumb|280px|The Raw Fade]] |
||
| − | {{See Also|The Raw Fade}} |
||
| − | Return to the Raw Fade to find and vanquish one of the |
+ | Return to the Raw Fade to find and vanquish one of the guardians blocking your path to the sloth demon. On the way you can grab an Essence of Dexterity by following the path you walked the first time around (Fade Portal to the area where you learned the Mouse form, mouse hole to the northern corner of the largest island, fade portal to the northwest island with a simple path). This time, when you are on the northwest island you can activate Spirit form and go through a spirit door. This will lead you to the northeast island, where you can grab the essence. Apart from that the island holds a derelict ship and two wisps, which you will have to battle. |
| − | Next, continue along the path until you return to the starting point, where Niall is. Activate the Spirit |
+ | Next, continue along the path until you return to the starting point, where Niall is. Activate the Spirit form and you will see a spirit door to your right. This door will lead you to the central region of the biggest island in the area, where you will face [[Desire demon|Yevena]] and a couple of [[shade]]s. |
==== Guardian: Yevena ==== |
==== Guardian: Yevena ==== |
||
| − | One possible strategy is to cast both [[Crushing Prison (Origins)|Crushing Prison]] and [[Winter's Grasp (Origins)|Winter's Grasp]], then switch to your regular form and finish her off. Casting both these spells should leave her with about 25% health on normal difficulty. |
+ | One possible strategy is to cast both [[Crushing Prison (Origins)|Crushing Prison]] and [[Winter's Grasp (Origins)|Winter's Grasp]], then switch to your regular form and finish her off. Casting both these spells should leave her with about 25% health on normal difficulty. If the Warden is a mage and has [[Mana Clash]], it should kill Yevena and both minions instantly. |
| − | Mage tip: [[Mana Clash]] should kill Yevena and both minions with one shot. |
||
| − | When the fight is |
+ | When the fight is over, turn to Spirit form and check around: you should find an Essence of Willpower and the [[Codex entry: The Black City]]. Note that once Yevena is killed and the essence collected, the x mark on the map will state "Hidden Room" where the essence was collected. Go back through the spirit door to where Niall is, then use the Fade Pedestal again. |
=== The Burning Tower === |
=== The Burning Tower === |
||
[[File:Map-Burning Tower.jpg|thumb|280px|The Burning Tower]] |
[[File:Map-Burning Tower.jpg|thumb|280px|The Burning Tower]] |
||
| − | {{ |
+ | {{Main|Burning Tower}} |
| − | This section of the Fade is filled with fire and fire-based creatures. Expect most to be [[Resistances (Origins)|resistant]] to fire-based attacks - and in some cases, magical fire may heal your enemy. The [[Winter's Grasp (Origins)|Winter's Grasp]] spell provided by the Spirit |
+ | This section of the Fade is filled with fire and fire-based creatures. Expect most to be [[Resistances (Origins)|resistant]] to fire-based attacks - and in some cases, magical fire may heal your enemy. The [[Winter's Grasp (Origins)|Winter's Grasp]] spell provided by the Spirit form is a much better option. |
| − | The room you arrive in has a |
+ | The room you arrive in has a mouse hole that leads to an Essence of Cunning. |
| − | Exit through the door in the north corner of the room and follow the path |
+ | Exit through the door in the north corner of the room and follow the path while avoiding the fire barriers and you will come to a room with two burning templars and a massive door. After defeating the templars, go through the door to the right of where you entered the room at the top of the small staircase. Past this is a large, square-shaped set of corridors with a fire barrier in front of you; turn right at it and defeat the two burning hounds that attack. After that take a left at the next corridor, fend off the burning templar and two burning hounds, then go right, stopping at the lyrium vein if needed. There will be two more burning hounds and then a mouse hole. Change into Mouse form and go through the mouse hole. Eventually you will find a room with a dreaming templar and a lesser [[rage demon]], both of which will attack you. After the fight, the templar will reward you with the [[Shapeshifting (Fade)#Burning Man|Burning Man form]]. You now have access to a couple of fire-based spells, and more importantly the only way to pass through fire barriers. Note that while in Burning Man form, you will wield whatever weapon is equipped, but will not benefit from enchantments placed on it, nor from weapon talents. |
| − | + | For those unfamiliar with the standard [[Primal spells (Origins)#Fire tree|Primal]] spell of the same name, it is worth mentioning the dual utility of the [[Fireball (Origins)|Fireball]] available through this form. It not only delivers Area of Effect damage, but also a form of crowd control, since it has a chance of knocking down anyone in the target area. Unfortunately, while the form is immune to the fireball's damage, it is ''not'' immune to the knockdown. |
|
| − | As usual, you should explore as much of the realm as you can. In the room after the |
+ | As usual, you should explore as much of the realm as you can. In the room after the dreaming templar, take the southern door, back to a square-shaped hallway containing a spirit door, which leads to essences of Cunning and Constitution. Back in the room of the dreaming templar, the massive door to the north leads to Rhagos, guardian of the Burning Tower. You'll be able to [[The Fade: Lost in Dreams#The Burning Tower (2)|reach him]] once you obtain the [[Shapeshifting (Fade)#Golem|Golem form]]. |
| ⚫ | |||
| − | {{See|[[The Fade: Lost in Dreams#The Burning Tower (2)|The Burning Tower (2)]]}} |
||
| − | |||
| ⚫ | |||
[[File:Map-Mage Asunder.jpg|thumb|280px|Mage Asunder]] |
[[File:Map-Mage Asunder.jpg|thumb|280px|Mage Asunder]] |
||
| − | {{ |
+ | {{Main|Mage Asunder}} |
| − | This section of the Fade is populated with various groups of [[ |
+ | This section of the Fade is populated with various groups of [[mage]]s, [[Chantry]] priests and [[golem]]s. Careful use of Spirit and Burning Man forms should see you through the various encounters. The Burning Man will allow you to walk through the fire barriers on the other side of some doors, and the [[Fireball (Origins)|Fireball]] knock-down effect can be quite handy. Be wary of the mage opponents' frost-based attacks, which the Burning Man form has a reduced resistance to. In addition, golems are strong melee fighters with melee ''and'' ranged knock-down effects. |
| − | When arriving in the first room, enter the |
+ | When arriving in the first room, enter the mouse hole directly to your left. This leads to a Font of Strength and the [[Codex entry: Hierarchy of the Circle]]. Now return to the first room. |
| − | Step out of the first room into a circular hall. The room to your left has two mages who will attack immediately when the door is opened. |
+ | Step out of the first room into a circular hall. The room to your left has two mages who will attack immediately when the door is opened. It is possible to sneak in via the mouse hole and get the jump on them. If you sneak into the room, the mages may not respond to your presence, even if you change to another form. Opening the door will still get their attention, however. |
| − | The third room |
+ | The third room - continuing clockwise around the tower - contains two more mages. Once they are dealt with, switch to Spirit form and you can interact with the glowing pile of books, an Essence of Magic. Also you may find the [[Codex entry: History of the Circle]] in a bookcase. Pay attention to the last room in the hall, with an open door. As you approach this room, the four mages within will begin an exchange that escalates into a fight. If you approach the room in stealth mode, you can wait until some or even all of the mages kill each other, making this encounter much easier for you, albeit this results in less XP gain. |
| − | In the large room at the end of the hall are three servants |
+ | In the large room at the end of the hall are three servants, two in stealth mode. Change into Burning Man form prior to entering the next room, due to a fire barrier on the other side of the door. In the next room are four lesser rage demons; they attack in pairs and are fairly easy to dispatch in Burning Man form. |
| ⚫ | In the next room there are several mages waiting to attack as soon as the door is opened. They have strong attacks but low health. If you can freeze them or otherwise immobilize them it helps a lot. It is also possible to sneak in in Mouse form just past the fire barrier and wait for them to kill each other like in the previous room. One other strategy is to open the door (as Burning Man), then immediately retreat back to the previous room. Only two of the mages will follow you, and you can dispatch them with a [[Fireball (Origins)|Fireball]] plus [[Flame Blast]]. Then you can return to the doorway with a simpler fight to finish. |
||
| ⚫ | |||
| + | In the very next room you will encounter a mage instructor and four mage pupils. They are very strong offensively, with multiple volleys of [[Fireball (Origins)|Fireball]] and even [[Inferno]] from the instructor. Just stand next to them in Burning Man form and they'll kill themselves with their own devastating spells. |
||
| ⚫ | In the next room there are several mages waiting to attack as soon as the door is opened. They have strong attacks but low health. If you can freeze them or otherwise immobilize them it helps a lot. It is also possible to sneak in in |
||
| ⚫ | If your main character is a mage, casting an area of effect spell such as [[Inferno]] or [[Blizzard (Origins)|Blizzard]] from just inside the door will cause them to take damage once you approach them. They have low health, and should die quickly. Another useful addition to this tactic for the [[Arcane Warrior]] is to use [[Shimmering Shield]], which should make sure that you will sustain almost no damage at all. |
||
| − | In the very next room you will encounter a mage instructor and four mage pupils. This can be a very hard fight, especially when unprepared. They are very strong offensively. Be especially mindful of the instructor. Several of his spells may kill you in one hit, and he has access to [[Inferno]]. Try to get the instructor to cast this near the door and duck around it in Burning Man form. The mages will follow and probably die before reaching you. |
||
| ⚫ | |||
| ⚫ | If your main character is a mage, casting an area of effect spell such as [[Inferno]] or [[Blizzard]] from just inside the door will cause them to take damage once you approach them. |
||
| ⚫ | The next room has a group of Chantry priests and golems attacking a cursed dreamer. Help the dreamer out and you'll be rewarded with the [[Shapeshifting (Fade)#Golem|Golem form]], with the all-important [[Hurl Rock]] ability that will let you smash through those previously impassable massive doors. In order to pass these doors, you do not actually use the ability; simply walk up to the door in Golem form and try to open it like any other, and your stony self will automatically pick up a rock and proceed to bash the door down. Doing this does put the Hurl Rock ability on its cooldown, however. You can now backtrack to other areas of the Fade and finish exploring each remote corner. However, while you're here in the Mage Asunder, you might as well finish this area first. There are also other essences to find here. Explore beyond any enemy and obstacle (assuming you've collected all of the forms you will need by now), and eventually you will find the guardian of this area: Slavren and any of the few remaining essences here. |
||
| ⚫ | |||
| + | Slavren is in the southernmost room of the Mages Asunder section. You will have to smash open a door in Golem form to enter one room before getting to the room where Slavren is. Be careful! This first room will contain two Arcane Horrors who may paralyze and kill you before you have a chance to do anything. It is recommended to smash open the door while standing off to the side so that when the door is open you are out of line of sight of the abominations. Then, once the door is open, you may attack them with crowd control or other spells before they can attack you. |
||
| ⚫ | The next room has a group of Chantry |
||
| + | |||
| + | {{Bug|The cursed dreamer may not start the dialog need for the form. To fix this, go out of the room and go back in.}} |
||
==== Guardian: Slavren ==== |
==== Guardian: Slavren ==== |
||
| − | Slavren is a lieutenant-grade [[abomination]] that should be easy to handle using the various abilities provided by the |
+ | Slavren is a lieutenant-grade [[abomination]] that should be easy to handle using the various abilities provided by the forms necessary to reach him. In particular, consider the Spirit's [[Crushing Prison (Origins)|Crushing Prison]] and the Burning Man's [[Fireball (Origins)|Fireball]]. |
After the fight, use the Fade Pedestal to backtrack to the Darkspawn Invasion. |
After the fight, use the Fade Pedestal to backtrack to the Darkspawn Invasion. |
||
| Line 164: | Line 153: | ||
=== The Darkspawn Invasion (2) === |
=== The Darkspawn Invasion (2) === |
||
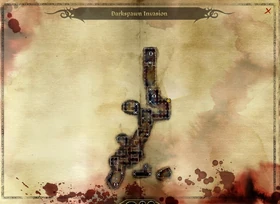
[[File:Map-Darkspawn Invasion.jpg|thumb|280px|The Darkspawn Invasion]] |
[[File:Map-Darkspawn Invasion.jpg|thumb|280px|The Darkspawn Invasion]] |
||
| − | {{See Also|Darkspawn Invasion}} |
||
| − | After acquiring all of the available Forms, the Warden should return to the Darkspawn Invasion area and explore each room to find all available essences and fonts. In addition, the Warden can now find and fight Uthkiel the Crusher, the |
+ | After acquiring all of the available Forms, the Warden should return to the Darkspawn Invasion area and explore each room to find all available essences and fonts. In addition, the Warden can now find and fight Uthkiel the Crusher, the guardian of this area. |
| + | |||
| + | As soon as you use the fade pedestal to go back you will encounter a massive door. Use your golem to open the door. Once the door has been opened an army of hurlock will attack you so be prepared. Use a combination of burning man to stun them with the fireball then golem, to spirit to fight them off. Go to the end of the hallway and you will encounter two more hurlock if you haven't already disposed of them. Next you will come to a massive door. Use golem here to open it. Once opened you will find: |
||
==== Guardian: Uthkiel The Crusher ==== |
==== Guardian: Uthkiel The Crusher ==== |
||
Uthkiel the Crusher is more powerful than most [[ogre]]s and hits very hard. However, the various abilities you collected before reaching him should make it relatively easy to put the Crusher in his place. |
Uthkiel the Crusher is more powerful than most [[ogre]]s and hits very hard. However, the various abilities you collected before reaching him should make it relatively easy to put the Crusher in his place. |
||
| − | If you are a mage with Blizzard, Earthquake or Tempest, these can be placed over the unopened |
+ | If you are a mage with [[Blizzard (Origins)|Blizzard]], [[Earthquake]] or [[Tempest (Origins)|Tempest]], these can be placed over the unopened massive door in a way such that Uthkiel will be in the area of effect but unable to retaliate. A less exploitative and lower-level option is [[Cone of Cold (Origins)|Cone of Cold]] followed by [[Stonefist (Origins)|Stonefist]]. If he seems resistant to shattering via Stonefist, freeze him with [[Winter's Grasp (Origins)|Winter's Grasp]] and follow with Crushing Prison. Then switch back to your normal form. You can use Burning Man to damage him, but he is immune to the knock-down. |
=== The Burning Tower (2) === |
=== The Burning Tower (2) === |
||
[[File:Map-Burning Tower.jpg|thumb|280px|The Burning Tower]] |
[[File:Map-Burning Tower.jpg|thumb|280px|The Burning Tower]] |
||
| − | {{See Also|Burning Tower}} |
||
| − | With all Forms at your disposal you can easily get to the last few rooms of this area. Use Burning Man to pass through |
+ | With all Forms at your disposal you can easily get to the last few rooms of this area. A massive door will be in the room you spawn in. Use Golem to break it down. Use Burning Man to pass through fire barriers and protect yourself from fire-based attacks. Burning templars, a burning hound and [[shambling corpse]]s will stand between you and the guardian of the Burning Tower: Rhagos. Note that the burning man's spells are useless against the burning enemies - the Golem form works best. |
==== Guardian: Rhagos ==== |
==== Guardian: Rhagos ==== |
||
| − | Rhagos is a lieutenant-grade [[ |
+ | Rhagos is a lieutenant-grade [[rage demon]]. He may have more health than his critter-grade siblings and may deal greater damage, but the Warden has obtained the Burning Man form by now. This means you can ignore almost all damage Rhagos can dish out, and a warrior or rogue should easily be able to finish him. On the other hand, Rhagos has a similar level of protection. You may hop into other forms to unleash both the Spirit's spells and the Golem's abilities to quickly end the battle with Rhagos before he can attack. The Spirit form is very useful in particular, as [[Winter's Grasp (Origins)|Winter's Grasp]] takes advantage of Rhagos' weakness to frost. A combination of Spirit Form's Crushing Prison and Winter's Grasp in this order, and then attacking him in normal form will dispatch him quickly as well. If you're a mage, the Crushing Prison and Winter's Grasp should suffice. |
=== The Templar's Nightmare === |
=== The Templar's Nightmare === |
||
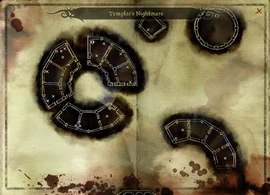
[[File:Map-Templar's Nightmare.jpg|thumb|270px|Templar's Nightmare]] |
[[File:Map-Templar's Nightmare.jpg|thumb|270px|Templar's Nightmare]] |
||
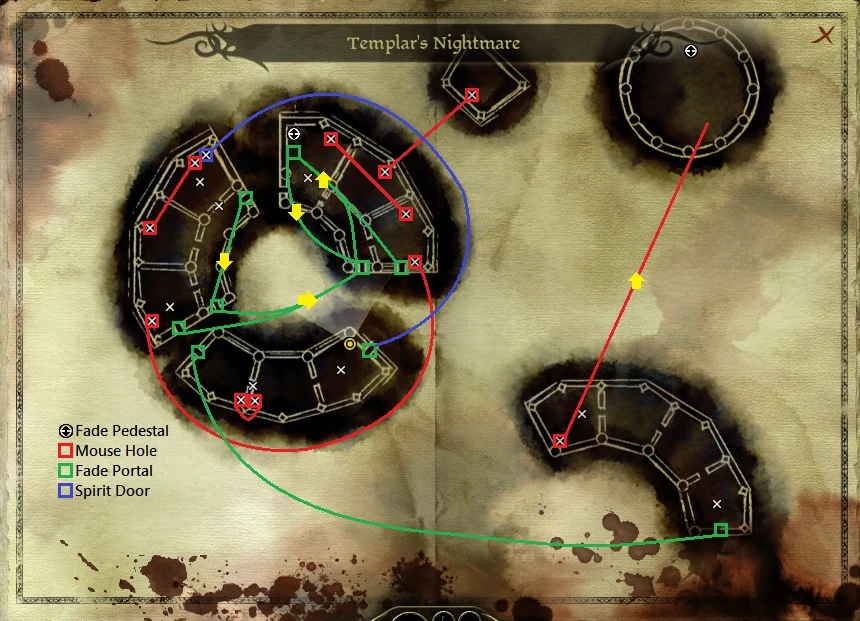
[[File:Templar's Nightmare navigation.jpg|thumb|Templar's Nightmare Navigational Map]] |
[[File:Templar's Nightmare navigation.jpg|thumb|Templar's Nightmare Navigational Map]] |
||
| − | {{ |
+ | {{Main|Templar's Nightmare}} |
| − | The enemies in this area are stronger than those in the other parts of the Fade, and the |
+ | The enemies in this area are stronger than those in the other parts of the Fade, and the special doorways (mouse holes, spirit doors and fade portals) are not all two-way, so proceed with caution. Check the navigational map to see the one-way trips. |
| − | As far as your enemies, the first encounter in |
+ | As far as your enemies, the first encounter in the Templar's Nightmare is with an [[arcane horror]], and the second is with an [[ogre]]. These may be difficult foes to face, but you should have all the required forms by now and quite an array of abilities at your disposal. If you are a mage, Mana Clash is extremely useful. It (and other spells like Crushing Prison) can even be cast through walls into a room before opening the door to kill Abominations and Arcane Horrors, if you are in Tactical View. Mana Clash will often one-shot casters, or come close to doing so. |
| + | |||
| + | Watch out for a few traps on the ground, and behind some of the doors. More enemies of comparable or lower level will follow. To get to the third hub - the bottom of the circle on the map - you need to pass through the spirit door in the second hub area, on the left of the circle. Eventually you will reach the guardian of this area: [[Desire demon|Vereveel]]. |
||
==== Guardian: Vereveel ==== |
==== Guardian: Vereveel ==== |
||
| − | Your best bet will be to burn |
+ | Vereveel quickly turns herself into a mouse and taunts you to chase her. She then goes through a mousehole and you follow her to the circle-formed room to fight her. Your best bet will be to burn her down as fast as you can. Like all desire demons, she particularly likes to employ [[Winter's Grasp (Origins)|Winter's Grasp]] and [[Cone of Cold (Origins)|Cone of Cold]], both of which inflict high damage and freeze you; the Spirit form can be useful because [[Regeneration]] continues even when you're frozen. [[Crushing Prison (Origins)|Crushing Prison]] plus [[Fireball (Origins)|Fireball]] should take her out quickly. |
=== Companion nightmares === |
=== Companion nightmares === |
||
| − | Once the Warden has vanquished the five guardians, you have access to the [[The Fade: Lost in Dreams#Inner Sanctum|Inner Sanctum]] of the [[ |
+ | Once the Warden has vanquished the five guardians, you have access to the [[The Fade: Lost in Dreams#Inner Sanctum|Inner Sanctum]] of the [[sloth demon]]. However, there are three more areas that become accessible during this process. Each holds one of the companions who were with the Warden when the demon put the party to sleep, all of them trapped within a nightmare. |
| − | |||
| ⚫ | |||
| − | |||
| ⚫ | For each nightmare the Warden visits and defeats, the corresponding |
||
| − | |||
| ⚫ | * |
||
| ⚫ | |||
| ⚫ | * |
||
| ⚫ | |||
| ⚫ | |||
| ⚫ | * |
||
| ⚫ | |||
| ⚫ | |||
| ⚫ | |||
| − | |||
| ⚫ | |||
| ⚫ | |||
| ⚫ | |||
| ⚫ | For each nightmare the Warden visits and defeats, the corresponding companion will meet the Warden in the Inner Sanctum. Unless the companion's approval rating is too low, they will then join in the fight against the demon, providing valuable support since that fight can be quite challenging to the Warden only. If you do not rescue a companion, they will not be available for the fight against the sloth demon, but they will awaken unharmed when you return to the real world. |
||
| ⚫ | |||
| ⚫ | *[[Alistair]] believes he is spending time with his [[Goldanna|sister]] and her children. The Warden may be able to persuade him that it is all a trick through proper dialogue options, or simply attack [[Goldanna|Alistair's sister]] and her children which turn out to be demons. If Alistair is persuaded, he will help the Warden in this fight, but a few extra demons will spawn in an attempt to even out their odds. |
||
| ⚫ | |||
| ⚫ | |||
| ⚫ | *[[Leliana]] is praying with a Revered Mother, "finding peace" - she won't remember the Warden. The Warden needs to only remind her of her vision, and because of the demon's response she will realize something isn't right. Not speaking about her vision seems to result in her not helping in this fight. |
||
| ⚫ | |||
| ⚫ | |||
| ⚫ | *[[Sten]] is with the [[Qunari]] soldiers he came to [[Ferelden]] with. He is actually aware of being trapped in a dream, but seems content with this. The Warden can remind Sten he has given his word to follow them, and Sten will decide to abandon the dream; the Warden and Sten will have to fight, but Sten's approval may be increased if the correct dialogue choices are selected. |
||
| ⚫ | |||
| ⚫ | |||
| ⚫ | |||
| ⚫ | |||
| ⚫ | |||
=== Inner Sanctum === |
=== Inner Sanctum === |
||
| − | After defeating the five guardians, the Warden can access the central portion, marked on the |
+ | After defeating the five guardians, the Warden can access the central portion, marked on the travel map as [[Sloth Demon's Sanctum|Inner Sanctum]]. Here they will face the [[sloth demon]] that is keeping them in the dream realm. If the Warden has freed any of their companions before reaching this destination, they will appear during the introductory cut-scene and dialogue. Unless their approval rating is too low, each of the freed companions will join the Warden in the fight. |
==== Sloth demon ==== |
==== Sloth demon ==== |
||
| − | + | In general, the sloth demon fight is a multi-stage fight. Every time his health is reduced to zero, he will transform in his next form with replenished health. He will use the listed forms in the following order: |
|
# [[Ogre]] |
# [[Ogre]] |
||
# [[Rage demon]] |
# [[Rage demon]] |
||
# [[Abomination]] |
# [[Abomination]] |
||
# [[Shade]] |
# [[Shade]] |
||
| − | # [[Arcane |
+ | # [[Arcane horror]] |
| + | Each form has Boss-ranked stats, but beyond that the strategy used for dealing with lesser versions (you fought several of them in the process of unlocking the lair) will suffice. Ideally, you'll have a range-oriented party with no more than one warrior (whether it's the Warden or Alistair), and the Warden can shapeshift into what would be most useful in that situation. Position them on extreme ends of the map, yet with a clear line of sight, and near enough to the lyrium veins that mages can make use of them. The warrior's/Warden's job is simply to keep his forms from a concentrated effort to kill one ally. This can be done with crowd-control abilities (there's several between the arsenals of the Golem and Spirit forms), as well as manually-controlling the targeted ally and running wide circles around the enemy to prevent him from targeting ("kiting"). |
||
| − | Use the standard strategies that you will use when fighting monsters of each of these types, but remember that each iteration has 'boss'-level stats. |
||
| + | #For the Ogre, use Golem form and tank while your allies attack from range. Morrigan and Wynne are the most useful, followed by Leliana. Alternatively, use Spirit Form for a quick application of Crushing Prison, which may or may not succeed. Do not remain in Spirit form while fighting Sloth's Ogre form. |
||
| − | It is worth paying particular attention to the Demon's final form (the Sloth Demon form proper), since he will try and cast a [[Blizzard]] which can freeze and dish considerable damage to the party (whose resources might be running thin at this stage). The usual means of interrupting the enemy spell casting should be used, as well as the various abilities that the Warden has access to through the Forms acquired in the Fade. |
||
| + | #When the Rage Demon form emerges, switch to Burning Man, regardless of ally makeup. Get his attention and wail on him with melee weapons, he will be helpless as his attacks do zero damage. |
||
| + | #The Abomination comes next, and other than some melee attacks it's no threat to the Golem. If you are a warrior or rogue, you may favor faster attacks in your normal form. If your allies are clear of the area, make use of its abilities. |
||
| + | #The Shade is fourth, and it might be fast, but the physical resistance of the Golem should help deal with its Leap attack. Other than that, the same strategy for the Abomination should suffice. |
||
| + | #The Arcane Horror is the final and most dangerous form, since he will try to cast cold spells regularly, including [[Blizzard (Origins)|Blizzard]]. For those who don't have the spell yet, it has a high chance of freezing combined with regular cold damage over time. Do NOT use Burning Man under any circumstances. This leaves Spirit form for decent spell resistance but leaving you unable to deal heavy damage, and Golem form, which has no mental resistance but the most muscle. |
||
| + | :*The key to victory is in overcoming the Blizzard, and to this end your three allies should be holding position as described above, keeping them out of the epicenter. Wynne should equip [[Shiver]], which is always available from an encounter on the third floor of the Tower. [[Iced Band|Iced Bands]] also work, but they will spawn in Circle-type [[Containers|containers]] and are not guaranteed to show up. If you obtain 1 or 2, they can supplement Shiver but are by no means necessary. The same goes for Ice Salves, as you will likely not obtain many of them early in the game without purchasing them. With Wynne resisting the damage and freezing effect better than the others, she can cast Heal and Group Heal to keep health up while the popsicled allies wait out the storm. It's also possible to switch between Spirit and Golem forms as the need arises, using Spirit form and casting [[Regeneration (Spell)|Regeneration]] to assist Wynne with healing. The Arcane Horror may also use Fireball, but if your allies are clear of the Blizzard and far enough away, it will only affect the Golem-shifted Warden. |
||
| + | Lastly, don't forget that there are lyrium veins the area. They are best saved for mages, and the safest time to use them would be the very end of the fourth round, at around 10% of the Shade's health remaining. |
||
| − | Particularly important to those non-dwarves using large amounts of mana/stamina: the lyrium veins in this area can respawn during the fight. |
||
==== Sloth demon (Solo strategy) ==== |
==== Sloth demon (Solo strategy) ==== |
||
Trying to solo Sloth demon is surprisingly easy, if you exploit [[Shapeshifting (Fade)|shapeshift healing]]. |
Trying to solo Sloth demon is surprisingly easy, if you exploit [[Shapeshifting (Fade)|shapeshift healing]]. |
||
| − | [[ |
+ | The [[ogre]] form is able to deal some heavy physical damage, and all of his special attacks cannot be evaded by high defense. This makes golem form the obvious choice, for its increased health and armor. Simply smash at the Ogre until your health drops to half, and then use slam ability to knock him back. Shift to normal and back to golem to reset your health to full. Slam gives you just enough time to do so while the ogre is running back to you. Repeat until the ogre dies. |
| − | [[ |
+ | The [[rage demon]] form is easily countered with burning man form, which gives you immunity to all of his special abilities, thus protecting you from near 80% of damage the rage demon can cause. |
| − | [[ |
+ | The [[abomination]] form is basically your standard abomination with increased health. It suffers from fairly bad attack score, so any dexterity based characters are able to hack at him and take no damage themselves. |
| − | + | The [[shade]] form is perhaps the most complete melee fighter, with its high defense and attack, slam, leap and drain life abilities. Repeating the ogre tactics always works, though your standard form might be able to do just fine, depending on your defense. |
|
| − | Sloth's final form, [[ |
+ | Sloth's final form, the [[arcane horror]], is the most dangerous. The worst of his spells is of course [[Crushing Prison (Origins)|Crushing Prison]], which will, if it catches you unprepared, result in certain death. [[Winter's Grasp (Origins)|Winter's Grasp]] and [[Cone of Cold (Origins)|Cone of Cold]] will be repeated as soon as the cooldown period expires, making [[Greater Ice Salve|Ice Salves]] and [[Greater Spirit Balm|Spirit Balms]] a must for this fight. The best strategy here is to change into Spirit form. Not only will you gain additional spell resistance, you can heal yourself as needed. Another strategy is to achieve very high spell resistance (80%+, preferably 100%), use the salves, and shift to golem form for increased health. This should be enough to survive Crushing Prison and everything he throws at you while immobilized. When his initial barrage of spells has passed, you can shift back to normal form if you prefer and keep attacking until he dies, drinking health poultices as necessary. Alternatively, if you planned ahead and got yourself [[Mana Clash]], it will instantly kill this form. |
== Result == |
== Result == |
||
| − | After defeating the demon, a final conversation with Niall will ensue, where the [[Litany of Adralla]] is mentioned |
+ | After defeating the demon, a final conversation with Niall will ensue, where the [[Litany of Adralla]] is mentioned, which will be a critical element in the next section of [[Broken Circle#Walkthrough: Part Two|Broken Circle]]. After the conversation ends, the party is released from the Fade. |
== Notes == |
== Notes == |
||
| − | * |
+ | *Once in combat and if you're in a shapeshifted form, you cannot use potions even if selected from the radial menu. |
| − | * |
+ | *[[Ranger]]s cannot summon animals in the Fade. |
| − | * |
+ | *Mages cannot cast [[Animate Dead]] in the Fade. |
| − | * |
+ | *There is no loot on anything defeated in the Fade except if a [[The Fade: Lost in Dreams#Bugs|bug]] occurs. |
| ⚫ | |||
| ⚫ | * |
||
| ⚫ | |||
| ⚫ | |||
| ⚫ | |||
:Strength: 4 |
:Strength: 4 |
||
:Dexterity: 4 |
:Dexterity: 4 |
||
| Line 268: | Line 255: | ||
:Cunning: 5 |
:Cunning: 5 |
||
:Constitution: 2 |
:Constitution: 2 |
||
| − | * |
+ | *All demons are magic based, making the spell [[Mana Clash]] extremely effective here. |
| − | * |
+ | *The flame barriers are passable without [[Shapeshifting (Fade)#Burning Man|Burning Man form]] through use of a [[Greater Warmth Balm]]. However the player must continually "push" against the barrier to pass through it and may have to drink a health poultice halfway through. When pushing against the barriers, transition through it slows which may result in death in some cases unless the full 75% fire resistance is attained (which lets the Warden move through all barriers safely). The balm provides 60%, the remaining 15% can be attained by briefly equipping items with the ability or casting [[Heroic Defense]] if playing a mage that possesses it. |
== Exploit == |
== Exploit == |
||
| − | * You can spam the essence pools by clicking fast on them. Doing so |
+ | *{{platforms|pc}} You can spam the essence pools by clicking fast on them. Doing so it is possible to get more than one point from each essence and font. When it works, you should see many times the indication saying you gained a skill point. Using a macro to right click fast, and clicking pause key fast you can get a lot of skill points. There was a max of 99 in each attribute, but as of [[Patches (Origins)#Patch 1.04|patch 1.04]] that is not the case. There have been cases of getting higher than 200. |
| + | *(For PC version) Stand very close to the essence so that the character cannot move any further toward it and pause the game. Place your mouse cursor over the essence and start clicking repeatedly as fast as you can. While still clicking release the pause. It is possible to acquire more than +5 points from each font. Make sure you are not trying to click on the other side of the font because your character will try to walk to that point. For this to work he/she must not move. It may also help to right-click it the same time as pausing the game (1 extra point). |
||
| − | == |
+ | == Bugs == |
| ⚫ | |||
| ⚫ | |||
| ⚫ | |||
| ⚫ | |||
| ⚫ | |||
| ⚫ | |||
| ⚫ | *{{platforms|pc|xbox360|ps3}} If you speak to Morrigan before the game remembers to end combat, after killing Flemeth, the cut-scene will restart but Flemeth will be dead. If Flemeth is slain with a decapitating critical, Morrigan and the Warden have a talk with a headless Flemeth. You will be unable to use the Fade Pedestal because you are "still in combat". You can walk away and come back a few minutes later and the issue should resolve itself; otherwise, reload and try again. |
||
| ⚫ | |||
| ⚫ | |||
| ⚫ | *Sometimes the second cut-scene in each nightmare, the one to take place after the companions are freed, where they disappear, will not trigger as intended. The Warden may be stuck repeating their last dialogue with the companion. Walking a distance - as far as possible in these small areas - and then trying again to talk to the companion seems to be a viable work-around for these issues. |
||
| ⚫ | **Another quick workaround for any companion nightmare glitch, when after the mobs have been killed the cutscene doesn't trigger, is to go into Golem form and use [[Quake (Origins)|Quake]]. If you have floating damage text enabled you will see damage numbers even though no mobs are visible. The cut-scene should trigger after the quake ends. |
||
| + | *Sometimes when players return to human form from Mouse form, the game won't load their body correctly and the player's human appearance will be that of a mouse in a vertical position. The player will have full access to their regular human form abilities. Making a new save and loading back to it will fix this issue. |
||
== Trivia == |
== Trivia == |
||
{{SpoilerDAO|style=short| |
{{SpoilerDAO|style=short| |
||
| − | [[File:Toolset Fade Maric.png|thumb| |
+ | [[File:Toolset Fade Maric.png|thumb|100px|Maric from Loghain's Nightmare]] |
| − | The toolset includes references to an unimplemented companion nightmare where a fade spirit masquerading as a noble and jovial King [[Maric Theirin|Maric]] torments Loghain. |
+ | The toolset includes references to an unimplemented companion nightmare where a fade spirit masquerading as a noble and jovial King [[Maric Theirin|Maric]] torments [[Loghain Mac Tir|Loghain]].}} |
| + | |||
| − | }} |
||
| + | == See also == |
||
| ⚫ | |||
| ⚫ | |||
| ⚫ | |||
| ⚫ | |||
| + | |||
{{DEFAULTSORT:Fade: Lost in Dreams}} |
{{DEFAULTSORT:Fade: Lost in Dreams}} |
||
[[Category:Dragon Age: Origins quests]] |
[[Category:Dragon Age: Origins quests]] |
||
Revision as of 23:50, 28 March 2020
“I never thought I'd die like this, in this cold, forsaken place. Alone.” ―Niall
Lost in Dreams is a quest in Dragon Age: Origins and part of the Broken Circle quest line. It also calls on the use of several abilities not available to certain classes. This quest line utilizes the mechanics of shapeshifting and other spells, even if the Warden is not a mage. For someone who is yet to play a mage but may do so in the future, it can be considered practice. It is possible, however, to get by with a minimal use of these abilities, as they are only strictly required for small portions of the quest.
Acquisition
This quest is initiated during the Broken Circle quest line. After fighting their way through most of the Circle Tower, the party is put to sleep by an abomination of sloth. Their conscious selves are thus cast into the Fade, a realm of dreams and spirits, usually consciously accessed only by mages. The sloth demon has actually cast the Warden and their companions into its own domain within the Fade. To escape, the Warden will have to travel throughout the domain, acquiring a set of special skills to gain access to specific areas. Ultimately, the Warden must fight a set of mini-bosses to gain access to the Sloth Demon, then defeat it to escape the Fade.
Companions
The Warden wakes up alone in the sloth demon's domain, and travels alone for the majority of this quest line. Any companions in the Warden's party at this time will also be trapped in dreams individually tailored to their fears, hopes, regrets. Freeing these prisoners before confronting the sloth demon will hasten its defeat, after which the party will recover control of their physical bodies whether or not they were freed from their nightmares. If you free the companions they will disappear after being freed, only reappearing during the fight with the sloth demon. In some instances, you may be forced to free your whole party from their nightmares.
Walkthrough
Quick Overview
A map of the fade
- The Warden will wake up alone in the Fade, a dream-like place;
- The Warden should travel through different areas of the Fade to gather different forms necessary to travel through certain obstacles:
- Mouse form gained in The Raw Fade;
- Spirit form gained in the Darkspawn Invasion;
- Burning Man form gained in the Burning Tower;
- Golem form gained in the Mage Asunder;
- Find and kill each of the five guardians protecting the Sloth Demon:
- Yevena in the Raw Fade;
- Slavren in the Mage Asunder;
- Uthkiel the Crusher in the Darkspawn Invasion;
- Rhagos in the Burning Tower;
- Vereveel in the Templar's Nightmare;
- Optionally free your companions from their own dream realm;
- Optionally explore every section and region to find and use the various essences and fonts granting bonus points to the Warden's attributes;
- Reach and fight the sloth demon.
- When you arrive in a room, North: Forwards, South: Behind you, East: To your left, West: To your right
Weisshaupt
Weisshaupt
- Main article: Weisshaupt (The Fade)
The Warden wakes up alone in the Fade within a large chamber. Duncan will greet you, explaining that he survived the Battle of Ostagar. Furthermore, the Blight was defeated and the Grey Wardens have retired to Weisshaupt, recording and sharing history instead of preparing for battle. The Warden won't fall for this story, and the conversation will eventually become a fight. Duncan will be aided by two allies, while the Warden can only count on his or her own abilities, and a Lyrium vein which is inaccessible for dwarves.
Once the Warden has defeated the Duncan impostor and his allies, a Fade Pedestal will appear; clicking on it will display the Travel Map for this portion of the Fade.
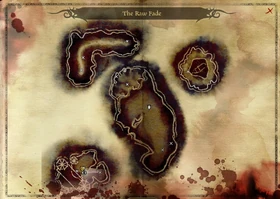
The Raw Fade

The Raw Fade
- Main article: The Raw Fade
The Warden enters this section of the Fade in the southwest corner. There is a spirit door to your right, but you won't be able to interact with it without Spirit form. There is also an inactive Fade Pedestal.
Of more immediate interest, you will find Niall, a mage who has been imprisoned in this realm much like the Warden. A mage Warden may remember Niall from their origin. Niall will share his experiences in the Fade - mostly his failed attempts at escaping it. Amidst the gloom and doom, he'll hint about small passages he could not fit through. That is, in essence, your hint for the first section of this quest line: you need to travel through the areas you can reach, and gather more forms in order to access more sections of the sloth demon's realm.
The first form you need is the Mouse form. Use the fade portal behind Niall to reach the central section of the Raw Fade, which is the largest "island" on the map. While this looks like a large area, you will have access to a limited portion of it for the time being: just a few feet around the south of the island. Here you will find a lyrium vein, a mouse hole, a mouse, and a rage demon. Take care of the demon first. Use the lyrium if necessary, and talk to the mouse after the fight. The mouse will grant you the Mouse form. This will give you access to Stealth, but more importantly, it lets the Warden travel through the mouse holes you'll find on your way.
Turn into a mouse and travel through the mouse hole. You will find yourself in the northern corner of the same central island of the Raw Fade. Be prepared to fight more rage demons. Interact with a nearby statue to gain a codex entry. A fade portal will take you from here to the northwest island. You will pass by a shimmering spirit door on your right that you can't use yet until later, and further on another fade portal that returns you to where you met Niall.
Talking to Niall once again should activate the Fade Pedestal next to him. At this point the Warden can use the pedestal to reach four more sections of the Fade, in any order. The following walkthrough is only one possible sequence, with minimal backtracking. Whether you follow this sequence or devise your own, the objectives are as mentioned above: gather all four forms, kill the five guardians around the Sloth Demon, optionally free your companions from their nightmares unless you want to take on the sloth demon alone, optionally grab all possible essences and fonts, and eventually find and face the sloth demon. Until you obtain all of the forms, your path will be blocked by one of these obstacles:
- Mouse holes require the Mouse form
- Spirit doors require the Spirit form
- Fire barriers require the Burning Man form
- Massive doors require the Golem form
The Darkspawn Invasion
The Darkspawn Invasion
- Main article: Darkspawn Invasion
This section of the Fade is populated with various darkspawn enemies. The first time you enter, you will be in the southernmost room marked as Entrance. Depending on the forms you already obtained, you'll be able to explore only certain portions of map.
Going by this walkthrough, you'll first enter this area with nothing but the Mouse form at your disposal. Go through the mouse hole in the northeast corner of the entrance room. This will send you to a room with two more mouse holes. Head through the mouse hole straight ahead, and right-click the Essence of Cunning to permanently gain +1 cunning. Head back to the fork and enter the second mouse hole. Here you will be attacked by some darkspawn. Dispatch them quickly, and head through the northern doors. Kill the darkspawn here, and head into the mouse hole on the west side of the room. You can enter the room on the left here and take care of the darkspawn if you wish. Either way, head through the mouse hole at the end of the hall and you'll end up in a room with pillars, a templar spirit and a group of darkspawn attacking him. Help the spirit of the templar and be rewarded with the Spirit form. Among other useful abilities, this form gives you access to all spirit doors and certain essences and fonts which are inaccessible to all other forms.
Because the Warden is traveling alone, it is important to grasp the value of the spirit form's Crushing Prison spell. Cast this spell on one of your enemies every time you encounter a new group of enemies. Some will die before the spell ends; others will be imprisoned for enough time to let you finish at least one other in the group. Be mindful that this spell has a long cool-down (60 seconds).
The spirit templar also leaves behind a new Fade Pedestal. Before using it, grab the Essence of Willpower that is in the same room and requires your new Spirit form. The rest of the area is blocked by a massive door and a fire barrier; for now, use Spirit form to do a bit of backtracking and finish up the areas already visited.
Weisshaupt (2)
Once you have the Spirit form, make a quick trip back to Weisshaupt, since there is an Essence of Willpower you could not interact with until now.
The Raw Fade (2)
The Raw Fade
Return to the Raw Fade to find and vanquish one of the guardians blocking your path to the sloth demon. On the way you can grab an Essence of Dexterity by following the path you walked the first time around (Fade Portal to the area where you learned the Mouse form, mouse hole to the northern corner of the largest island, fade portal to the northwest island with a simple path). This time, when you are on the northwest island you can activate Spirit form and go through a spirit door. This will lead you to the northeast island, where you can grab the essence. Apart from that the island holds a derelict ship and two wisps, which you will have to battle.
Next, continue along the path until you return to the starting point, where Niall is. Activate the Spirit form and you will see a spirit door to your right. This door will lead you to the central region of the biggest island in the area, where you will face Yevena and a couple of shades.
Guardian: Yevena
One possible strategy is to cast both Crushing Prison and Winter's Grasp, then switch to your regular form and finish her off. Casting both these spells should leave her with about 25% health on normal difficulty. If the Warden is a mage and has Mana Clash, it should kill Yevena and both minions instantly.
When the fight is over, turn to Spirit form and check around: you should find an Essence of Willpower and the Codex entry: The Black City. Note that once Yevena is killed and the essence collected, the x mark on the map will state "Hidden Room" where the essence was collected. Go back through the spirit door to where Niall is, then use the Fade Pedestal again.
The Burning Tower

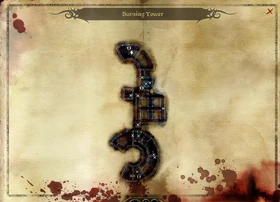
The Burning Tower
- Main article: Burning Tower
This section of the Fade is filled with fire and fire-based creatures. Expect most to be resistant to fire-based attacks - and in some cases, magical fire may heal your enemy. The Winter's Grasp spell provided by the Spirit form is a much better option.
The room you arrive in has a mouse hole that leads to an Essence of Cunning.
Exit through the door in the north corner of the room and follow the path while avoiding the fire barriers and you will come to a room with two burning templars and a massive door. After defeating the templars, go through the door to the right of where you entered the room at the top of the small staircase. Past this is a large, square-shaped set of corridors with a fire barrier in front of you; turn right at it and defeat the two burning hounds that attack. After that take a left at the next corridor, fend off the burning templar and two burning hounds, then go right, stopping at the lyrium vein if needed. There will be two more burning hounds and then a mouse hole. Change into Mouse form and go through the mouse hole. Eventually you will find a room with a dreaming templar and a lesser rage demon, both of which will attack you. After the fight, the templar will reward you with the Burning Man form. You now have access to a couple of fire-based spells, and more importantly the only way to pass through fire barriers. Note that while in Burning Man form, you will wield whatever weapon is equipped, but will not benefit from enchantments placed on it, nor from weapon talents.
For those unfamiliar with the standard Primal spell of the same name, it is worth mentioning the dual utility of the Fireball available through this form. It not only delivers Area of Effect damage, but also a form of crowd control, since it has a chance of knocking down anyone in the target area. Unfortunately, while the form is immune to the fireball's damage, it is not immune to the knockdown.
As usual, you should explore as much of the realm as you can. In the room after the dreaming templar, take the southern door, back to a square-shaped hallway containing a spirit door, which leads to essences of Cunning and Constitution. Back in the room of the dreaming templar, the massive door to the north leads to Rhagos, guardian of the Burning Tower. You'll be able to reach him once you obtain the Golem form.
Mage Asunder

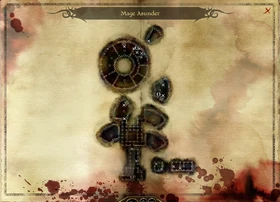
Mage Asunder
- Main article: Mage Asunder
This section of the Fade is populated with various groups of mages, Chantry priests and golems. Careful use of Spirit and Burning Man forms should see you through the various encounters. The Burning Man will allow you to walk through the fire barriers on the other side of some doors, and the Fireball knock-down effect can be quite handy. Be wary of the mage opponents' frost-based attacks, which the Burning Man form has a reduced resistance to. In addition, golems are strong melee fighters with melee and ranged knock-down effects.
When arriving in the first room, enter the mouse hole directly to your left. This leads to a Font of Strength and the Codex entry: Hierarchy of the Circle. Now return to the first room.
Step out of the first room into a circular hall. The room to your left has two mages who will attack immediately when the door is opened. It is possible to sneak in via the mouse hole and get the jump on them. If you sneak into the room, the mages may not respond to your presence, even if you change to another form. Opening the door will still get their attention, however.
The third room - continuing clockwise around the tower - contains two more mages. Once they are dealt with, switch to Spirit form and you can interact with the glowing pile of books, an Essence of Magic. Also you may find the Codex entry: History of the Circle in a bookcase. Pay attention to the last room in the hall, with an open door. As you approach this room, the four mages within will begin an exchange that escalates into a fight. If you approach the room in stealth mode, you can wait until some or even all of the mages kill each other, making this encounter much easier for you, albeit this results in less XP gain.
In the large room at the end of the hall are three servants, two in stealth mode. Change into Burning Man form prior to entering the next room, due to a fire barrier on the other side of the door. In the next room are four lesser rage demons; they attack in pairs and are fairly easy to dispatch in Burning Man form.
In the next room there are several mages waiting to attack as soon as the door is opened. They have strong attacks but low health. If you can freeze them or otherwise immobilize them it helps a lot. It is also possible to sneak in in Mouse form just past the fire barrier and wait for them to kill each other like in the previous room. One other strategy is to open the door (as Burning Man), then immediately retreat back to the previous room. Only two of the mages will follow you, and you can dispatch them with a Fireball plus Flame Blast. Then you can return to the doorway with a simpler fight to finish.
In the very next room you will encounter a mage instructor and four mage pupils. They are very strong offensively, with multiple volleys of Fireball and even Inferno from the instructor. Just stand next to them in Burning Man form and they'll kill themselves with their own devastating spells.
If your main character is a mage, casting an area of effect spell such as Inferno or Blizzard from just inside the door will cause them to take damage once you approach them. They have low health, and should die quickly. Another useful addition to this tactic for the Arcane Warrior is to use Shimmering Shield, which should make sure that you will sustain almost no damage at all.
After the fight, grab the Codex entry: The Cardinal Rules of Magic on the right side of the stairs for some easy experience and then go up the stairs.
The next room has a group of Chantry priests and golems attacking a cursed dreamer. Help the dreamer out and you'll be rewarded with the Golem form, with the all-important Hurl Rock ability that will let you smash through those previously impassable massive doors. In order to pass these doors, you do not actually use the ability; simply walk up to the door in Golem form and try to open it like any other, and your stony self will automatically pick up a rock and proceed to bash the door down. Doing this does put the Hurl Rock ability on its cooldown, however. You can now backtrack to other areas of the Fade and finish exploring each remote corner. However, while you're here in the Mage Asunder, you might as well finish this area first. There are also other essences to find here. Explore beyond any enemy and obstacle (assuming you've collected all of the forms you will need by now), and eventually you will find the guardian of this area: Slavren and any of the few remaining essences here.
Slavren is in the southernmost room of the Mages Asunder section. You will have to smash open a door in Golem form to enter one room before getting to the room where Slavren is. Be careful! This first room will contain two Arcane Horrors who may paralyze and kill you before you have a chance to do anything. It is recommended to smash open the door while standing off to the side so that when the door is open you are out of line of sight of the abominations. Then, once the door is open, you may attack them with crowd control or other spells before they can attack you.
Guardian: Slavren
Slavren is a lieutenant-grade abomination that should be easy to handle using the various abilities provided by the forms necessary to reach him. In particular, consider the Spirit's Crushing Prison and the Burning Man's Fireball.
After the fight, use the Fade Pedestal to backtrack to the Darkspawn Invasion.
The Darkspawn Invasion (2)
The Darkspawn Invasion
After acquiring all of the available Forms, the Warden should return to the Darkspawn Invasion area and explore each room to find all available essences and fonts. In addition, the Warden can now find and fight Uthkiel the Crusher, the guardian of this area.
As soon as you use the fade pedestal to go back you will encounter a massive door. Use your golem to open the door. Once the door has been opened an army of hurlock will attack you so be prepared. Use a combination of burning man to stun them with the fireball then golem, to spirit to fight them off. Go to the end of the hallway and you will encounter two more hurlock if you haven't already disposed of them. Next you will come to a massive door. Use golem here to open it. Once opened you will find:
Guardian: Uthkiel The Crusher
Uthkiel the Crusher is more powerful than most ogres and hits very hard. However, the various abilities you collected before reaching him should make it relatively easy to put the Crusher in his place.
If you are a mage with Blizzard, Earthquake or Tempest, these can be placed over the unopened massive door in a way such that Uthkiel will be in the area of effect but unable to retaliate. A less exploitative and lower-level option is Cone of Cold followed by Stonefist. If he seems resistant to shattering via Stonefist, freeze him with Winter's Grasp and follow with Crushing Prison. Then switch back to your normal form. You can use Burning Man to damage him, but he is immune to the knock-down.
The Burning Tower (2)
The Burning Tower
With all Forms at your disposal you can easily get to the last few rooms of this area. A massive door will be in the room you spawn in. Use Golem to break it down. Use Burning Man to pass through fire barriers and protect yourself from fire-based attacks. Burning templars, a burning hound and shambling corpses will stand between you and the guardian of the Burning Tower: Rhagos. Note that the burning man's spells are useless against the burning enemies - the Golem form works best.
Guardian: Rhagos
Rhagos is a lieutenant-grade rage demon. He may have more health than his critter-grade siblings and may deal greater damage, but the Warden has obtained the Burning Man form by now. This means you can ignore almost all damage Rhagos can dish out, and a warrior or rogue should easily be able to finish him. On the other hand, Rhagos has a similar level of protection. You may hop into other forms to unleash both the Spirit's spells and the Golem's abilities to quickly end the battle with Rhagos before he can attack. The Spirit form is very useful in particular, as Winter's Grasp takes advantage of Rhagos' weakness to frost. A combination of Spirit Form's Crushing Prison and Winter's Grasp in this order, and then attacking him in normal form will dispatch him quickly as well. If you're a mage, the Crushing Prison and Winter's Grasp should suffice.
The Templar's Nightmare
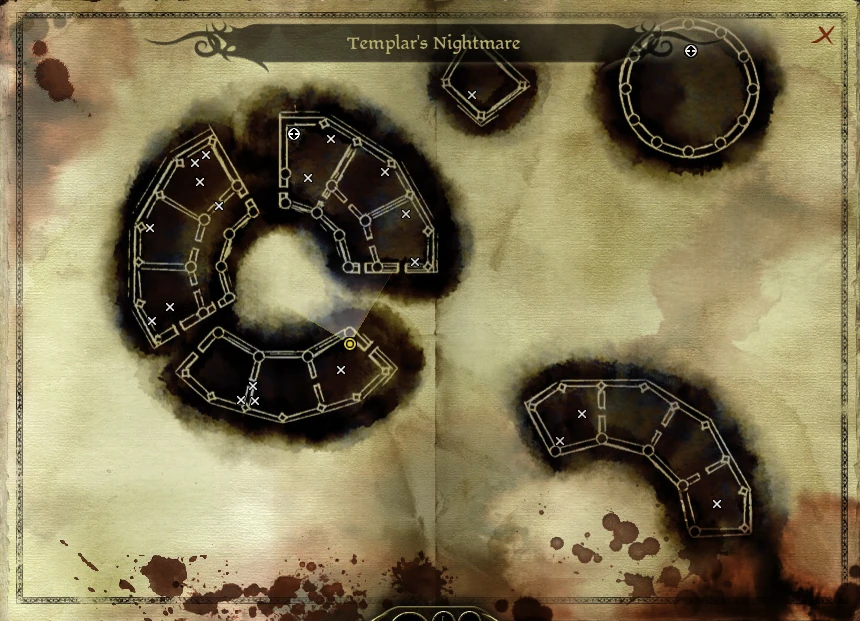
Templar's Nightmare
Templar's Nightmare Navigational Map
- Main article: Templar's Nightmare
The enemies in this area are stronger than those in the other parts of the Fade, and the special doorways (mouse holes, spirit doors and fade portals) are not all two-way, so proceed with caution. Check the navigational map to see the one-way trips.
As far as your enemies, the first encounter in the Templar's Nightmare is with an arcane horror, and the second is with an ogre. These may be difficult foes to face, but you should have all the required forms by now and quite an array of abilities at your disposal. If you are a mage, Mana Clash is extremely useful. It (and other spells like Crushing Prison) can even be cast through walls into a room before opening the door to kill Abominations and Arcane Horrors, if you are in Tactical View. Mana Clash will often one-shot casters, or come close to doing so.
Watch out for a few traps on the ground, and behind some of the doors. More enemies of comparable or lower level will follow. To get to the third hub - the bottom of the circle on the map - you need to pass through the spirit door in the second hub area, on the left of the circle. Eventually you will reach the guardian of this area: Vereveel.
Guardian: Vereveel
Vereveel quickly turns herself into a mouse and taunts you to chase her. She then goes through a mousehole and you follow her to the circle-formed room to fight her. Your best bet will be to burn her down as fast as you can. Like all desire demons, she particularly likes to employ Winter's Grasp and Cone of Cold, both of which inflict high damage and freeze you; the Spirit form can be useful because Regeneration continues even when you're frozen. Crushing Prison plus Fireball should take her out quickly.
Companion nightmares
Once the Warden has vanquished the five guardians, you have access to the Inner Sanctum of the sloth demon. However, there are three more areas that become accessible during this process. Each holds one of the companions who were with the Warden when the demon put the party to sleep, all of them trapped within a nightmare.
Each nightmare is a very small space, where a close-quarter fight will take place. See below for details on each nightmare.
For each nightmare the Warden visits and defeats, the corresponding companion will meet the Warden in the Inner Sanctum. Unless the companion's approval rating is too low, they will then join in the fight against the demon, providing valuable support since that fight can be quite challenging to the Warden only. If you do not rescue a companion, they will not be available for the fight against the sloth demon, but they will awaken unharmed when you return to the real world.
- Alistair believes he is spending time with his sister and her children. The Warden may be able to persuade him that it is all a trick through proper dialogue options, or simply attack Alistair's sister and her children which turn out to be demons. If Alistair is persuaded, he will help the Warden in this fight, but a few extra demons will spawn in an attempt to even out their odds.
- Dog is simply enjoying a nap; no fight is required to rouse him.
- Leliana is praying with a Revered Mother, "finding peace" - she won't remember the Warden. The Warden needs to only remind her of her vision, and because of the demon's response she will realize something isn't right. Not speaking about her vision seems to result in her not helping in this fight.
- Wynne believes she is surrounded by apprentices that died due to her negligence. The Warden must convince her that she is in the Fade.
- Shale is frozen as a statue again; no battle is necessary to wake Shale up.
- Sten is with the Qunari soldiers he came to Ferelden with. He is actually aware of being trapped in a dream, but seems content with this. The Warden can remind Sten he has given his word to follow them, and Sten will decide to abandon the dream; the Warden and Sten will have to fight, but Sten's approval may be increased if the correct dialogue choices are selected.
- Zevran is on a rack being "trained" by two Antivan Crows. When you convince him he is already a Crow, you will fight the two false Crows, but Zevran doesn't help.
- Oghren believes he is in a tavern, being constantly mocked by other dwarves.
- Morrigan is with Flemeth, but already knows it is not her and tells the Warden to kill the spirit. She will comment that the demon is even more annoying than her mother and that it cannot even achieve a passable impression of Flemeth.
When the companions are convinced that they are in a dream (and, with few exceptions, the ensuing fight is over), they will disappear, only to reappear at the most opportune moment.
Inner Sanctum
After defeating the five guardians, the Warden can access the central portion, marked on the travel map as Inner Sanctum. Here they will face the sloth demon that is keeping them in the dream realm. If the Warden has freed any of their companions before reaching this destination, they will appear during the introductory cut-scene and dialogue. Unless their approval rating is too low, each of the freed companions will join the Warden in the fight.
Sloth demon
In general, the sloth demon fight is a multi-stage fight. Every time his health is reduced to zero, he will transform in his next form with replenished health. He will use the listed forms in the following order:
Each form has Boss-ranked stats, but beyond that the strategy used for dealing with lesser versions (you fought several of them in the process of unlocking the lair) will suffice. Ideally, you'll have a range-oriented party with no more than one warrior (whether it's the Warden or Alistair), and the Warden can shapeshift into what would be most useful in that situation. Position them on extreme ends of the map, yet with a clear line of sight, and near enough to the lyrium veins that mages can make use of them. The warrior's/Warden's job is simply to keep his forms from a concentrated effort to kill one ally. This can be done with crowd-control abilities (there's several between the arsenals of the Golem and Spirit forms), as well as manually-controlling the targeted ally and running wide circles around the enemy to prevent him from targeting ("kiting").
- For the Ogre, use Golem form and tank while your allies attack from range. Morrigan and Wynne are the most useful, followed by Leliana. Alternatively, use Spirit Form for a quick application of Crushing Prison, which may or may not succeed. Do not remain in Spirit form while fighting Sloth's Ogre form.
- When the Rage Demon form emerges, switch to Burning Man, regardless of ally makeup. Get his attention and wail on him with melee weapons, he will be helpless as his attacks do zero damage.
- The Abomination comes next, and other than some melee attacks it's no threat to the Golem. If you are a warrior or rogue, you may favor faster attacks in your normal form. If your allies are clear of the area, make use of its abilities.
- The Shade is fourth, and it might be fast, but the physical resistance of the Golem should help deal with its Leap attack. Other than that, the same strategy for the Abomination should suffice.
- The Arcane Horror is the final and most dangerous form, since he will try to cast cold spells regularly, including Blizzard. For those who don't have the spell yet, it has a high chance of freezing combined with regular cold damage over time. Do NOT use Burning Man under any circumstances. This leaves Spirit form for decent spell resistance but leaving you unable to deal heavy damage, and Golem form, which has no mental resistance but the most muscle.
- The key to victory is in overcoming the Blizzard, and to this end your three allies should be holding position as described above, keeping them out of the epicenter. Wynne should equip Shiver, which is always available from an encounter on the third floor of the Tower. Iced Bands also work, but they will spawn in Circle-type containers and are not guaranteed to show up. If you obtain 1 or 2, they can supplement Shiver but are by no means necessary. The same goes for Ice Salves, as you will likely not obtain many of them early in the game without purchasing them. With Wynne resisting the damage and freezing effect better than the others, she can cast Heal and Group Heal to keep health up while the popsicled allies wait out the storm. It's also possible to switch between Spirit and Golem forms as the need arises, using Spirit form and casting Regeneration to assist Wynne with healing. The Arcane Horror may also use Fireball, but if your allies are clear of the Blizzard and far enough away, it will only affect the Golem-shifted Warden.
Lastly, don't forget that there are lyrium veins the area. They are best saved for mages, and the safest time to use them would be the very end of the fourth round, at around 10% of the Shade's health remaining.
Sloth demon (Solo strategy)
Trying to solo Sloth demon is surprisingly easy, if you exploit shapeshift healing.
The ogre form is able to deal some heavy physical damage, and all of his special attacks cannot be evaded by high defense. This makes golem form the obvious choice, for its increased health and armor. Simply smash at the Ogre until your health drops to half, and then use slam ability to knock him back. Shift to normal and back to golem to reset your health to full. Slam gives you just enough time to do so while the ogre is running back to you. Repeat until the ogre dies.
The rage demon form is easily countered with burning man form, which gives you immunity to all of his special abilities, thus protecting you from near 80% of damage the rage demon can cause.
The abomination form is basically your standard abomination with increased health. It suffers from fairly bad attack score, so any dexterity based characters are able to hack at him and take no damage themselves.
The shade form is perhaps the most complete melee fighter, with its high defense and attack, slam, leap and drain life abilities. Repeating the ogre tactics always works, though your standard form might be able to do just fine, depending on your defense.
Sloth's final form, the arcane horror, is the most dangerous. The worst of his spells is of course Crushing Prison, which will, if it catches you unprepared, result in certain death. Winter's Grasp and Cone of Cold will be repeated as soon as the cooldown period expires, making Ice Salves and Spirit Balms a must for this fight. The best strategy here is to change into Spirit form. Not only will you gain additional spell resistance, you can heal yourself as needed. Another strategy is to achieve very high spell resistance (80%+, preferably 100%), use the salves, and shift to golem form for increased health. This should be enough to survive Crushing Prison and everything he throws at you while immobilized. When his initial barrage of spells has passed, you can shift back to normal form if you prefer and keep attacking until he dies, drinking health poultices as necessary. Alternatively, if you planned ahead and got yourself Mana Clash, it will instantly kill this form.
Result
After defeating the demon, a final conversation with Niall will ensue, where the Litany of Adralla is mentioned, which will be a critical element in the next section of Broken Circle. After the conversation ends, the party is released from the Fade.
Notes
- Once in combat and if you're in a shapeshifted form, you cannot use potions even if selected from the radial menu.
- Rangers cannot summon animals in the Fade.
- Mages cannot cast Animate Dead in the Fade.
- There is no loot on anything defeated in the Fade except if a bug occurs.
- It is possible to obtain free healing simply by shifting from human form to another and back to human form. It works best with the Golem form.
- There are a total of 21 attribute points available via fonts and essences:
- Strength: 4
- Dexterity: 4
- Willpower: 4
- Magic: 2
- Cunning: 5
- Constitution: 2
- All demons are magic based, making the spell Mana Clash extremely effective here.
- The flame barriers are passable without Burning Man form through use of a Greater Warmth Balm. However the player must continually "push" against the barrier to pass through it and may have to drink a health poultice halfway through. When pushing against the barriers, transition through it slows which may result in death in some cases unless the full 75% fire resistance is attained (which lets the Warden move through all barriers safely). The balm provides 60%, the remaining 15% can be attained by briefly equipping items with the ability or casting Heroic Defense if playing a mage that possesses it.
Exploit
 You can spam the essence pools by clicking fast on them. Doing so it is possible to get more than one point from each essence and font. When it works, you should see many times the indication saying you gained a skill point. Using a macro to right click fast, and clicking pause key fast you can get a lot of skill points. There was a max of 99 in each attribute, but as of patch 1.04 that is not the case. There have been cases of getting higher than 200.
- (For PC version) Stand very close to the essence so that the character cannot move any further toward it and pause the game. Place your mouse cursor over the essence and start clicking repeatedly as fast as you can. While still clicking release the pause. It is possible to acquire more than +5 points from each font. Make sure you are not trying to click on the other side of the font because your character will try to walk to that point. For this to work he/she must not move. It may also help to right-click it the same time as pausing the game (1 extra point).
Bugs
- If you finish an island and use the fade portal but it doesn't give you the "Quest updated" notification, you can either wait or leave the current island, return, then leave again. This should then give you the notification. If you choose to wait, it may take up to a full minute to register.
- In the Mage Asunder the last set of lesser rage demons can be looted to find lesser health poultices.
- You must free all trapped companions before facing the sloth demon.
- If you speak to Morrigan before the game remembers to end combat, after killing Flemeth, the cut-scene will restart but Flemeth will be dead. If Flemeth is slain with a decapitating critical, Morrigan and the Warden have a talk with a headless Flemeth. You will be unable to use the Fade Pedestal because you are "still in combat". You can walk away and come back a few minutes later and the issue should resolve itself; otherwise, reload and try again.
- When fighting Zevran's torturers, if the decapitation animation occurs, there is a chance that the first dialogue will repeat, with one of the guards having no head. No fighting ensues, but the bug repeats for an unknown amount of time.
- Sometimes the second cut-scene in each nightmare, the one to take place after the companions are freed, where they disappear, will not trigger as intended. The Warden may be stuck repeating their last dialogue with the companion. Walking a distance - as far as possible in these small areas - and then trying again to talk to the companion seems to be a viable work-around for these issues.
- Another quick workaround for any companion nightmare glitch, when after the mobs have been killed the cutscene doesn't trigger, is to go into Golem form and use Quake. If you have floating damage text enabled you will see damage numbers even though no mobs are visible. The cut-scene should trigger after the quake ends.
- Sometimes when players return to human form from Mouse form, the game won't load their body correctly and the player's human appearance will be that of a mouse in a vertical position. The player will have full access to their regular human form abilities. Making a new save and loading back to it will fix this issue.
Trivia
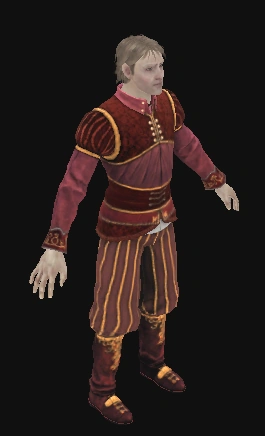

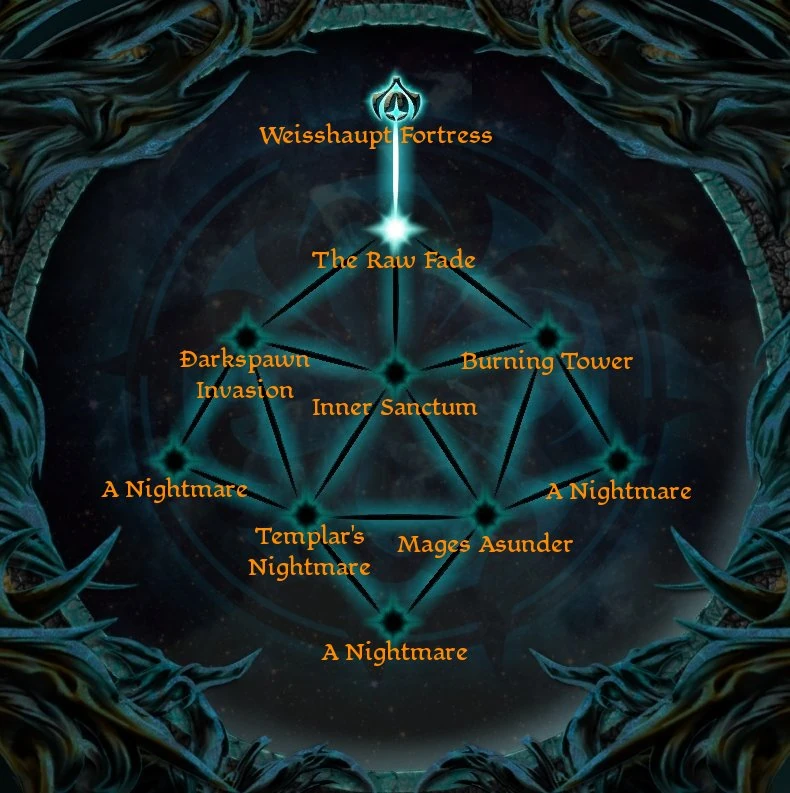
See also
- Broken Circle quest line
- Fade Pedestal for all areas and travel map.
- Shapeshifting (Fade) for the abilities gained here
- Essences and Fonts found across the Fade