Mostlyautumn (talk | contribs) (formatting) |
|||
| (40 intermediate revisions by 24 users not shown) | |||
| Line 1: | Line 1: | ||
| − | {{pictures wanted}} |
||
| − | {{stub}} |
||
| − | {{Quote|A large metal remnant, by shape it is one of three. If brought together they would form an intricate Andrastian design. So it is Of the Lady, but strangely ringed with heretical elven symbols that predate the Old Gods. There is no wear, so it is impossible to tell when it was made. It thrums with a cold energy, and the air around it tastes of iron. This was the anchor that held its resting place secure.}} |
||
<onlyinclude>{{QuestTransformer |
<onlyinclude>{{QuestTransformer |
||
|style = {{{style|}}} |
|style = {{{style|}}} |
||
|name = [[The Awiergan Scrolls: Pride Unbound]] |
|name = [[The Awiergan Scrolls: Pride Unbound]] |
||
| + | |act = 3 |
||
|icon = Quest icon DA2.png |
|icon = Quest icon DA2.png |
||
| − | |image = |
+ | |image = Pride Demon - Hybris.jpg |
|px = 270px |
|px = 270px |
||
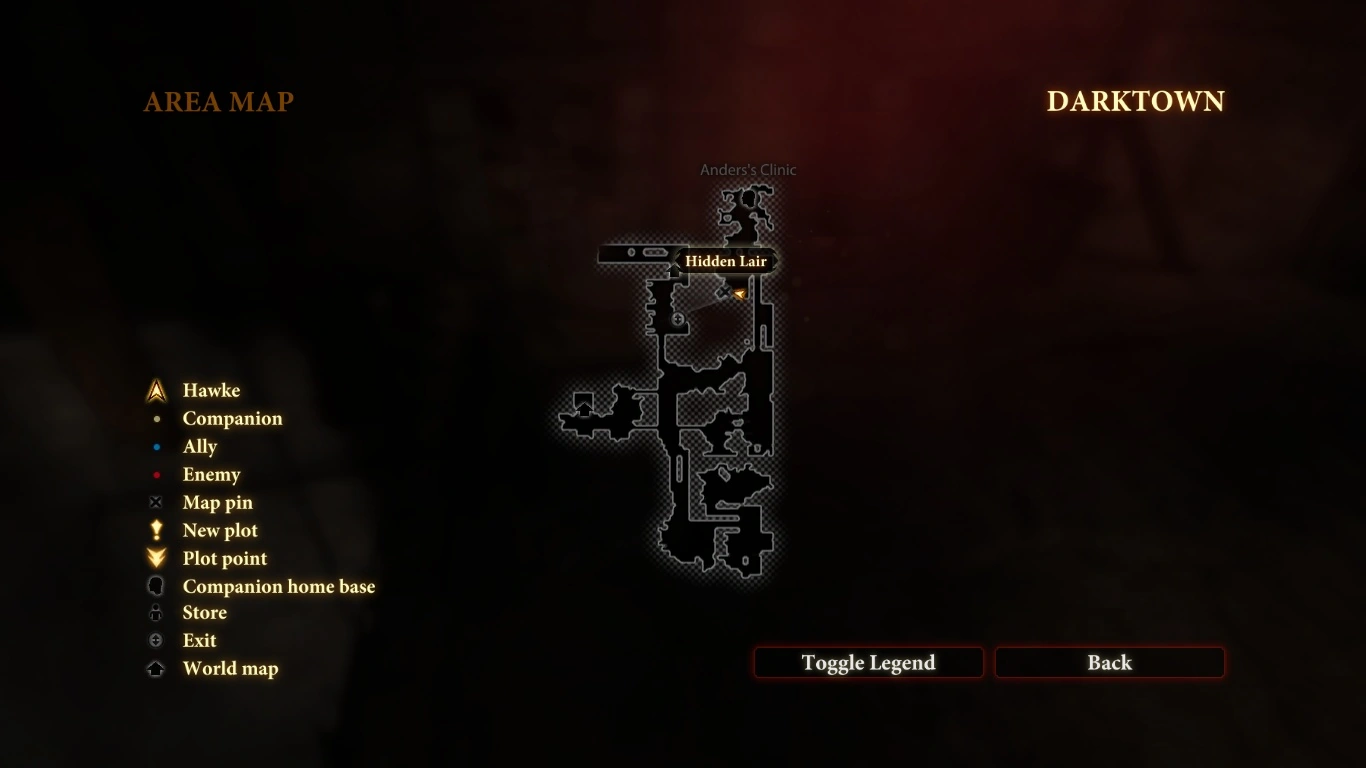
|caption = Hidden Lair |
|caption = Hidden Lair |
||
| − | |start = |
+ | |start = [[Wounded Coast|The Wounded Coast]] or [[Sundermount]] |
| − | |end = |
+ | |end = Hidden Lair ([[Darktown]]) |
|prereqs = [[The Awiergan Scrolls: First Aspect]] [[The Awiergan Scrolls: Second Aspect]] [[The Awiergan Scrolls: Third Aspect]] |
|prereqs = [[The Awiergan Scrolls: First Aspect]] [[The Awiergan Scrolls: Second Aspect]] [[The Awiergan Scrolls: Third Aspect]] |
||
|location = [[Darktown]] |
|location = [[Darktown]] |
||
| Line 19: | Line 17: | ||
}}</onlyinclude> |
}}</onlyinclude> |
||
| + | '''The Awiergan Scrolls: Pride Unbound''' is an Act 3 [[Side quests (Dragon Age II)|side quest]] in ''[[Dragon Age II]]''. |
||
| − | <!--- Several sentence lead section with bolded mention of '''article name'''. ---> |
||
| − | |||
| ⚫ | |||
| − | '''The Awiergan Scrolls: Pride Unbound''' is acquired after completing one of [[The Awiergan Scrolls: First Aspect]] , [[The Awiergan Scrolls: Second Aspect]] , [[The Awiergan Scrolls: Third Aspect]]. |
||
== Description == |
== Description == |
||
| + | |||
| − | "There is an ancient evil sealed beneath Kirkwall. Search Darktown for a hidden magical entrance." |
+ | ''"There is an ancient evil sealed beneath Kirkwall. Search Darktown for a hidden magical entrance."'' |
| + | |||
| ⚫ | |||
| + | This quest is acquired after completing other [[#Related quests|Awiergan Scrolls]] side quests. |
||
== Walkthrough == |
== Walkthrough == |
||
| − | + | To acquire this quest you must first find one of the Awiergan Scrolls, either on the [[Wounded Coast]] or in the [[Dalish camp]], and its respective hidden lair; this quest then remains open while you do the other two. |
|
| + | {{Note|See the [[#Related quests|related quests]] for scroll and hidden lair locations.}} |
||
| − | There is an order to finding the lair though. You get the quest in Act 3, either on the Wounded Coast or in the Dalish camp. Once you've finished the first scroll, head to the other location for the second scroll. An "X" appears on your Sundermount map identifying a Hidden Lair. Once you've killed all of the baddies in the lair, you will get the last scroll that tells you where the demon is hiding. |
||
| + | [[File:The Awiergan Scrolls - Pride Unbound.png|thumb|Entrance Location]] |
||
| ⚫ | |||
| + | In order to enter the lair, you must have first found all three of the Awiergan Scrolls. The quickest way to get to the Lair is to travel to [[Anders's Clinic]]. It's the same door used for the quest [[Birthright]] in Act 1. |
||
| ⚫ | |||
| ⚫ | |||
| ⚫ | |||
The fight with Hybris is a combination of avoiding Hybris' special abilities and managing the creatures he summons. |
The fight with Hybris is a combination of avoiding Hybris' special abilities and managing the creatures he summons. |
||
| − | Two |
+ | Two [[tank]]s should be present at most (one is actually sufficient), as the ranged attackers of the party will deal most of the damage. The tank could be a warrior [[Hawke]], [[Fenris]], or [[Aveline Vallen|Aveline]]. As a supplement, equip any melee characters with high nature resistance - a single [[Rune of Nature Warding]] in the allies' armor is sufficient (90% resistance). On Hard difficulty, this will bring the green fire shield's damage down to 1. |
| − | Hybris will begin the fight with one of either two abilities, a green fire shield that |
+ | Hybris will begin the fight with one of either two abilities, a green fire shield that poisons nearby foes, or a massive blue light-vortex on the floor which traps and deals damage to enemies within its area-of-effect. You will see both of these abilities throughout the fight, and they are rather hard to miss. The green fire shield makes the fight fairly difficult for melee damage characters without high nature resistance since it buffets them with decent amounts of nature damage each round. His melee attacks are much less punishing than his two special moves, however. |
The blue light-vortex needs to be run out of immediately. Placing your party on "hold" and telling them to move out manually is recommended for this since they will not run out of it on their own. After a few seconds, the light-vortex will trigger, stunning characters caught in the center and dealing large amounts of damage. |
The blue light-vortex needs to be run out of immediately. Placing your party on "hold" and telling them to move out manually is recommended for this since they will not run out of it on their own. After a few seconds, the light-vortex will trigger, stunning characters caught in the center and dealing large amounts of damage. |
||
| − | {{Note|[[Dispel Magic (Dragon Age II)|Dispel Magic]] can remove Hybris's magic, making Hybris pretty harmless. [[The Bringer of Silence]] and [[Cleanse]] are also capable of removing the green fire shield engulfing Hybris |
+ | {{Note|[[Dispel Magic (Dragon Age II)|Dispel Magic]] can remove Hybris's magic, making Hybris pretty harmless. [[The Bringer of Silence]] and [[Cleanse]] are also capable of removing the green fire shield engulfing Hybris, [[A New Path|Audacity]] and the [[Pride Demon]]s encountered during [[The Last Straw]].}} |
| + | It's also possible to use the mage spell [[Gravitic Ring]] to temporarily slow down Hybris. This spell requires you to have the [[Force Mage]] [[Specialization]]. As long as the spell is active Hybris remains inactive. This allows you to focus your time killing the [[shade]]s and [[rage demon]]s. After all of them are eliminated you can focus on Hybris. You will have to use the [[Gravitic Ring]] several times throughout the fight to keep Hybris inactive while you eliminate all the waves of lesser demons. This strategy is particularly useful on [[Difficulty settings (Dragon Age II)|Nightmare]] difficulty. |
||
| ⚫ | |||
| + | |||
| ⚫ | As for the creatures that Hybris summons, the first wave will consist of four to six medium-health shades. Having a rogue with upgraded [[Goad]] can be very efficient for this portion of the fight, as there is a very good chance that your tank will not have enough stamina to get them all with [[Taunt (Dragon Age II)|Taunt]]. The second wave of minions will consist of four to six medium health shades and one high-health rage demon. The third wave will consist of four to six shades and two high-health rage demons. It is recommended that you eliminate the minions that Hybris summons lest you become overwhelmed. |
||
Goad and [[Walking Bomb (Dragon Age II)|Walking Bomb]] become especially useful this fight. Using Goad whenever possible on the tank reduces the possibility of your more delicate party members of attracting attention and dying to the minion's ministrations. And while hard to use, Walking bomb becomes an incredible asset if it is timed properly and goes off next to multiple minions or even Hybris himself. |
Goad and [[Walking Bomb (Dragon Age II)|Walking Bomb]] become especially useful this fight. Using Goad whenever possible on the tank reduces the possibility of your more delicate party members of attracting attention and dying to the minion's ministrations. And while hard to use, Walking bomb becomes an incredible asset if it is timed properly and goes off next to multiple minions or even Hybris himself. |
||
| Line 53: | Line 56: | ||
== Rewards == |
== Rewards == |
||
| − | + | *{{:Glandivalis|style=iconmini}}, a longsword dropped by Hybris. |
|
| − | Unlocks Achievement: [[Achievements (Dragon Age II)#Combat|Demon Slayer]]. |
+ | *Unlocks Achievement: [[Achievements (Dragon Age II)#Combat|Demon Slayer]]. |
== Bugs == |
== Bugs == |
||
| + | *In some instances the door at Ander's Clinic will never open and the quest cannot be completed, even if you have all the scrolls. Possible fix: try marking Pride Unbound as your active quest, then approach the entrance. |
||
| − | *There are 3 scrolls for this quest line. 2 are located at Sundermount. Of those 2 the first one you encounter is near the zone entrance and before you reach the camp. The second one is past the camp and on the mountain behind some broken walls. |
||
| + | *{{Platforms|PC|Xbox360}} Rarely, if Hybris is killed and there are other enemies remaining, the other enemies will disappear, but the player remains in battle mode. Characters may take continuous damage for no apparent reason. Since the player is still in battle, the door will not open and the player will be trapped in the room. Continuing basic attacks has ended the battle for at least some players, resulting in gameplay continuing as expected. Removing the sustained mode for the dog might resolve this issue as well. |
||
| − | **If you missed the first scroll before the camp and you are on the Pride Unbound portion of this quest line, then you may find yourself stuck because the instance at Anders's Clinic will not open. |
||
| + | |||
| − | **If you missed the second scroll, the same thing will happen.{{Citation needed}} |
||
| + | == Related quests == |
||
| − | **You will need to go back to the Wounded Coast and locate the scroll. Then you will also have to go back to the location of the second scroll past the camp to defeat Bysmor, Beacon and Gifre. Then the quest chain will continue and the instance at Anders's Clinic will open.{{Citation needed}} |
||
| + | {{:The Awiergan Scrolls: First Aspect|style=iconmini}}<br> |
||
| − | *There is also a rare bug that occurs with a low probability. Sometimes after Hybris is killed, there will be no enemies around anywhere, but you will still stay in battle mode. Also, the controlled character at the time of Hybris' death will take continual damage until he/she is dead, for no apparent reason. Since the player is still in battle, the door will not open and the player will be trapped in the room.{{Citation needed}} |
||
| + | {{:The Awiergan Scrolls: Second Aspect|style=iconmini}}<br> |
||
| + | {{:The Awiergan Scrolls: Third Aspect|style=iconmini}} |
||
| + | |||
{{DEFAULTSORT:Awiergan Scrolls: Pride Unbound, The}} |
{{DEFAULTSORT:Awiergan Scrolls: Pride Unbound, The}} |
||
[[Category:Dragon Age II side quests]] |
[[Category:Dragon Age II side quests]] |
||
Revision as of 14:20, 26 March 2020
The Awiergan Scrolls: Pride Unbound is an Act 3 side quest in Dragon Age II.
Description
"There is an ancient evil sealed beneath Kirkwall. Search Darktown for a hidden magical entrance."
Acquisition
This quest is acquired after completing other Awiergan Scrolls side quests.
Walkthrough
To acquire this quest you must first find one of the Awiergan Scrolls, either on the Wounded Coast or in the Dalish camp, and its respective hidden lair; this quest then remains open while you do the other two.
Entrance Location
In order to enter the lair, you must have first found all three of the Awiergan Scrolls. The quickest way to get to the Lair is to travel to Anders's Clinic. It's the same door used for the quest Birthright in Act 1. Entering the lair will trigger a cut scene were you will encounter a Pride Demon named Hybris. Through combat, he will summon several Shades and Rage Demons.
Tactics
The fight with Hybris is a combination of avoiding Hybris' special abilities and managing the creatures he summons.
Two tanks should be present at most (one is actually sufficient), as the ranged attackers of the party will deal most of the damage. The tank could be a warrior Hawke, Fenris, or Aveline. As a supplement, equip any melee characters with high nature resistance - a single Rune of Nature Warding in the allies' armor is sufficient (90% resistance). On Hard difficulty, this will bring the green fire shield's damage down to 1.
Hybris will begin the fight with one of either two abilities, a green fire shield that poisons nearby foes, or a massive blue light-vortex on the floor which traps and deals damage to enemies within its area-of-effect. You will see both of these abilities throughout the fight, and they are rather hard to miss. The green fire shield makes the fight fairly difficult for melee damage characters without high nature resistance since it buffets them with decent amounts of nature damage each round. His melee attacks are much less punishing than his two special moves, however.
The blue light-vortex needs to be run out of immediately. Placing your party on "hold" and telling them to move out manually is recommended for this since they will not run out of it on their own. After a few seconds, the light-vortex will trigger, stunning characters caught in the center and dealing large amounts of damage.
It's also possible to use the mage spell Gravitic Ring to temporarily slow down Hybris. This spell requires you to have the Force Mage Specialization. As long as the spell is active Hybris remains inactive. This allows you to focus your time killing the shades and rage demons. After all of them are eliminated you can focus on Hybris. You will have to use the Gravitic Ring several times throughout the fight to keep Hybris inactive while you eliminate all the waves of lesser demons. This strategy is particularly useful on Nightmare difficulty.
As for the creatures that Hybris summons, the first wave will consist of four to six medium-health shades. Having a rogue with upgraded Goad can be very efficient for this portion of the fight, as there is a very good chance that your tank will not have enough stamina to get them all with Taunt. The second wave of minions will consist of four to six medium health shades and one high-health rage demon. The third wave will consist of four to six shades and two high-health rage demons. It is recommended that you eliminate the minions that Hybris summons lest you become overwhelmed.
Goad and Walking Bomb become especially useful this fight. Using Goad whenever possible on the tank reduces the possibility of your more delicate party members of attracting attention and dying to the minion's ministrations. And while hard to use, Walking bomb becomes an incredible asset if it is timed properly and goes off next to multiple minions or even Hybris himself.
On Nightmare difficulty, Hybris is immune to nature damage.
Rewards
 Glandivalis, a longsword dropped by Hybris.
- Unlocks Achievement: Demon Slayer.
Bugs
- In some instances the door at Ander's Clinic will never open and the quest cannot be completed, even if you have all the scrolls. Possible fix: try marking Pride Unbound as your active quest, then approach the entrance.

 Rarely, if Hybris is killed and there are other enemies remaining, the other enemies will disappear, but the player remains in battle mode. Characters may take continuous damage for no apparent reason. Since the player is still in battle, the door will not open and the player will be trapped in the room. Continuing basic attacks has ended the battle for at least some players, resulting in gameplay continuing as expected. Removing the sustained mode for the dog might resolve this issue as well.
Related quests
![]() The Awiergan Scrolls: First Aspect
The Awiergan Scrolls: First Aspect
![]() The Awiergan Scrolls: Second Aspect
The Awiergan Scrolls: Second Aspect
![]() The Awiergan Scrolls: Third Aspect
The Awiergan Scrolls: Third Aspect