(→Enter the Castle: cleanup) |
m (→Main Floor: cleanup) |
||
| Line 85: | Line 85: | ||
==== Main Floor ==== |
==== Main Floor ==== |
||
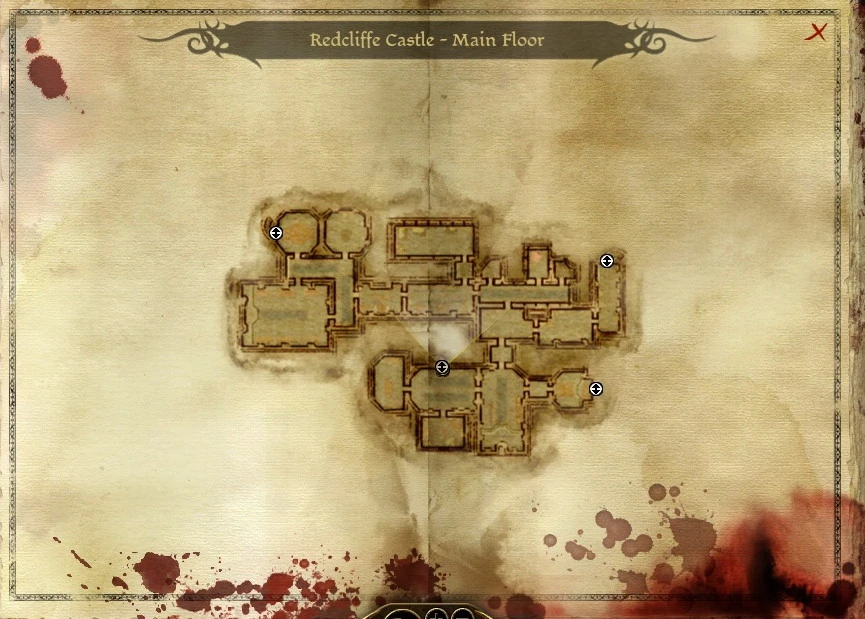
[[File:Map-Redcliffe_Castle_-_Main_Floor.jpg|thumb|270px|Map of Main Floor]] |
[[File:Map-Redcliffe_Castle_-_Main_Floor.jpg|thumb|270px|Map of Main Floor]] |
||
| − | The first time the party enters this area is from below, into the northwest corner. They will quickly be confronted by undead. The chapel across the hall holds an elite [[greater shade]] with a few lesser minions and a [[Codex entry: The History of the Chantry, Chapter 2|book]]. The other room |
+ | The first time the party enters this area is from below, into the northwest corner. They will quickly be confronted by undead. The chapel across the hall holds an elite [[greater shade]] with a few lesser minions, and a [[Codex entry: The History of the Chantry, Chapter 2|book]]. The other room nearby is the armoury (which is locked and contains a variety of weapons and armor). |
| − | To the east more [[corpse]]s will be encountered. Kennels |
+ | To the east more [[corpse]]s will be encountered. Kennels north of the hall contain several [[mabari]] (one elite); these will only attack if approached. |
::Loot here includes kaddis, a collar and a {{GiftLink|Lamb Bone}} for Dog. |
::Loot here includes kaddis, a collar and a {{GiftLink|Lamb Bone}} for Dog. |
||
{{Note|Watch out for traps.}} |
{{Note|Watch out for traps.}} |
||
Revision as of 09:27, 27 July 2013
“Whatever you do, Eamon is the priority here. If you have to, just get him out of there. Isolde, me, and anyone else... we're expendable.” ―Bann Teagan
The Arl of Redcliffe is one of the main quests in Dragon Age: Origins. After the introductory quests, Alistair recommends that the party journey to Redcliffe, in order to obtain the assistance of Arl Eamon Guerrein.
Walkthrough
Redcliffe Village
- Main article: A Village Under Siege
As you approach the Redcliffe Village, you will meet Tomas, triggering a cut-scene in which you are introduced to Bann Teagan, Arl Eamon's brother. He is essentially leading the villagers as the Arl has fallen ill, and communications with the castle have been interrupted by the undead army that is storming the village every night.
When speaking to Bann Teagan and offering your help to defend the village:
- If you help:
 Alistair approves (+2)
- Oghren approves (+4)
 Wynne approves (+2)
- Leliana approves (+2)
- Morrigan does not want to get involved: Morrigan disapproves (-5).
- Sten will argue it is pointless: Sten disapproves (-2)
- With sufficient persuasion (25 is not enough), this can be reversed: Sten approves (+2).
- With sufficient persuasion (25 is not enough), this can be reversed:
If you choose to help Redcliffe, the next steps involve preparing for imminent attack (see A Village Under Siege), and eventually fighting off the undead (see The Attack at Nightfall). Warning: Leaving the village for a different location on the World Map (not including Party Camp) will mark either quest as failed.
After the undead have been fought off, Arlessa Isolde will join The Warden and Bann Teagan in a cut-scene providing some information on what is happening in the castle.
Redcliffe Castle
According to Isolde, Redcliffe Castle has been invaded by an "evil force" released by an infiltrator - a mage paid by Loghain to poison Arl Eamon. The mage was discovered and captured, but the evil is beyond control. Most within the castle have been killed, but the arl and arlessa, their son Connor and the mage are still alive. Connor is somehow afflicted, and Isolde claims she was allowed to leave to find him help in the village. Ultimately, she tries to bring Bann Teagan to the castle, alone.
Teagan agrees to go, but gives The Warden his Signet Ring for secret access to the castle's basement.
- Inside the windmill, opposite the entrance to this secret passage, is a chest containing an Injury Kit and a love letter for Correspondence Interruptus.
Enter the Castle
After using the secret passage, open the first door to three Enraged Corpses waiting to attack. After this fight, you find Jowan (former colleague of the mage Warden) in a cell.
Talking to him garners some information about what is happening in the castle. Jowan will tell The Warden that he used the guise of tutoring Connor to poison Arl Eamon, and that Loghain directed him to do so in exchange for amnesty (Jowan being a condemned blood mage). He insists, however, that he did not do anything to summon the undead, despite the arlessa's claims. She has had him tortured and locked up. Jowan expresses the desire to right his wrongs, and asks The Warden to release him.
There are four options at this point:
1. Kill Jowan.
- Alistair disapproves (-5), unless hardened (+2)
- Leliana disapproves (-3)
- Morrigan disapproves (-5)
- Sten approves (+3)
- (Oghren, Wynne, Zevran and Shale are indifferent)
2. Free Jowan and tell him to do anything other than run.
- He will refuse to leave without making amends, and is encountered again later.
- Alistair disapproves (-5) if you do not Persuade him otherwise
- Leliana disapproves (-3) (or +2 if you attempt to recruit him (he will refuse) and then say "Just don't make things worse.")
- Morrigan approves (+7)
- Sten disapproves (-5)
- (Wynne, Zevran and Shale are indifferent)
3. Free Jowan and tell him you never want to see him again. (This or killing Jowan, and siding with the templars in Broken Circle, will eliminate any option of saving Connor's life.)
- Alistair disapproves (-5) if you do not Persuade him otherwise
- Morrigan approves (+7)
- Sten disapproves (-5)
- Wynne disapproves (-5)
- (Shale and Zevran are indifferent)
4. Leave Jowan locked up.
- He remains in the cell until you change your mind, or Bann Teagan retrieves him later.
Explore the Castle
Main Floor

Map of Main Floor
The first time the party enters this area is from below, into the northwest corner. They will quickly be confronted by undead. The chapel across the hall holds an elite greater shade with a few lesser minions, and a book. The other room nearby is the armoury (which is locked and contains a variety of weapons and armor).
To the east more corpses will be encountered. Kennels north of the hall contain several mabari (one elite); these will only attack if approached.
- Loot here includes kaddis, a collar and a Lamb Bone for Dog.
South of the corridor, a door leading to the Main Hall is impassable; another leads to more undead. Beyond are stairs to the castle's cellar.
Basement - Cellar
- Main article: Redcliffe Dungeons
The next section of the basement is a single room providing passage to the courtyard. Check the containers here for Steel Bracers and a Love Letter.
Courtyard
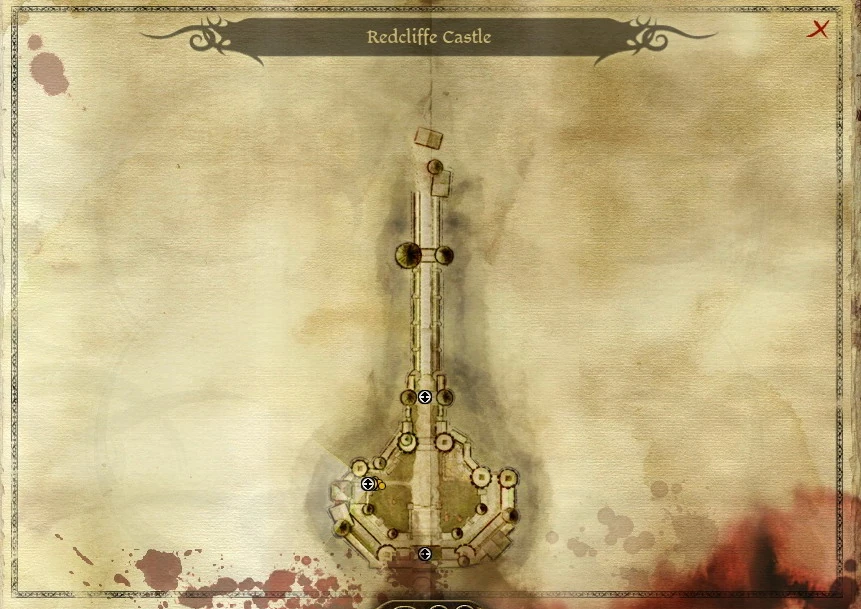
Map of Courtyard and bridge
Here a considerable fight awaits. Shambling Corpses and Skeleton Archers make up the majority of the enemies. However, there is also a Revenant.
A lever just inside the inner gate may be activated before, during or after any fighting. Ser Perth and other knights (those not lost during The Attack at Nightfall) wait just outside the gate, and will join battle if it is lifted.
Once the knights are inside the gates and the fight is over, you may advise them to hold the courtyard or proceed inside. Either way, entering the main floor triggers a cut-scene.
What to do with Connor
Eventually, The Warden will reach the Main Hall of the Castle and find Bann Teagan (possessed), Connor (possessed) and Isolde. A cut-scene leads to a fight against a group of dominated guards, led by Bann Teagan. Connor runs away during this battle; afterwards, The Warden must decide how to handle the boy's possession:
- Option 1
- Kill Connor
- This may seem like the simplest option, but it is still a difficult one. On the second floor are large groups of undead waiting to lay waste to the party, and it may be necessary to cycle in your best fighters before venturing there. (It is also wise to bring a lock-picker, as Redcliffe's vault contains a decent cache of treasure and equipment. The vault's key drops from the Chamberlain on the main floor, but after this quest is completed only sufficient lockpicking can (re-)open that door.
- As for killing Connor, you had better come prepared. Connor himself will lose control, and the Demon in its 'true' form will block all exits from the room. Out of all the options, this is definitely the hardest, and the ensuing battle is far more difficult than the possible options below (not including Broken Circle, which has tough fights of its own).
- The Demon will start off the fight with AOE spells, which it will repeat every now and then between single-target attacks. It has high health but its spells can easily be avoided as long as the group keeps moving. When its health reaches a certain amount, the Demon will disappear in a burst of light that brings a few Rage Demons. These deal significant damage when ganging up, but can be killed rather easily. Between finishing them off and the return of the Desire Demon
- The demon will come back and run through its spells once more, not really changing strategies. It will teleport once again when its health gets low enough, bringing in more powerful and more numerous rage demons.
- Hopefully the Desire Demon is now sufficiently weak enough for you to dispatch it. Cutscene: The Warden is summoned to the Arl's chambers to discuss his situation.Note: Although there is a dialogue option allowing the player to be moved by Isolde's plea and back down from killing Connor after the fight, she will soon determine that her son has suffered a grievous wound and will want to end his suffering then and there.
- Option 2
- Jowan's Ritual
- If you freed Jowan from his cell earlier on, or at the very least did not kill him, you have the option of utilizing his rather unpleasant talent for Blood Magic to deal with the Demon in its own territory. Jowan will explain that he can do this alone, but he will need two things: A mage to enter the Fade and kill the Demon, and a person to sacrifice in the process. Isolde will tearfully step forward as the one who will die, and will not be persuaded otherwise, so there is only the matter of which mage to send. A mage Warden may enter the Fade and deal with the demon personally (possibly gaining a powerful prize in the process). Otherwise, you will need to 'volunteer' one of the mages available. Once this is decided, the ritual can begin.
- A slightly disturbing cutscene will ensue, in which Jowan will begin to cast his spell and Isolde will ready herself for her fate. In an instant, Isolde will be gruesomely killed, as if run through by an invisible spear. Your chosen mage will also be wounded and brutally hurled to the floor. Pale, unresponsive and apparently lifeless, s/he will depart from the physical and journey into the realm of the Fade...
- Option 3
- Travel to the Circle Tower for help
- This will spare Connor and Isolde. This option will be unavailable if Broken Circle is already completed and the Warden sided with the Templars. If the party has not yet braved Kinloch Hold's abominations, the resolution to "Arl of Redcliffe" must come after it is completed - and without taking the Templars' side. (This 'wait' will not make any difference to Connor's condition, nor to Eamon's.)
- If you choose to do this after sparing Connor on the main floor, it is best to not approach him on the second floor. Be very careful if you speak to him here: most dialog paths, or attempting to enter Arl Eamon's bedroom, will incite the demon to attack, meaning death to either Connor or the party. You can enter Connor's room (to the left when facing him) without triggering this conversation.
- When returning with mage support, go to Irving on the main floor to proceed with the ritual; Connor remains in front of his father's room until this quest is resolved.
The dialogue includes the option of stalling for time, providing an opportunity to explore the rest of the castle. Some enemies and treasures available at this point will be removed once the quest line has progressed. Alistair's Mother's Amulet is found in a desk. Any knights that made it inside can help you with the fighting on this floor.
Upper Floor
Note: It is advised that you save before entering the Upper Floor, as the vault is one of the few locations where a large amount of especially rare items can be found (for example part of the Commander's Plate Armor Set or Chevalier Armor Set). Therefore people should save before entering and reload and repeat until they can get the best loot available.
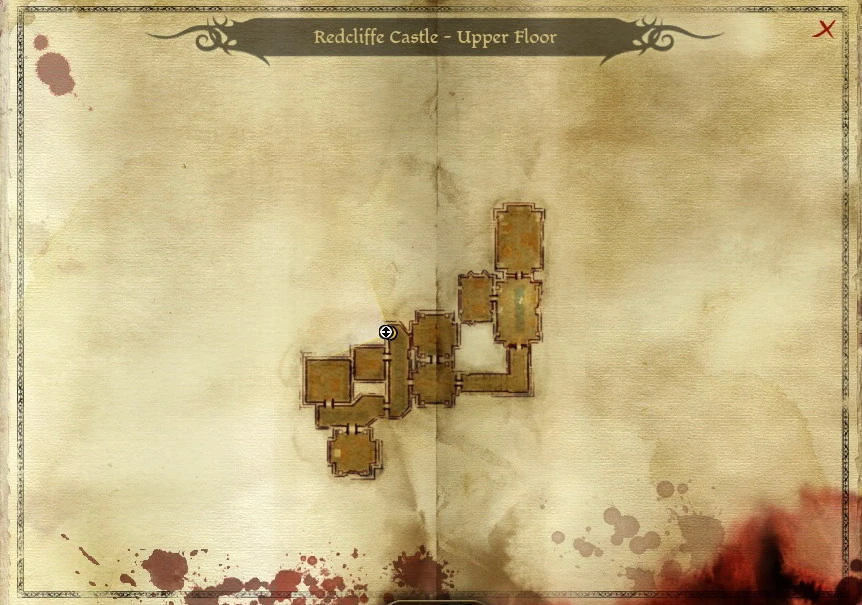
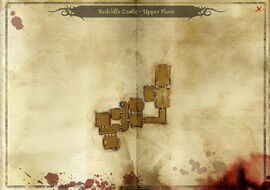
Map of Upper Floor
If this level of the Castle is explored before completing the Arl quest, the Warden can find:
- The Guerrins of Ferelden: A Genealogical History
- a Stone Dragon Statuette
- Corpse Gall (from the undead around here)
- the Vault: the door to this room can be opened with a key found on the body of the Chamberlain, found on the Main Floor of the Castle. Opening the door provides 50 experience points, and access to a good selection of weapons and armors (both elite and boss rank), as well as:
Enter the Fade
The Fade can be entered by the Warden (if playing as a mage), Morrigan, Wynne, Jowan (if the Circle has been recruited and he was brought/sent upstairs from his cell) or First Enchanter Irving (if the Circle has been recruited and he is asked to perform this ritual). The discussion regarding who will go should trigger approval changes.
- If you say you must think about who will enter the Fade:
- Alistair approves (+4)
- Leliana approves (+2)
- Oghren disapproves (-3)
- Sten disapproves (-10)
- Wynne approves (+4)
- If you decide to let Jowan sacrifice Isolde for the ritual:
- Alistair disapproves (-10)
- Even if not in the current party; also see below. Can be mitigated to (-9), possibly further, with high cunning.[confirmation needed]
- Even if not in the current party; also see below. Can be mitigated to
- Leliana disapproves (-3)
- Morrigan approves (+2) (or -1 if you send her into the Fade)
- Wynne disapproves (-10) (or -20 if you send her into the Fade)
- Shale disapproves (-5)
- If you have the Circle of Magi use lyrium for the ritual:
- Alistair approves (+4)
- Leliana approves (+2)
- Oghren disapproves (-3)
- Sten disapproves (-10)
- Wynne approves (+4)
- If you suggest killing Connor:
- Leliana disapproves (-5)
- This loss can be canceled by successful persuasion;
- Oghren disapproves (-3)
- Sten approves (+4)
- Wynne disapproves (-3)
- Shale approves (+4)
- If you go through with killing Connor:
- Morrigan approves (+4)
- Oghren disapproves (-20)
- Shale is indifferent
Note that Jowan has Blood Mage spells but only basic gear. Also, if you send someone other than The Warden, there will be no option to bargain with the Desire Demon.
The Fade
- See also: The Fade: Concerning Connor
One of the options in dealing with Connor is to enter the Fade as the Warden yourself (assuming the Warden is a Mage). This section of the Fade is fairly small and a single path winds its way through smaller portions. Various Fade Portals will provide passage to the next part every time. On the destination side of each portal, the Warden will find what appears to be Connor, but quickly turns into a Demon after a brief dialogue. These Demons have the appearance of the Desire Demon the Warden is hunting, but none of its abilities. As the Warden progresses, the Demons will also be aided by Lesser Rage Demons. After defeating each Demon, the Fade portal that lead to the encounter re-opens, allowing passage to the next section.
The Desire Demon


The Desire Demon as met in the Fade.
In the Fade, the demon possessing Connor can either be killed or convinced to trade a favor for its life. If the Warden is a mage and enters the Fade personally, the Blood Mage specialization can be unlocked by conversing with the demon. If someone else (Morrigan, Wynne, Jowan, or Irving) enters the Fade, they will not trade with the demon and the specialization (or any other reward) cannot be unlocked.
Soon after entering the Fade, you will see the Arl calling out for Connor. Speaking with him is not necessary, but it can be informative. Continue down the path and enter the portal, where you will see Connor. You must speak with Connor; regardless of which options are selected the demon will replace Connor and fight you. Once defeated, the demon will disappear and the exit portal will activate. Traveling through it will lead to another "Connor". This process repeats three times. None of the dialogue options change the progression or the final conversation with the true Desire Demon.
When you speak with the demon in her true form, you should not choose any of the below replies if you wish to gain a reward from her (keep in mind she will only bargain with the Warden):
- "There will be no discussion."
- "No, I will not deal with you."
- "I want you to pay for your atrocities."
- "I want nothing from you."
- "I say no deal."
- "No. Our talk is done here."
If the option, "(Intimidate) How about you leave and I do not destroy you." is selected the only way to still get a reward from the demon is if a second, harder Intimidate test is passed: "(Intimidate) On the contrary, I believe you can offer more." Master Persuasion may be necessary to force the demon's hand. This is the only way to get the demon to leave for good, which is proven true by the epilogue, and still get a reward from it.
Other than the above mentioned, every option will eventually lead to a final choice that will determine what Desire Demon will give you. Possible trades are:
- "Arcane secrets. I want to know specialized blood magic." → unlocks the Blood Mage specialization.
- "I'll take pleasure, demon. Show me what you've got." → a kissing scene between the Warden and the demon.
- "Pleasure is empty. I want the love of those around me." → you can boost one of your companions' approval ratings (+20).
- "Keep it simple. Something to increase my talents." → you get a Tome of Ethereal Suggestion (+1 talent/spell).
- "I want nothing from you."
If you unlock Blood Mage, it will appear in the specializations the next time you level up.
Notes
- Like all other specializations, the Blood Mage unlock is tied to your account, and only needs to be unlocked on one character. One also has the option of simply unlocking it once, then reverting to a prior save.
- If you are intimidating enough you can intimidate her twice to let her go away permanently and get one of the trades for free as well.
- If you attack and kill the demon in the Fade, you will not be able to loot her as nothing real exists in the fade.
- If you choose Jowan, you can not make any deals with the demon and you face a difficult time in the fade, for Jowan is a very weak offensive mage and has no health or lyrium potions.
Confronting Connor
- If you wait to make your decision and explore the castle, you will eventually find Connor on the 2nd floor, past the vault. If you try to enter the Arl's room (directly behind Connor), you will get in combat with the desire demon in the physical realm; at that point it will be impossible to keep Connor alive.
- This may be tougher than a Fade confrontation, as the desire demon brings forth corpses and rage demons to help it. However, it does yield experience for all party members (unlike using the Fade to free Connor, which only gives XP to the Warden, Morrigan or Wynne).
- For what it's worth, killing Connor is the only way to loot this demon. It will also affect approval of allies not in your current party.
If you win the fight, you have several options:
- Let Isolde kill Connor:
- Alistair disapproves (-10)
- Morrigan approves (+4)
- Wynne approves (+1)
- Zevran approves (+2)
- Shale is indifferent
- Knock her out and kill Connor yourself:
- Alistair disapproves (-20)
- Leliana disapproves (-5)
- This happens even if she is not present.
- Morrigan approves (+4)
- Oghren disapproves (-20)
- If Oghren is not in the current party, the loss is only -10.
- Sten approves (+4)
- Wynne disapproves (-5)
- Zevran approves (+6)
- Kill Connor yourself:
- Leliana disapproves (-3)
- Morrigan approves (+4)
- Sten approves (+4)
- Wynne approves (+1)
- Zevran approves (+2)
- Let Isolde kill Connor:
Result
Once the demon has departed, a cutscene presents the state of Redcliffe. Teagan is leading the rebuilding effort since the Arl is still sick (albeit in what seems to be a stable condition); it seems the only hope for healing him is The Urn of Sacred Ashes. If Jowan is still alive, Teagan asks for advice in dealing with him, but waits to give the decision to his brother regardless of the Warden's input.
If the quest for the Urn is already completed, this dialogue will only be ended by revealing the ashes to Isolde and/or Teagan.
Once "Arl of Redcliffe", Broken Circle, A Paragon of Her Kind, and Nature of the Beast) are complete, Arl Eamon will be ready to call the Landsmeet (but will wait if asked to).
Rewards
After the Attack at Nightfall
![]() Helm of the Red - if you can keep all villagers and knights alive.
Helm of the Red - if you can keep all villagers and knights alive.
After dealing with Connor
![]() Enchanter's Staff - will be given by Isolde if you try to persuade her to give some of her wealth; if Connor still lives, you can suggest she give it to him instead
Enchanter's Staff - will be given by Isolde if you try to persuade her to give some of her wealth; if Connor still lives, you can suggest she give it to him instead
![]() Blood Mage specialization unlocked (if the Warden is a mage and asked for arcane secrets from the Desire Demon).
Blood Mage specialization unlocked (if the Warden is a mage and asked for arcane secrets from the Desire Demon).
After Arl Eamon recovers
Champion may refer to:
- Champion (Origins), for the specialization in Dragon Age: Origins.
- Champion (Inquisition), for the specialization in Dragon Age: Inquisition.
- Champion, for the title bestowed by a city ruler of the Free Marches.
| This disambiguation page lists articles associated with the same title. If an internal link led you here, you may wish to change the link to point directly to the intended article. |
specialization unlocked.
Additionally, once Arl Eamon is cured you will receive either +1 spell/talent (as mage/warrior) or +1 skill (as rogue) if his offer of a reward is accepted. You may also receive +1 attribute point (not on ![]() v 1.04).
v 1.04).
Alistair's Reaction
Upon arriving in camp after resolving the situation with Connor, Alistair will confront the Warden about it. If the Warden chose to kill Connor, or allowed Jowan to use Blood Magic to reach the Fade, Alistair will angrily confront her/him about it; you can attempt to mitigate Alistair's reaction, or fan the flames.
- Allowing Jowan to use Blood Magic may trigger Alistair to lose (-10) immediately, and during the Camp conversation, up to an additional (-41) can be lost.
- If Alistair is in the party and The Warden kills Connor, (-41) from the Camp conversation may be lost. However, if the Warden assures Alistair that the act was not enjoyed, Alistair may acknowledge the choice as necessary, and only (-6) will be lost; this may be affected by the way in which the Warden speaks to Connor and Isolde during the quest.
- If Alistair is not in the party when Connor is killed or Jowan uses Blood Magic, he will still confront The Warden in camp. He can be soothed and persuaded that the Warden did the best he/she could, leading to a loss of only (-9) or, even less, (-6) if the Warden succeeds in Persuading him that there was no other option.
- If Alistair was in the party when Connor is killed or Jowan is allowed to use Blood Magic, he will confront The Warden at the camp. If The Warden picks the option "I think that turned out quite well, don't you?" in response to the confrontation, Alistair will thank The Warden for saving the Arl's family, even though either Connor or Isolde was killed. Alistair will gain (+7) from this conversation. However , on the PS3 this same response can invoke a possible ( -13).
- If the Circle of Magi are called in, which results in Connor and his mother living, then when Alistair confronts you he will thank you rather than be angry ( (+7)).
Additional Notes
- If you have done the Broken Circle quest first you can only seek the Circle's help if the mages were saved.
- If you have completed the Urn of Sacred Ashes quest prior of reaching Redcliffe, you won't have any dialogue choices for informing either Bann Teagan or Arlessa Isolde about having the Ashes for the Arl until this quest is completed.
Side quests
Bugs
Exploit
After resolving the issues with Connor, the Vault will be relocked. Unlocking it gives 50 XP (the Key that may have first opened it will no longer work). Every time you return to the second floor, it will be locked again.
If you elect to confront the Desire Demon in The Fade, the player has the option to take items from any character in the party that shows an approval increase or decrease from the decision. Click on the message showing the increase/decrease in the lower left-hand corner to open the character screen. Click on the backpack icon from here to open the inventory. Remove desired items. Repeat with any additional characters. Equip the items to the playable character in The Fade. Any items equipped to Jowan or Irving, as well as any items in their inventories, will be lost to them upon exiting The Fade.
See also
Gallery
")