Walkthrough
Courtyard and Keep
Once the quest is complete and the veil is sealed, you will not be able to re-enter the keep. Therefore, if you do not have a character able to unlock chests, you will miss out on a lot of locked chests inside. Walk up the hill to your left and select the statue to initiate Ancient History quest (this is for Asturian's Chest see article for details). When walking back down you will be attacked by 3 waves of Dead Wardens.
Enter the keep on the first floor and kill the 2 Lesser Rage Demons and an Arcane Warrior in the Mess Hall. There are 4 enemies in the Barracks, as well as some items and a chest in the kitchen. The library has demons and an Archivist, kill them and then proceed to the second floor.
Entering the Great Hall
Before entering the great hall (big room with four purple summoning circles on the floor), buff your characters and prepare for a tough fight. A Rage Demon will show up, along with one undead warden in each summoning circle (four total). The undead will heal the Rage Demon, so it's best to get rid of them first. Alternatively you may cast Curse of Mortality on the Rage Demon to prevent it from healing. After you kill the first wave and have reduced the demon's health to some point, another four undead wardens will show up, as well as 2 Greater Rage Demons. Kill them all and continue attacking the Rage Demon, then watch the cutscene that follows.
Now you have two choices: Kill Sophia and side with Avernus; or side with Sophia and kill Avernus.
Meeting Sophia Dryden
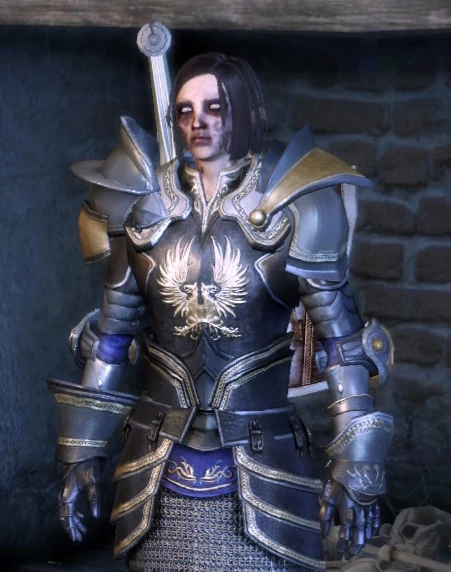
Meeting Possessed Sophia
Kill the undead in the courtyard and enter the castle to watch a cutscene. Make your way to the second floor Commander's Quarters to encounter Commander Sophia Dryden, who's possessed by a demon. You can choose to free the demon, which means going into the Mage's tower and destroying Avernus. Or you may choose to kill the demon to get the Warden Commander Armor, Warden Commander Gloves and Warden Commander Boots. If you choose to kill the demon now, you will have to fight the possessed Sophia Dryden and four warden skeletons.
Alternatively, you can choose to aid the demon by freeing the magical barrier that keeps it in Soldier's Peak. If you do so, you may persuade it to tell you the secrets of Sophia Dryden or to give you a personal reward. If it agrees, it will promise to reveal Sophia's secrets after you have slain Avernus.
If you prefer to truely stay neutral and gain knowledge to your own advantage (which may be the advantage of Ferelden after all), convince Sophia to seal the Veil before you destroy the tower. Promise her...
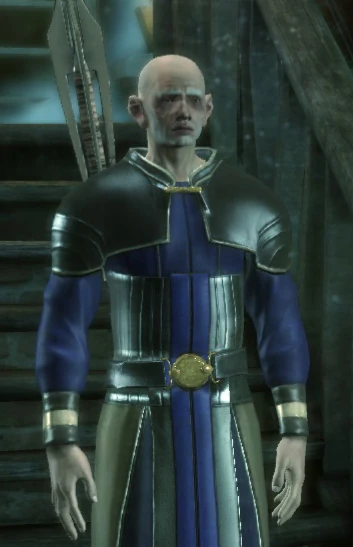
Meeting Avernus
Meeting Avernus
Once you have either killed or sided with Sophia Dryden, continue onto the bridge, past the Dead Wardens, Skeleton Archers and the traps, and enter Avernus' tower. Make your way to the lab and read the journal for a cutscene that tells you about the terrible experiments Avernus has been conducting on fellow wardens. Unless you morally oppose dark magic, drink from the bottle to gain two Power of Blood skills. Enter the door and talk to Avernus to get a complete understanding of what's going on. If you killed Sophie, tell Avernus that you want some answers, then persuade him that his experiments are wrong, and he will ask for you to help seal the veil before accepting your judgment for his failures. Choose to aid Avernus, and then follow him to the Great Hall.
Alternatively, if you agreed to help Sophie, the Warden will be given a choice to attack Avernus. He is a Blood Mage and has an affinity for casting fireballs. If you choose to attack him, you will have to deal with him, three paralysis traps, and a few undead skeletons.
If you made Sophia believe you were on her side and you would kill Avernus - you still don't have to do it. Stay neutral, accquire all knowledge you can get and let him continue his research. You will get all the loot, keep the keep and have a cosy place to come back for trading and knowledge gain.
Crisis
If you have not slain the demon, nor Avernus, they will cross paths in the hallways outside of Sophie's office. Avernus will ask for your aid and you must choose to fight alongside Avernus or the possessed Sophie Dryden. Whoever you choose to aid will take no damage during this fight and cannot be killed.
A word of caution: If you side with Avernus and kill Sophia without killing her lackeys, you will jump straight into the Main Hall and seal the veil. If you then kill Avernus through combat (which leads to the auto-scripted talk with Levi), you will be stuck in combat since the Warden Skeletons have seen you, the door is stuck (they can't open because they are mobs, and you will not be able to open because you are in combat) and you will be stuck in combat mode (can't save or open doors). Make sure the mobs are dead before you kill Sophia.
Sealing the Veil
Eventually, whomever you sided with, Avernus or the possessed Sophie Dryden, will attempt to seal the veil. They will stand in each summoning circle in turn, during which time demons will appear and attack your party, one wave per circle for a total of four waves. There is a small window of peace between each wave, so save and heal. Eventually, Desire Demon appears. Once she is killed, the battle is over and the veil is sealed.
Post Veil
If the Warden sided with Avernus, and persuaded him that the experiments he conducted was wrong, he will yield to your mercy. You can execute him and get the Robes of Avernus, kick him out of the keep to never see him again, or let him continue his research.
If the Warden sided with the possessed Sophie Dryden, you may ask for your reward now. If you asked for a personal reward, the demon will reveal the location of a secret stash of 8 ![]() in Sophie's office. If you asked for the history behind the rebellion, Sophie will explain it now. Once you have received your reward, you may demand the other. Once this is done, you can allow the demon to leave the keep, or fight it to prevent it from leaving which will give you the Warden Commander Armor, Warden Commander Gloves and Warden Commander Boots.
in Sophie's office. If you asked for the history behind the rebellion, Sophie will explain it now. Once you have received your reward, you may demand the other. Once this is done, you can allow the demon to leave the keep, or fight it to prevent it from leaving which will give you the Warden Commander Armor, Warden Commander Gloves and Warden Commander Boots.
You must leave and then return to Soldier's Peak to get the Party Storage Chest and for Levi's shop to be open. You can also shop at Mikhael's Smithy once you return.
Party Reaction
If you have Morrigan in your party and persuade Avernus to submit to the Warden's judgment, then decide that death is the only solution, Morrigan will disapprove.
If you have Wynne in your party and persuade Avernus to submit to the Warden's judgment, then decide that you will not be his judge, she will object that what he has done is completely amoral and there must be consequences. If you choose to support him, you will lose 3 approval from her. At this point, the worse case scenario for Avernus is to cast him out of the Wardens, and you will not lose any points with her. A similar discussion occurs if you choose that his punishment is to live with what he has done, also losing 3 approval if you support him. Wynne will not disapprove if you allow Avernus to continue his experiments ethically, which can be done before or after closing the Veil.
If Zevran is in your group and you choose to make a deal with Sophia Dryden, you will gain +4 approval from him.
Note however that if the scene draws no comment from either Morrigan or Zevran, there will be no change in approval. This can happen if another party member such as Alistair or Sten reacts first.