Tag: Visual edit |
|||
| (17 intermediate revisions by 12 users not shown) | |||
| Line 1: | Line 1: | ||
| − | {{About|the quest|the downloadable content|Return to Ostagar}} |
||
| − | |||
<onlyinclude>{{QuestTransformer |
<onlyinclude>{{QuestTransformer |
||
|style = {{{style|}}} |
|style = {{{style|}}} |
||
| Line 16: | Line 14: | ||
== Background == |
== Background == |
||
| − | When |
+ | When Return to Ostagar is installed, the Warden will receive a quest called [[A King's Confidant]], suggesting they seek out a survivor of the events at [[Ostagar]] who can be found in a new location, [[Bann Loren's Lands]]. After speaking with the confidant, [[Elric Maraigne]], the Warden can travel back to Ostagar on the [[World map (Origins)|world map]]. |
| − | {{Note|Companions who had some involvement with the [[Battle |
+ | {{Note|Companions who had some involvement with the [[Battle of Ostagar]] — [[Wynne]], [[Alistair]] and [[Secret Companion]] — will have additional dialogue during this quest, so you may want to take some of them along. (Indeed, Alistair will strongly recommend during A King's Confidant that he and Wynne, at least, accompany the Warden to Ostagar, though this is not mandatory). [[Dog]] also has some "lines". [[Sten]], [[Leliana]] and [[Zevran Arainai|Zevran]] have a single line of dialogue when you find [[Maric's Blade]]. [[Oghren]] will have a line if he is the only other member of the party. If [[Secret Companion]] is the only other member of the party, after he finishes his normal lines, [[Morrigan]] will speak a line even though she is not there.}} |
== Walkthrough == |
== Walkthrough == |
||
| Line 24: | Line 22: | ||
=== Ostagar === |
=== Ostagar === |
||
[[File:Map-ReturnToOstagar-Ostagar.png|thumb|270px|Ostagar upon the Warden's return.]] |
[[File:Map-ReturnToOstagar-Ostagar.png|thumb|270px|Ostagar upon the Warden's return.]] |
||
| − | + | The party enters Ostagar at the upper west side of the ruins, through the previously out-of-bounds gate that led to the army camp. Whilst exploring Ostagar and making your way towards the [[Tower of Ishal]] on the east side of the map, you will run into several mobs of [[Darkspawn|darkspawn]], the commanders of which will drop pieces of [[Cailan's armor set]]: [[Cailan's Breastplate]], [[Cailan's Gauntlets]], [[Cailan's Greaves]] and [[Cailan's Shield]] are all dropped in various exterior portions of the Ostagar area. [[Cailan's Helm]] is '''''not''''' in this area. Maric's Blade is in the Royal Arms Chest. |
|
| − | * If you had not previously obtained it as part of [[The Hungry Deserter]], loot the Mages' Chest Key from the corpse of the prisoner |
+ | * If you had not previously obtained it as part of [[The Hungry Deserter]], loot the Mages' Chest Key from the corpse of the prisoner in the fallen cage near the starting position. This key can be used to loot the Mages' Chest and obtain the [[Corrupted Magister's Staff]], as well as the loot that would have been found in the chest had it been opened prior to the Battle of Ostagar. If you looted the chest when in Ostagar previously, you will ''not'' be able to open it now, because the key will not be there. |
| − | ** {{Platforms|pc}}users can install a [http://www. |
+ | ** {{Platforms|pc}} users can install a [http://www.nexusmods.com/dragonage/mods/728/? cheat] that allows them to add the key to the inventory once more. |
| − | * If you killed |
+ | * If you killed Dog before the Battle of Ostagar, or you told Dog to shoo during the [[Deserted Farmland]] [[Encounters (Origins)|encounter]] after first leaving [[Flemeth's Hut]] for [[Lothering]], then there will be a cutscene where you find a new hound in the Kennels that can be recruited. |
| ⚫ | |||
| ⚫ | * Continue on towards King Cailan's Tent, |
||
| + | * The Joining Chalice can be found east past the former War Council hall on the first circular plateau overlooking the cliff. |
||
| − | {{SpoilerDAO|style=short|As you walk southwest from the Magi encampment, there is an ambush by two [[genlock]]s and [[Hurlock Vanguard]]. If your rogue is far enough forward from the party, this appears to be triggered by approaching the dead [[Mabari]] bodies, as is the appearance of the [[Blight wolf|blight wolves]]. The problem is that if the rogue is far enough forward, you won't even hear the combat noises and characters will dying before you even realize it. To avoid this, leave the other characters up on the northernmost region behind the wall above the ramp. Then, when the ambush occurs, the ambush and the wolves run to a spot southwest of [[Duncan]]'s Fire and you can decide from there how to deal with them.}} |
||
| ⚫ | |||
| ⚫ | * Continue on towards King Cailan's Tent, where you will find {{TextContainer|Cailan's Chest}}. Loot Maric's Blade and the quest item [[Secret Correspondence]], which unlocks [[Codex entry: Cailan's Documents - Page 1 of 3]], [[Codex entry: Cailan's Documents - Page 2 of 3]] and [[Codex entry: Cailan's Documents - Page 3 of 3]]. |
||
| − | * Cross the bridge to the eastern side of the ruins where you will discover [[Cailan Theirin|Cailan's]] body afterwards clear the eastern side of the ruins and head for the Tower of Ishal. |
||
| + | |||
| − | * Five of the six items needed for the quest are in this area. Cailan's Breastplate, Gauntlets, Greaves & Shield are all dropped by Elite Darkspawn in this area while Maric's Blade is in the Royal Arms Chest. Cailan's Helm is '''''not''''' in this area. |
||
| + | * As you walk southwest from the Magi Encampment, there is an attack by [[Blight wolf|Blight Wolves]], two [[Genlock]]s, and a [[Hurlock vanguard|Hurlock Vanguard]]. This is triggered once any party member draws level with the dead [[Mabari]] bodies. A [[Stealth (Origins)|stealthed]] [[Rogue (Origins)|rogue]] may trigger this attack but remain undetected, which causes the enemies to gather tightly around a spot close to [[Duncan]]'s Fire. This tight gathering by a mob can also be triggered by a stealthed rogue moving down the slope from the War Council area towards the Magi Encampment. |
||
| + | |||
| + | * Cross the Bridge to the eastern side of the ruins. On the way, you will discover [[Cailan Theirin|Cailan's]] body. Clear the eastern side of the ruins and head to the Tower of Ishal.{{Note|On the far right side of the map is an exit to the World Map. It is recommended that you take this opportunity to visit the [[party camp]] and sell or remove any excess items from the party inventory before heading into the Tower of Ishal.}} |
||
=== Tower of Ishal === |
=== Tower of Ishal === |
||
[[File:Map-ReturnToOstagar-TowerofIshal.png|thumb|270px|The Tower of Ishal]] |
[[File:Map-ReturnToOstagar-TowerofIshal.png|thumb|270px|The Tower of Ishal]] |
||
| ⚫ | * Fight your way past the Genlocks, [[Hurlock grunt|Hurlock Grunt]]s, and an [[Ogre]]. If you keep your entire party in the first room you enter, you can have a single party member stand just at the door into the next room. With this arrangement, the darkspawn seem to attack only one at a time. You can also draw the Ogre into this room after most of the darkspawn are dead. |
||
| − | {{Note|Before heading into the Tower of Ishal, on the far left and right side of the map, is a world map marker. It is highly recommended you leave (temporarily) to dump off any excess items you may be carrying (via the party camp). No doubt, you have acquired a lot of loot at this point, and the Tower of Ishal has a fair amount of items, too.}} |
||
| ⚫ | |||
| ⚫ | * Fight your way past the Genlocks |
||
| ⚫ | |||
=== Darkspawn Tunnels === |
=== Darkspawn Tunnels === |
||
| + | [[File:Darkspawn tunnels map dao.png|thumb|270px|Darkspawn tunnels]] |
||
| ⚫ | |||
| + | |||
| ⚫ | |||
| ⚫ | |||
| + | |||
| ⚫ | |||
=== Battlefield === |
=== Battlefield === |
||
| − | * Defeat the [[boss]] level |
+ | * Defeat the [[boss]] level [[risen ogre]] and the [[Genlock necromancer|Genlock Necromancer]]. The Necromancer will command the ten corpses on the battlefield to rise. While these skeletons appear frozen already, they are not immune to cold. Killing the Genlock Necromancer will cause the risen ogre and all other enemies on the battlefield to fall, although the party will not gain XP for their deaths. There is sometimes a lag between the time you kill the Necromancer and the time the risen enemies die. |
| + | |||
| − | * |
+ | * Re-enter the darkspawn tunnel. A cutscene will ensue. |
=== Cailan's body === |
=== Cailan's body === |
||
| − | At this point, there are three options presented as to what to do with Cailan's body: give him a funeral pyre, cut him down and leave him for the wolves or leave him for the |
+ | At this point, there are three options presented as to what to do with Cailan's body: give him a funeral pyre, cut him down and leave him for the wolves, or leave him for the darkspawn. Active party members will approve or disapprove to varying degrees depending on the choice that is made: |
{| class="daotable" width="100%" |
{| class="daotable" width="100%" |
||
| − | !colspan="3"|<div align="center">Approval Changes</div> |
+ | ! colspan="3" |<div align="center">Approval Changes</div> |
|- |
|- |
||
!|<div align="center">Funeral Pyre</div> |
!|<div align="center">Funeral Pyre</div> |
||
| Line 64: | Line 67: | ||
!|<div align="center">Leave him</div> |
!|<div align="center">Leave him</div> |
||
|- |
|- |
||
| − | |valign="top"| |
+ | | valign="top" | |
:{{Approval|Alistair|7}} |
:{{Approval|Alistair|7}} |
||
:{{Approval|Leliana|2}} |
:{{Approval|Leliana|2}} |
||
| ⚫ | |||
:{{Approval|Secret Companion|-5}} |
:{{Approval|Secret Companion|-5}} |
||
| ⚫ | |||
:{{Approval|Wynne|4}} |
:{{Approval|Wynne|4}} |
||
| ⚫ | |||
:{{Approval|Zevran|-3}} |
:{{Approval|Zevran|-3}} |
||
| ⚫ | |||
:{{Approval|Oghren|2}} |
:{{Approval|Oghren|2}} |
||
| − | |valign="top"| |
+ | | valign="top" | |
:{{Approval|Alistair|-10}} |
:{{Approval|Alistair|-10}} |
||
:{{Approval|Leliana|2}} |
:{{Approval|Leliana|2}} |
||
:{{Approval|Secret Companion|4}} |
:{{Approval|Secret Companion|4}} |
||
:{{Approval|Wynne|-3}} |
:{{Approval|Wynne|-3}} |
||
| ⚫ | |||
:{{Approval|Morrigan|2}} |
:{{Approval|Morrigan|2}} |
||
| ⚫ | |||
:{{Approval|Oghren|2}} |
:{{Approval|Oghren|2}} |
||
| − | |valign="top"| |
+ | | valign="top" | |
:{{Approval|Alistair|-10}} |
:{{Approval|Alistair|-10}} |
||
:{{Approval|Leliana|-3}} |
:{{Approval|Leliana|-3}} |
||
:{{Approval|Secret Companion|-3}} |
:{{Approval|Secret Companion|-3}} |
||
| ⚫ | |||
:{{Approval|Wynne|-10}} |
:{{Approval|Wynne|-10}} |
||
:{{Approval|Morrigan|-3}} |
:{{Approval|Morrigan|-3}} |
||
:{{Approval|Zevran|2}} |
:{{Approval|Zevran|2}} |
||
| ⚫ | |||
|} |
|} |
||
== Leaving Ostagar == |
== Leaving Ostagar == |
||
| − | After dealing with the king's body, the party can continue exploring the area or |
+ | After dealing with the king's body, the party can either continue exploring the area, or leave. Despite a statement made in the quest log about Ostagar about to go into darkness and be overrun with darkspawn again, it is possible to return without hazard if the player wants to access items that were not picked up earlier ({{Platforms|ps3|xbox360}}). A large number of weapons, armor, and items can be found, so a return trip can be worth the effort if anything was left behind. |
| + | {{Note|{{Platforms|pc}} If the party leaves Ostagar after the main quest is complete, the location becomes inaccessible once again.}} |
||
== Notable items == |
== Notable items == |
||
| Line 100: | Line 104: | ||
{{:Cailan's Helm|style=iconmini}}, source: Drop {{TextContainer|Genlock Necromancer}}{{clrl}} |
{{:Cailan's Helm|style=iconmini}}, source: Drop {{TextContainer|Genlock Necromancer}}{{clrl}} |
||
{{:Cailan's Shield|style=iconmini}}, source: Drop {{TextContainer|Hurlock Vanguard}}{{clrl}} |
{{:Cailan's Shield|style=iconmini}}, source: Drop {{TextContainer|Hurlock Vanguard}}{{clrl}} |
||
| − | {{:Corrupt Inquisitor Staff|style=iconmini}}, source: {{TextContainer|Mages' Chest}}, |
+ | {{:Corrupt Inquisitor Staff|style=iconmini}}, source: {{TextContainer|Mages' Chest}}, as long as the Mages' Chest wasn't opened before the Battle of Ostagar after acquiring the Key to the Mages' Chest during [[The Hungry Deserter]]{{clrl}} |
| − | {{:Duncan's Dagger|style=iconmini}}, source: Drop {{TextContainer|Risen |
+ | {{:Duncan's Dagger|style=iconmini}}, source: Drop {{TextContainer|Risen ogre}}{{clrl}} |
| − | {{:Duncan's Sword|style=iconmini}}, source: Drop {{TextContainer|Risen |
+ | {{:Duncan's Sword|style=iconmini}}, source: Drop {{TextContainer|Risen ogre}}{{clrl}} |
{{:Firestone Harness|style=iconmini}}, source: {{TextContainer|Dead Mabari}}{{clrl}} |
{{:Firestone Harness|style=iconmini}}, source: {{TextContainer|Dead Mabari}}{{clrl}} |
||
{{:Joining Chalice|style=iconmini}}, {{ColorItemGift|Gift}}, source: Found where the Joining Ritual took place{{clrl}} |
{{:Joining Chalice|style=iconmini}}, {{ColorItemGift|Gift}}, source: Found where the Joining Ritual took place{{clrl}} |
||
| Line 114: | Line 118: | ||
== Enemies == |
== Enemies == |
||
| − | * [[Blight Wolf]] |
+ | * [[Blight wolf|Blight Wolf]] |
* Genlock Grunt |
* Genlock Grunt |
||
* Genlock Rogue |
* Genlock Rogue |
||
* [[Genlock]] |
* [[Genlock]] |
||
* Genlock Forgemaster, Elite |
* Genlock Forgemaster, Elite |
||
| − | * [[Genlock Necromancer]], Elite |
+ | * [[Genlock necromancer|Genlock Necromancer]], Elite |
* [[Hurlock]] |
* [[Hurlock]] |
||
* Hurlock Grunt |
* Hurlock Grunt |
||
| − | * [[Hurlock Alpha]], Elite |
+ | * [[Hurlock alpha|Hurlock Alpha]], Elite |
| − | * [[Hurlock Emissary]], Elite |
+ | * [[Hurlock emissary|Hurlock Emissary]], Elite |
| − | * Hurlock General, Elite |
+ | * [[Hurlock general|Hurlock General]], Elite |
* Hurlock Strategist, Elite |
* Hurlock Strategist, Elite |
||
* Hurlock Strider, Elite |
* Hurlock Strider, Elite |
||
| − | * [[Hurlock Vanguard]], Elite |
+ | * [[Hurlock vanguard|Hurlock Vanguard]], Elite |
* [[Ogre]] |
* [[Ogre]] |
||
| − | * Risen |
+ | * [[Risen ogre]], [[Rank#Boss|Boss]] |
| − | * [[Shambling Corpse]] |
+ | * [[Shambling corpse|Shambling Corpse]] |
| − | * [[Shambling Skeleton]] |
+ | * [[Shambling skeleton|Shambling Skeleton]] |
| − | * [[ |
+ | * [[Shriek]]s |
== Bugs == |
== Bugs == |
||
| − | * Sometimes the Genlock |
+ | * Sometimes, the Genlock Necromancer appears standing amidst a horde of other darkspawn and cannot be targeted or killed. He only becomes active and killable when the risen ogre on the battlefield is finally dead, but will not be in his correct location on the battlefield and you will have to go and find him in the location where the bug occurred. After killing the Necromancer, you will have to return to the battlefield site where you encountered the risen ogre and then try to exit the area through the tunnels in order to trigger the cutscene and proceed with the quest correctly. After killing the Necromancer, wait until the quest is updated before looting him, otherwise you will not be able to finish the quest. If you do not do this, interacting with King Cailan's body afterwards will not give you options to 'deal' with his body, despite the quest being shown as complete. |
** This can be fixed by selling all of the king's items, closing the trading window, talking to the merchant again and buying the items back. |
** This can be fixed by selling all of the king's items, closing the trading window, talking to the merchant again and buying the items back. |
||
| − | * A number of items |
+ | * A number of items (e.g., Cailan's Armor Set and Cailan's Arms) are scalable, i.e. they should be higher tier if the player character is of a higher level. However, some items may be found at Tier 5 even by higher level characters. |
| − | **{{Platforms|PS3|Xbox360}}These can be upgraded by placing them in the [[Party Storage Chest]] (found in the ''[[Warden's Keep]]'' [[Downloadable content (Origins)|DLC]]), by leaving and returning, or by selling them to a merchant then repurchasing them later. |
+ | **{{Platforms|PS3|Xbox360}}These can be upgraded by placing them in the [[Party Storage Chest]] (found in the ''[[Warden's Keep]]'' [[Downloadable content (Origins)|DLC]]), by leaving and returning, or by selling them to a merchant and then repurchasing them later. |
| − | * {{Platforms|PC}}If you steal from the elite darkspawn holding parts of Cailan's armor you may get the items |
+ | * {{Platforms|PC}}If you [[Stealing|steal]] from the elite darkspawn holding parts of Cailan's armor, you may get the items prematurely, leaving you unable to loot their corpses as intended and making the quest impossible to complete. |
| − | * Entering the Tower of Ishal will trigger a cinematic cutscene involving the Genlock |
+ | * Entering the Tower of Ishal will trigger a cinematic cutscene involving the Genlock Necromancer summoning a fireball and several Hurlock Grunts running up to the Warden. This cutscene triggers every time the Warden enters the tower, not just the first time. (Bug fixed in the latest PS3 version) |
| − | * If you go to the southeast of the map ( |
+ | * If you go to the southeast of the map (up the slope between Cailan's and Loghain's tent and turn left) and go to the ruined edge of the tower, you can fall down to the battlefield. |
| + | * If you go to the tower where the [[Genlock]] is firing a ballista and look down at the bridge, the structure that [[Cailan Theirin|Cailan's]] body is on can be seen, but his body is missing. |
||
[[Category:Return to Ostagar quests]] |
[[Category:Return to Ostagar quests]] |
||
Revision as of 03:51, 13 February 2020
Return to Ostagar is the main quest unlocked by the Return to Ostagar DLC for Dragon Age: Origins.
Background
When Return to Ostagar is installed, the Warden will receive a quest called A King's Confidant, suggesting they seek out a survivor of the events at Ostagar who can be found in a new location, Bann Loren's Lands. After speaking with the confidant, Elric Maraigne, the Warden can travel back to Ostagar on the world map.
Walkthrough
Ostagar
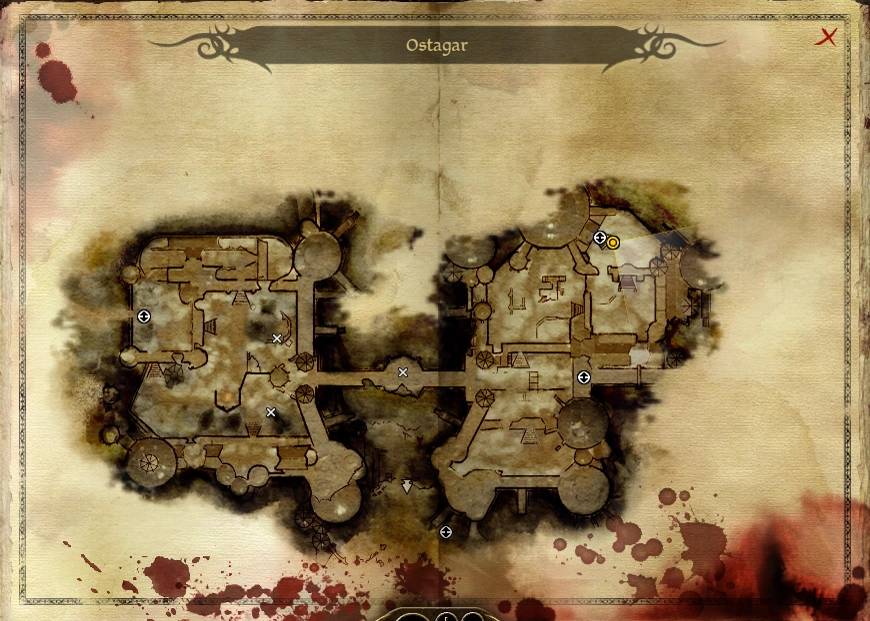
Ostagar upon the Warden's return.
The party enters Ostagar at the upper west side of the ruins, through the previously out-of-bounds gate that led to the army camp. Whilst exploring Ostagar and making your way towards the Tower of Ishal on the east side of the map, you will run into several mobs of darkspawn, the commanders of which will drop pieces of Cailan's armor set: Cailan's Breastplate, Cailan's Gauntlets, Cailan's Greaves and Cailan's Shield are all dropped in various exterior portions of the Ostagar area. Cailan's Helm is not in this area. Maric's Blade is in the Royal Arms Chest.
- If you had not previously obtained it as part of The Hungry Deserter, loot the Mages' Chest Key from the corpse of the prisoner in the fallen cage near the starting position. This key can be used to loot the Mages' Chest and obtain the Corrupted Magister's Staff, as well as the loot that would have been found in the chest had it been opened prior to the Battle of Ostagar. If you looted the chest when in Ostagar previously, you will not be able to open it now, because the key will not be there.
 users can install a cheat that allows them to add the key to the inventory once more.
- If you killed Dog before the Battle of Ostagar, or you told Dog to shoo during the Deserted Farmland encounter after first leaving Flemeth's Hut for Lothering, then there will be a cutscene where you find a new hound in the Kennels that can be recruited.
- The Joining Chalice can be found east past the former War Council hall on the first circular plateau overlooking the cliff.
- Heading south from the location of the War Council and towards the former Magi Encampment, you will find rubble marked Elric's Buried Key, and loot the Key to the Royal Arms Chest.
- Continue on towards King Cailan's Tent, where you will find Cailan's Chest. Loot Maric's Blade and the quest item Secret Correspondence, which unlocks Codex entry: Cailan's Documents - Page 1 of 3, Codex entry: Cailan's Documents - Page 2 of 3 and Codex entry: Cailan's Documents - Page 3 of 3.
- As you walk southwest from the Magi Encampment, there is an attack by Blight Wolves, two Genlocks, and a Hurlock Vanguard. This is triggered once any party member draws level with the dead Mabari bodies. A stealthed rogue may trigger this attack but remain undetected, which causes the enemies to gather tightly around a spot close to Duncan's Fire. This tight gathering by a mob can also be triggered by a stealthed rogue moving down the slope from the War Council area towards the Magi Encampment.
- Cross the Bridge to the eastern side of the ruins. On the way, you will discover Cailan's body. Clear the eastern side of the ruins and head to the Tower of Ishal.Note: On the far right side of the map is an exit to the World Map. It is recommended that you take this opportunity to visit the party camp and sell or remove any excess items from the party inventory before heading into the Tower of Ishal.
Tower of Ishal
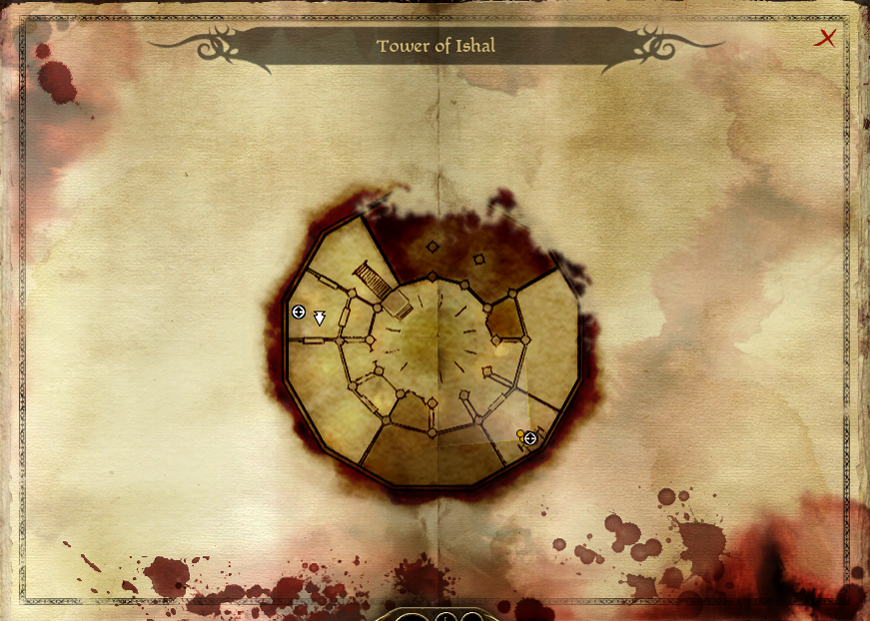
The Tower of Ishal
- Fight your way past the Genlocks, Hurlock Grunts, and an Ogre. If you keep your entire party in the first room you enter, you can have a single party member stand just at the door into the next room. With this arrangement, the darkspawn seem to attack only one at a time. You can also draw the Ogre into this room after most of the darkspawn are dead.
- In the final room, there's a hole in the floor. The door leading to the rest of the tower is barricaded. Go "Down the hole and into the deep."
Darkspawn Tunnels

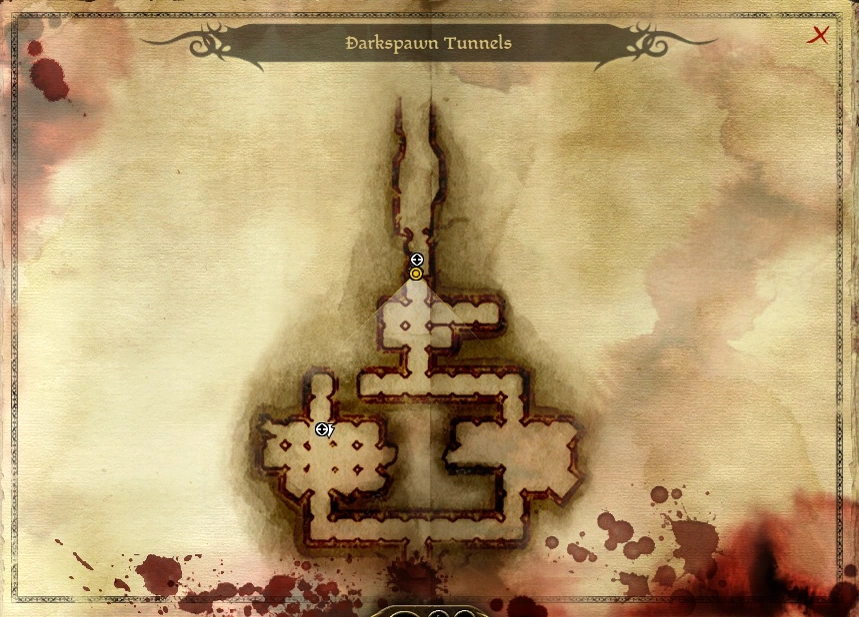
Darkspawn tunnels
- Follow the tunnels, fighting more darkspawn and some Corrupted spiders.
- Take the exit to the Battlefield.
Battlefield
- Defeat the boss level risen ogre and the Genlock Necromancer. The Necromancer will command the ten corpses on the battlefield to rise. While these skeletons appear frozen already, they are not immune to cold. Killing the Genlock Necromancer will cause the risen ogre and all other enemies on the battlefield to fall, although the party will not gain XP for their deaths. There is sometimes a lag between the time you kill the Necromancer and the time the risen enemies die.
- Re-enter the darkspawn tunnel. A cutscene will ensue.
Cailan's body
At this point, there are three options presented as to what to do with Cailan's body: give him a funeral pyre, cut him down and leave him for the wolves, or leave him for the darkspawn. Active party members will approve or disapprove to varying degrees depending on the choice that is made:
Approval Changes
| ||
|---|---|---|
Funeral Pyre
|
Wolves
|
Leave him
|
|
|
|
Leaving Ostagar
After dealing with the king's body, the party can either continue exploring the area, or leave. Despite a statement made in the quest log about Ostagar about to go into darkness and be overrun with darkspawn again, it is possible to return without hazard if the player wants to access items that were not picked up earlier (![]()
![]() ). A large number of weapons, armor, and items can be found, so a return trip can be worth the effort if anything was left behind.
). A large number of weapons, armor, and items can be found, so a return trip can be worth the effort if anything was left behind.
Notable items
![]() Cailan's Breastplate, source: Drop Hurlock General
Cailan's Breastplate, source: Drop Hurlock General
![]() Cailan's Gauntlets, source: Drop Hurlock Strategist
Cailan's Gauntlets, source: Drop Hurlock Strategist
![]() Cailan's Greaves, source: Drop Hurlock Strider
Cailan's Greaves, source: Drop Hurlock Strider
![]() Cailan's Helm, source: Drop Genlock Necromancer
Cailan's Helm, source: Drop Genlock Necromancer
![]() Cailan's Shield, source: Drop Hurlock Vanguard
Cailan's Shield, source: Drop Hurlock Vanguard
![]() Corrupted Magister's Staff, source: Mages' Chest, as long as the Mages' Chest wasn't opened before the Battle of Ostagar after acquiring the Key to the Mages' Chest during The Hungry Deserter
Corrupted Magister's Staff, source: Mages' Chest, as long as the Mages' Chest wasn't opened before the Battle of Ostagar after acquiring the Key to the Mages' Chest during The Hungry Deserter
![]() Duncan's Dagger, source: Drop Risen ogre
Duncan's Dagger, source: Drop Risen ogre
![]() Duncan's Sword, source: Drop Risen ogre
Duncan's Sword, source: Drop Risen ogre
![]() Firestone Harness, source: Dead Mabari
Firestone Harness, source: Dead Mabari
![]() Joining Chalice, Gift, source: Found where the Joining Ritual took place
Joining Chalice, Gift, source: Found where the Joining Ritual took place
![]() Key to Mages' Chest, source: Charred Corpse
Key to Mages' Chest, source: Charred Corpse
![]() Key to the Royal Arms Chest, source: Elric's Buried Key
Key to the Royal Arms Chest, source: Elric's Buried Key
![]() Maric's Blade, source: Cailan's Chest
Maric's Blade, source: Cailan's Chest
![]() Nug Crusher, source: Weapon Stand, Tower of Ishal
Nug Crusher, source: Weapon Stand, Tower of Ishal
![]() Repeater Gloves, source: Wooden Crate
Repeater Gloves, source: Wooden Crate
![]() Secret Correspondence, source: Cailan's Chest
Secret Correspondence, source: Cailan's Chest
![]() Swiftrunner Warpaint, source: Dead Mabari
Swiftrunner Warpaint, source: Dead Mabari
Enemies
- Blight Wolf
- Genlock Grunt
- Genlock Rogue
- Genlock
- Genlock Forgemaster, Elite
- Genlock Necromancer, Elite
- Hurlock
- Hurlock Grunt
- Hurlock Alpha, Elite
- Hurlock Emissary, Elite
- Hurlock General, Elite
- Hurlock Strategist, Elite
- Hurlock Strider, Elite
- Hurlock Vanguard, Elite
- Ogre
- Risen ogre, Boss
- Shambling Corpse
- Shambling Skeleton
- Shrieks
Bugs
- Sometimes, the Genlock Necromancer appears standing amidst a horde of other darkspawn and cannot be targeted or killed. He only becomes active and killable when the risen ogre on the battlefield is finally dead, but will not be in his correct location on the battlefield and you will have to go and find him in the location where the bug occurred. After killing the Necromancer, you will have to return to the battlefield site where you encountered the risen ogre and then try to exit the area through the tunnels in order to trigger the cutscene and proceed with the quest correctly. After killing the Necromancer, wait until the quest is updated before looting him, otherwise you will not be able to finish the quest. If you do not do this, interacting with King Cailan's body afterwards will not give you options to 'deal' with his body, despite the quest being shown as complete.
- This can be fixed by selling all of the king's items, closing the trading window, talking to the merchant again and buying the items back.
- A number of items (e.g., Cailan's Armor Set and Cailan's Arms) are scalable, i.e. they should be higher tier if the player character is of a higher level. However, some items may be found at Tier 5 even by higher level characters.
 These can be upgraded by placing them in the Party Storage Chest (found in the Warden's Keep DLC), by leaving and returning, or by selling them to a merchant and then repurchasing them later.
- If you steal from the elite darkspawn holding parts of Cailan's armor, you may get the items prematurely, leaving you unable to loot their corpses as intended and making the quest impossible to complete.
- Entering the Tower of Ishal will trigger a cinematic cutscene involving the Genlock Necromancer summoning a fireball and several Hurlock Grunts running up to the Warden. This cutscene triggers every time the Warden enters the tower, not just the first time. (Bug fixed in the latest PS3 version)
- If you go to the southeast of the map (up the slope between Cailan's and Loghain's tent and turn left) and go to the ruined edge of the tower, you can fall down to the battlefield.
- If you go to the tower where the Genlock is firing a ballista and look down at the bridge, the structure that Cailan's body is on can be seen, but his body is missing.