Galefan2004 (talk | contribs) (→Notes) |
Imperiagon (talk | contribs) (→No Companions: grammar fix) Tag: Visual edit |
||
| (90 intermediate revisions by 45 users not shown) | |||
| Line 5: | Line 5: | ||
|icon = Quest icon DA2.png |
|icon = Quest icon DA2.png |
||
|image = Nights_terrors.jpg |
|image = Nights_terrors.jpg |
||
| − | |px = |
+ | |px = 270px |
|start = [[Kirkwall Alienage]] ([[Lowtown]]) |
|start = [[Kirkwall Alienage]] ([[Lowtown]]) |
||
|end = Kirkwall Alienage (Lowtown) |
|end = Kirkwall Alienage (Lowtown) |
||
| Line 17: | Line 17: | ||
== Acquisition == |
== Acquisition == |
||
| − | The quest is acquired from [[Letter: Night Terror|a letter]] in [[Hawke Estate|Hawke's mansion]] at the beginning of Act 2. [[Feynriel]], the [[apostate]] [[mage]] rescued from [[slavery|slavers]] during [[Wayward Son]], has gone into a coma due to his [[Dreamer|particular talent]]. His mother, [[Arianni]], has called upon assistance of [[Hawke]] and [[Keeper Marethari]] to save him. In order to wake him up, Hawke must enter the [[Fade]] to confront the [[ |
+ | The quest is acquired from [[Letter: Night Terror|a letter]] in [[Hawke Estate|Hawke's mansion]] at the beginning of Act 2. [[Feynriel]], the [[apostate]] [[mage]] rescued from [[slavery|slavers]] during [[Wayward Son]], has gone into a coma due to his [[Dreamer|particular talent]]. His mother, [[Arianni]], has called upon the assistance of [[Hawke]] and [[Keeper Marethari]] to save him. In order to wake him up, Hawke must enter the [[Fade]] to confront the [[demon]]s struggling for control over Feynriel. |
| + | |||
== Walkthrough == |
== Walkthrough == |
||
| + | === The Elven Alienage === |
||
| + | After the Quest is started, Hawke will meet Feynriel's mother, Arianni, in Lowdown's Alienage. She explains that the only way to save her son is for Hawke to enter the Fade with an ancient Dalish ritual prepared by Keeper [[Marethari]]. Hawke must first agree to help, and then Arianni asks if Hawke wants to stay and wait for Marethari to arrive, which begins the ritual immediately, or to come back later, which begins the ritual the next time Hawke interacts with her. Hawke can also refuse, which has the same result as agreeing to come back later. |
||
| + | |||
| + | If Hawke chooses either of the Helpful dialogue options, they effectively agree to help and it will immediately skip the conversation to the choice to begin the ritual right away or come back later. [[Sebastian]] will object to entering the Fade, stating that the [[Golden City]] was corrupted by such folly, resulting in {{Approval2|Sebastian|-10}}. |
||
| + | |||
| + | {{Note|Sebastian only disapproves if he actually speaks during the dialogue. In most cases only two companions will speak, and it's difficult to determine exactly how companion dialogue fires during this conversation, but having a balanced party (i.e. Sebastian as rogue, along with any warrior and mage) tends to place the warrior's and mage's comments ahead of his. Having two warriors, two mages, Isabela without Anders, or Varric with anyone, alongside Sebastian tends to allow him a window to speak, so players should take this into consideration when going for the "Loyalty of the Prince" achievement/trophy. A party of Isabela, Aveline, and Sebastian allows all three of them to speak.}} |
||
| + | Keeper Marethari arrives in the Alienage to a great deal of solemnity and deference from the Alienage residents, after which she, Arianni, and Hawke's entourage enter Arianni's home. Inside, Marethari speaks to Hawke and Arianni about the true extent of Feynriel's powers; he is a [[Dreamer]], one of the only mages in all of Thedas who can enter the Fade at will and actually reshape the parts and layers of it to suit his whims. This power makes him even more attractive to demons than the average mage, and he must be saved from their temptations. After this, the Keeper talks to Hawke in private, asking them to kill [[Feynriel]] in the Fade should he prove too weak to control his abilities, as they cannot risk him becoming an [[abomination]]. She explains that killing Feynriel in the Fade will instantly make him [[Tranquil]] and no longer a threat. |
||
| − | === Before entering the Fade === |
||
| − | After a conversation with [[Keeper Marethari]] and Arianni, the Keeper will talk to Hawke in person, asking them to kill [[Feynriel]] in the Fade should he prove too weak to control his abilities, and risk becoming an [[abomination]]. She explains that killing Feynriel in the Fade would make him [[Tranquil]], no longer be a threat. |
||
If you answer "I understand": |
If you answer "I understand": |
||
| Line 27: | Line 33: | ||
:{{Approval2|Merrill|-10}} |
:{{Approval2|Merrill|-10}} |
||
:{{Approval2|Sebastian|+10}} |
:{{Approval2|Sebastian|+10}} |
||
| − | {{Note|If in your party when you talk to Arianni, [[Sebastian]] will disapprove {{Approval2|-10}}. It can be nullified by selecting "I understand" when talking with Marethari, as it will cause Sebastian to {{Approval2|+10.}}}} |
||
| − | The other option "I can't do that" |
+ | The other option "I can't do that": |
:{{Approval2|Anders|+5}} |
:{{Approval2|Anders|+5}} |
||
:{{Approval2|Merrill|+5}} |
:{{Approval2|Merrill|+5}} |
||
:{{Approval2|Sebastian|-10}} |
:{{Approval2|Sebastian|-10}} |
||
| − | + | :*(Paired with the above {{Approval2|Sebastian|-10}} gives a total of {{Approval2|Sebastian|-20}}) |
|
| − | After |
+ | After the conversation with [[Keeper Marethari]] concerning [[Feynriel]]'s fate, your [[Companions (Dragon Age II)|companions]] will have some commentary on the prospect of venturing into the fade. |
| + | |||
| + | If Aveline is in your party she will state that the matter is perhaps best left to the Circle of Magi. Fenris states something similar, in that the Fade is a place for mages. Isabela is intrigued by the idea of "frolicking" through dreams, Anders says Hawke will need someone experienced in the Fade to go with them. Merrill's response seems dependent on friendship/rivalry; on the rivalry path she is, surprisingly, appalled that the Keeper would delve into the ancient magics to protect "this half-breed," insisting Marethari would never do the same for her, however, on the friendship path she merrily asks if she can come along, suggesting that it sounds like fun. Varric is unsure of how much help he'd be there, and none of these statements affect approval. |
||
| + | |||
| + | After this conversation, you have the option of selecting your companions to go into the Fade. Note that Sebastian is greyed out from his refusal to enter. Select as many or as few as you desire; all companions will have their own interactions during this quest. |
||
=== In the Fade === |
=== In the Fade === |
||
| − | Hawke |
+ | Hawke finds themselves in Feynriel's vision of the [[Templar Hall]]. Entering the Fade unlocks: |
| ⚫ | |||
| ⚫ | |||
| − | If Anders is in the party, [[Justice]] takes over. |
||
| + | {{Note|If Anders is in the party, [[Justice]] takes over. None of the three dialogue options affect friendship or rivalry. Justice automatically casts [[Vengeance (spell)|Vengeance]] when in the Fade, even if Anders has not learned it. This effect will persist outside the Fade until such time that Anders is removed from the party, falls in combat, or a party selection is initiated. To learn it permanently, either unlock it with a talent point or simply complete [[Dissent]].}} |
||
| ⚫ | |||
| − | {{Note|Hawke has 3 dialogue options with Anders/Justice and none have any affect on approval/rivalry ratings.}} |
||
| + | All demons encountered in the Fade are not only Critter- and Normal-ranked, but they fall much easier than their real world counterparts. There shouldn't be any significant difficulty faced, save for the encounters in Feynriel's nightmares, and only because of who you brought into the Fade. See [[#Companions' temptations|Companions' temptations]] below for more details. |
||
| ⚫ | |||
=== Torpor === |
=== Torpor === |
||
[[File:Torpor.jpg|thumb|The sloth demon]] |
[[File:Torpor.jpg|thumb|The sloth demon]] |
||
| − | If Hawke proceeds out into the courtyard, they |
+ | If Hawke proceeds out into the courtyard, they meet the first [[demon]], Torpor. It is a [[sloth demon]] who attempts to bargain with Hawke to allow it to possess [[Feynriel]]. See [[#Rewards|Rewards]] for details. |
| − | You can either refuse its offer immediately or question it further. If you pick the latter and Anders is in the party, Justice |
+ | You can either refuse its offer immediately or question it further. If you pick the latter and Anders is in the party, Justice pleads for Hawke to refuse its offer. If Hawke tells the spirit to back down, Justice attacks and Hawke is forced to defeat him. Justice/Anders is removed from the party for the remainder of the quest, leaving Hawke with a smaller party. |
| + | After defeating Justice, or if Anders was not brought along, Torpor makes it offer to Hawke for power, knowledge, or magic. Hawke can accept one of these boons or reject the demon's offer for the same approval changes as described below, but with the exception of Anders. |
||
| ⚫ | |||
| ⚫ | |||
| − | {{Note|Torpor falls to [[Blood Slave]] and can help fight its fellow [[shade]]s}} |
||
If you accept the demon's offer right away and do not question him: |
If you accept the demon's offer right away and do not question him: |
||
| Line 69: | Line 78: | ||
:{{Approval2|Merrill|-5}} |
:{{Approval2|Merrill|-5}} |
||
| − | If you listen to Anders and attack the demon: |
+ | If you listen to Anders/Justice and attack the demon: |
:{{Approval2|Anders|+10}} |
:{{Approval2|Anders|+10}} |
||
| − | {{Note| |
+ | {{Note|Merrill's approval rating remains unchanged in this case.}} |
| − | If you tell Justice to back down, it |
+ | If you tell Justice to back down, it attacks Hawke. |
:{{Approval2|Anders|-10}} |
:{{Approval2|Anders|-10}} |
||
:{{Approval2|Fenris|+5}} |
:{{Approval2|Fenris|+5}} |
||
:{{Approval2|Merrill|-5}} |
:{{Approval2|Merrill|-5}} |
||
| − | {{Note| |
+ | {{Note|If Hawke has begun a [[Romance (Dragon Age II)|romance]] with Anders, accepting Torpor's offer will eventually lead to Anders breaking up with Hawke. However, you can still betray Torpor later by telling Feynriel to wake up, which then provides a special dialogue option to tell Anders it was a ruse during [[Anders in the Fade]]. This is the only way to preserve the romance.}} |
| − | === |
+ | === Feynriel's nightmares === |
| − | There |
+ | There are two quest markers waiting for you at two doors up the steps on either side of the hall. Proceed to one of the rooms. |
| ⚫ | |||
| − | Proceed to one of the rooms. |
||
| + | *(Top) Point out the discontinuities of the visions. Middle option not available in second dialogue. Choosing the second top option convinces Feynriel that they are illusions, and he confidently dismisses the demons. |
||
| ⚫ | |||
| + | *(Middle) Agree with the demons, pretending that the visions are real. Middle option available in second dialogue. Choosing the second middle option causes Feynriel to believe he is surrounded by demons, causing him to panic and flee. |
||
| + | *(Bottom) Bluntly tell Feynriel that he is facing a demon. Always available, but picking either one ends dialogue and Feynriel flees in terror. |
||
| + | Choosing the bottom option in either dialogue or the second middle option, in either demon encounter, frightens Feynriel and makes him insecure. Choosing the second top option in both demon encounters, even if the first middle option was taken, makes him more confident in his abilities. |
||
| − | * (top options) point out the discontinuities of the visions |
||
| − | * (middle options) agree with the demons, pretending that the visions are real |
||
| − | * (bottom options) bluntly tell Feynriel that he is facing the demons |
||
| ⚫ | |||
| − | Choosing mostly middle or bottom options will frighten Feynriel and make him insecure, while choosing mostly top options will make him more confident of his powers. |
||
| + | ==== No Companions ==== |
||
| ⚫ | If trying to make a deal with Torpor, |
||
| + | If Hawke enters the Fade without any companions, all will proceed as below with two exceptions: |
||
| + | #There will be no companion betrayals and therefore, none of the companion betrayal quests listed below. |
||
| ⚫ | |||
| + | #In the combat with Wyrme, two Ghostly Elves will manifest and attack Hawke. |
||
| + | Note that Dog can be summoned in the Fade, but cannot enter the realms of either Caress or Wryme. |
||
| ⚫ | |||
| + | ==== Two Companions ==== |
||
| ⚫ | |||
| − | If Hawke |
+ | If Hawke enters the Fade with only two companions, a single Ghostly Elf will spawn during the combat with Wyrme. |
| + | |||
| − | {{Note|Only one party member is tempted at each encounter. If fight poses too much of a challenge, it is helpful to load an earlier game and remove betraying companion's equipment}} |
||
| ⚫ | |||
| − | See below for [[Night_Terrors#A note on the characters’ temptations|a note on the characters’ temptations]]. |
||
| ⚫ | |||
| ⚫ | |||
| ⚫ | |||
| + | If Hawke's party is in the Fade with them, one of them may fall to temptation and betray Hawke to side with the demon; they must be defeated. |
||
| + | See below for [[#Companions' temptations|more details]]. |
||
| ⚫ | |||
*:{{Approval2|+5}}, if a witty comment chosen |
*:{{Approval2|+5}}, if a witty comment chosen |
||
*:{{Approval2|-5}}, if an aggressive comment chosen |
*:{{Approval2|-5}}, if an aggressive comment chosen |
||
| − | * |
+ | *[[Aveline Vallen|Aveline]] is tempted by an illusion of her deceased husband, Ser [[Wesley Vallen]], and her failure to save him. She has long made peace with his passing, but still wishes it could have been prevented. |
| − | : |
+ | :*If Hawke is a mage, Wesley comments on Aveline's troubles starting when they met the apostate Hawke. If [[Bethany]] was the family mage, "Wesley" comments that the troubles began when they met "this family of apostates." |
| − | ==== ''Wryme'' in |
+ | ==== ''Wryme'' in Feynriel's Pride ==== |
| − | As you go through the door from the courtyard, go in the first door on the left and pick up the book with [[Codex entry: Beyond the Veil: Spirits and Demons]] (you may already have that codex entry from the altar on Sundermount - if that's the case, no codex entry |
+ | As you go through the door from the courtyard, go in the first door on the left and pick up the book with [[Codex entry: Beyond the Veil: Spirits and Demons]] (you may already have that codex entry from the altar on Sundermount - if that's the case, no codex entry is available here). In the end room, the [[pride demon]] Wryme poses as [[Keeper Marethari]]. Hawke confronts Feynriel in the form of [[First Enchanter]] [[Orsino]]. |
| − | Another companion may betray Hawke during the |
+ | Another companion may betray Hawke during the confrontation. See below for [[#Companions' temptations|a note on the characters' temptations]]. |
| − | * |
+ | *[[Merrill]] is tempted by the same offer Wryme made to Feynriel; power enough to become savior of the [[Dalish]]. |
*:{{Approval2|-20}} for a diplomatic choice. |
*:{{Approval2|-20}} for a diplomatic choice. |
||
| ⚫ | |||
*:{{Approval2|-10}} for an aggressive choice. |
*:{{Approval2|-10}} for an aggressive choice. |
||
| ⚫ | |||
| − | * [[Fenris]] will be tempted by being given power enough to be an equal to the [[magisters]]. |
||
| − | * |
+ | *[[Fenris]] is tempted by being given power enough to be an equal to the [[magister]]s. |
| + | *[[Varric Tethras|Varric]] is tempted by the offer of power that "would've allowed him to walk away with the glory" from [[the Deep Roads Expedition]], rather than his traitorous brother [[Bartrand Tethras|Bartrand]]. |
||
| + | |||
| ⚫ | |||
| + | After the first demon is defeated, a [[rage demon]] spawns in the main area of the hall. Justice, Merrill, and even Torpor will comment on this demon. Dispatch this demon and proceed to the other room. |
||
| ⚫ | |||
| ⚫ | |||
| − | A [[rage demon]] will spawn after the first demon is defeated, no matter which one you picked to kill first. |
||
| ⚫ | |||
==== If you made an agreement with Torpor ==== |
==== If you made an agreement with Torpor ==== |
||
| + | [[File:Grigor & Melson.png|thumb|right|200px|Guardsman Grigor & Melson]] |
||
| − | Torpor and Feynriel will be waiting in the Courtyard once both demons are defeated. If you strengthened Feynriel's mind in his projections, you will now have a choice once again. You can let Torpor possess the boy, or tell Feynriel to wake up. This betrayal will cause Torpor to attack, and Feynriel to plead to let him die. This death will cause him to become Tranquil, as the Keeper explained at the beginning of the quest. Hawke will still receive reward for the quest, though not in full. |
||
| + | Torpor and Feynriel are waiting in the Courtyard once both demons are defeated. Torpor encircles the boy and attempts to lull him into a deep sleep. You can encourage Feynriel to fall asleep, which leads to his possession, or betray Torpor and tell the boy to wake up. Betraying him causes Torpor to attack, and Feynriel will then speak to Hawke as though Torpor was slain earlier, his tone depending on how the illusions were dispelled. |
||
| − | If you lie to Feynriel and let Torpor |
+ | If you lie to Feynriel and let Torpor possess him, in Act 3 there are people in [[Lowtown]] driven to madness by the dreamer-abomination. Hawke encounters Grigor, a member of the [[Kirkwall City Guard|city guard]], in Lowtown at night cornered by Melson and his personal guards. Melson has gone crazy and killed several city guards, saying that Feynriel told him that they were thieves. Melson & his guards attack and are killed by Hawke. After the fight, Grigor refers to Feynriel as "The Dreamstalker." |
| − | ==== If you refused Torpor's offer and killed it ==== |
+ | ==== If you refused Torpor's offer and killed it ==== |
| − | Feynriel |
+ | Feynriel is waiting in the Courtyard where you killed Torpor once both demons are defeated. If he fled from the temptations in fear, he begs you to kill him. However, if you helped him see through the illusions, Feynriel is more confident and learns to leave the Fade on his own, ending the dream state. He decides to go to [[Tevinter Imperium|Tevinter]] to study his Dreamer skills. He later saves a woman during [[Who Needs Rescuing?]] from his place of study hundreds of miles away. |
| − | == |
+ | == Fade puzzles == |
| − | Before you leave, there are some extras you |
+ | Before you leave, there are some extras you can look into; you can acquire up to {{ColorPositiveStat|+4 attribute points}}. One is from reading the [[#Book|Book in the room you spawn in,]] one for solving the [[#First Barrel Puzzle|First Barrel Puzzle]], and two for solving [[#Second Barrel Puzzle|the second]]. |
| − | {{Note| The character you use to complete a puzzle |
+ | {{Note| The character you use to complete a puzzle gets the attribute points. For this reason, you may want to order everyone to hold position some distance away from the puzzles and use only the character you want to receive the points.}} |
| − | For the barrel puzzles, there is a |
+ | For the barrel puzzles, there is a maximum number of moves you can make before some demons are summoned and you are locked out of the puzzle. |
| − | {{Note| It is recommended to save the game before attempting a puzzle: a bug sometimes occurs causing the barrel to |
+ | {{Note| It is recommended to save the game before attempting a puzzle: a bug sometimes occurs causing the barrel to move into the floor or inside another barrel. If this happens just load your last save and start over.}} |
=== Book === |
=== Book === |
||
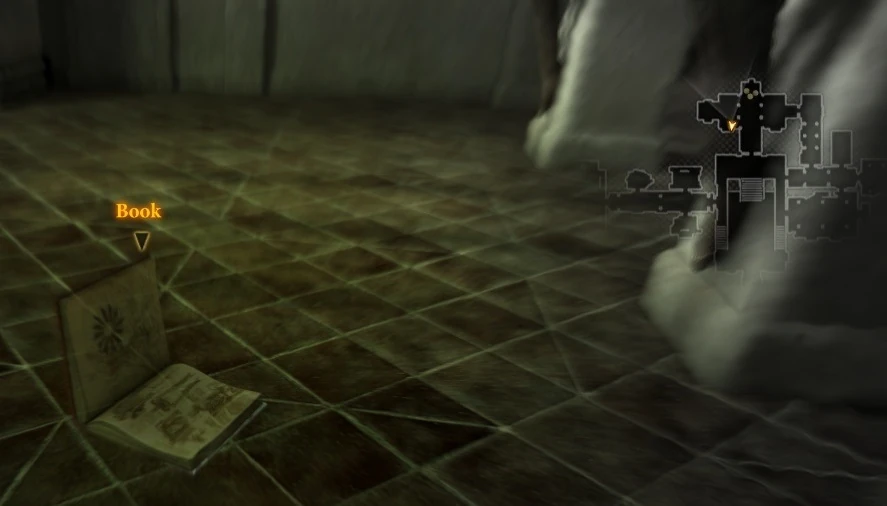
[[File:Night terrors book.jpg|thumb|The book which is found in the first room]] |
[[File:Night terrors book.jpg|thumb|The book which is found in the first room]] |
||
| − | The book is in the room you spawn in. With the entry behind you it can be found floating around the second column on your right. It |
+ | The book is in the room you spawn in. With the entry behind you it can be found floating around the second column on your right. It is transparent as it moves, and solid-looking as it stops. It is only when it stops that you can interact with it and get the attribute point. First click "catches" the book causing it to fall to the floor, second click awards the attribute points. |
| + | |||
| − | It is recommended to stop the party members from following you as you chase the book and try to interact with it. To do this, open the radial menu and push “Hold Position” while |
+ | It is recommended to stop the party members from following you as you chase the book and try to interact with it. To do this, on console open the radial menu and push “Hold Position” and on {{PC}} press the hold button ("H" by default) while you're a bit away from the book's route. Push the same button again after you have the attribute point to let the party members move freely. |
=== First Barrel Puzzle === |
=== First Barrel Puzzle === |
||
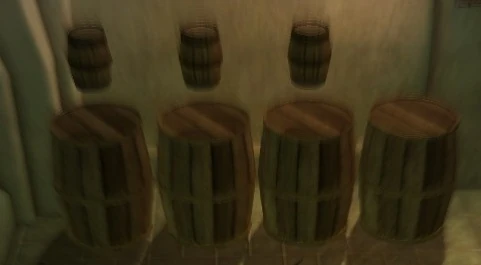
[[File:Puzzle1solution.jpg|thumb|right|Solution to the first barrel puzzle]] |
[[File:Puzzle1solution.jpg|thumb|right|Solution to the first barrel puzzle]] |
||
| − | + | Turning left from the starting point there is a room with 7 barrels. These can be moved by clicking on them. If you can get all four large barrels on the floor and the three smaller ones above them within the move-limit you get another {{ColorPositiveStat|+1 attribute point}}. You have a limited number of moves to solve the puzzle. |
|
'''Puzzle 1''' |
'''Puzzle 1''' |
||
| Line 155: | Line 173: | ||
E F G H |
E F G H |
||
| − | {{Note|These letters represent the positions, and not the barrels on them. Thus the barrel on position A can be moved to position B, and |
+ | {{Note|These letters represent the positions, and not the barrels on them. Thus the barrel on position A can be moved to position B, and no longer has the label 'A'.}} |
''Click on the barrels in this order:'' |
''Click on the barrels in this order:'' |
||
C G F E A B F E A B C G H D |
C G F E A B F E A B C G H D |
||
| + | |||
| + | or for a shorter solution: |
||
| + | |||
| + | C G F B A E F B C G H D |
||
| + | |||
| + | If you try to simply "rotate" the arrangement, you'll run out of moves and have to fight demons, which are not as valuable as extra attribute points. Instead, move the large barrel in position "C" off to the right, into position "D" so that "H" can tuck under the small barrels at the end, followed by the barrel in "D". That way, instead of all barrels having to travel the same path, each only has to move once or twice. |
||
| + | |||
| + | <gallery> |
||
| + | Dragon Age 2 Night Terrors The Fade - Barrel Puzzle 1 |
||
| + | </gallery> |
||
=== Second Barrel Puzzle === |
=== Second Barrel Puzzle === |
||
[[File:Puzzle2solution.jpg|thumb|right|Solution for the second barrel puzzle]] |
[[File:Puzzle2solution.jpg|thumb|right|Solution for the second barrel puzzle]] |
||
| − | The second barrel puzzle is in the next room to the east, accessed by the hallway south of the two rooms. This time you have to get all four red barrels into the middle of the 10 barrels to get another {{ColorPositiveStat|+2 attribute points}}. You |
+ | The second barrel puzzle is in the next room to the east, accessed by the hallway south of the two rooms. This time you have to get all four red barrels into the middle of the 10 barrels to get another {{ColorPositiveStat|+2 attribute points}}. You have a limited number of moves to solve the puzzle. |
'''Puzzle 2''' |
'''Puzzle 2''' |
||
| Line 171: | Line 199: | ||
G H I J K L |
G H I J K L |
||
| + | {{Note|As was the case with the first puzzle, these letters represent the positions, not the barrels on them.}} |
||
| − | {{Note|See the note under Puzzle 1.}} |
||
''Click on the barrels in this order:'' |
''Click on the barrels in this order:'' |
||
| Line 177: | Line 205: | ||
B H E K G A L F B C E D I H J K |
B H E K G A L F B C E D I H J K |
||
| + | Essentially, you'll want to divide the puzzle in half and treat it as two smaller symmetric puzzles, mirroring the movements from one side on the other. Shift the brown barrels out of the way of the corner reds, slide them next to the center reds, then "rotate" the barrel arrangement by moving one at a time (counterclockwise on the left, clockwise on the right) until the reds are in the center with one on top of the other. |
||
| − | == A note on the characters’ temptations == |
||
| ⚫ | |||
| + | <gallery> |
||
| − | The party members listed above will always betray Hawke, regardless of friendship or rivalry points, or the resolution of issues related to their temptation. For example, even if Varric's friend meter is maxed out and he has confronted [[Bartrand]] during the relevant [[Family Matter|companion quest]], he will still betray Hawke when tempted by Wryme. Likewise, Aveline will still betray Hawke when tempted by Caress, even if she has a full friend meter and has begun a relationship with [[Donnic]]. |
||
| + | File:Dragon Age 2 Night Terrors The Fade - Barrel Puzzle 2 |
||
| + | </gallery> |
||
| + | == Companions' temptations == |
||
| − | In both cases, only those characters will betray Hawke. With Caress, Isabela is the default, but if she isn't in your party and Aveline is, it will be Aveline. With Wryme the order is Merrill, Fenris, then Varric. Therefore, if you go into the Fade with Anders, Aveline, and Varric, you could potentially lose all three for the duration of the quest (if you choose to deal with Torpor). A party of Merrill, Fenris, and Varric could only lose one character, as could a party of Anders, Isabela and Aveline (provided Torpor is not negotiated with). |
||
| + | Hawke's companions are grouped according to Isabela and Aveline for Caress to tempt, and Merrill, Fenris, and Varric for Wryme to tempt. Only one companion from each group can be tempted, with priority going in that order. |
||
| ⚫ | When either demon succeeds in tempting a party member (which they always will), Hawke has to fight the demon and the tempted companion, who is removed from the party and expelled from the Fade when defeated. [[Anders]] is immune to temptation, as [[Justice]] keeps him safe here, although Justice attacks you if you agree to deal with Torpor. [[Sebastian]] refuses to even enter the Fade, as this is apparently no place for "men of faith." |
||
| − | == Possible Outcomes == |
||
| + | |||
| + | The party members listed above always betray Hawke, regardless of friendship or rivalry status, or the resolution of their companion quests: |
||
| + | *For Isabela, she's still seeking the relic and more importantly a new ship, neither of which Hawke can provide. |
||
| + | *For Aveline, her temptation stems from failing to save Wesley rather than any lingering feelings for him, thus [[The Long Road (Dragon Age II)|starting a relationship]] with [[Donnic]] wouldn't prevent this wound from resurfacing. |
||
| + | *For Merrill, her people are everything to her. Whether Hawke [[Mirror Image|supports her or meddles in her efforts]], or if she is in love with them, she ultimately can't choose them over her people. |
||
| + | *For Fenris, even if [[Hadriana]] is [[A Bitter Pill|dead]], Danarius and many other magisters who tortured him remain, and he still fears the day they will come for him. The power to defeat them for good and permanently secure his freedom is simply too tempting to pass up. |
||
| + | *With Varric, even if he has [[Family Matter|confronted]] his brother [[Bartrand]], his temptation stems from Bartrand being able to walk away with the glory and recognition for discovering the [[Primeval Thaig]], effectively "making him the hero of [Varric's] tale" in spite of his betrayal, leaving Varric with only "tarnished silver and flesh wounds." Regardless of Bartrand's fate, Varric still harbors great resentment over him being the favorite child. |
||
| + | |||
| + | In any event, only one companion from each group can betray Hawke. By making a deal with Torpor and bringing one companion from each group, you could potentially lose all three for the duration of the quest. With both Isabela and Aveline, Isabela will be tempted, leaving Aveline safe to use. Fenris is safe to use with Merrill to get tempted in his place, and Varric is safe with either of them. |
||
| + | |||
| + | Despite having the health bar of Boss-ranked enemies, they are roughly equivalent to Normal ranks, with the health and vulnerabilities thereof, including stuns and the instant "kill" of [[Assassinate]]. Of the betrayers, Fenris and Aveline tend to be the most difficult to defeat on Nightmare difficulty; companions are only dangerous for as long as they remain on the battlefield, and warriors have the armor, Fortitude, and crowd control resistance to last longer than mages or rogues. This all depends heavily on how they've been built and which passive abilities they've unlocked, however, but Aveline's resilience allows her to stay in the fight long enough to gain the upper hand. Fenris has some of this durability going for him, along with a much longer range and damage potential. If he's learned any AoEs like Scythe and Whirlwind he can one-shot Hawke and their remaining companions in a single attack. Like any archer, Varric can hit you anywhere and from anywhere without fail, though he is even more annoying than an ordinary archer due to his attack speed bonuses and Pinning Shot. They are a greater threat than any demon in the room, including Wryme, so first focus your efforts on expelling your companions from the Fade with stuns, paralysis, and burst damage. |
||
| + | |||
| ⚫ | If you're having difficulty, you can turn off the tempted character's Tactics and add one with Self:Any -> Wait, and they will just stand there for the whole fight making it much easier. Note that you need to leave Tactics as a whole "Enabled" while turning off the non-Wait tactics individually; by "Disabling" them as a whole, the default A.I. script takes over. You also need to set the Tactics before you enter the room, because once the battle starts, they are no longer in your party, thus their tactics cannot be altered. |
||
| + | |||
| + | == Results == |
||
| + | [[File:feynrielleaves.png|thumb|Feynriel gains control of his dream.]] |
||
There are three possible outcomes for Feynriel for this quest. |
There are three possible outcomes for Feynriel for this quest. |
||
| − | * |
+ | *'''Deal with the Demon''' To ensure a reward is given, the player must respond with the topmost or bottom most answers during the demon encounters. Upon returning to Torpor, the player must convince Feynriel he is safe with the demon. If any condition is not satisfied, the sloth demon says his mind is useless and attacks, resulting in the next mentioned conclusion. If successful, the possession results in an encounter later in the game with people who have been driven insane by their dreams. |
| + | |||
| ⚫ | *'''The Dreamer''' With encouragement and Hawke's refusal to kill him, Feynriel seeks out mages in Tevinter for more knowledge on how to handle his abilities. His mother is not happy that he leaves without saying goodbye, but understands. The Keeper rewards you with the [[Tome of the Slumbering Elders]]. If you didn't tell Feynriel of the demons and he figures it out for himself, he shows more confidence and does not ask you to kill him. This outcome triggers the [[Who Needs Rescuing?]] quest in Act 3, where Feynriel uses his newly gained abilities to save a kidnapped noble. |
||
| + | |||
| ⚫ | *'''Tranquil Dreams''' If you choose mostly middle or bottom options in the conversations with Caress and Wryme, Feynriel becomes horrified and begs for Hawke to kill him. If you respond with the topmost answers, Feynriel wants to go to Tevinter, but you still have the option to make him Tranquil against his will: choose "I cannot let you go." Back from the Fade, the Keeper rewards you with the [[Tome of the Slumbering Elders]]. Arianni is stricken with grief. If you subsequently speak to [[Thrask]] in the Gallows Courtyard in Act 2, he tells Hawke that Arianni committed suicide by taking poison. |
||
| ⚫ | |||
| ⚫ | * |
||
| ⚫ | |||
| ⚫ | |||
| ⚫ | |||
| ⚫ | * |
||
| ⚫ | |||
| ⚫ | {{Note|You can regain some friendship points with Anders after you exit the Fade if you sided with Torpor against Justice. When speaking to Arianni, Anders cuts in and tells her that his mind could have been saved. Agree with Anders and tell her that if it was not for Hawke's weakness before the demon's temptation, her son would have had a better chance.}} |
||
| ⚫ | |||
| ⚫ | |||
| ⚫ | |||
| ⚫ | |||
| ⚫ | |||
| ⚫ | |||
| ⚫ | |||
| ⚫ | {{Note|You can regain some friendship points with Anders after you exit the Fade if you sided with Torpor against Justice. When speaking to Arianni Anders |
||
| ⚫ | |||
| ⚫ | |||
| ⚫ | |||
| ⚫ | |||
| ⚫ | |||
| ⚫ | |||
| ⚫ | |||
| ⚫ | |||
| + | Note that only one of Doubts that Linger or Isabela's Apology can be gotten in any one playthrough, same for one of Merrill, An Apology, Fenris Night Terrors, or Varric's Apology. Anders in the Fade can be gotten by simply going along with Torpor's offer, for a total of three quests. |
||
| ⚫ | |||
| ⚫ | |||
| − | points. <br><br> |
||
| ⚫ | |||
| ⚫ | |||
| ⚫ | |||
| ⚫ | |||
| ⚫ | |||
| ⚫ | |||
== Rewards == |
== Rewards == |
||
| − | # |
+ | #4 attribute points: |
| − | ## |
+ | ##1 for reading the Book in the first room |
| − | ## |
+ | ##1 for solving the first barrel puzzle |
| − | ## |
+ | ##2 for solving the second barrel puzzle |
| − | # |
+ | #If Hawke sides with the demon: |
| − | ## |
+ | ##6 attribute points if Hawke chooses "Power" |
| − | ## |
+ | ##1 talent/spell point if Hawke chooses "Knowledge" |
| − | ## |
+ | ##2 unique runes, [[Torpor's Barrier Rune]], that offer magic resistance if Hawke chooses "Magic" |
| − | # |
+ | #If Hawke does not side with the demon: |
| − | ## |
+ | ##[[Tome of the Slumbering Elders]] (if Feynriel masters his mind) |
| − | # |
+ | #500 XP/(major) demon and 1000 XP (quest completion) |
== Notes == |
== Notes == |
||
| ⚫ | *If you visit Sundermount before starting this quest you may encounter Templars demanding a group of Dalish hand over [[Feynriel]] (if Feynriel joined them at the conclusion of [[Wayward Son]]). During the conversation you can side with either the Dalish or the Templars in the following fight or simply leave the conversation. Taking a side results in {{Approval2|Isabela|-5}} while simply leaving results in {{Approval2|Isabela|+5}}. It is also possible with a special dialogue option to convince the Templars to leave peacefully, though reluctantly. Therefore: |
||
| − | :* Anders in the Fade ONLY becomes available if you took Anders to the fade. If not, it never happens, and you can continue the romance even after taking the deal with the demon. |
||
| ⚫ | * |
||
:*You don't gain anything from the peaceful solution. |
:*You don't gain anything from the peaceful solution. |
||
| − | :*If you take either side you gain roughly 275 XP for the kills and 750 XP for resolving this situation (plus random loot from corpses). Siding with the templars has no effect on "Night |
+ | :*If you take either side you gain roughly 275 XP for the kills and 750 XP for resolving this situation (plus random loot from corpses). Siding with the templars has no effect on "Night Terrors." |
| − | :*The rogue skill [[Confusion]] can be used to turn allies (templars or |
+ | :*The rogue skill [[Confusion]] can be used to turn allies (templars or elves) into enemies. If you kill them during [[Confusion]]'s duration, you can gain roughly 100 additional XP. The leaders of each group cannot be killed, however. |
| ⚫ | |||
| − | * {{Approval2|Sebastian|-10}} if he is in the party when you speak with Arianni in regards to the quest, stating it was what caused the fall of the Golden City by Tevinter mages. He will also refuse to be in the party to enter the Fade, stating it's no place for a man of the faith. So if you are working on the Loyalty of the Prince achievement down friendship path do not take Sebastian to your initial conversation with Arianni, then select "I'll come back later" instead of starting the quest. Go to Merrill's home nearby and add him to your party, then go back to Arianni and begin the quest. and select "I understand" when talking to Marethari. Once the quest begins, you will immediately go to the party select screen, so you can replace Sebastian as he refuses to come. |
||
| + | *If Feynriel was sent to the Dalish rather than the Circle and then masters his powers, Arianni will head to the clan to say goodbye rather than his room in the Circle, at which point Marethari invites her to return to the clan, revealing that she was not exiled for giving birth to Feynriel but rather that leaving was her choice entirely. Arianni will return to the Dalish Camp in Act 3 and remain there for the remainder of the game. If [[A New Path]] ends in violence, she must be slain along with the rest of the elves. Arianni is not explicitly invited to return if Feynriel was sent to the Circle, but so long as he masters his powers and leaves Kirkwall for Tevinter, she too will leave and return to her clan. |
||
| ⚫ | |||
| + | *If Feynriel was sent to the Circle and then mastered his abilities, Thrask implies that he is still there and they are petitioning for the boy's transfer to Tevinter for training. Arianni, however, implies that he has simply disappeared. This discontinuity has no effect on the end result. |
||
| ⚫ | |||
== Bugs == |
== Bugs == |
||
| − | * |
+ | *At times, the puzzle barrels go into each other, higher than they should and/or lower than they should. If this happens just carry on or try again, it's still possible to get the reward if this happens. |
| ⚫ | |||
| − | * If you use the Hold Position command as soon as you enter the Fade, and go to the second barrel puzzle with the red barrels, it triggers the effect of you walking out and talking with Torpor. If you side with him and choose Power, this will automatically give you a specialization point, making it possible to gain all three specializations.{{confirm|See talk page}} |
||
| + | *Defeating Wryme too quickly prevents all of its subordinates from summoning, thus the game rewards less than half of the intended 500 XP for the battle. To avoid this you must first kill each of the enemies he summons before going for Wryme itself, with the shade being the last of these enemies. Due to Wryme's fragility compared to more typical pride demons this may require deliberately pulling your punches and allowing it to attack you freely, which may not be worth it on higher difficulties. {{Platforms|Xbox360|ps3|pc}}(1.04) |
||
| ⚫ | |||
== Trivia == |
== Trivia == |
||
| + | *Normally Justice speaks through Anders during the quest, but if you threaten Fenris in an attempt to keep him from accepting Wryme's offer ('Attack' dialogue option), Anders uses his own voice to condemn the hypocrisy of Fenris's decision, stating "And he is so free to condemn others for the same sin." |
||
| − | * |
+ | *When Isabela is tempted with the offer of a ship, she rationalizes her betrayal to Hawke by saying, "I like big boats, I cannot lie." This is a reference to the rap song "[[wikipedia:Baby Got Back|Baby Got Back]]". If Hawke has a Sarcastic personality, they repeat this line verbatim during [[Isabela's Apology]]. |
| ⚫ | |||
| + | *In the quest [[Repentance]], Hawke can say "I do like power..." to [[Allure]] at the end. Normally Isabela does not react to this dialogue, but if she betrayed you here beforehand and is brought along, she will state, "Just make sure whatever it is doesn't disappear this time. Bloody demons with their promises and their stupid imaginary boats." |
||
| ⚫ | |||
| + | *When first speaking to Arianni to initiate the quest, a mage Hawke can mention that they have "braved the Fade before" even though this was never previously shown to the player. This statement is a possible reference to a cut Act 1 quest that would have involved a mage Hawke entering the Fade, but was never implemented in the final game. It could also mean that, as a mage, Hawke would've walked the Fade consciously at some point in their lives, either on their own or under the tutelage of their father [[Malcolm]]. |
||
| + | *Curiously, the entire quest takes place in an area identical to the Templar Hall in Kirkwall, even if Feynriel was sent to the Dalish. |
||
== External links == |
== External links == |
||
| − | * |
+ | *[http://www.rarityguide.com/articles/articles/639/1/Dragon-Age-II-Walkthrough-Night-Terrors-Puzzle-Solutions-Guide/Page1.html RarityGuide.com: Step by Step Puzzle Solution Guide] (with images) |
[[Category:Dragon Age II secondary quests]] |
[[Category:Dragon Age II secondary quests]] |
||
Revision as of 16:17, 26 May 2019
Night Terrors is an Act 2 secondary quest in Dragon Age II.
Acquisition
The quest is acquired from a letter in Hawke's mansion at the beginning of Act 2. Feynriel, the apostate mage rescued from slavers during Wayward Son, has gone into a coma due to his particular talent. His mother, Arianni, has called upon the assistance of Hawke and Keeper Marethari to save him. In order to wake him up, Hawke must enter the Fade to confront the demons struggling for control over Feynriel.
Walkthrough
The Elven Alienage
After the Quest is started, Hawke will meet Feynriel's mother, Arianni, in Lowdown's Alienage. She explains that the only way to save her son is for Hawke to enter the Fade with an ancient Dalish ritual prepared by Keeper Marethari. Hawke must first agree to help, and then Arianni asks if Hawke wants to stay and wait for Marethari to arrive, which begins the ritual immediately, or to come back later, which begins the ritual the next time Hawke interacts with her. Hawke can also refuse, which has the same result as agreeing to come back later.
If Hawke chooses either of the Helpful dialogue options, they effectively agree to help and it will immediately skip the conversation to the choice to begin the ritual right away or come back later. Sebastian will object to entering the Fade, stating that the Golden City was corrupted by such folly, resulting in ![]() Sebastian: rivalry (+10).
Sebastian: rivalry (+10).
Keeper Marethari arrives in the Alienage to a great deal of solemnity and deference from the Alienage residents, after which she, Arianni, and Hawke's entourage enter Arianni's home. Inside, Marethari speaks to Hawke and Arianni about the true extent of Feynriel's powers; he is a Dreamer, one of the only mages in all of Thedas who can enter the Fade at will and actually reshape the parts and layers of it to suit his whims. This power makes him even more attractive to demons than the average mage, and he must be saved from their temptations. After this, the Keeper talks to Hawke in private, asking them to kill Feynriel in the Fade should he prove too weak to control his abilities, as they cannot risk him becoming an abomination. She explains that killing Feynriel in the Fade will instantly make him Tranquil and no longer a threat.
If you answer "I understand":
 Anders: rivalry (+5)
- Merrill: rivalry (+10)
- Sebastian: friendship (+10)
The other option "I can't do that":
- Anders: friendship (+5)
- Merrill: friendship (+5)
- Sebastian: rivalry (+10)
- (Paired with the above Sebastian: rivalry (+10) gives a total of Sebastian: rivalry (+20))
- (Paired with the above
After the conversation with Keeper Marethari concerning Feynriel's fate, your companions will have some commentary on the prospect of venturing into the fade.
If Aveline is in your party she will state that the matter is perhaps best left to the Circle of Magi. Fenris states something similar, in that the Fade is a place for mages. Isabela is intrigued by the idea of "frolicking" through dreams, Anders says Hawke will need someone experienced in the Fade to go with them. Merrill's response seems dependent on friendship/rivalry; on the rivalry path she is, surprisingly, appalled that the Keeper would delve into the ancient magics to protect "this half-breed," insisting Marethari would never do the same for her, however, on the friendship path she merrily asks if she can come along, suggesting that it sounds like fun. Varric is unsure of how much help he'd be there, and none of these statements affect approval.
After this conversation, you have the option of selecting your companions to go into the Fade. Note that Sebastian is greyed out from his refusal to enter. Select as many or as few as you desire; all companions will have their own interactions during this quest.
In the Fade
Hawke finds themselves in Feynriel's vision of the Templar Hall. Entering the Fade unlocks:
Note that in this room, there is a book that gives Hawke +1 attribute point, one out of four you can get from the Fade. See Fade puzzles below for details.
All demons encountered in the Fade are not only Critter- and Normal-ranked, but they fall much easier than their real world counterparts. There shouldn't be any significant difficulty faced, save for the encounters in Feynriel's nightmares, and only because of who you brought into the Fade. See Companions' temptations below for more details.
Torpor


The sloth demon
If Hawke proceeds out into the courtyard, they meet the first demon, Torpor. It is a sloth demon who attempts to bargain with Hawke to allow it to possess Feynriel. See Rewards for details.
You can either refuse its offer immediately or question it further. If you pick the latter and Anders is in the party, Justice pleads for Hawke to refuse its offer. If Hawke tells the spirit to back down, Justice attacks and Hawke is forced to defeat him. Justice/Anders is removed from the party for the remainder of the quest, leaving Hawke with a smaller party.
After defeating Justice, or if Anders was not brought along, Torpor makes it offer to Hawke for power, knowledge, or magic. Hawke can accept one of these boons or reject the demon's offer for the same approval changes as described below, but with the exception of Anders.
If Hawke rejects the offer, Torpor must be defeated. If not done so by the time Caress and Wryme have been defeated, Hawke has a third chance to stop the demon from possessing Feynriel by betraying it and telling the boy to wake up (but this will deny Hawke the agreed upon reward).
If you accept the demon's offer right away and do not question him:
- Anders: rivalry (+15)
- Fenris: rivalry (+15)
- Aveline: rivalry (+15)
- Merrill: friendship (+5)
If you reject the demon's offer:
- Aveline: friendship (+10)
- Anders: friendship (+10)
- Fenris: friendship (+5)
- Merrill: rivalry (+5)
If you listen to Anders/Justice and attack the demon:
- Anders: friendship (+10)
If you tell Justice to back down, it attacks Hawke.
- Anders: rivalry (+10)
- Fenris: friendship (+5)
- Merrill: rivalry (+5)
Feynriel's nightmares
There are two quest markers waiting for you at two doors up the steps on either side of the hall. Proceed to one of the rooms.
Once inside, Hawke has an opportunity to help Feynriel realize he is in the Fade. Hawke may attempt to help the demons fool him, but ultimately Feynriel realizes he is in fact in the presence of a demon. You are presented with following options:
- (Top) Point out the discontinuities of the visions. Middle option not available in second dialogue. Choosing the second top option convinces Feynriel that they are illusions, and he confidently dismisses the demons.
- (Middle) Agree with the demons, pretending that the visions are real. Middle option available in second dialogue. Choosing the second middle option causes Feynriel to believe he is surrounded by demons, causing him to panic and flee.
- (Bottom) Bluntly tell Feynriel that he is facing a demon. Always available, but picking either one ends dialogue and Feynriel flees in terror.
Choosing the bottom option in either dialogue or the second middle option, in either demon encounter, frightens Feynriel and makes him insecure. Choosing the second top option in both demon encounters, even if the first middle option was taken, makes him more confident in his abilities.
If trying to make a deal with Torpor, making Feynriel afraid results in the demon refusing to possess him if given the opportunity at the end. This breaks the deal, leading to a fight with Torpor and not getting its reward for the quest.
No Companions
If Hawke enters the Fade without any companions, all will proceed as below with two exceptions:
- There will be no companion betrayals and therefore, none of the companion betrayal quests listed below.
- In the combat with Wyrme, two Ghostly Elves will manifest and attack Hawke.
Note that Dog can be summoned in the Fade, but cannot enter the realms of either Caress or Wryme.
Two Companions
If Hawke enters the Fade with only two companions, a single Ghostly Elf will spawn during the combat with Wyrme.
Caress in Feynriel's Desires


The desire demon
Through the eastern door up the stairs is the desire demon Caress. The demon poses as Feynriel's father, Vincento. Hawke confronts Feynriel in the form of his mother Arianni. If Hawke's party is in the Fade with them, one of them may fall to temptation and betray Hawke to side with the demon; they must be defeated. See below for more details.
- Isabela is tempted by the offer of a new ship and crew.
- (+5), if a witty comment chosen
- (+5), if an aggressive comment chosen
- Aveline is tempted by an illusion of her deceased husband, Ser Wesley Vallen, and her failure to save him. She has long made peace with his passing, but still wishes it could have been prevented.
- If Hawke is a mage, Wesley comments on Aveline's troubles starting when they met the apostate Hawke. If Bethany was the family mage, "Wesley" comments that the troubles began when they met "this family of apostates."
Wryme in Feynriel's Pride
As you go through the door from the courtyard, go in the first door on the left and pick up the book with Codex entry: Beyond the Veil: Spirits and Demons (you may already have that codex entry from the altar on Sundermount - if that's the case, no codex entry is available here). In the end room, the pride demon Wryme poses as Keeper Marethari. Hawke confronts Feynriel in the form of First Enchanter Orsino. Another companion may betray Hawke during the confrontation. See below for a note on the characters' temptations.
- Merrill is tempted by the same offer Wryme made to Feynriel; power enough to become savior of the Dalish.
- (+20) for a diplomatic choice.
- (+10) for an aggressive choice.
- (+10) for a sarcastic choice.
- Fenris is tempted by being given power enough to be an equal to the magisters.
- Varric is tempted by the offer of power that "would've allowed him to walk away with the glory" from the Deep Roads Expedition, rather than his traitorous brother Bartrand.
After the demons are defeated
After the first demon is defeated, a rage demon spawns in the main area of the hall. Justice, Merrill, and even Torpor will comment on this demon. Dispatch this demon and proceed to the other room.
When Hawke has killed both demons, it's the last chance to pick up the bonus attribute points mentioned earlier before ending the quest. Players can follow the upper walkway around the hall if they are not ready to speak to Feynriel.
If you made an agreement with Torpor

Guardsman Grigor & Melson
Torpor and Feynriel are waiting in the Courtyard once both demons are defeated. Torpor encircles the boy and attempts to lull him into a deep sleep. You can encourage Feynriel to fall asleep, which leads to his possession, or betray Torpor and tell the boy to wake up. Betraying him causes Torpor to attack, and Feynriel will then speak to Hawke as though Torpor was slain earlier, his tone depending on how the illusions were dispelled.
If you lie to Feynriel and let Torpor possess him, in Act 3 there are people in Lowtown driven to madness by the dreamer-abomination. Hawke encounters Grigor, a member of the city guard, in Lowtown at night cornered by Melson and his personal guards. Melson has gone crazy and killed several city guards, saying that Feynriel told him that they were thieves. Melson & his guards attack and are killed by Hawke. After the fight, Grigor refers to Feynriel as "The Dreamstalker."
If you refused Torpor's offer and killed it
Feynriel is waiting in the Courtyard where you killed Torpor once both demons are defeated. If he fled from the temptations in fear, he begs you to kill him. However, if you helped him see through the illusions, Feynriel is more confident and learns to leave the Fade on his own, ending the dream state. He decides to go to Tevinter to study his Dreamer skills. He later saves a woman during Who Needs Rescuing? from his place of study hundreds of miles away.
Fade puzzles
Before you leave, there are some extras you can look into; you can acquire up to +4 attribute points. One is from reading the Book in the room you spawn in, one for solving the First Barrel Puzzle, and two for solving the second.
For the barrel puzzles, there is a maximum number of moves you can make before some demons are summoned and you are locked out of the puzzle.
Book
The book which is found in the first room
The book is in the room you spawn in. With the entry behind you it can be found floating around the second column on your right. It is transparent as it moves, and solid-looking as it stops. It is only when it stops that you can interact with it and get the attribute point. First click "catches" the book causing it to fall to the floor, second click awards the attribute points.
It is recommended to stop the party members from following you as you chase the book and try to interact with it. To do this, on console open the radial menu and push “Hold Position” and on ![]() press the hold button ("H" by default) while you're a bit away from the book's route. Push the same button again after you have the attribute point to let the party members move freely.
press the hold button ("H" by default) while you're a bit away from the book's route. Push the same button again after you have the attribute point to let the party members move freely.
First Barrel Puzzle

Solution to the first barrel puzzle
Turning left from the starting point there is a room with 7 barrels. These can be moved by clicking on them. If you can get all four large barrels on the floor and the three smaller ones above them within the move-limit you get another +1 attribute point. You have a limited number of moves to solve the puzzle.
Puzzle 1
A B C D
E F G H
Click on the barrels in this order:
C G F E A B F E A B C G H D
or for a shorter solution:
C G F B A E F B C G H D
If you try to simply "rotate" the arrangement, you'll run out of moves and have to fight demons, which are not as valuable as extra attribute points. Instead, move the large barrel in position "C" off to the right, into position "D" so that "H" can tuck under the small barrels at the end, followed by the barrel in "D". That way, instead of all barrels having to travel the same path, each only has to move once or twice.
")
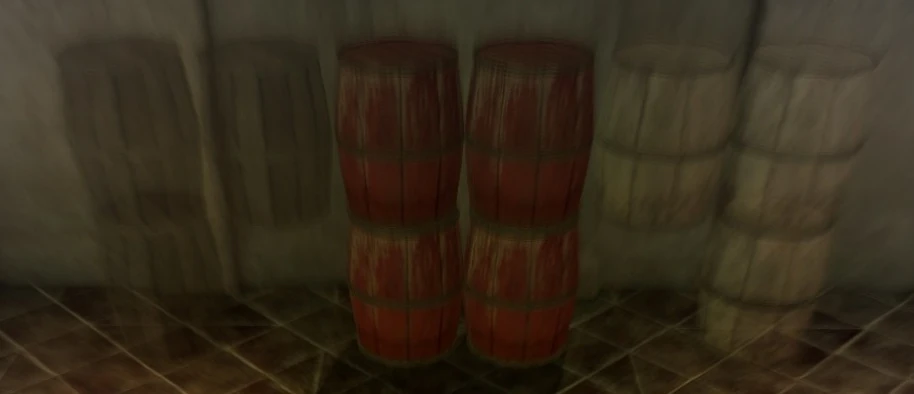
Second Barrel Puzzle

Solution for the second barrel puzzle
The second barrel puzzle is in the next room to the east, accessed by the hallway south of the two rooms. This time you have to get all four red barrels into the middle of the 10 barrels to get another +2 attribute points. You have a limited number of moves to solve the puzzle.
Puzzle 2
A B C D E F
G H I J K L
Click on the barrels in this order:
B H E K G A L F B C E D I H J K
Essentially, you'll want to divide the puzzle in half and treat it as two smaller symmetric puzzles, mirroring the movements from one side on the other. Shift the brown barrels out of the way of the corner reds, slide them next to the center reds, then "rotate" the barrel arrangement by moving one at a time (counterclockwise on the left, clockwise on the right) until the reds are in the center with one on top of the other.
")
Companions' temptations
Hawke's companions are grouped according to Isabela and Aveline for Caress to tempt, and Merrill, Fenris, and Varric for Wryme to tempt. Only one companion from each group can be tempted, with priority going in that order.
When either demon succeeds in tempting a party member (which they always will), Hawke has to fight the demon and the tempted companion, who is removed from the party and expelled from the Fade when defeated. Anders is immune to temptation, as Justice keeps him safe here, although Justice attacks you if you agree to deal with Torpor. Sebastian refuses to even enter the Fade, as this is apparently no place for "men of faith."
The party members listed above always betray Hawke, regardless of friendship or rivalry status, or the resolution of their companion quests:
- For Isabela, she's still seeking the relic and more importantly a new ship, neither of which Hawke can provide.
- For Aveline, her temptation stems from failing to save Wesley rather than any lingering feelings for him, thus starting a relationship with Donnic wouldn't prevent this wound from resurfacing.
- For Merrill, her people are everything to her. Whether Hawke supports her or meddles in her efforts, or if she is in love with them, she ultimately can't choose them over her people.
- For Fenris, even if Hadriana is dead, Danarius and many other magisters who tortured him remain, and he still fears the day they will come for him. The power to defeat them for good and permanently secure his freedom is simply too tempting to pass up.
- With Varric, even if he has confronted his brother Bartrand, his temptation stems from Bartrand being able to walk away with the glory and recognition for discovering the Primeval Thaig, effectively "making him the hero of [Varric's] tale" in spite of his betrayal, leaving Varric with only "tarnished silver and flesh wounds." Regardless of Bartrand's fate, Varric still harbors great resentment over him being the favorite child.
In any event, only one companion from each group can betray Hawke. By making a deal with Torpor and bringing one companion from each group, you could potentially lose all three for the duration of the quest. With both Isabela and Aveline, Isabela will be tempted, leaving Aveline safe to use. Fenris is safe to use with Merrill to get tempted in his place, and Varric is safe with either of them.
Despite having the health bar of Boss-ranked enemies, they are roughly equivalent to Normal ranks, with the health and vulnerabilities thereof, including stuns and the instant "kill" of Assassinate. Of the betrayers, Fenris and Aveline tend to be the most difficult to defeat on Nightmare difficulty; companions are only dangerous for as long as they remain on the battlefield, and warriors have the armor, Fortitude, and crowd control resistance to last longer than mages or rogues. This all depends heavily on how they've been built and which passive abilities they've unlocked, however, but Aveline's resilience allows her to stay in the fight long enough to gain the upper hand. Fenris has some of this durability going for him, along with a much longer range and damage potential. If he's learned any AoEs like Scythe and Whirlwind he can one-shot Hawke and their remaining companions in a single attack. Like any archer, Varric can hit you anywhere and from anywhere without fail, though he is even more annoying than an ordinary archer due to his attack speed bonuses and Pinning Shot. They are a greater threat than any demon in the room, including Wryme, so first focus your efforts on expelling your companions from the Fade with stuns, paralysis, and burst damage.
If you're having difficulty, you can turn off the tempted character's Tactics and add one with Self:Any -> Wait, and they will just stand there for the whole fight making it much easier. Note that you need to leave Tactics as a whole "Enabled" while turning off the non-Wait tactics individually; by "Disabling" them as a whole, the default A.I. script takes over. You also need to set the Tactics before you enter the room, because once the battle starts, they are no longer in your party, thus their tactics cannot be altered.
Results

Feynriel gains control of his dream.
There are three possible outcomes for Feynriel for this quest.
- Deal with the Demon To ensure a reward is given, the player must respond with the topmost or bottom most answers during the demon encounters. Upon returning to Torpor, the player must convince Feynriel he is safe with the demon. If any condition is not satisfied, the sloth demon says his mind is useless and attacks, resulting in the next mentioned conclusion. If successful, the possession results in an encounter later in the game with people who have been driven insane by their dreams.
- The Dreamer With encouragement and Hawke's refusal to kill him, Feynriel seeks out mages in Tevinter for more knowledge on how to handle his abilities. His mother is not happy that he leaves without saying goodbye, but understands. The Keeper rewards you with the Tome of the Slumbering Elders. If you didn't tell Feynriel of the demons and he figures it out for himself, he shows more confidence and does not ask you to kill him. This outcome triggers the Who Needs Rescuing? quest in Act 3, where Feynriel uses his newly gained abilities to save a kidnapped noble.
- Tranquil Dreams If you choose mostly middle or bottom options in the conversations with Caress and Wryme, Feynriel becomes horrified and begs for Hawke to kill him. If you respond with the topmost answers, Feynriel wants to go to Tevinter, but you still have the option to make him Tranquil against his will: choose "I cannot let you go." Back from the Fade, the Keeper rewards you with the Tome of the Slumbering Elders. Arianni is stricken with grief. If you subsequently speak to Thrask in the Gallows Courtyard in Act 2, he tells Hawke that Arianni committed suicide by taking poison.
- Save Feynriel:
- Anders: friendship (+5)
- Aveline: rivalry (+5)
- Kill Feynriel in the Fade:
- Anders: rivalry (+15)
- Anders admits that he did not expect Hawke to be so honest and gives some respect for telling the truth. Fenyriel's mother is furious with Hawke, but Keeper Marethari interrupts her and defends Hawke, saying that even the best can fall prey to demonic temptation.
Betrayals by companions result in certain companion quests for each betraying companion. Depending on Hawke's dialogue choices, they can lead to additional friendship or rivalry points:
- Aveline - Doubts that Linger
- Isabela - Isabela's Apology
- Merrill - Merrill, An Apology
- Fenris - Fenris Night Terrors
- Varric - Varric's Apology
- Anders - Anders in the Fade
Note that only one of Doubts that Linger or Isabela's Apology can be gotten in any one playthrough, same for one of Merrill, An Apology, Fenris Night Terrors, or Varric's Apology. Anders in the Fade can be gotten by simply going along with Torpor's offer, for a total of three quests.
Rewards
- 4 attribute points:
- 1 for reading the Book in the first room
- 1 for solving the first barrel puzzle
- 2 for solving the second barrel puzzle
- If Hawke sides with the demon:
- 6 attribute points if Hawke chooses "Power"
- 1 talent/spell point if Hawke chooses "Knowledge"
- 2 unique runes, Torpor's Barrier Rune, that offer magic resistance if Hawke chooses "Magic"
- If Hawke does not side with the demon:
- Tome of the Slumbering Elders (if Feynriel masters his mind)
- 500 XP/(major) demon and 1000 XP (quest completion)
Notes
- If you visit Sundermount before starting this quest you may encounter Templars demanding a group of Dalish hand over Feynriel (if Feynriel joined them at the conclusion of Wayward Son). During the conversation you can side with either the Dalish or the Templars in the following fight or simply leave the conversation. Taking a side results in Isabela: rivalry (+5) while simply leaving results in Isabela: friendship (+5). It is also possible with a special dialogue option to convince the Templars to leave peacefully, though reluctantly. Therefore:
- You don't gain anything from the peaceful solution.
- If you take either side you gain roughly 275 XP for the kills and 750 XP for resolving this situation (plus random loot from corpses). Siding with the templars has no effect on "Night Terrors."
- The rogue skill Confusion can be used to turn allies (templars or elves) into enemies. If you kill them during Confusion's duration, you can gain roughly 100 additional XP. The leaders of each group cannot be killed, however.
- The DLC mabari hound can be very useful here; as he is not a companion in the same sense as the others, he cannot be tempted to turn on Hawke. However, when gearing up for the Wryme fight, wait to summon the dog once the fight is initiated or he might be locked out behind the door.
- If Feynriel was sent to the Dalish rather than the Circle and then masters his powers, Arianni will head to the clan to say goodbye rather than his room in the Circle, at which point Marethari invites her to return to the clan, revealing that she was not exiled for giving birth to Feynriel but rather that leaving was her choice entirely. Arianni will return to the Dalish Camp in Act 3 and remain there for the remainder of the game. If A New Path ends in violence, she must be slain along with the rest of the elves. Arianni is not explicitly invited to return if Feynriel was sent to the Circle, but so long as he masters his powers and leaves Kirkwall for Tevinter, she too will leave and return to her clan.
- If Feynriel was sent to the Circle and then mastered his abilities, Thrask implies that he is still there and they are petitioning for the boy's transfer to Tevinter for training. Arianni, however, implies that he has simply disappeared. This discontinuity has no effect on the end result.
Bugs
- At times, the puzzle barrels go into each other, higher than they should and/or lower than they should. If this happens just carry on or try again, it's still possible to get the reward if this happens.
- If Anders is in your party, Vengeance remains active after this quest is over. If he has this spell, you can deactivate it manually. If he does not, you must remove him from your party, add others and confirm, then add him back (1.04)
- Defeating Wryme too quickly prevents all of its subordinates from summoning, thus the game rewards less than half of the intended 500 XP for the battle. To avoid this you must first kill each of the enemies he summons before going for Wryme itself, with the shade being the last of these enemies. Due to Wryme's fragility compared to more typical pride demons this may require deliberately pulling your punches and allowing it to attack you freely, which may not be worth it on higher difficulties. (1.04)
Trivia
- Normally Justice speaks through Anders during the quest, but if you threaten Fenris in an attempt to keep him from accepting Wryme's offer ('Attack' dialogue option), Anders uses his own voice to condemn the hypocrisy of Fenris's decision, stating "And he is so free to condemn others for the same sin."
- When Isabela is tempted with the offer of a ship, she rationalizes her betrayal to Hawke by saying, "I like big boats, I cannot lie." This is a reference to the rap song "Baby Got Back". If Hawke has a Sarcastic personality, they repeat this line verbatim during Isabela's Apology.
- In the quest Repentance, Hawke can say "I do like power..." to Allure at the end. Normally Isabela does not react to this dialogue, but if she betrayed you here beforehand and is brought along, she will state, "Just make sure whatever it is doesn't disappear this time. Bloody demons with their promises and their stupid imaginary boats."
- The official strategy guide suggests taking Sebastian with you especially on Nightmare difficulty, as he is "immune to the temptations of the Fade." However, Sebastian cannot be taken with you at all, saying "the Fade is no place for men of faith."
- When first speaking to Arianni to initiate the quest, a mage Hawke can mention that they have "braved the Fade before" even though this was never previously shown to the player. This statement is a possible reference to a cut Act 1 quest that would have involved a mage Hawke entering the Fade, but was never implemented in the final game. It could also mean that, as a mage, Hawke would've walked the Fade consciously at some point in their lives, either on their own or under the tutelage of their father Malcolm.
- Curiously, the entire quest takes place in an area identical to the Templar Hall in Kirkwall, even if Feynriel was sent to the Dalish.
External links
- RarityGuide.com: Step by Step Puzzle Solution Guide (with images)