“Yes, it seems like you have had your own troubles. What are the odds?” ―Alistair
Nature of the Beast is one of the four main quest lines in Dragon Age: Origins that must be completed before calling the Landsmeet.
Background
The Dalish elves are being destroyed by a virulent disease which is turning them all into werewolves. The clan keeper, Zathrian, asks for your assistance in ridding them of the curse. He requests that you find the first werewolf, Witherfang, and return with his heart to end the curse destroying his people. The quest takes you through the Brecilian Forest to track down the lead werewolf.
Walkthrough
The Dalish Camp
When the Warden travels to the Brecilian Outskirts, he will be greeted by Mithra, a Dalish elf leading a patrol. After a brief exchange (nothing to be gained by withholding the truth in this dialogue; let her know you have business with her leader, and that you are a Grey Warden), she will lead the Warden to Keeper Zathrian in the Dalish Camp. He explains that the Dalish elves currently cannot honor the ancient treaties because many of their hunters have been afflicted after they were ambushed by Werewolves since they entered this part of the forest.
Zathrian will explain that the lycanthropy spreads like a disease but is linked to its original source: a wolf known as Witherfang and that, with the beast's heart, he may be able to find a cure, which will enable them join the Warden in the fight against the Blight. If the Warden offers to help, Zathrian will share a few parting tips, for example: watch for the white wolves, and promptly directs you to his apprentice Lanaya and the clan storyteller Sarel. If pressed about equipment, he will have Varathorn set aside some supplies for you. As you progress through the quest, you can consult Zathrian concerning any new developments.
The Warden should explore the camp before moving on, to grab the side quests, codex entries, and some spare loot. One locked Chest, right next to Zathrian, will trigger angry reactions from the Elves if you ignore Lanaya's warnings. The other locked chests can be freely opened however.
Note: For fighting werewolves later, have Shale or Dog in the party. Against a party full of people the werewolves will use overwhelm and kill everyone very quickly. Dog and Shale are immune to the werewolf overwhelm ability, and any other creatures overwhelm ability. For this reason, along with many others, Shale or Dog make a great addition to a player party.
Note: If one kills Zathrian using cone of cold spells etc. then you may not be able to side with the werewolves or Zathrian at the end, meaning you must kill him during later dialogue in the quest. This means Lanaya will become the Keeper. (Xbox confirmed).
West Brecilian Forest
After checking out the Dalish Camp, the Warden can use the exit in the eastern side of the area. This will lead the party to a new unlocked area: West Brecilian Forest. The path through the forest is patrolled by groups of wolves, blighted wolves, and werewolves. Along the northwest path from the entrance, the Warden will find a Great Bear guarding a Corpse with some loot and one Andraste's Grace nearby.
In the northern central portion of the map, next to the waterfalls, there is a small island with 3 bridges. All of the paths west of the waterfalls lead here. As the party approaches, three werewolves confront the party. One of them is named Swiftrunner, and will tell the Warden to give up and go back to the Dalish. It is possible to use the Warden's Coercion skill to Intimidate or Persuade Swiftrunner to avoid a confrontation; otherwise they will attack, though they retreat once one has lost 50% health. The dialogue hints that the werewolves have grievances against the Dalish Elves, and you will encounter Swiftrunner again multiple times during this quest.
After dealing with Swiftrunner, the Warden can cross the bridge heading eastward across a creek, and fight another group of werewolves. Crossing the next bridge will lead the party to a group composed of Darkspawn, some Hurlocks, plus an Ogre (which drops Silver Cord).
- Notes
- Deygan, a Dalish elf, lies seriously wounded just past the encounter with Swiftrunner. See the Wounded in the Forest side quest for details.
- Just south of the path, where the Darkspawn were camped, the Warden can inspect a Mystical Site of Power for the Places of Power quest. There is also a Gravestone that "gives you an uneasy feeling", but for the time being the only option given is to "Leave the tombstone alone". This Gravestone belongs to The Mage's Treasure quest, and cannot be inspected/ activated until another Gravestone is activated - see also the Northern Ancient Tombstone section below for details.
- A Pile of Rubble around the same area has an Ox Bone and a Painted Skyball.
- To the north of this area, the Warden can retrieve a piece of Ironbark from a Fallen Tree, for the Rare Ironbark quest.
The Grand Oak
The path splits into a northern branch leading to the North Exit to East Forest (guarded by a Wild Sylvan), and a southern branch. The latter leads to the South Exit to East Forest (guarded by another group of werewolves, some of the Rabid variety), but also to a clearing further South, marked on the map as Grand Oak Clearing. This branch of the path is guarded by a number of Wild Sylvans, but leads to a friendly sylvan known as The Grand Oak. Amidst the rhymes, the oak will offer a new quest: recover the stolen acorn from the Mad Hermit (more on this later, see the The Magical Barrier section below).
- Notes
- The Warden can attack The Grand Oak during this encounter, or later in the quest line. The Grand Oak entry has further details.
- Just south of the Grand Oak, a small bridge gives access to a seemingly abandoned camp site. See the West Brecilian Forest entry for details.
- A Landmark Tree lies just east of the campsite, up a short ramp. If Dog is in your party, you may use this to activate Mabari Dominance for this area.
- Meeting the Grand Oak is one of the events in the quest line that triggers the spawning of fresh groups of enemies (werewolves and blighted wolves) throughout the Forest.
East Brecilian Forest
As mentioned, the Warden can enter the East Brecilian Forest from the West Brecilian Forest via either of two passages. The Northern passage is guarded by a group of werewolves, while the southern passage is guarded by a lone Wild Sylvan.
The two Western paths converge at a central crossing, where you'll encounter three Wild Sylvans. From here, three paths leave in easterly directions:
- North-East path: leads to the Northern Ancient Tombstone;
- East path: leads to the Mad Hermit Clearing
- South-East path: leads to the Magical Barrier
The northeast and east paths are also connected after the respective landmarks. See below for more details on each section.
The Magical Barrier
The southeast passage leads to a misty magical barrier: when the party tries to pass through, a cutscene shows them magically turned around, walking out of the mist in the same location where they entered it. The main quest line (Nature of the Beast) will be updated to reflect that the Warden needs to find a way to cross this barrier.
There are two main options to achieve this:
- Side with the Mad Hermit found in the Eastern Forest: He will ask the Warden to kill The Grand Oak, and offer passage through the barrier in exchange.
- Side with The Grand Oak found in the Western Forest: You will need to retrieve the Grand Oak Acorn from the Mad Hermit and the Oak will give the Warden an Oak Branch that allows passage through the barrier.
If you kill the Grand Oak first, and don't have the wood, talk to the hermit and he will offer to make you invisible with a Werewolf Skin, which you probably have since you picked it when killing them along the way.
You can also side with the Grand Oak by trading for the acorn, return the acorn to the Oak, and then come back to the Hermit and mess with his stump. This will cause the Hermit to attack.
Note for PC: With the latest patch for PC it is no longer possible to kill both Mad Hermit and The Grand Oak using the method described above, because you can't leave the area while in Combat Mode, and you will stay in Combat Mode until the Hermit and his Allies are dead. Also, if you run to an Exit after having initiated Combat, the Hermit and his Allies will follow you, you cannot out-run them.
Northern Ancient Tombstone
The northeast path has several bears. Past them, the clearing in front of the ruins in this area is guarded by two ogres.
Notes:
- This is referred to as the Northern Ancient Tombstone since there are two landmarks in this section of the Forest marked as Ancient Tombstone on the map. The second one is found past the magical barrier, further south, and is referred to as the Southern Ancient Tombstone.
- Among the piles of rubble and corpses in this clearing, there is a Gravestone, similar to the one found in the Western Brecilian Forest. Inspecting it, the Warden will find that "the air seems unnaturally cold around this ancient tombstone. Runes of warding are carved into the surface". If the Warden chooses to "Disturb the Wards", then The Mage's Treasure quest is added to the journal (if you didn't already start it), the Codex entry: Legend of the Juggernaut is unlocked, and the party will be attacked by a Revenant and his undead minions.
- Once the Mage's Treasure quest is obtained, if the Warden has received the Thy Brother's Killer quest, and leaves the Eastern Bracilian Forest, a group of maleficar will spawn in the Northern Ancient Tombstone Clearing (towards the eastern-most path that leads to the Mad Hermit clearing).
- On the path between the Northern Ancient Tombstone Clearing and the Mad Hermit Clearing, the Warden can find Aneirin, for the Wynne's Regret quest.
- You can find a Steel Spiked Collar for Dog on one of the corpses.
The Mad Hermit
When the Warden approaches the Mad Hermit's clearing, he will teleport in the middle of the camp, swinging fists to the empty air, dancing and overall being faithful to his name. Engage him in dialogue, and he'll offer to help you reach the center of the Forest if you kill The Grand Oak in the Western Brecilian Forest. The Warden has now various options, as described in the Mad Hermit entry, to receive the help [s]he requires to cross the magical barrier in the forest. They all involve a trip back to The Grand Oak so, keep your eyes open for newly spawned patrols in the forest.
- If you kill the Mad Hermit, his camp will later be occupied by bandits, and a group of darkspawn will appear by the southern Ancient Tombstone.
- There is a Landmark Tent where Dog can activate Mabari Dominance, as well as a nearby locked chest.
- The Hermit may become hostile if you stick your hand in the tree stump. It is possible to retrieve a Golden Ring (+1 constitution) from here.
Southern Ancient Tombstone
On the other side of the Magic Barrier, the Warden will encounter Swiftrunner once again. The dialogue may lead to more unanswered questions about the conflict between the Dalish elves and the werewolves, but will also lead to an unavoidable fight with Swiftrunner and 3 Rabid Werewolves. When Swiftrunner's health gets too low, Witherfang will make an appearance, and bring the fighting to an abrupt end, allowing Swiftrunner to flee. Just ahead lies the Southern Ancient Tombstone.
Past the Southern Ancient Tombstone the Warden will have a brief encounter with another named werewolf, the Gatekeeper, and a couple of his aids. They will run away before the Warden can do anything, but drop a hint about a "Lady" to be protected. Beyond this point lies the entrance to the Ruins, a.k.a. The Elven Tombs.
The Elven Tombs
The ruins in the Brecilian Forest include two levels leading to the werewolves' lair. See The Elven Tombs entry for other details.
Ruins Upper Level
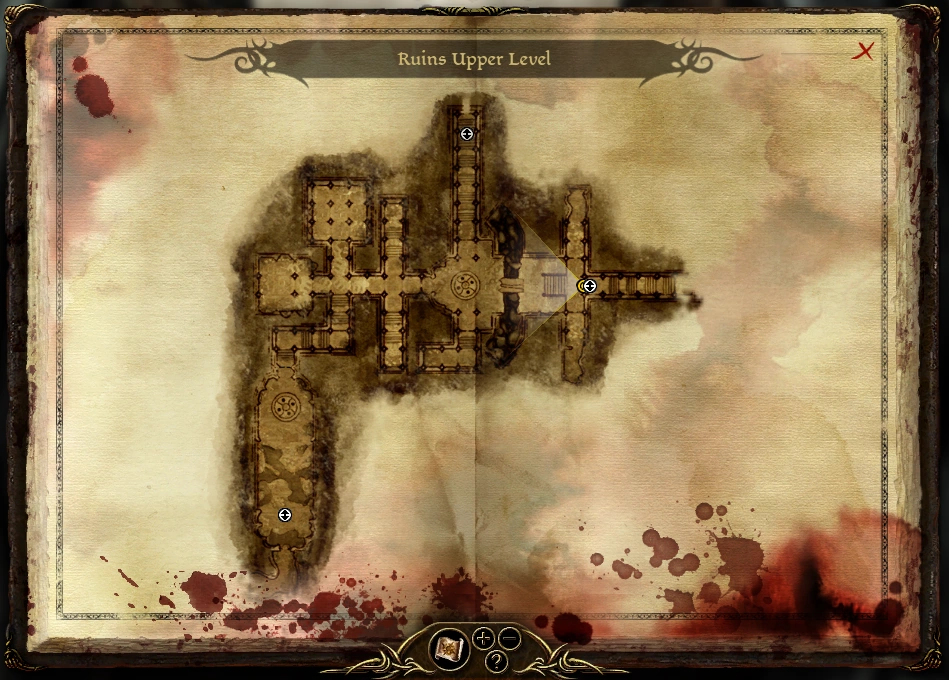
Map of the Ruins Upper Level
The Warden enters this level from the eastern corridor, in a large room where a couple of werewolves give the party their own brand of welcome. The stairs leading down and north-ward from this room lead to the Lair of the Werewolves, the Warden's objective. Unfortunately, the door is barred and to reach the lair the Warden will have to travel the long way through both the upper and lower level of the ruins to find a second entrance.
- Notes
- The Upper Ruins have many secret doors. They look like bricked-up arches, but once the controlled party member gets close enough, they are recognized for what they are. Loot and enemies are found behind these doors, and sometimes multiple doors are connected so that opening one will open a second door (behind you).
- One such secret door is found to the left of the first flight of stairs; a locked chest behind it yields a letter for the Correspondence Interruptus side quest.
- Watch out for traps throughout the Ruins: keep a rogue character up front to try to detect them.
The only way is beyond the door facing west, where the Warden will meet Giant Spiders and Web Traps. Straight ahead, and to the north the Warden will find a couple of small rooms with columns, some Piles of Rubble and Cocoons. The party should follow the south branch, which leads downstairs. As you descend, you'll hear the sound of a large creature in the distance, along with an auto-save, as well as nervous comments by your companions. At the bottom you'll enter a larger room with a few corpses laying around and a round mosaic in the center. There are a number of traps surrounding the mosaic. When you cross the mosaic, a Dragon will swoop down and attack. If the party includes a character that can disable traps, some of them can be disarmed before starting the fight with the Dragon.
The Dragon may drop a generic armor chest piece. The corpses, chests, and the Dragon's Hoard in the room will make up for it. The Hoard will yield Falon'Din's Reach and a Silver Medallion, along with a large selection of gems, potions, and gold. At the end lies the stairs to the Lower Ruins.
Lower Ruins

Map of the Lower Ruins
The Warden enters this level from the Northern path in the middle of the map. The first thing the companions are likely to notice is a ghostly elf just ahead of the group. The spirit will move away as the party approaches, but a group of undead (Skeletons and corpses) will raise up and attack. The two side rooms just ahead hold more Skeletons, and the passage beyond that (just before the collapsed portion) contain web traps and more spiders.
The collapsed corridor will force the Warden to a detour eastward, leading to a larger room with a round mosaic in the center. After encountering a ghostly boy, a large group of skeletons will ambush the companions here. Check the side room for a Sarcophagus that yields a Fancy Scroll and a Tablet.
The group should continue east, and turn southward at the end of the corridor (or north-ward to complete The Elven Ritual and subsequently The Mage's Treasure quests). A group of Skeletons will be waiting at the bottom of a flight of stairs. Once the group is defeated, a larger group of Skeletons will spawn around the party.
At the next crossing, the party will meet 2 groups of undead (one from the side room to the east, the other from the corridor up ahead), while a third group waits behind the closed door to the West. The main path lies beyond that door.
Approach this door with care, since the large room behind holds many enemies (mostly Skeletons), and a very large amount of traps (5 pressure plates surround you as soon as you step through the door, just to get you started). Keep the group from entering the door, and pull the skeletons to you (they have archers so you may have to run behind a corner to force them closer, or close the door after getting their attention). If the party can disarm traps, do so between pulling groups; otherwise walk carefully each party member past the door and hugging the wall. The skeleton groups and traps don't stop right past the door, so keep an eye on the movement of your companions.
Once the room is disarmed and skeletons are eliminated, the party can move through the door on the west side, into the corridor that was beyond the collapsed section at the beginning of the level. A Metal Door (and an Auto-Save) lies ahead, leading to the largest room of the Lower Ruins. Skeletons of all kinds will greet the Warden past this point. Once the initial groups are dealt with, the party can descend the first flight of stairs into this enormous room. Don't let the statues and paraphernalia distract you, because an Arcane Horror will spawn as soon as the Warden gets close enough.
The Arcane Horror will teleport from one corner of the room to the other at regular intervals if someone tries to attack it at melee, making the fight difficult. At the same time, a large number of skeletons from the surrounding balconies and ancillary passages will pour into the room and attack the party.
- It's often safest to attack the Arcane Horror with ranged weapons from atop the stairs. It will only counter with Spirit Blast against ranged attackers.
- The skeletons will eventually wander into the large room after a time if you remain atop the stairs.
The Arcane Horror will drop a pair of Ashen Gloves among other things. More loot can be found down the flight of stairs facing south from this room (a sarcophagus holds Ancient Elven Armor and a Legacy White Shear)–one of the chests has a lock difficulty of Very Hard (60).
A few more skeletons await the Warden on the path heading north from this room, but the entrance to the Werewolf Lair is just past them.
Lair of the Werewolves
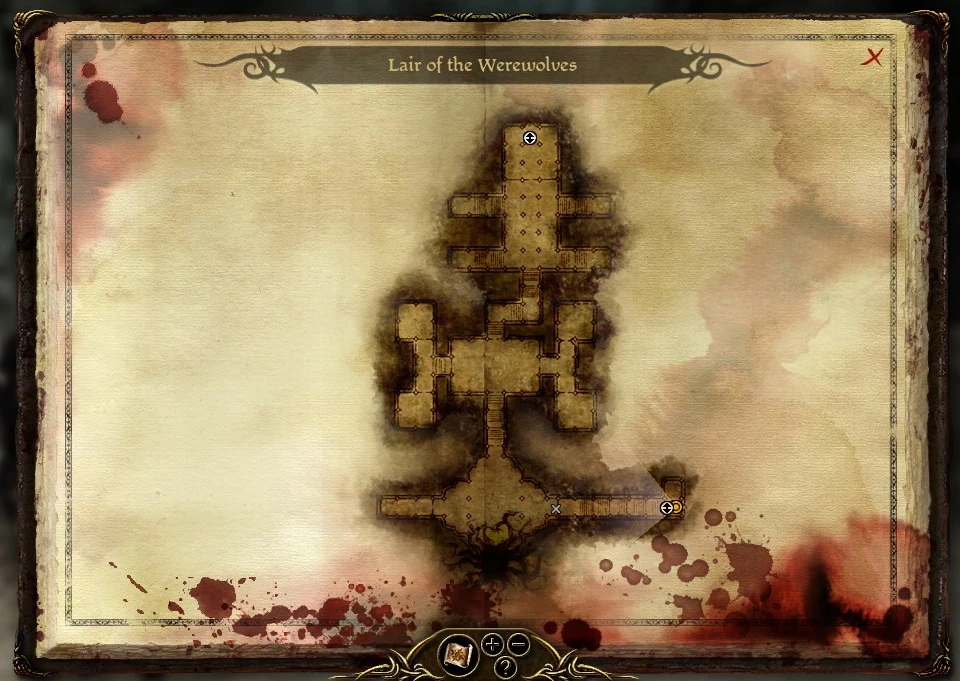
Map of the Lair of the Werewolves
- See also: Werewolf Lair
The Warden enters the Lair through a passage in the Lower Ruins, arriving into the northern-most room of the level, a small safe area separated from the main room ahead by a door (the corpses can be looted for Corpse Gall). Beyond the door, a large group of werewolves, including shadow werewolves, stand guard and will attack as soon as the Warden opens the door. Shadow werewolves use stealth and will try to overwhelm your companions. Once this group is defeated, the party can explore the large room ahead: be careful of traps and more werewolves (including hidden shadow werewolves) just ahead. The companions can use the barricades for cover and to lure the werewolves closer when the party is ready. The flights of stairs to the sides may yield some loot, but lead nowhere. The only option is to move forward and down the stairs headed South.
Past the door at the bottom of these stairs, the party will meet the Gatekeeper (and a couple of aids). He has been sent by The Lady to offer an opportunity to parley. The alternative, of course, is to attack them. A persuasion check can yield ![]() Wynne approves (+1) when refusing to parley.
Wynne approves (+1) when refusing to parley.
At this point, the Warden has choices about how the quest line will be completed.
The Warden's Choices
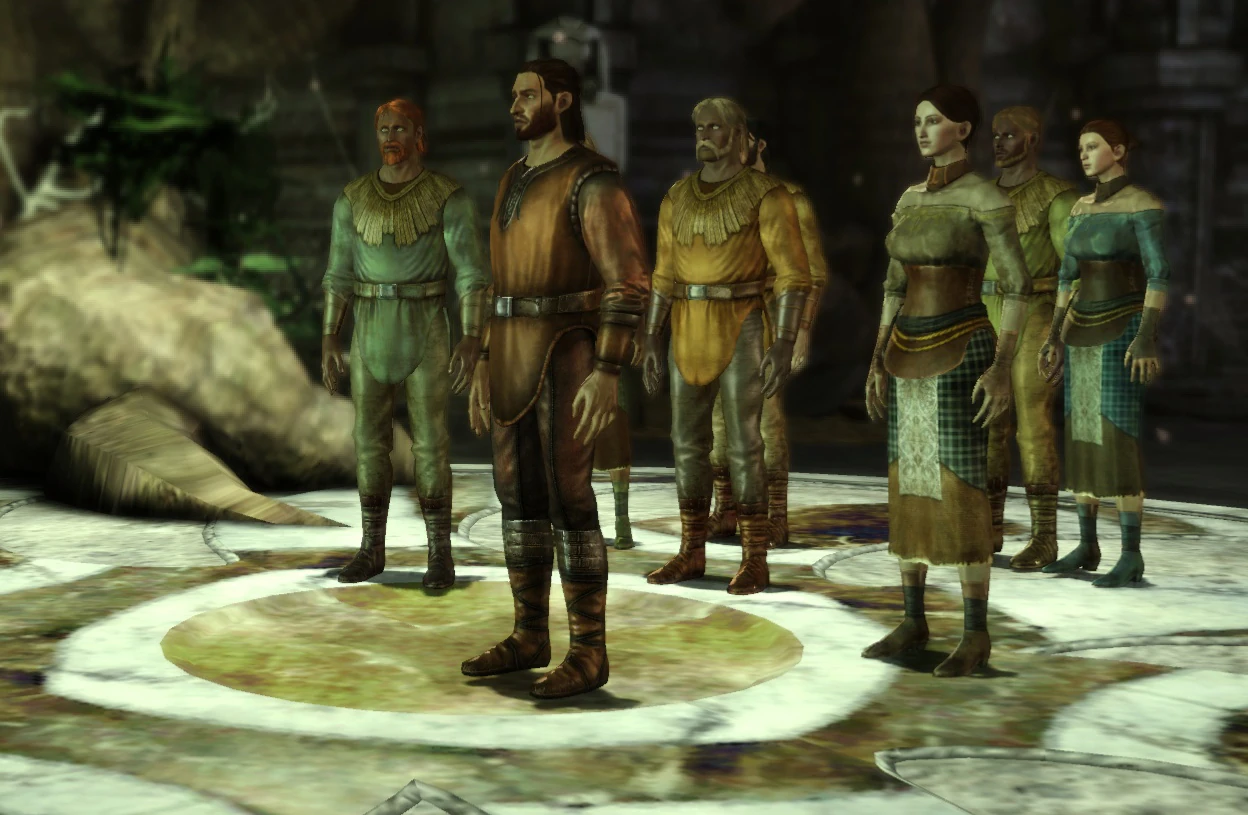
The conversation with The Lady of the Forest will explain the origin of the conflict between the werewolves and the Dalish elves: Zathrian cursed into Werewolf form a group of human settlers who had murdered his son and raped his daughter. The werewolves currently in the forest are not the original criminals, but unfortunates who wandered into the forest since. The Lady asks the Warden to bring Zathrian to the chamber so they may talk. ![]() Alistair disapproves (-3) for refusing to seek Zathrian.
Alistair disapproves (-3) for refusing to seek Zathrian.
Ultimately, the Warden will have to side with either the werewolves or the elves. The decision will have an impact towards the forces available in the The Final Battle, as well as the approval of the Warden's companions.
Even if you choose not to parley and refuse to seek Zathrian, he will still arrive in the circle room. There you may talk about what you have learned, and travel back with him. He will give you Griffon's Beak even if you didn't ask for a reward. Also, this path leads to no way to kill Zathrian like the path described in the Siding with the elves: Kill the werewolves section.
Siding with the werewolves: Kill the elves
One option is to Persuade the Lady that the best course of action is to kill all the Dalish elves. This is the only option that leads to the werewolves siding with the Warden for the final battle. In addition, this course of action will trigger the following approval changes from the Companions:
 Morrigan approves (+4). You get this for *suggesting* to kill the elves. If you tell Zevran you'll find another way when he begs you not to go through with it, you still get the approval bonus.
- Shale approves (+4)
- Wynne disapproves (-3) (after one more persuasion check versus your companions)
- Zevran strongly disapproves unless you pass a persuasion check with him and he loses no approval.
This will result in the Lady and the werewolves attacking the elves at the Dalish Camp. All the other elves will defend Zathrian (so needless to say, you will not be able to barter with Varathorn after this course of action). You can loot a Keeper's Ring and Magister's Staff from Zathrian after he is slain.
Siding with the elves: Kill the werewolves
The Warden may agree to bring Zathrian to the Lady. In that case, the party will meet the Keeper as they exit the ruins. Once Zathrian is brought to the Lady and negotiations reach a standstill, the Warden can choose to engage the werewolves with Zathrian's help. Companions' approval changes when this course of action is selected:
- Morrigan approves (+2)
- Oghren approves (+4)
- Leliana disapproves (-10)
- Wynne disapproves (-5)
- Shale disapproves (-15)
The Lady of the Forest will transform into Witherfang, and along with Swiftrunner & the other werewolves will attack the party and Zathrian.
- Zathrian can keep Witherfang busy during most of the fight, but he may accidentally freeze the party with Cone of Cold. Careful positioning during the fight minimize this problem.
- Witherfang's Howl ability has an additional knockdown affect. It is best to deal with Swiftrunner and the pack of werewolves first before engaging Witherfang.
- You can loot the Heart of Witherfang and an Expert Cold Iron Rune from Witherfang's corpse.
Once Witherfang and the werewolves are slain, Zathrian will ask if the Warden would like to return to camp with him as he prepares the cure. If, before the fight, the Warden had asked for a reward in exchange of his/her help, the Keeper will give a Griffon's Beak. The Warden can go with him, stay and continue to explore the ruins, or opt to double-cross Zathrian and kill him (since Lanaya knows how to cure the hunters). If you do this, he will summon four Sylvans and two Greater Shades to assist him. However, Zathrian will be injured from the battle with Witherfang, so he will be weaker than usual. As above, you can loot his ring.
Bug!: When you kill all the werewolves and Witherfang, the conversation resets (also, the Lady of the Forest is invisible until she turns into Witherfang). After the conversation the wolves are dead. (on PS3)
Convince Zathrian to lift the curse
Curse Lifted
If the Warden brings Zathrian to the Lady of the Forest and refuses to help him, Zathrian will attack the party and the werewolves. As above, he will summon four Sylvans and two Greater Shades to assist him. Companions' approval changes when this course of action is selected:
- Oghren disapproves (-5)
- Alistair approves (+2)
- Morrigan approves (+2)
- Leliana approves (+6)
- Wynne approves (+7)
If you promise to protect Zathrian before he meets the Lady, and then say it was just a ruse to get Zathrian to the meeting:
- Sten approves (+3)
During this fight, Witherfang and all the werewolves will be paralyzed; you will need to dispel this, otherwise it will be a difficult battle. If Alistair or any other templars have Cleanse Area, this will free your allies, making the battle significantly easier. Alternatively, you can cast Mana Clash on Zathrian, which will finish him off in a single round. Once his health reaches about 20%, he will surrender, and eventually agrees to lift the curse, sacrificing himself and banishing the Lady of the Forest in the process. The remaining werewolves will all revert to human form and leave to rejoin society. When you return to the Dalish camp, Lanaya (as the new Keeper) will pledge Dalish support against the Darkspawn.
- You will not be able to loot the Heart of Witherfang or a Keeper's Ring if you take this course of action.
- However, the Warden may ask Swiftrunner, for a reward: Swiftrunner's Shield.
- It's also possible, as with Zathrian, to double-cross the now human werewolves after you receive his shield. If the Warden says "Not enough", all the ex-werewolves will attack. The party may focus on Swiftrunner at first, since he is the only one doing any serious damage.
Comment PC version 1.04: The mentioned approval ratings varies depending on a lot of choices it seems. In one case where I tricked Zathrian by telling I would kill Witherfang and then later told him it was just to get him down there I got:
- Morrigan approves (+2)
- Leliana approves (+2)
- Sten approves (+3)
during the fight, and then
- Leliana approves (+7)
on top of that when the curse was lifted. In a second run where I instead convinced Zathrian to talk to the Lady there was no approval changes during the combat. But I got
- Leliana approves (+7)
when the curse was lifted.
Result
1. If you sided with the elves, all the ailing Dalish hunters are cured once you return to camp. Zathrian (or Lanaya, if he died) will honor the Grey Warden treaties and pledge the Dalish army to help you battle the Blight. At this point, Emissary Caron will appear in your camp and you can turn in crafting materials to the Dalish army. If Zathrian did not lift the curse (and wasn't double-crossed), he will later appear in Redliffe Castle prior to the Final Onlaught, and will fight alongside you against the Archdemon.
2. If instead you convinced the werewolves to kill the elves, the werewolves will pledge themselves to help you battle the Blight. At this point, Emissary Bulfa will appear in your camp and you can feed him a single nug (though no caged nugs are actually removed from your inventory). The Lady of the Forest will later appear in Redliffe Castle prior to the Final Onlaught, and Swiftrunner will fight alongside you against the Archdemon.
3. If you chose to side with both and convinced Zathrian to kill himself and lift the curse, the humans will disappate and the elves will honor the treaties.
Regardless of how you completed this quest, you can now freely open the chest by the Keeper's aravel to obtain the Song Book, which grants Codex entry: In Uthenera. ![]() It's not possible to open this chest if you slaughter the elves (chest is no longer interactive), but Leliana will sing the song in camp anyway.
It's not possible to open this chest if you slaughter the elves (chest is no longer interactive), but Leliana will sing the song in camp anyway.
The next time you enter the West Brecilian Forest, you will be confronted by Panowen (whose husband was slain by the werewolves) and several Dalish hunters. If you lifted the curse or sided with the werewolves, she will attack you unless you can persuade her that Zathrian was to blame (in which case she gives you the Silverleaf ring). If instead you killed the werewolves, she will thank you and bestow the ring as a reward.
And lastly, the next time you speak with Leliana at the party camp, she will sing "In Uthenera".
Side quests
There are four side quests that can be taken in the Dalish Camp once Nature of the Beast has been started. Some of them cannot be completed after resolving the werewolf/elf conflict. Obviously, none of them can be completed if you side with the werewolves (as all the elves will be dead).
- Cammen's Lament Ends upon return to camp if you did not visit Cammen prior to ending the curse. This quest is easily completed with two ranks of coercion skill during your first encounter with Cammen prior to entering the Brecilian Forest.
- Elora's Halla Can be completed at any time.
- Lost to the Curse Speak to Danyla's husband before entering the Forest; completed by discussing her fate with him upon your return.
- Rare Ironbark Begin this before you enter the Forest; it will remain open after completing the main quest.
Codex objects
Some of these entries can be unlocked in other areas before reaching this area.
- One of The Black Vials
- One of the pieces of Ancient Elven Armor
- One of the Unbound journal entries
Notes
- Stealing from the Hermit's tree stump will result in him turning hostile, forcing you to kill him. However, you can actually steal the acorn this way (if you didn't trade for it), so the quest can be continued.
- When you find the Arcane Warrior phylactery, it will begin vibrating. If you say, Nah, you may have a use later, it will stop vibrating & the light will go away. However, you still get to choose the Specialization. On the Xbox, the Phylactery might remain clickable without being usable.
- On the console version, you can gain the Slayer achievement even if you side with the Elves. Save the game before entering the lair and after you gain Slayer. Reload and then choose to slay the wolves, you will keep the achievement yet choose to aid the Elves. (This is true for all achievements on all platforms--once unlocked always unlocked. The other common situations where this is used include acquiring the Blood Mage and Reaver specializations.)
- When agreeing to find Zathrian, before you leave you may be able to kill the werewolves surrounding the Lady of The Forest with the exception of Swiftrunner, this can be accomplished by casting a 4th tier area of effect spell like Inferno, you'll get extra experience and loot without actual battle (however doing so will also result in a lack of support in the battle against Zathrian as they are all dead. (tested on PC, patch 1.02)
- Some players prefer to side with the Elves because of their strong bow attack, which the werewolves lack. Mages & templars (and even golems, from Branka) offer some ranged support, but none are as powerful as the Dalish army.
- If you choose to kill or free the werewolves from their cure you can return to the east woods to find an elf looking for the werewolves to avenge her husband's death. This is Panowen, as mentioned above. She will be hostile towards you and will admit to wanting to continue hunting them down even if they were turned back to humans. You can talk her down with persuasion and in return she will give you an item (Silverleaf ring).
- Unsurprisingly, if you open Varathorn's equipment chest before actually asking him about it, he comments on you looting through things before you know you can have them, but this has no known negative effects on your interactions with him or the rest of the Dalish.
Bugs
- After movie of the curse lifting, you might not be able to exit; the doors somehow lose their activation icon. Save and reload game.
- Some players have reported a glitch where werewolf pelts disappear from inventory, preventing access to the ruins through the Hermit. Only matters if the player has already killed the Grand Oak.
- Talk to the Grand Oak before killing the hermit (or checking the stump, which will force his death). If he dies first, you can be stuck without a way to complete the quest; the Hermit will be dead, the stump useless, leaving you no way to cross the barrier. Likewise, if you trade with the Hermit for the acorn, leave the conversation, give the acorn to the Grand Oak, and then return to the Hermit to either continue trading or check his stump, you may acquire yet another acorn that you will keep for the duration of the game.
- When siding with the werewolves, it is possible to get blocked from completing the Nature of the Beast quest. Only Swiftrunner and Witherfang appear, standing near the forest entrance after the battle. This can happen when the battle ends prematurely if not all the elves in the Dalish camp are defeated. To ensure this does not happen, make sure you run into all the elves by checking around the area. A cutscene should play shortly after all the elves are defeated.
- Trading the hermit for the helmet then saving and reloading the game will glitch the game, it will allow you to talk to the Grand Oak with the option as if you had the acorn. Proceeding with the option will not cause you to lose the helmet, and it will proceed as if you traded for the acorn. However talking to the Hermit will still result in him saying he still has the book and the acorn. You can still advance normally without actually getting the acorn from the hermit.
- Even when using Cleanse Area and releasing some of the werewolves from being "paralyzed " they do not engage Zathrian and continue standing where they were for the entire battle.