Tag: Visual edit |
(Happens even without max friendship, & the value does not actually move in any way when maxed (i.e. values do not change, & if a change is noted it’d be a bug)) |
||
| (19 intermediate revisions by 10 users not shown) | |||
| Line 23: | Line 23: | ||
== Walkthrough == |
== Walkthrough == |
||
| − | Travel to the Dalish camp at [[Sundermount]], (don't forget to pick up the [[Elfroot ( |
+ | Travel to the Dalish camp at [[Sundermount]], (don't forget to pick up the [[Elfroot (Dragon Age II)|Elfroot]] to the south, before entering the camp), and speak with [[Keeper]] [[Marethari]]. Hawke will automatically get [[Codex entry: The Dalish Elves]]. Marethari will send [[Hawke]] to meet her First, [[Merrill]], who will accompany Hawke up the mountain to perform a ritual involving the amulet received from [[Flemeth]]. She acts as a guest party member for the duration of this quest. Although she cannot be directly controlled during this quest, she will contribute to battles as she sees fit. |
Hawke won't get far before a small group of undead attacks and Hawke discovers that Merrill is a [[mage]]. After a brief conversation, continue up the mountain until reaching a cave entrance. Fight your way through spiders in the cave, emerging on a hillside. |
Hawke won't get far before a small group of undead attacks and Hawke discovers that Merrill is a [[mage]]. After a brief conversation, continue up the mountain until reaching a cave entrance. Fight your way through spiders in the cave, emerging on a hillside. |
||
| Line 34: | Line 34: | ||
Return to the cave entrance and Hawke's party is automatically transported back to the Dalish camp. From there, Hawke's party is transported to the [[Kirkwall Alienage|Elven Alienage]] in [[Lowtown]] where Merrill asks if she can expect a visit from Hawke in her new home. |
Return to the cave entrance and Hawke's party is automatically transported back to the Dalish camp. From there, Hawke's party is transported to the [[Kirkwall Alienage|Elven Alienage]] in [[Lowtown]] where Merrill asks if she can expect a visit from Hawke in her new home. |
||
| + | |||
| + | === Strategy === |
||
| + | The hike itself is not too difficult, especially with Merrill acting as an invincible fifth party member. However, on Nightmare difficulty all of the enemies (save for shades, which are optional encounters only) are simply immune to her Nature-element staff's basic attacks, making her little more than a useful distraction when she's not using her default spells of [[Spirit Bolt]], [[Stonefist (Dragon Age II)|Stonefist]], and [[Hex of Torment]]. Beyond this, all enemies encountered on Sundermount are highly vulnerable to electricity, with fire, frost, and spirit as useful elements in their own right. The only enemies of significant threat are the Shadow Warriors. They fight like "commander"-style enemies among the Elite-ranked templars and mercenaries of Kirkwall, only they are immune to nature damage, thus they can easily tank a full-party assault while casting a health-regenerating aura on nearby corpses, making it even more difficult to take them down as they hack away at your party. There are three in total on Sundermount; two are optional, thus they can be left until the party is more powerful, but the mandatory one comes on the heels of a battle with an Arcane Horror. These enemies, while Elite-ranked, have little to no protection and can fall quickly with a full party assault, especially since they're vulnerable to Merrill's nature element. However, they can cast spirit-element area-of-effect spells and wipe out the entire party in less than a few seconds. Full DPS all-out assaults will often eliminate the Arcane Horror before it can do too much damage of its own. This approach may encourage the Arcane Horror to unleash its AoE attack at its feet against all melee companions, however, so either allow it to make a single cast and move each companion around the AoE, or take no more than 3 seconds to kill it, remaining ready to flee if it cannot be done in time (scatter each companion rather than moving them as a group). Dual-wielding talents can deal the greatest damage for this purpose while leaving nearby allies unscathed, whereas a two-hander's techniques may end up harming the party more than the Arcane Horror, so they should stick to basic attacks and [[Cleave]] if available, if not simply focus on the corpses and draw threat, leaving the demon to the mages and rogues. |
||
| + | |||
| + | With the Arcane Horror out of the picture, the corpses aren't much more threat than in any other encounter on the hike. The biggest concern are the Skeleton Archers, three Normal-ranked and one Critter-ranked, as they can attack from range while the corpses must shamble after party members, leaving them vulnerable to kiting and focused fire. Send companions to engage them where they would be most effective (AoE spells on the two furthest from the shrine, dual-wielder to Backstab the Critter-rank, et cetera), then focus the full party on each corpse one at a time. The Shadow Warrior will appear after 6-7 kills, ideally with no one nearby to register as the greatest threat, thus targeting Merrill. Focus on eliminating the remaining corpses before committing the full might of your party to defeating him. His grenades can deal a significant chunk of damage while inflicting knockback and reducing movement speed, therefore attack him from all sides so he cannot catch multiple characters in a single bomb (which he re-uses every 5-10 seconds). If you retained enough healing potions in the hike up and still have more than two party members alive you can defeat him with attrition. |
||
== Friendship and rivalry == |
== Friendship and rivalry == |
||
| Line 43: | Line 48: | ||
** [[Carver Hawke|Carver]] "Elven gibberish." |
** [[Carver Hawke|Carver]] "Elven gibberish." |
||
| − | If more than one of |
+ | If more than one of these companions are present, Fenris' comment will take priority, followed by Aveline's. |
*Investigating "What are the Dalish": |
*Investigating "What are the Dalish": |
||
| Line 52: | Line 57: | ||
When [[Merrill]] removes the barrier: |
When [[Merrill]] removes the barrier: |
||
| − | *choosing "It did help us |
+ | *choosing "It did help us" (diplomatic option): |
** {{Approval2|Anders|-10}} |
** {{Approval2|Anders|-10}} |
||
** {{Approval2|Fenris|-10}} |
** {{Approval2|Fenris|-10}} |
||
| Line 59: | Line 64: | ||
** {{Approval2|Carver|-5}} |
** {{Approval2|Carver|-5}} |
||
| − | *choosing "They don't keep helping |
+ | *choosing "They don't keep helping" (sarcastic option): |
** {{Approval2|Aveline|+5}} |
** {{Approval2|Aveline|+5}} |
||
| − | *choosing "The demon, you mean |
+ | *choosing "The demon, you mean" (aggressive option): |
** {{Approval2|Anders|+10}} |
** {{Approval2|Anders|+10}} |
||
** {{Approval2|Fenris|+10}} |
** {{Approval2|Fenris|+10}} |
||
| Line 69: | Line 74: | ||
:{{Note|{{platforms|xbox360}} With a party made up of Anders, Fenris, and Bethany, the +5 from Bethany was not received.}} |
:{{Note|{{platforms|xbox360}} With a party made up of Anders, Fenris, and Bethany, the +5 from Bethany was not received.}} |
||
| + | '''''Note:''' (PC) With a party made up of Aveline, Varric, and Bethany, the +5 from Bethany was not received''. |
||
| − | |||
| − | :{{Note|{{platforms|pc}} If Fenris is present during the conversation with Flemeth at the |
+ | :{{Note|{{platforms|pc}} If Fenris is present during the conversation with Flemeth at the altar, Hawke has the option to let him speak, which provides some supplemental information about Flemeth.}} |
| Line 86: | Line 91: | ||
== Result == |
== Result == |
||
*[[Merrill]] joins Hawke's party. |
*[[Merrill]] joins Hawke's party. |
||
| + | *Regardless of whether or not Hawke told Merrill that she could expect a visit, the [http://dragonage.wikia.com/wiki/Companion_quests_(Dragon_Age_II) companion quest] [http://dragonage.wikia.com/wiki/Welcome_Home Welcome Home] becomes available. |
||
*The next time Hawke leaves Kirkwall, you will find yourself at the [[Dead Man's Pass]] and receive the main quest [[Blackpowder Promise]]. |
*The next time Hawke leaves Kirkwall, you will find yourself at the [[Dead Man's Pass]] and receive the main quest [[Blackpowder Promise]]. |
||
| + | * You can talk to Arianni, Feynriel's mother, in the Elven Alienage in Lowtown and start the [[Wayward Son]] quest. |
||
== Rewards == |
== Rewards == |
||
| − | + | After the conversation with Flemeth: |
|
| + | * 800 XP |
||
| + | * 8 {{g}} |
||
==Notes== |
==Notes== |
||
| − | * If seeking the [[Supplier]] achievement, be sure to grab the [[Silverite]] in the caverns (next to the door in the firepit room just after the entrance), the [[Elfroot (Dragon Age II)|Elfroot]] near the rock slide below the cavern entrance, and the [[Deep Mushroom (Dragon Age II)|Deep Mushroom]] in the Elven Graveyard. |
+ | * If seeking the [[Supplier]] achievement, be sure to grab the [[Silverite]] in the caverns (next to the door in the firepit room just after the entrance), the [[Elfroot (Dragon Age II)|Elfroot]] near the rock slide below the cavern entrance, and the [[Deep Mushroom (Dragon Age II)|Deep Mushroom]] in the Elven Graveyard. If you are trying to recruit everyone at low levels it is best to avoid these items for now, as they are rich in experience but can be claimed at any time. |
| − | * |
+ | * Inside the mountain cave, after killing the spiders and in a little room to the right are the class-specific Act 1 [[Item sets (Dragon Age II)|item set]] gloves. |
| − | * It may be worthwhile to continue past the Altar, to the top of [[Sundermount]], while [[Merrill]] is following Hawke around as a "bonus" party member. The [[Arm of Adruil]] awaits at the summit |
+ | * It may be worthwhile to continue past the Altar, to the top of [[Sundermount]], while [[Merrill]] is following Hawke around as a "bonus" party member. The [[Arm of Adruil]] awaits at the summit, but Hawke must defeat a [[Shadow Warrior]] and nine shades, as well as touch the magical barrier nearby to trigger the encounter, which incurs a knockback in the middle of a group of freshly-spawned shades. On the way up the party must win a difficult fight against corpses, a [[Revenant]], and a few shades spawned after the corpses are slain. Even though Merrill's basic attacks deal no damage to the enemies save for the shades on Nightmare difficulty, having her as an invulnerable decoy should make the climb much easier. It is still possible with only four party members, as are any encounters on the highest difficulty, but it may necessitate returning only after acquiring more powerful weapons, talents, and passives. There is also a line of four Simple-ranked traps on the way from the altar to the top. Before examining the Altar, it is possible to return to Kirkwall to add a rogue party member and still retain [[Merrill]] in a bonus capacity. {{Note| Be careful to head up the path before getting too close to altar as, once the encounter with the Arcane Horror is triggered, Merrill will not follow you up the mountain. She stays in the altar area even after talking to [[Flemeth]]. (Fixed in 1.04)}} |
| − | * The [[Arcane Horror]] guarding the Altar drops |
+ | * The [[Arcane Horror]] guarding the Altar drops ≈6 {{g}} and a [[Ring of the Magister]] when he dies. As a guaranteed accessory, it is a worthwhile addition to the party's inventory. |
| + | * Completing the Dalish ritual earns 8 {{g}}. Together with the loot from the Arcane Horror, this makes the quest one of the best early sources of income for Act 1. |
||
| + | * [[Fenris]] has a lot to say during this quest. He trades barbs with the Dalish when they refer to him as a "city elf," chastises Merrill for using blood magic, and even has optional commentary on Flemeth (which in turn leads Flemeth to "see" and reveal a bit of Fenris' history and state of mind). |
||
| − | * If [[Fenris]] is in Hawke's party, there is a small exchange between him and [[Merrill]] when she summons the dragon's spirit. |
||
| + | * [[Isabela]] wonders if Flemeth is a "friend of [Hawke's]," to which Flemeth notes she "says the word like it were cheap coin to be traded away." Isabela retorts "You don't know me," and Flemeth responds "I know your type." |
||
| + | * [[Anders]] has commentary on Flemeth, but their exchange is superseded by Fenris' comments. |
||
| + | * If Hawke uses the sarcastic dialogue after Flemeth's advice to them about the future ("Cheap advice from a dragon"), [[Bethany]] responds that the party is going to regret bringing her to the Free Marches. Flemeth wistfully comments that she knows regret too well, and warns Bethany not "to hold it so close that it poisons your soul." |
||
| + | *The barrier at the top of the mountain causes knockback as the enemies spawn, however the knockback can be successfully prevented with the right items or abilities. It should only be a minor deterrent at best, however. |
||
| − | * If you select "What do you think, Fenris?", there is some dialogue that will reveal a bit about [[Fenris]]. |
||
==Trivia== |
==Trivia== |
||
* The verbal component of the ritual is the first stanza of [[Codex entry: In Uthenera|"In Uthenera"]] |
* The verbal component of the ritual is the first stanza of [[Codex entry: In Uthenera|"In Uthenera"]] |
||
| + | |||
| + | [[ru:Долгий_путь_домой]] |
||
[[Category:Dragon Age II main quests]] |
[[Category:Dragon Age II main quests]] |
||
Revision as of 12:11, 9 July 2019
Long Way Home is an Act 1 main quest in Dragon Age II.
During this quest Hawke must travel to the top of Sundermount with Merrill in order to perform a ritual involving the amulet received from Flemeth during the Prologue.
Acquisition
This quest may be performed after gaining entry into Kirkwall, having been received from Flemeth during the Prologue.
Walkthrough
Travel to the Dalish camp at Sundermount, (don't forget to pick up the Elfroot to the south, before entering the camp), and speak with Keeper Marethari. Hawke will automatically get Codex entry: The Dalish Elves. Marethari will send Hawke to meet her First, Merrill, who will accompany Hawke up the mountain to perform a ritual involving the amulet received from Flemeth. She acts as a guest party member for the duration of this quest. Although she cannot be directly controlled during this quest, she will contribute to battles as she sees fit.
Hawke won't get far before a small group of undead attacks and Hawke discovers that Merrill is a mage. After a brief conversation, continue up the mountain until reaching a cave entrance. Fight your way through spiders in the cave, emerging on a hillside.
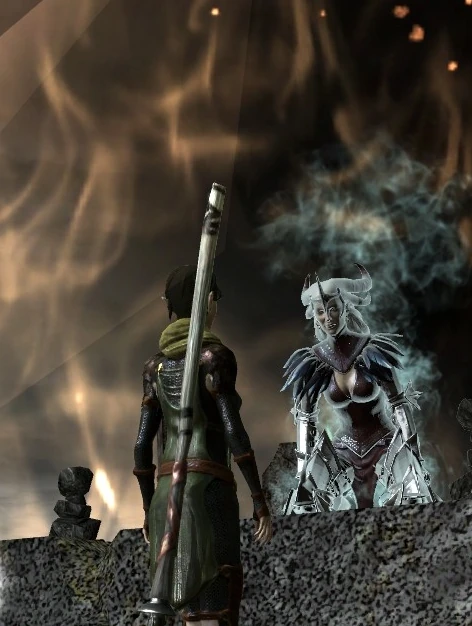
Flemeth emerging from the amulet
The way forward is blocked by a magical barrier. When prompted, Merrill will remove it via blood magic. On the other side of the barrier lies a spooky graveyard. The party will be attacked by an arcane horror accompanied by several undead and a shadow warrior. After dispatching the creatures, go to the altar where Merrill will perform the ritual. Flemeth emerges from the amulet and explains (in her own weird way) that Hawke may well have saved her life, in return for saving Hawke's.
If Fenris or Anders are in Hawke's party, there is an option to hear some extra dialogue from one of them via the dialogue wheel, with no approval changes. If both Fenris and Anders are in your party, Fenris takes priority (when choosing Call on Companion/ "What do you think?"). Bethany or Carver will have dialogue at the very end of the conversation. Flemeth then transforms into a dragon and flies away.
Return to the cave entrance and Hawke's party is automatically transported back to the Dalish camp. From there, Hawke's party is transported to the Elven Alienage in Lowtown where Merrill asks if she can expect a visit from Hawke in her new home.
Strategy
The hike itself is not too difficult, especially with Merrill acting as an invincible fifth party member. However, on Nightmare difficulty all of the enemies (save for shades, which are optional encounters only) are simply immune to her Nature-element staff's basic attacks, making her little more than a useful distraction when she's not using her default spells of Spirit Bolt, Stonefist, and Hex of Torment. Beyond this, all enemies encountered on Sundermount are highly vulnerable to electricity, with fire, frost, and spirit as useful elements in their own right. The only enemies of significant threat are the Shadow Warriors. They fight like "commander"-style enemies among the Elite-ranked templars and mercenaries of Kirkwall, only they are immune to nature damage, thus they can easily tank a full-party assault while casting a health-regenerating aura on nearby corpses, making it even more difficult to take them down as they hack away at your party. There are three in total on Sundermount; two are optional, thus they can be left until the party is more powerful, but the mandatory one comes on the heels of a battle with an Arcane Horror. These enemies, while Elite-ranked, have little to no protection and can fall quickly with a full party assault, especially since they're vulnerable to Merrill's nature element. However, they can cast spirit-element area-of-effect spells and wipe out the entire party in less than a few seconds. Full DPS all-out assaults will often eliminate the Arcane Horror before it can do too much damage of its own. This approach may encourage the Arcane Horror to unleash its AoE attack at its feet against all melee companions, however, so either allow it to make a single cast and move each companion around the AoE, or take no more than 3 seconds to kill it, remaining ready to flee if it cannot be done in time (scatter each companion rather than moving them as a group). Dual-wielding talents can deal the greatest damage for this purpose while leaving nearby allies unscathed, whereas a two-hander's techniques may end up harming the party more than the Arcane Horror, so they should stick to basic attacks and Cleave if available, if not simply focus on the corpses and draw threat, leaving the demon to the mages and rogues.
With the Arcane Horror out of the picture, the corpses aren't much more threat than in any other encounter on the hike. The biggest concern are the Skeleton Archers, three Normal-ranked and one Critter-ranked, as they can attack from range while the corpses must shamble after party members, leaving them vulnerable to kiting and focused fire. Send companions to engage them where they would be most effective (AoE spells on the two furthest from the shrine, dual-wielder to Backstab the Critter-rank, et cetera), then focus the full party on each corpse one at a time. The Shadow Warrior will appear after 6-7 kills, ideally with no one nearby to register as the greatest threat, thus targeting Merrill. Focus on eliminating the remaining corpses before committing the full might of your party to defeating him. His grenades can deal a significant chunk of damage while inflicting knockback and reducing movement speed, therefore attack him from all sides so he cannot catch multiple characters in a single bomb (which he re-uses every 5-10 seconds). If you retained enough healing potions in the hike up and still have more than two party members alive you can defeat him with attrition.
Friendship and rivalry
Interactions of companions before meeting the Dalish keeper at Sundermount**
- Investigating "What did you call me?":
If more than one of these companions are present, Fenris' comment will take priority, followed by Aveline's.
- Investigating "What are the Dalish":
When Merrill removes the barrier:
- choosing "It did help us" (diplomatic option):
 Anders: rivalry (+10)
- Fenris: rivalry (+10)
 Aveline: rivalry (+5)
- Bethany: rivalry (+5)
- Carver: rivalry (+5)
- choosing "They don't keep helping" (sarcastic option):
- Aveline: friendship (+5)
- choosing "The demon, you mean" (aggressive option):
- Anders: friendship (+10)
- Fenris: friendship (+10)
- Aveline: friendship (+5)
- Bethany: friendship (+5)
- Note: With a party made up of Anders, Fenris, and Bethany, the +5 from Bethany was not received.
Note: (PC) With a party made up of Aveline, Varric, and Bethany, the +5 from Bethany was not received.
- Note: If Fenris is present during the conversation with Flemeth at the altar, Hawke has the option to let him speak, which provides some supplemental information about Flemeth.
When conferring with Merrill back in Kirkwall towards the end of the quest, the response to her question about a possible visit from Hawke will affect friendship/rivalry as follows:
- choosing "I will."
- Fenris: rivalry (+5)
- choosing "I don't think so."
- Fenris: friendship (+5)
- Aveline: rivalry (+5)
- Note: Either way, Hawke will still be able to visit Merrill at her new home in the Kirkwall Alienage (Lowtown) later. There are no friendship/rivalry changes for Merrill as she has not officially joined Hawke's party yet.
Result
- Merrill joins Hawke's party.
- Regardless of whether or not Hawke told Merrill that she could expect a visit, the companion quest Welcome Home becomes available.
- The next time Hawke leaves Kirkwall, you will find yourself at the Dead Man's Pass and receive the main quest Blackpowder Promise.
- You can talk to Arianni, Feynriel's mother, in the Elven Alienage in Lowtown and start the Wayward Son quest.
Rewards
After the conversation with Flemeth:
- 800 XP
- 8
Notes
- If seeking the Supplier achievement, be sure to grab the Silverite in the caverns (next to the door in the firepit room just after the entrance), the Elfroot near the rock slide below the cavern entrance, and the Deep Mushroom in the Elven Graveyard. If you are trying to recruit everyone at low levels it is best to avoid these items for now, as they are rich in experience but can be claimed at any time.
- Inside the mountain cave, after killing the spiders and in a little room to the right are the class-specific Act 1 item set gloves.
- It may be worthwhile to continue past the Altar, to the top of Sundermount, while Merrill is following Hawke around as a "bonus" party member. The Arm of Adruil awaits at the summit, but Hawke must defeat a Shadow Warrior and nine shades, as well as touch the magical barrier nearby to trigger the encounter, which incurs a knockback in the middle of a group of freshly-spawned shades. On the way up the party must win a difficult fight against corpses, a Revenant, and a few shades spawned after the corpses are slain. Even though Merrill's basic attacks deal no damage to the enemies save for the shades on Nightmare difficulty, having her as an invulnerable decoy should make the climb much easier. It is still possible with only four party members, as are any encounters on the highest difficulty, but it may necessitate returning only after acquiring more powerful weapons, talents, and passives. There is also a line of four Simple-ranked traps on the way from the altar to the top. Before examining the Altar, it is possible to return to Kirkwall to add a rogue party member and still retain Merrill in a bonus capacity. Note: Be careful to head up the path before getting too close to altar as, once the encounter with the Arcane Horror is triggered, Merrill will not follow you up the mountain. She stays in the altar area even after talking to Flemeth. (Fixed in 1.04)
- The Arcane Horror guarding the Altar drops ≈6 and a Ring of the Magister when he dies. As a guaranteed accessory, it is a worthwhile addition to the party's inventory.
- Completing the Dalish ritual earns 8 . Together with the loot from the Arcane Horror, this makes the quest one of the best early sources of income for Act 1.
- Fenris has a lot to say during this quest. He trades barbs with the Dalish when they refer to him as a "city elf," chastises Merrill for using blood magic, and even has optional commentary on Flemeth (which in turn leads Flemeth to "see" and reveal a bit of Fenris' history and state of mind).
- Isabela wonders if Flemeth is a "friend of [Hawke's]," to which Flemeth notes she "says the word like it were cheap coin to be traded away." Isabela retorts "You don't know me," and Flemeth responds "I know your type."
- Anders has commentary on Flemeth, but their exchange is superseded by Fenris' comments.
- If Hawke uses the sarcastic dialogue after Flemeth's advice to them about the future ("Cheap advice from a dragon"), Bethany responds that the party is going to regret bringing her to the Free Marches. Flemeth wistfully comments that she knows regret too well, and warns Bethany not "to hold it so close that it poisons your soul."
- The barrier at the top of the mountain causes knockback as the enemies spawn, however the knockback can be successfully prevented with the right items or abilities. It should only be a minor deterrent at best, however.
Trivia
- The verbal component of the ritual is the first stanza of "In Uthenera"