m (fix) |
m (→Background) |
||
| (27 intermediate revisions by 14 users not shown) | |||
| Line 1: | Line 1: | ||
| − | |||
<onlyinclude>{{LocationTransformer |
<onlyinclude>{{LocationTransformer |
||
|style = {{{style|}}} |
|style = {{{style|}}} |
||
| Line 9: | Line 8: | ||
|terrain = Forest |
|terrain = Forest |
||
|location = South-Eastern [[Ferelden]] |
|location = South-Eastern [[Ferelden]] |
||
| − | |exits = [[Flemeth's Hut]]<br>[[Ostagar]] |
+ | |exits = [[Flemeth's Hut]] <br> [[Ostagar]] |
| − | |inhabitants = [[ |
+ | |inhabitants = [[Human]]s, [[Chasind Wilder|Chasind]], [[Wolf|Wolves]], [[Darkspawn]], [[Firesprite]]s, [[Silent Crawler]]s |
|characters = Dying Soldier, [[Morrigan]] |
|characters = Dying Soldier, [[Morrigan]] |
||
| − | |appearances = [[Dragon Age: The Stolen Throne]] <br> [[Dragon Age: Origins]] |
+ | |appearances = [[Dragon Age: The Stolen Throne]] <br> [[Dragon Age: Origins]] <br> [[Dragon Age (tabletop RPG)]] |
}}</onlyinclude> |
}}</onlyinclude> |
||
| − | The '''Korcari Wilds''' are a cold southern expanse of forest and swamp, the extent of which is not truly known. |
+ | The '''Korcari Wilds''' are a cold southern expanse of forest and swamp, the extent of which is not truly known. [[Chasind Wilder]]s speak of a wasteland of snow and ice further to the south, filled only with desolate tundra and nomadic barbarians. Most northerners believe little of what the Chasind have to say. |
The Wilds are also home to [[Flemeth]], the legendary "[[Witch of the Wilds]]", and her daughters. |
The Wilds are also home to [[Flemeth]], the legendary "[[Witch of the Wilds]]", and her daughters. |
||
| + | |||
| + | South of the Wilds itself lies the mysterious region known as the Sunless Lands.<ref>[https://web.archive.org/web/20181202181044/http://holyshitdragonage.tumblr.com/post/95151315186/are-the-lands-north-of-thedas-convenient The Bittersweetest Thing] (archived)</ref><ref>[[The Sunless Staff]]</ref> |
||
== Background == |
== Background == |
||
| Line 24: | Line 25: | ||
At -410 [[Ancient Age|Ancient]] a group of [[Kossith]] lands in the southern [[Korcari Wilds]], likely from The Frozen Seas on the east and establishes a colony. This group is believed to have been eliminated during the [[First Blight]] but beforehand, some of its females were turned into [[broodmother]]s by the [[darkspawn]] and gave rise to the first appearance of [[Ogre]]s in [[Thedas]].<ref>{{Cite wot|26}}</ref> |
At -410 [[Ancient Age|Ancient]] a group of [[Kossith]] lands in the southern [[Korcari Wilds]], likely from The Frozen Seas on the east and establishes a colony. This group is believed to have been eliminated during the [[First Blight]] but beforehand, some of its females were turned into [[broodmother]]s by the [[darkspawn]] and gave rise to the first appearance of [[Ogre]]s in [[Thedas]].<ref>{{Cite wot|26}}</ref> |
||
| + | {{Tabletop RPG material}} |
||
| + | The Wilds are native to monsters such as the giant swamp crabs.<ref>''[[Dragon Age (tabletop RPG)]]'', Blood in Ferelden p. 27</ref> |
||
== Involvement == |
== Involvement == |
||
| − | {{SpoilerTST|[[Maric Theirin|Prince Maric]] fled with the help of [[Loghain]] into the Korcari Wilds in order to escape from the forces of the usurper King [[Meghren]] during the [[Fereldan Rebellion]] in 8:96 [[Blessed Age|Blessed]]. Within the Wilds, they experienced many difficulties and they felt relieved when they finally left the forest. A [[Dalish]] |
+ | {{SpoilerTST|[[Maric Theirin|Prince Maric]] fled with the help of [[Loghain Mac Tir|Loghain]] into the Korcari Wilds in order to escape from the forces of the usurper King [[Meghren]] during the [[Fereldan Rebellion]] in 8:96 [[Blessed Age|Blessed]]. Within the Wilds, they experienced many difficulties and they felt relieved when they finally left the forest. A [[Dalish]] clan also resided within the Korcari Wilds at that time.}} |
{{SpoilerDAO| |
{{SpoilerDAO| |
||
* In this region the new recruits will encounter their first [[hurlock emissary]] and [[hurlock alpha]]. |
* In this region the new recruits will encounter their first [[hurlock emissary]] and [[hurlock alpha]]. |
||
| − | * Interacting with a Dying Soldier (just past the wolves near the exit) triggers a cut-scene in which each party member can express their attitude towards the current mission. |
+ | * Interacting with a Dying Soldier (just past the wolves near the exit) triggers a cut-scene in which each party member can express their attitude towards the current mission. The soldier is the sole survivor of a scouting party ambushed by darkspawn. If The Warden kills the soldier ({{approval|Alistair|-3}}) or leaves him to die, a low-tier armor piece or weapon will drop. |
| − | * Missionary Jogby (the son): the corpse of a missionary can be found at the edge of the water southwest of the exit. Searching the body yields a [[Codex: |
+ | * Missionary Jogby (the son): the corpse of a missionary can be found at the edge of the water southwest of the exit. Searching the body yields a [[Codex entry: Letter to Jogby|letter]] and starts the side quest [[the Missionary]]. |
| − | * Missionary Rigby (the father): another corpse, this can be found atop a hill on the mid-east side of the map, near a locked chest amongst some ruins. |
+ | * Missionary Rigby (the father): another corpse, this can be found atop a hill on the mid-east side of the map, near a locked chest amongst some ruins. Looting the body will unlock a [[Codex entry: Rigby's Last Will and Testament|codex entry]] and start the side quest [[Last Will and Testament]]. |
| − | * The [[Wilds Flower |
+ | * The [[Wilds Flower]] needed for [[the Mabari Hound]] can be found in numerous locations throughout the area, all on mossy logs; the one closest to the exit is just past the dying soldier mentioned above. (If the Warden has not acquired the appropriate side quest, examining the flower prompts [[Daveth]] to mention that the [[Kennel Master]] is offering a reward for it). Once any one of these has been picked, they all cease to be "lootable" objects. |
| − | * The [[Vial of Darkspawn Blood|blood]] needed for the [[Tainted Blood]] quest will drop frequently from [[Hurlock]]s and [[Genlock]]s alike. |
+ | * The [[Vial of Darkspawn Blood|blood]] needed for the [[Tainted Blood]] quest will drop frequently from [[Hurlock]]s and [[Genlock]]s alike. Although the quest only requires three vials, it is possible to end up with more; however, they are still simply plot items and serve no other purpose. Once three or more have been picked up, they will cease to drop, and all the collected [[Vial of Darkspawn Blood|vials]] will be removed from inventory when the quest is resolved. |
| − | * At a campsite to the northwest is a chest containing Rigby's |
+ | * At a campsite to the northwest is a chest containing [[Rigby's Field Journal]]. Taking it will unlock a [[Codex entry: Signs of the Chasind|codex entry]], set in motion the quest [[Chasind Trail Signs]], and mark the first Sign on the area map, just past the arches next to the campsite. Note that the quest might not appear in the party journal until all Signs have been tracked down. |
* In the same campsite (beneath the campfire) is a hidden cache that continues the [[Last Will and Testament]] side quest (see Missionary Rigby, above; the cache will not be accessible until that quest has begun). '''''(A note under [[Chasind Trail Signs]] charts a walkthrough for all three of the Jogby/Rigby side quests.)''''' |
* In the same campsite (beneath the campfire) is a hidden cache that continues the [[Last Will and Testament]] side quest (see Missionary Rigby, above; the cache will not be accessible until that quest has begun). '''''(A note under [[Chasind Trail Signs]] charts a walkthrough for all three of the Jogby/Rigby side quests.)''''' |
||
| − | * Across the bridge in the south end (an area dense with Flimsy Leghold Traps) is the corpse of a soldier carrying a [[Excerpt from Local Myths and Legends|page]] from a book and a [[Pouch of Ashes|pouch]]. |
+ | * Across the bridge in the south end (an area dense with Flimsy Leghold Traps) is the corpse of a soldier carrying a [[Excerpt from Local Myths and Legends|page]] from a book and a [[Pouch of Ashes|pouch]]. The ashes in the pouch can be used to summon a powerful [[Gazarath|shade]] at a small pile of rocks on a rise, east of the corpse. See [[A Pinch of Ashes]] for details. |
* Alistair and the recruits will eventually (in the eastern half of the map) reach a ruined tower where they find [[The Grey Wardens' Cache]] - or what is left of it. Examining the remains triggers the cut-scene introducing [[Morrigan]]. After a brief, possibly reciprocated interrogation, she is prepared to bring the party to [[Flemeth's Hut]], though departure may be postponed if the party is not yet ready to proceed.}} |
* Alistair and the recruits will eventually (in the eastern half of the map) reach a ruined tower where they find [[The Grey Wardens' Cache]] - or what is left of it. Examining the remains triggers the cut-scene introducing [[Morrigan]]. After a brief, possibly reciprocated interrogation, she is prepared to bring the party to [[Flemeth's Hut]], though departure may be postponed if the party is not yet ready to proceed.}} |
||
| Line 44: | Line 47: | ||
* [[Genlock]] ([[Darkspawn]], [[Normal]]) |
* [[Genlock]] ([[Darkspawn]], [[Normal]]) |
||
* [[Genlock archer]] ([[Darkspawn]], [[Normal]]) |
* [[Genlock archer]] ([[Darkspawn]], [[Normal]]) |
||
| − | * [[Genlock rogue]] ([[Darkspawn]], [[Normal]]) - uses [[stealth]] |
+ | * [[Genlock rogue]] ([[Darkspawn]], [[Normal]]) - uses [[Stealth (Origins)|stealth]] |
* [[Hurlock]] ([[Darkspawn]], [[Normal]]) |
* [[Hurlock]] ([[Darkspawn]], [[Normal]]) |
||
* [[Hurlock archer]] ([[Darkspawn]], [[Normal]]) |
* [[Hurlock archer]] ([[Darkspawn]], [[Normal]]) |
||
| Line 78: | Line 81: | ||
'''Other:''' |
'''Other:''' |
||
{{:Chasind Flatblade|style=iconmini}}{{clrl}} |
{{:Chasind Flatblade|style=iconmini}}{{clrl}} |
||
| − | {{:Enchanted Dagger|style=iconmini}}{{clrl}} |
+ | {{:Enchanted Dagger (Origins)|style=iconmini}}{{clrl}} |
{{:Darkspawn Staff (Origins)|style=iconmini}}{{clrl}} |
{{:Darkspawn Staff (Origins)|style=iconmini}}{{clrl}} |
||
{{:Enchanter's Footing|style=iconmini}}{{clrl}} |
{{:Enchanter's Footing|style=iconmini}}{{clrl}} |
||
| Line 86: | Line 89: | ||
{{:Codex entry: A Pinch of Ashes|style=iconmini}}{{clrl}} |
{{:Codex entry: A Pinch of Ashes|style=iconmini}}{{clrl}} |
||
{{:Codex entry: Farewell Letter to Jogby|style=iconmini}}{{clrl}} |
{{:Codex entry: Farewell Letter to Jogby|style=iconmini}}{{clrl}} |
||
| − | {{:Codex entry: Genlock|style=iconmini}}{{clrl}} |
+ | {{:Codex entry: Genlock (Origins)|style=iconmini}}{{clrl}} |
{{:Codex entry: Hurlock|style=iconmini}} (with addenda for the Alpha and Emissary){{clrl}} |
{{:Codex entry: Hurlock|style=iconmini}} (with addenda for the Alpha and Emissary){{clrl}} |
||
{{:Codex entry: Letter to Jogby|style=iconmini}}{{clrl}} |
{{:Codex entry: Letter to Jogby|style=iconmini}}{{clrl}} |
||
{{:Codex entry: Rigby's Last Will and Testament|style=iconmini}}{{clrl}} |
{{:Codex entry: Rigby's Last Will and Testament|style=iconmini}}{{clrl}} |
||
{{:Codex entry: Signs of the Chasind|style=iconmini}}{{clrl}} |
{{:Codex entry: Signs of the Chasind|style=iconmini}}{{clrl}} |
||
| + | {{:Codex entry: Shade|style=iconmini}} (if you kill [[Gazarath]]){{clrl}} |
||
{{:Codex entry: Wolf|style=iconmini}}{{clrl}} |
{{:Codex entry: Wolf|style=iconmini}}{{clrl}} |
||
| + | |||
| ⚫ | |||
== Containers == |
== Containers == |
||
''Near wolves vs. darkspawn area'' |
''Near wolves vs. darkspawn area'' |
||
| − | * {{TextContainer|Chest}} ([[Treasure#Darkspawn| |
+ | * {{TextContainer|Chest}} ([[Treasure#Darkspawn|Darkspawn]], Elite) - locked |
* {{TextContainer|Chest}} ([[Treasure#Ferelden|Ferelden]], Normal) - locked |
* {{TextContainer|Chest}} ([[Treasure#Ferelden|Ferelden]], Normal) - locked |
||
* {{TextContainer|Crate}} ([[Treasure#Generic Armor|Generic Armor]], Critter) |
* {{TextContainer|Crate}} ([[Treasure#Generic Armor|Generic Armor]], Critter) |
||
| Line 110: | Line 116: | ||
== Notes == |
== Notes == |
||
| − | * {{platforms|pc}} |
+ | * {{platforms|pc}}One of the Flimsy Leghold Traps cannot be disarmed. |
* Once the cutscene with [[Morrigan]] and [[Flemeth]] is over, it is still possible to return to the Wilds, but only before the Joining ritual is done. After the Joining, this area becomes permanently inaccessible. |
* Once the cutscene with [[Morrigan]] and [[Flemeth]] is over, it is still possible to return to the Wilds, but only before the Joining ritual is done. After the Joining, this area becomes permanently inaccessible. |
||
== Trivia == |
== Trivia == |
||
| − | * On the [[: |
+ | * On the [[:File:ThedasMap.jpg|official map]] released by [[BioWare]], the Korcari Wilds are misspelled as "Kocari Wilds." |
| − | |||
| − | <gallery widths=189 captionalign="center"> |
||
| ⚫ | |||
| − | </gallery> |
||
== See also == |
== See also == |
||
| Line 125: | Line 127: | ||
== References == |
== References == |
||
<references/> |
<references/> |
||
| + | |||
| + | [[es:Espesura de Korcari]] |
||
| + | [[Category:Dragon Age: The Stolen Throne locations]] |
||
[[Category:Dragon Age: Origins locations]] |
[[Category:Dragon Age: Origins locations]] |
||
[[Category:Ferelden]] |
[[Category:Ferelden]] |
||
| + | [[Category:Dragon Age (tabletop RPG) locations]] |
||
Revision as of 14:18, 28 January 2020
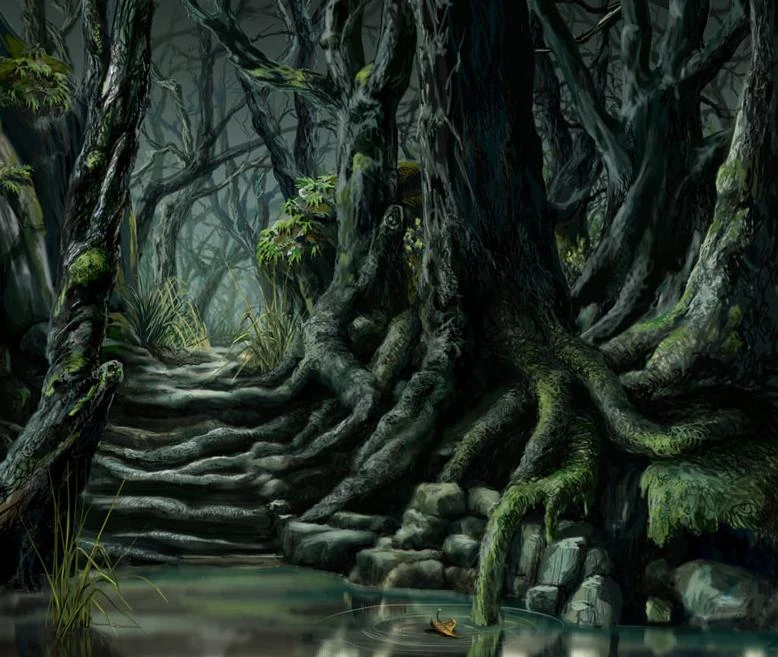
The Korcari Wilds are a cold southern expanse of forest and swamp, the extent of which is not truly known. Chasind Wilders speak of a wasteland of snow and ice further to the south, filled only with desolate tundra and nomadic barbarians. Most northerners believe little of what the Chasind have to say.
The Wilds are also home to Flemeth, the legendary "Witch of the Wilds", and her daughters.
South of the Wilds itself lies the mysterious region known as the Sunless Lands.[1][2]
Background
Local legends state that the perpetual mist surrounding the Wilds is not natural, but rather the result of a curse. Long ago, when werewolves terrorized the country, a great arl ventured into the Wilds killing every wolf he could find, as well as any Chasind. A Chasind mother was outraged upon finding her sons dead at the soldiers' blades - one of which she stabbed into her own heart. A great mist seeped forth from this mortal wound and spread throughout the Wilds. It was so dense that the arl and his soldiers were lost inside forever.
At -410 Ancient a group of Kossith lands in the southern Korcari Wilds, likely from The Frozen Seas on the east and establishes a colony. This group is believed to have been eliminated during the First Blight but beforehand, some of its females were turned into broodmothers by the darkspawn and gave rise to the first appearance of Ogres in Thedas.[3]
The Wilds are native to monsters such as the giant swamp crabs.[4]
Involvement
- In this region the new recruits will encounter their first hurlock emissary and hurlock alpha.
- Interacting with a Dying Soldier (just past the wolves near the exit) triggers a cut-scene in which each party member can express their attitude towards the current mission. The soldier is the sole survivor of a scouting party ambushed by darkspawn. If The Warden kills the soldier (
 Alistair disapproves (-3)) or leaves him to die, a low-tier armor piece or weapon will drop.
 - Missionary Jogby (the son): the corpse of a missionary can be found at the edge of the water southwest of the exit. Searching the body yields a letter and starts the side quest the Missionary.
- Missionary Rigby (the father): another corpse, this can be found atop a hill on the mid-east side of the map, near a locked chest amongst some ruins. Looting the body will unlock a codex entry and start the side quest Last Will and Testament.
- The Wilds Flower needed for the Mabari Hound can be found in numerous locations throughout the area, all on mossy logs; the one closest to the exit is just past the dying soldier mentioned above. (If the Warden has not acquired the appropriate side quest, examining the flower prompts Daveth to mention that the Kennel Master is offering a reward for it). Once any one of these has been picked, they all cease to be "lootable" objects.
- The blood needed for the Tainted Blood quest will drop frequently from Hurlocks and Genlocks alike. Although the quest only requires three vials, it is possible to end up with more; however, they are still simply plot items and serve no other purpose. Once three or more have been picked up, they will cease to drop, and all the collected vials will be removed from inventory when the quest is resolved.
- At a campsite to the northwest is a chest containing Rigby's Field Journal. Taking it will unlock a codex entry, set in motion the quest Chasind Trail Signs, and mark the first Sign on the area map, just past the arches next to the campsite. Note that the quest might not appear in the party journal until all Signs have been tracked down.
- In the same campsite (beneath the campfire) is a hidden cache that continues the Last Will and Testament side quest (see Missionary Rigby, above; the cache will not be accessible until that quest has begun). (A note under Chasind Trail Signs charts a walkthrough for all three of the Jogby/Rigby side quests.)
- Across the bridge in the south end (an area dense with Flimsy Leghold Traps) is the corpse of a soldier carrying a page from a book and a pouch. The ashes in the pouch can be used to summon a powerful shade at a small pile of rocks on a rise, east of the corpse. See A Pinch of Ashes for details.
- Alistair and the recruits will eventually (in the eastern half of the map) reach a ruined tower where they find The Grey Wardens' Cache - or what is left of it. Examining the remains triggers the cut-scene introducing Morrigan. After a brief, possibly reciprocated interrogation, she is prepared to bring the party to Flemeth's Hut, though departure may be postponed if the party is not yet ready to proceed.
Enemies
- Wolf (Animal, Normal)
- Alpha Wolf (Animal, Elite)
- Genlock (Darkspawn, Normal)
- Genlock archer (Darkspawn, Normal)
- Genlock rogue (Darkspawn, Normal) - uses stealth
- Hurlock (Darkspawn, Normal)
- Hurlock archer (Darkspawn, Normal)
- Hurlock emissary (Darkspawn, Elite)
- Hurlock Alpha (Darkspawn, Elite)
- Gazarath (Shade, Boss) - see A Pinch of Ashes

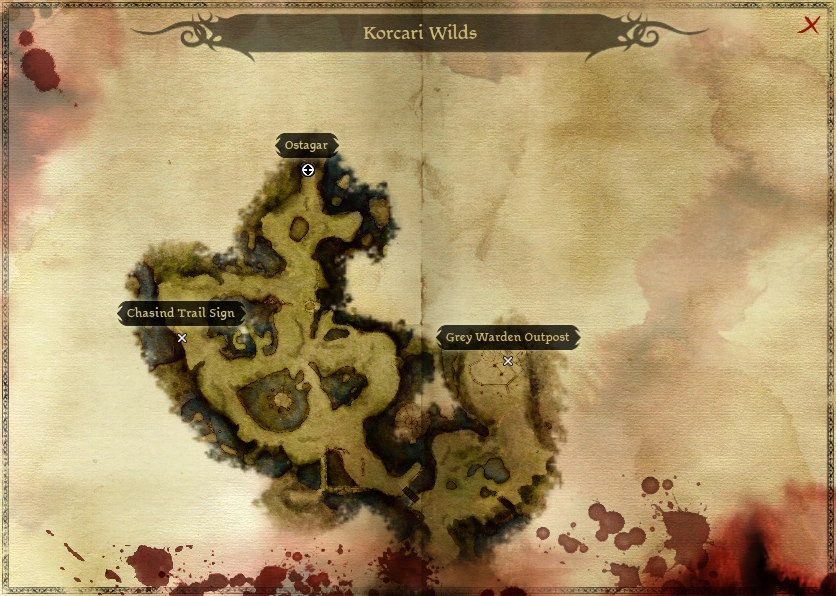
Map of the Area
Notable items
Plot Items:
![]() Excerpt from Local Myths and Legends
Excerpt from Local Myths and Legends
![]() Rigby's Last Will and Testament
Rigby's Last Will and Testament
Plants:
Chasind Cache:
Other:
Codex entries
![]() Codex entry: Farewell Letter to Jogby
Codex entry: Farewell Letter to Jogby
![]() Codex entry: Hurlock (with addenda for the Alpha and Emissary)
Codex entry: Hurlock (with addenda for the Alpha and Emissary)
![]() Codex entry: Rigby's Last Will and Testament
Codex entry: Rigby's Last Will and Testament
![]() Codex entry: Signs of the Chasind
Codex entry: Signs of the Chasind
![]() Codex entry: Shade (if you kill Gazarath)
Codex entry: Shade (if you kill Gazarath)
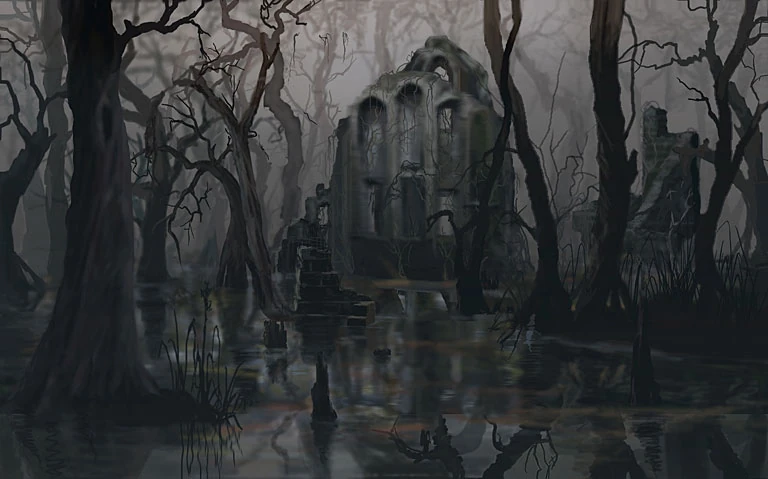
Concept art
Containers
Near wolves vs. darkspawn area
- Chest (Darkspawn, Elite) - locked
- Chest (Ferelden, Normal) - locked
- Crate (Generic Armor, Critter)
- Crate (Generic, Critter)
- Crate (Generic, Critter)
Western camp
Quest-related
- Iron Chest (Ferelden, Elite) - contains Chasind Flatblade and a letter
- Chasind Cache (see above)
Notes
- One of the Flimsy Leghold Traps cannot be disarmed.
- Once the cutscene with Morrigan and Flemeth is over, it is still possible to return to the Wilds, but only before the Joining ritual is done. After the Joining, this area becomes permanently inaccessible.
Trivia
- On the official map released by BioWare, the Korcari Wilds are misspelled as "Kocari Wilds."
See also
![]() Codex entry: The Korcari Wilds
Codex entry: The Korcari Wilds
References
- ↑ The Bittersweetest Thing (archived)
- ↑ The Sunless Staff
- ↑
 Dragon Age: The World of Thedas, vol. 1, p. 26
- ↑ Dragon Age (tabletop RPG), Blood in Ferelden p. 27