Cuboneskull (talk | contribs) (corrected the location of key of kiveal from lower level to top level) Tags: Visual edit apiedit |
|||
| (32 intermediate revisions by 19 users not shown) | |||
| Line 1: | Line 1: | ||
| − | <!---useMultiEdit---> |
||
| − | |||
<onlyinclude>{{QuestTransformer |
<onlyinclude>{{QuestTransformer |
||
| − | + | |style = {{{style|}}} |
|
| − | + | |name = [[It Comes From Beneath]] |
|
| − | + | |image = It Comes From Beneath.png |
|
| + | |px = 270px |
||
| − | |caption = Caption here |
||
| − | + | |start = [[Maverlies|Sergeant Maverlies]] |
|
| − | + | |end = |
|
| ⚫ | |||
| − | |prereqs = Prerequisites |
||
| ⚫ | |||
| ⚫ | |||
| ⚫ | |||
| − | |rewards = Quest rewards |
||
| ⚫ | |||
| ⚫ | |||
| ⚫ | |||
| ⚫ | |||
}}</onlyinclude> |
}}</onlyinclude> |
||
| ⚫ | |||
| − | <!---descr="Several sentence lead section with bolded mention of '''article name'''."---> |
||
| ⚫ | |||
| − | ==Journal Entry== |
||
| − | '''Eradicate darkspawn beneath the Vigil''' |
||
| − | *[[Sergeant Maverlies]] reports possible pockets of darkspawn beneath the Vigil. You can ask Maverlies to escort you to and from the basement. |
||
| − | == |
+ | == Acquisition == |
| − | This quest is initiated by talking to Sergeant Maverlies, who is standing in the courtyard near the door to the basement. She will explain that the explosions during the assault on Vigil's Keep caused some damage to the lower tunnels and that there are now darkspawn in the basement. If you agree to take the quest, she will escort your party downstairs. |
+ | This quest is initiated by talking to [[Maverlies|Sergeant Maverlies]], who is standing in the courtyard near the door to the [[Vigil's Keep - Basement|basement]]. She will explain that the explosions during the [[The Assault on Vigil's Keep|assault on Vigil's Keep]] caused some damage to the lower tunnels and that there are now [[darkspawn]] in the basement. If you agree to take the quest, she will escort your party downstairs. |
| + | == Walkthrough == |
||
| ⚫ | |||
| ⚫ | Go down the stairs into the large room with dead darkspawn. There is |
||
| ⚫ | |||
| ⚫ | Continue down the hallway, where you will encounter groups of darkspawn. The small rooms on each side of the hallway can be looted for various treasures. In the |
||
| ⚫ | Go down the stairs into the large room with dead darkspawn. There is a distressed [[mabari]] on the ground with a note attached to her collar. If the Warden-Commander, or a companion, has high enough [[survival]] skill (rank 3 or expert survival), they can calm the dog and gain {{Approval|2}} approval from [[Nathaniel Howe|Nathaniel]] (if he is in the party). If not, you can inspect the note, which begins the quest [[Adria's Plight]]. Examine the '''Warrior Statue''' to obtain the first part of [[Codex entry: The Great Strife]]. |
||
| ⚫ | Continue down the hallway, where you will encounter groups of darkspawn. The small rooms on each side of the hallway can be looted for various treasures, including {{GiftLink|West Hill Brandy}}. In the room on the left, there is a statue of [[Andraste]] that you can inspect to receive a message. The inscription mentions seeing through a flame. Once you have examined the statue, the torch immediately to the right of the statue becomes selectable. Examine the torch and a secret room with a locked {{TextContainer|chest}} is revealed. |
||
| ⚫ | In the next large room, |
||
| + | [[File:Prisoner ghoul vigil's keep.png|thumb|200px|A prisoner who turned into a [[ghoul]].]] |
||
| ⚫ | The Family Crypt is in the room to the left of the prison. If |
||
| ⚫ | In the next large room, [[Ghoul|darkspawn-infected prisoners]] will attack as soon as you enter. There are a few prisoners still alive, whom [[the Warden-Commander]] can release, leave in prison, or kill. Releasing the prisoners will gain you {{Approval|5}} approval from Nathaniel and [[Anders]], {{Approval|10}} from [[Sigrun]] but {{Approval|-10}} from [[Justice]]. Demanding their clothes as payment for their release will result in {{Approval|5}} from [[Oghren]] and [[Sigrun]] instead. Check {{TextContainer|Howe Correspondence}} for {{GiftLink|Delilah Howe's Letters}}. |
||
| ⚫ | |||
| ⚫ | The Family Crypt is in the room to the left of the prison. If Nathaniel is in your party, he is able to pick the lock on the '''Crypt Door'''. Otherwise, a [[Key to the Crypt|specific key]] must be found later. Head through the door and loot the {{TextContainer|Avvar sarcophagi}} along the top level since heading down to the lower level will trigger an attack by a dozen [[Skeleton|undead]]. The sarcophagus on the lower level can be looted without any risk of attack after that first spawn. On the wall facing where you entered, there are four '''keyholes''', which are part of [[The Wraith's Vengeance]] quest line and two '''Crypt Statues''' to update [[Codex entry: The Great Strife]]. One of the keys, [[Key of Kiveal]], is in a sarcophagus on the top level. The other three keys are found in the area beyond the rubble. {{GiftLink|Howe Bow (gift)}} can be looted from a {{TextContainer|sack}} lying against a beam in the middle of the room. |
||
| ⚫ | |||
| ⚫ | Return to the room with the jail cells and continue moving forward. The next room will trigger a cut scene and the Warden-Commander learns what has become of the mabari's owner, [[Adria]]. After a brief conversation, she attacks the party. Killing her completes the side quest. Loot her {{TextContainer|corpse}} for [[Ring of Mastery]] and search the {{TextContainer|Veridium Deposit}} for [[Veridium Ore]] and a {{TextContainer|knight's corpse}} for {{GiftLink|Gold Earring}}. |
||
| ⚫ | |||
| ⚫ | |||
| ⚫ | The Warden will have to leave Vigil's Keep for some time in order for |
||
| ⚫ | |||
| ⚫ | |||
| ⚫ | The Warden-Commander will have to leave Vigil's Keep for some time in order for Voldrik to get the work done (complete either [[Last of the Legion]], [[The Righteous Path]], or [[Shadows of the Blackmarsh]]). Upon returning, speak with Sergeant Maverlies, and she will inform the Warden-Commander that the rubble has been cleared away, revealing a tunnel that is connected to the [[Vigil's Keep - Deep Roads|Deep Roads]]. In order to prevent anymore darkspawn invasions, the darkspawn need to be cleared out, and the Warden-Commander will have to find a way to block the tunnel off. Head into the tunnel, checking the rooms to either side of the main path. The first room to the right contains a {{TextContainer|darkspawn corpse}} with a [[Golden Idol of Korth|statue]]. Loot the statue and head to [[the Shrine of Korth]], where the tier 8 [[Battleaxes (Origins)|battleaxe]] [[Frenzy]] can be obtained (See [[The Shrine of Korth]] for details.) The [[Key of Korth]] can be found in an {{TextContainer|urn}} to the right of the shrine. |
||
| − | Note : Only ONE of the keys (the key to the crypt itself) required for the side-quest "A Wraith's Vengeance" (in the Howe Family Crypt) is found on a darkspawn (1 in a sarcophagus in the crypt itself, 1 in an urn of the Shrine of Korth area, 2 in locked containers in the Deep Roads section of Vigil's Keep) |
||
| + | {{Note|If you prefer other options at the Shrine of Korth, i.e. add alternative offering or desecrate it, leave it alone and return later after picking up a diamond in the Gem Mine or a corrupted idol in the Forbidden Chamber.}} |
||
| ⚫ | |||
| ⚫ | |||
| + | Go down the second room on the left to reach the "Gem Mine", where you will find {{GiftLink|Elven Runestone}} in some {{TextContainer|rocks}}, and several {{TextContainer|gem clusters}} containing various gems. |
||
| ⚫ | At the end of the cutscene Sergeant Maverlies will ask you if you are ready to leave. If you say yes, you will be transported back to the surface. If you say that you need a moment, Maverlies and Voldrik will stay there with you and you will have time to collect the loot from the darkspawn you just killed (especially the |
||
| ⚫ | Go back to the main path and head down to the end that is blocked off. To the south is a small alcove with a portcullis. Proceed to the end of this hallway, passing through the "Circle of the Forsaken" and over a bridge to the "Forbidden Chamber", where you will confront a powerful [[Shade|wraith]] ([[Rank#Boss|boss]] level) called [[the Dark Theurge]], who will be reinforced by five [[Skeleton|undead]]. Unlike other wraiths, it can use [[Primal spells (Origins)#Lightning tree|lightning magic]] to deal heavy damage, so make sure your party can resist lightning attacks. When you get the Dark Theurge's health down to a low level, it will retreat into an alcove and be docile. Examining the '''Strange Apparatus''' in the center of the room will allow you to proceed onward, but will release the wraith from the chamber, initiating the quest [[The Wraith's Vengeance]]. Continue down the hall (stopping at the "Dwarven Outpost" to collect [[Key of the Lady]]), where, after a battle with an [[ogre commander]] and other darkspawn, the Dark Theurge will enter the ogre's body and rise up as a [[possessed ogre commander]]. Once the enemies are dead, a cut scene will commence showing the dwarf Voldrik repairing the operating mechanism to dwarven '''Great Barrier Doors''' leading deeper into the Deep Roads so that they can be sealed promptly. |
||
| ⚫ | |||
| + | |||
| − | <!---descr="What happens as a result of the quest - rewards, events, etc."---> |
||
| ⚫ | At the end of the cutscene Sergeant Maverlies will ask you if you are ready to leave. If you say 'yes', you will be transported back to the surface. If you say that you need a moment, Maverlies and Voldrik will stay there with you, and you will have time to collect the loot from the darkspawn you just killed (especially the ogre commander, who drops the unique belt [[Wasp's Sting]]). [[Key to the Crypt]] can be found on a {{TextContainer|darkspawn corpse}} here. You can also activate the "Mechanism" that Voldrik used to seal the door, though the only thing this will do is cause Maverlies to ask you if you are ready to leave. There is no scene showing the door being sealed again. |
||
| + | |||
| + | {{Note|On the PC version the tooltip suggests that the mechanism can be moved. It says "right-click: turn left, shift + right-click: turn right". However, when you activate it with right click or shift + right-click all that happens is that the conversation with Sergeant Maverlies is initiated. After that, the Mechanism can no longer be activated. It's not completely clear whether this is a bug, or whether you are not supposed to be able to do anything with the Mechanism.}} |
||
| + | |||
| ⚫ | |||
The Keep is secured from below. |
The Keep is secured from below. |
||
| − | == |
+ | == Rewards == |
| + | * 2000 XP for phase 1 up to the rubble in the basement |
||
| − | *[[Codex: Ancient Vows]] |
||
| + | * 2000 XP for closing the Great Barrier Doors in the Deep Roads |
||
| + | * 2000 XP when Sergeant Maverlies takes you back up to the courtyard after phase 2 |
||
| + | |||
| + | == Side quests == |
||
| + | {{:Adria's Plight|style=iconmini}}{{clrl}} |
||
| + | {{:Bombs Away!|style=iconmini}}{{clrl}} |
||
| + | {{:Elemental Requirements|style=iconmini}}{{clrl}} |
||
| + | {{:Golem's Might|style=iconmini}}{{clrl}} |
||
| + | {{:The Shrine of Korth|style=iconmini}}{{clrl}} |
||
| + | {{:The Wraith's Vengeance|style=iconmini}}{{clrl}} |
||
| + | {{:Codex entry: The Great Strife|style=iconmini}} - unmarked{{clrl}} |
||
| + | |||
| + | == Notable items == |
||
| + | {{:Call of the Inferno|style=iconmini}}, {{TextContainer|Urn}} in Forbidden Chamber{{clrl}} |
||
| + | {{:Frenzy|style=iconmini}}, from [[The Shrine of Korth]]{{clrl}} |
||
| + | {{:Ring of Mastery|style=iconmini}}, source: {{TextContainer|Adria the Ghoul}}{{clrl}} |
||
| + | {{:Talisman of Restoration|style=iconmini}}, {{TextContainer|Urn}} in Forbidden Chamber{{clrl}} |
||
| + | {{:Trickster's Boots|style=iconmini}}, source: {{TextContainer|Skeleton}} at the Circle of the Forsaken{{clrl}} |
||
| + | {{:Trickster's Cap|style=iconmini}}, source: {{TextContainer|Avvar Sarcophagus}} in the outer Avvar Crypt{{clrl}} |
||
| + | {{:Wasp's Sting|style=iconmini}}, source: {{TextContainer|Ogre commander}}{{clrl}} |
||
| + | {{:Veridium Ore|style=iconmini}}, in the chamber with Adria{{clrl}} |
||
| + | |||
| + | == Notes == |
||
| + | * This is one of three side quests in ''Awakening'' whose completion is required to earn [[Dragon Age: Origins - Awakening#Achievements and trophies|The Enduring Vigil]] [[Achievements (Origins)#Dragon Age: Origins - Awakening|achievement/trophy]]. |
||
| − | ==Bugs== |
+ | == Bugs == |
| − | If the player leaves the Deep Roads after killing the |
+ | * If the player leaves the Deep Roads after killing the ogre commander, but before the Dark Theurge reappears, the Dark Theurge will not be able to raise the Ogre and the quest will be broken. After casting several spells, and freezing (via cone of cold) on the Dark Theurge, it is possible to trigger the possessed Ogre and fix the quest. |
| ⚫ | * It is possible to trigger an infinite experience exploit with this quest. If Sergeant Maverlies is waiting outside for the rubble to be cleared (before one main plot quest is done), you can go down to the rubble through the door to the basement in Vigil's Keep courtyard. She will still be down at the blocked passage with Voldrik, talk to her and tell her that you want to go back to the surface. You get 2000 XP per run. |
||
| + | * The ogre commander has either a bug or a very limited move set to where he only uses [[Ram]] over and over again to knock the Warden-Commander down. Selecting another party member seems to break this cycle. |
||
| + | * If the rubble is still not cleared after completing the needed amount of main quests, the fix is to go down to where the rubble is after talking with her at the entrance and instead of activating the rubble, activate her and it should be cleared. |
||
| + | == See also == |
||
| − | ==Endless experience exploit== |
||
| + | {{:Codex entry: Ancient Vows|style=iconmini}}<br> |
||
| − | <!---descr="Links to other wiki articles."---> |
||
| + | {{:Codex entry: The Great Strife|style=iconmini}} |
||
| ⚫ | It is possible to trigger an infinite experience exploit with this quest. If |
||
| − | [[Category:Awakening |
+ | [[Category:Dragon Age: Origins - Awakening side quests]] |
| + | [[Category:Vigil's Keep side quests]] |
||
Revision as of 15:55, 25 May 2017
It Comes From Beneath is a side quest in Dragon Age: Origins - Awakening. It takes place in Vigil's Keep.
Acquisition
This quest is initiated by talking to Sergeant Maverlies, who is standing in the courtyard near the door to the basement. She will explain that the explosions during the assault on Vigil's Keep caused some damage to the lower tunnels and that there are now darkspawn in the basement. If you agree to take the quest, she will escort your party downstairs.
Walkthrough
Vigil's Keep - Basement
Go down the stairs into the large room with dead darkspawn. There is a distressed mabari on the ground with a note attached to her collar. If the Warden-Commander, or a companion, has high enough survival skill (rank 3 or expert survival), they can calm the dog and gain ![]() (+2) approval from Nathaniel (if he is in the party). If not, you can inspect the note, which begins the quest Adria's Plight. Examine the Warrior Statue to obtain the first part of Codex entry: The Great Strife.
(+2) approval from Nathaniel (if he is in the party). If not, you can inspect the note, which begins the quest Adria's Plight. Examine the Warrior Statue to obtain the first part of Codex entry: The Great Strife.
Continue down the hallway, where you will encounter groups of darkspawn. The small rooms on each side of the hallway can be looted for various treasures, including West Hill Brandy. In the room on the left, there is a statue of Andraste that you can inspect to receive a message. The inscription mentions seeing through a flame. Once you have examined the statue, the torch immediately to the right of the statue becomes selectable. Examine the torch and a secret room with a locked chest is revealed.
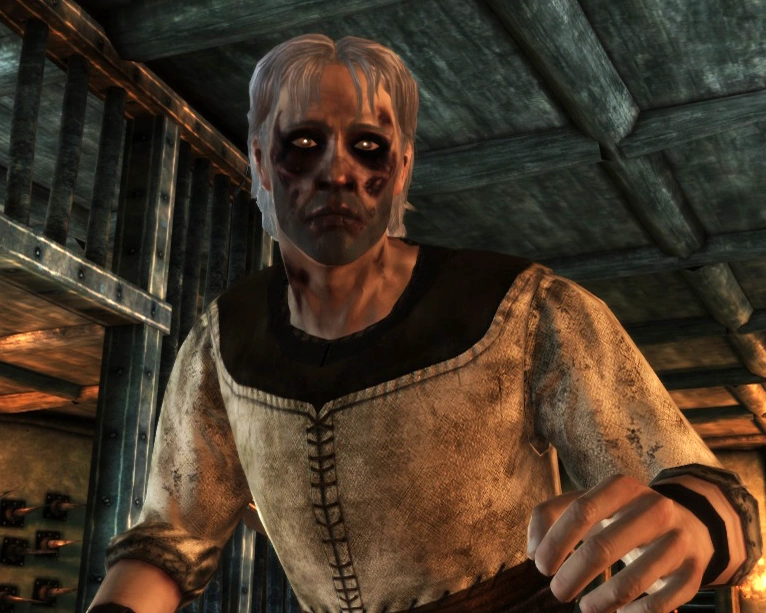
A prisoner who turned into a ghoul.
In the next large room, darkspawn-infected prisoners will attack as soon as you enter. There are a few prisoners still alive, whom the Warden-Commander can release, leave in prison, or kill. Releasing the prisoners will gain you ![]() (+5) approval from Nathaniel and Anders,
(+5) approval from Nathaniel and Anders, ![]() (+10) from Sigrun but
(+10) from Sigrun but ![]() (-10) from Justice. Demanding their clothes as payment for their release will result in
(-10) from Justice. Demanding their clothes as payment for their release will result in ![]() (+5) from Oghren and Sigrun instead. Check Howe Correspondence for Delilah Howe's Letters.
(+5) from Oghren and Sigrun instead. Check Howe Correspondence for Delilah Howe's Letters.
The Family Crypt is in the room to the left of the prison. If Nathaniel is in your party, he is able to pick the lock on the Crypt Door. Otherwise, a specific key must be found later. Head through the door and loot the Avvar sarcophagi along the top level since heading down to the lower level will trigger an attack by a dozen undead. The sarcophagus on the lower level can be looted without any risk of attack after that first spawn. On the wall facing where you entered, there are four keyholes, which are part of The Wraith's Vengeance quest line and two Crypt Statues to update Codex entry: The Great Strife. One of the keys, Key of Kiveal, is in a sarcophagus on the top level. The other three keys are found in the area beyond the rubble. Howe Bow (gift) can be looted from a sack lying against a beam in the middle of the room.
Return to the room with the jail cells and continue moving forward. The next room will trigger a cut scene and the Warden-Commander learns what has become of the mabari's owner, Adria. After a brief conversation, she attacks the party. Killing her completes the side quest. Loot her corpse for Ring of Mastery and search the Veridium Deposit for Veridium Ore and a knight's corpse for Gold Earring.
A pile of rubble blocks the Warden-Commander's further progress through the cellar. Voldrik can clear it away, but it will take some time. There is nothing more to do at this point, so accept Maverlies' offer to return to the courtyard.
Vigil's Keep - Deep Roads
The Warden-Commander will have to leave Vigil's Keep for some time in order for Voldrik to get the work done (complete either Last of the Legion, The Righteous Path, or Shadows of the Blackmarsh). Upon returning, speak with Sergeant Maverlies, and she will inform the Warden-Commander that the rubble has been cleared away, revealing a tunnel that is connected to the Deep Roads. In order to prevent anymore darkspawn invasions, the darkspawn need to be cleared out, and the Warden-Commander will have to find a way to block the tunnel off. Head into the tunnel, checking the rooms to either side of the main path. The first room to the right contains a darkspawn corpse with a statue. Loot the statue and head to the Shrine of Korth, where the tier 8 battleaxe Frenzy can be obtained (See The Shrine of Korth for details.) The Key of Korth can be found in an urn to the right of the shrine.
Backtrack to the crossroads and continue down the other path, fighting darkspawn along the way. A room on the right has Lyrium Sand and the one to the left a hidden trapdoor with a lock on it, which contains Key of Haakon - one of the keys needed for the Avvar Deep Crypt.
Go down the second room on the left to reach the "Gem Mine", where you will find Elven Runestone in some rocks, and several gem clusters containing various gems.
Go back to the main path and head down to the end that is blocked off. To the south is a small alcove with a portcullis. Proceed to the end of this hallway, passing through the "Circle of the Forsaken" and over a bridge to the "Forbidden Chamber", where you will confront a powerful wraith (boss level) called the Dark Theurge, who will be reinforced by five undead. Unlike other wraiths, it can use lightning magic to deal heavy damage, so make sure your party can resist lightning attacks. When you get the Dark Theurge's health down to a low level, it will retreat into an alcove and be docile. Examining the Strange Apparatus in the center of the room will allow you to proceed onward, but will release the wraith from the chamber, initiating the quest The Wraith's Vengeance. Continue down the hall (stopping at the "Dwarven Outpost" to collect Key of the Lady), where, after a battle with an ogre commander and other darkspawn, the Dark Theurge will enter the ogre's body and rise up as a possessed ogre commander. Once the enemies are dead, a cut scene will commence showing the dwarf Voldrik repairing the operating mechanism to dwarven Great Barrier Doors leading deeper into the Deep Roads so that they can be sealed promptly.
At the end of the cutscene Sergeant Maverlies will ask you if you are ready to leave. If you say 'yes', you will be transported back to the surface. If you say that you need a moment, Maverlies and Voldrik will stay there with you, and you will have time to collect the loot from the darkspawn you just killed (especially the ogre commander, who drops the unique belt Wasp's Sting). Key to the Crypt can be found on a darkspawn corpse here. You can also activate the "Mechanism" that Voldrik used to seal the door, though the only thing this will do is cause Maverlies to ask you if you are ready to leave. There is no scene showing the door being sealed again.
Result
The Keep is secured from below.
Rewards
- 2000 XP for phase 1 up to the rubble in the basement
- 2000 XP for closing the Great Barrier Doors in the Deep Roads
- 2000 XP when Sergeant Maverlies takes you back up to the courtyard after phase 2
Side quests
![]() Codex entry: The Great Strife - unmarked
Codex entry: The Great Strife - unmarked
Notable items
![]() Call of the Inferno, Urn in Forbidden Chamber
Call of the Inferno, Urn in Forbidden Chamber
![]() Frenzy, from The Shrine of Korth
Frenzy, from The Shrine of Korth
![]() Ring of Mastery, source: Adria the Ghoul
Ring of Mastery, source: Adria the Ghoul
![]() Talisman of Restoration, Urn in Forbidden Chamber
Talisman of Restoration, Urn in Forbidden Chamber
![]() Trickster's Boots, source: Skeleton at the Circle of the Forsaken
Trickster's Boots, source: Skeleton at the Circle of the Forsaken
![]() Trickster's Cap, source: Avvar Sarcophagus in the outer Avvar Crypt
Trickster's Cap, source: Avvar Sarcophagus in the outer Avvar Crypt
![]() Wasp's Sting, source: Ogre commander
Wasp's Sting, source: Ogre commander
![]() Veridium Ore, in the chamber with Adria
Veridium Ore, in the chamber with Adria
Notes
- This is one of three side quests in Awakening whose completion is required to earn The Enduring Vigil achievement/trophy.
Bugs
- If the player leaves the Deep Roads after killing the ogre commander, but before the Dark Theurge reappears, the Dark Theurge will not be able to raise the Ogre and the quest will be broken. After casting several spells, and freezing (via cone of cold) on the Dark Theurge, it is possible to trigger the possessed Ogre and fix the quest.
- It is possible to trigger an infinite experience exploit with this quest. If Sergeant Maverlies is waiting outside for the rubble to be cleared (before one main plot quest is done), you can go down to the rubble through the door to the basement in Vigil's Keep courtyard. She will still be down at the blocked passage with Voldrik, talk to her and tell her that you want to go back to the surface. You get 2000 XP per run.
- The ogre commander has either a bug or a very limited move set to where he only uses Ram over and over again to knock the Warden-Commander down. Selecting another party member seems to break this cycle.
- If the rubble is still not cleared after completing the needed amount of main quests, the fix is to go down to where the rubble is after talking with her at the entrance and instead of activating the rubble, activate her and it should be cleared.