Tags: Visual edit apiedit |
(→Back in Haven: Removed reference to a part of the article that no longer exists.) Tag: Visual edit |
||
| (35 intermediate revisions by 22 users not shown) | |||
| Line 3: | Line 3: | ||
|name = [[In Hushed Whispers]] |
|name = [[In Hushed Whispers]] |
||
|icon = Quest icon DAI.png |
|icon = Quest icon DAI.png |
||
| − | |image = |
+ | |image = In hushed whispers.png |
|px = 270x360px |
|px = 270x360px |
||
|power_cost = 15 |
|power_cost = 15 |
||
| Line 31: | Line 31: | ||
{{Blockquote|<nowiki>[</nowiki>'''Note''': Choosing the mages will make it impossible to [[Champions of the Just|work with the templars]]<nowiki>.]</nowiki> |
{{Blockquote|<nowiki>[</nowiki>'''Note''': Choosing the mages will make it impossible to [[Champions of the Just|work with the templars]]<nowiki>.]</nowiki> |
||
| − | Redcliffe Castle and the mages who could close the Breach are under the control of [[Alexius|Magister Gereon Alexius]], a [[Venatori]] cultist with an unhealthy interest in The Inquisitor and the power to reorder time itself. |
+ | Redcliffe Castle and the mages who could close the Breach are under the control of [[Alexius|Magister Gereon Alexius]], a [[Venatori]] cultist with an unhealthy interest in The Inquisitor and the power to reorder time itself. He has "kindly" invited The Inquisitor to the castle - alone - to negotiate. It's an obvious trap, but Leliana and her agents can infiltrate the castle and remove the Venatori threat while Alexius's attention is diverted. A dangerous game, but it's our best chance. |
Recommended Levels: 4 to 7}} |
Recommended Levels: 4 to 7}} |
||
=== Return to Haven and discuss Fiona's offer with the advisors === |
=== Return to Haven and discuss Fiona's offer with the advisors === |
||
| − | A scene will begin upon returning to the Haven chantry. |
+ | A scene will begin upon returning to the Haven chantry. Everyone bickers about which group to approach for help sealing the Breach. There is a chance for approval from [[Cassandra Pentaghast|Cassandra]]. |
| − | '''Cullen: You think the mage rebellion is more united? |
+ | '''Cullen: You think the mage rebellion is more united? It could be ten times worse.''' |
:*We should meet the mages. - {{Approval3|Cassandra Slightly Disapproves}} |
:*We should meet the mages. - {{Approval3|Cassandra Slightly Disapproves}} |
||
:*We should find the templars. - {{Approval3|Cassandra Slightly Approves}} |
:*We should find the templars. - {{Approval3|Cassandra Slightly Approves}} |
||
| Line 45: | Line 45: | ||
=== Travel to Redcliffe and make contact with the mages === |
=== Travel to Redcliffe and make contact with the mages === |
||
| − | As the party approaches Redcliffe, a fade rift opens just outside the main gate. |
+ | As the party approaches Redcliffe, a fade rift opens just outside the main gate. This rift will be different from other rifts encountered thus far. In addition to spawning demons, there will be temporal distortions at random spots on the ground, represented by green and yellow circles. Green circles will slow members/enemies down, while yellow circles will speed them up. '''''This includes attack speed and the time it takes to disrupt the rift.''''' |
=== Enter Redcliffe === |
=== Enter Redcliffe === |
||
| − | A party member and The Inquisitor will comment on these distortions after the rift is closed, and the guard will return and open the gate. |
+ | A party member and The Inquisitor will comment on these distortions after the rift is closed, and the guard will return and open the gate. After passing through the arch, a scene begins in which an Inquisition scout will inform The Inquisitor that no one was expecting them. A mage named Lysas will then arrive and say that a [[Gereon Alexius|Magister Alexius]] is in charge, but they can meet with Fiona in the meantime. |
=== Go to The Gull and Lantern to meet Fiona === |
=== Go to The Gull and Lantern to meet Fiona === |
||
[[File:In Hushed Whispers Quest Image.png|right|250px|thumb|The Negotiations]] |
[[File:In Hushed Whispers Quest Image.png|right|250px|thumb|The Negotiations]] |
||
| − | On the way to the tavern, the party may encounter [[Connor]] near the docks if he survived the events of |
+ | On the way to the tavern, the party may encounter [[Connor]] near the docks if he survived the events of [[The Arl of Redcliffe]]. |
:*Tell me about what you did. - {{Approval3|Solas Slightly Approves}} |
:*Tell me about what you did. - {{Approval3|Solas Slightly Approves}} |
||
| Line 61: | Line 61: | ||
:*They should have killed you. - {{Approval3|Vivienne Approves}} | {{Approval3|Cassandra Slightly Approves}} | {{Approval3|Sera Slightly Approves}} | {{Approval3|Blackwall Slightly Disapproves}} | {{Approval3|Solas Slightly Disapproves}} |
:*They should have killed you. - {{Approval3|Vivienne Approves}} | {{Approval3|Cassandra Slightly Approves}} | {{Approval3|Sera Slightly Approves}} | {{Approval3|Blackwall Slightly Disapproves}} | {{Approval3|Solas Slightly Disapproves}} |
||
| − | Enter the tavern to begin a scene with Fiona (bring [[Vivienne]] for some amusing dialogue). |
+ | Enter the tavern to begin a scene with Fiona (bring [[Vivienne]] for some amusing dialogue). She will claim that she hasn't been to Val Royeaux since before The Conclave. She also informs The Inquisitor that the rebel mages have pledged their service to the [[Tevinter Imperium]]: |
'''Fiona: As one indentured to a magister, I no longer have the authority to negotiate with you.''' |
'''Fiona: As one indentured to a magister, I no longer have the authority to negotiate with you.''' |
||
| Line 69: | Line 69: | ||
:*Then tell me who does. |
:*Then tell me who does. |
||
| − | Magister Gereon Alexius will show up at this point, and The Inquisitor begins to negotiate with him to acquire the assistance of the mages. |
+ | Magister Gereon Alexius will show up at this point, and The Inquisitor begins to negotiate with him to acquire the assistance of the mages. They are interrupted when Alexius' son, Felix, stumbles into the arms of The Inquisitor. But this is merely subterfuge to pass a note to The Inquisitor. Concerned for his son, Alexius leaves with Felix and Fiona, telling The Inquisitor that they will have to continue at a later date. After they leave, The Inquisitor reads the note: "Come to the Chantry. You are in danger." |
=== Meet Felix in the Chantry === |
=== Meet Felix in the Chantry === |
||
| − | Before leaving, a few codex entries can be found in the tavern, as well as [[Clemence|Clemence the Tranquil]], who can be recruited as an Agent for the Inquisition. |
+ | Before leaving, a few codex entries can be found in the tavern, as well as [[Clemence|Clemence the Tranquil]], who can be recruited as an Agent for the Inquisition. There is also a bitter mage named Linnea nearby, if the Inquisitor is a human mage there will be some unique dialogue. |
| − | '''Linnea: We don't need your kind here. |
+ | '''Linnea: We don't need your kind here. Your Inquisition's just templars by another name.''' |
:*I want to help the mages. - {{Approval3|Cassandra Slightly Disapproves}} |
:*I want to help the mages. - {{Approval3|Cassandra Slightly Disapproves}} |
||
:*The Inquisition's different. - {{Approval3|Sera Slightly Approves}} |
:*The Inquisition's different. - {{Approval3|Sera Slightly Approves}} |
||
:*You need me. - {{Approval3|Sera Slightly Approves}} | {{Approval3|Blackwall Slightly Approves}} |
:*You need me. - {{Approval3|Sera Slightly Approves}} | {{Approval3|Blackwall Slightly Approves}} |
||
| − | Upon exiting the tavern, veer to the right and fall down onto the grass. |
+ | Upon exiting the tavern, veer to the right and fall down onto the grass. The mage who greeted the party when they first entered Redcliffe, Lysas, will be standing near a column and The Inquisitor can choose to speak to him: |
'''Lysas: Were you really looking to ''ally'' with us?''' |
'''Lysas: Were you really looking to ''ally'' with us?''' |
||
| − | :*Yes. |
+ | :*Yes. Mages should be free. - {{Approval3|Cassandra Slightly Disapproves}} | {{Approval3|Vivienne Slightly Disapproves}} | {{Approval3|Sera Disapproves}} |
:*You sound doubtful. |
:*You sound doubtful. |
||
| − | :*No. |
+ | :*No. You should be contained. - {{Approval3|Cassandra Slightly Approves}} | {{Approval3|Sera Slightly Approves}} | {{Approval3|Vivienne Approves}} |
=== Help the strange mage close the Fade rift === |
=== Help the strange mage close the Fade rift === |
||
| − | Upon entering the Chantry, the party will find a mage fighting off demons, and he asks for assistance closing the rift. |
+ | Upon entering the Chantry, the party will find a mage fighting off demons, and he asks for assistance closing the rift. The temporal distortions will be present, so the party should use them to their advantage. |
[[File:In Hushed Whispers Chantry.png|right|250px|]] |
[[File:In Hushed Whispers Chantry.png|right|250px|]] |
||
| − | Upon closing the rift a scene begins, and the mage introduces himself as [[Dorian|Dorian Pavus]]. |
+ | Upon closing the rift a scene begins, and the mage introduces himself as [[Dorian|Dorian Pavus]]. Dorian will explain his relationship with Alexius as well as how Alexius managed to arrive before the Inquisition. |
'''Dorian: The magic Alexius is using is wildly unstable, and it's unraveling the world.''' |
'''Dorian: The magic Alexius is using is wildly unstable, and it's unraveling the world.''' |
||
| Line 100: | Line 100: | ||
'''Felix: And I can tell you one thing: whatever he's done for them, he's done it to get to you.''' |
'''Felix: And I can tell you one thing: whatever he's done for them, he's done it to get to you.''' |
||
:*How do we stop him? |
:*How do we stop him? |
||
| − | :*I'm flattered. - {{Approval3|Varric Slightly Approves}} |
+ | :*I'm flattered. - {{Approval3|Varric Slightly Approves}} <!-- {{Approval3|Dorian Slightly Approves}} ??? Judging by his smile, one happens for this answer. At least I went out of this scene with 2 points gained from him. --> |
:*He doesn't scare me. |
:*He doesn't scare me. |
||
=== Approach the mages === |
=== Approach the mages === |
||
| − | Back in the war room, choose the operation and a scene will play. |
+ | Back in the war room, choose the operation and a scene will play. Alexius has invited The Inquisitor to Redcliffe Castle to continue their negotiations, and it's obvious to everyone that the invitation is a trap. [[Leliana]] recalls the secret passage that leads from the windmill (which is now partially ruined) in Redcliffe Village to the castle (this was used by the [[The Warden|Hero of Ferelden]] during [[The Arl of Redcliffe]]). So the Inquisition decides to set a trap of its own, requiring The Inquisitor to distract Alexius, while Leliana's agents infiltrate the castle via the secret passage. |
| + | |||
| ⚫ | |||
| ⚫ | {{Blockquote|'''Note''': ''This is the point of no return with regards to which group you side with. Once you commence this operation the templars are no longer an option. Also, there will not be a chance to equip Dorian before leaving for Redcliffe, so it is useful to have a staff, armor and accessories in inventory to equip him with better than the starting Igneous Staff and Enchanter Coat.''}} |
||
| ⚫ | |||
| ⚫ | {{Blockquote| |
||
=== Redcliffe Castle === |
=== Redcliffe Castle === |
||
| − | [[File:Alexius and Felix (In Hushed Whispers).png|right|250px]]A lengthy scene begins with The Inquisitor's party arriving at the castle. Alexius reveals that his motive in all this is to cure his son, as the [[Elder One]] promised it could be done. |
+ | [[File:Alexius and Felix (In Hushed Whispers).png|right|250px]]A lengthy scene begins with The Inquisitor's party arriving at the castle. If you did not add any companion to the active party except Dorian then [[Varric Tethras|Varric]] and Cassandra will be automatically added. Alexius reveals that his motive in all this is to cure his son, as the [[Elder One]] promised it could be done. Only Solas, Iron Bull and Sera have approval changes for the conversation. |
'''Alexius: Fiona, you would not have turned your followers over to my care if you did not trust me with their lives.''' |
'''Alexius: Fiona, you would not have turned your followers over to my care if you did not trust me with their lives.''' |
||
| Line 116: | Line 117: | ||
:*Let's get to business. |
:*Let's get to business. |
||
| − | '''Alexius: The Inquisition needs mages to close the Breach, and I have them. |
+ | '''Alexius: The Inquisition needs mages to close the Breach, and I have them. So, what shall you offer in exchange?''' |
:*We have connections. - {{Approval3|Sera Slightly Disapproves}} |
:*We have connections. - {{Approval3|Sera Slightly Disapproves}} |
||
:*Nothing. - {{Approval3|Sera Slightly Approves}} |
:*Nothing. - {{Approval3|Sera Slightly Approves}} |
||
| Line 128: | Line 129: | ||
:*Why are you really here? |
:*Why are you really here? |
||
| − | '''Alexius: |
+ | '''Alexius: You're nothing but a mistake.''' |
:*What was supposed to happen? - {{Approval3|Solas Slightly Approves}} |
:*What was supposed to happen? - {{Approval3|Solas Slightly Approves}} |
||
:*What is the mark? - {{Approval3|Solas Slightly Approves}} |
:*What is the mark? - {{Approval3|Solas Slightly Approves}} |
||
:*Who killed the Divine? |
:*Who killed the Divine? |
||
| − | '''Alexius: The Elder One has power you would not believe. |
+ | '''Alexius: The Elder One has power you would not believe. He will raise the Imperium from its own ashes.''' |
:*Who is the Elder One? - {{Approval3|Solas Slightly Approves}} |
:*Who is the Elder One? - {{Approval3|Solas Slightly Approves}} |
||
:*You're a fanatic. - {{Approval3|Iron Bull Slightly Approves}} |
:*You're a fanatic. - {{Approval3|Iron Bull Slightly Approves}} |
||
:*What kind of power? |
:*What kind of power? |
||
| − | In the end, Alexius uses an amulet to create what appears to be a rift. |
+ | In the end, Alexius uses an amulet to create what appears to be a rift. Dorian attempts to counter the magic, chaos ensues and the scene blacks out. |
| − | The Inquisitor and Dorian wind up in a jail cell, which surprises a couple of guards, who will then attack. |
+ | The Inquisitor and Dorian wind up in a jail cell, which surprises a couple of guards, who will then attack. '''NOTE:''' this is the first time the player has control of Dorian, so as soon as the battle starts, open the character record and put points into his abilities and adjust his tactics and behaviors. |
| − | A scene begins immediately upon the guards' defeat. |
+ | A scene begins immediately upon the guards' defeat. Dorian surmises that the rift not only moved them to a different location within the castle, but a different time. Investigate through dialogue to learn more. |
=== Find out what happened === |
=== Find out what happened === |
||
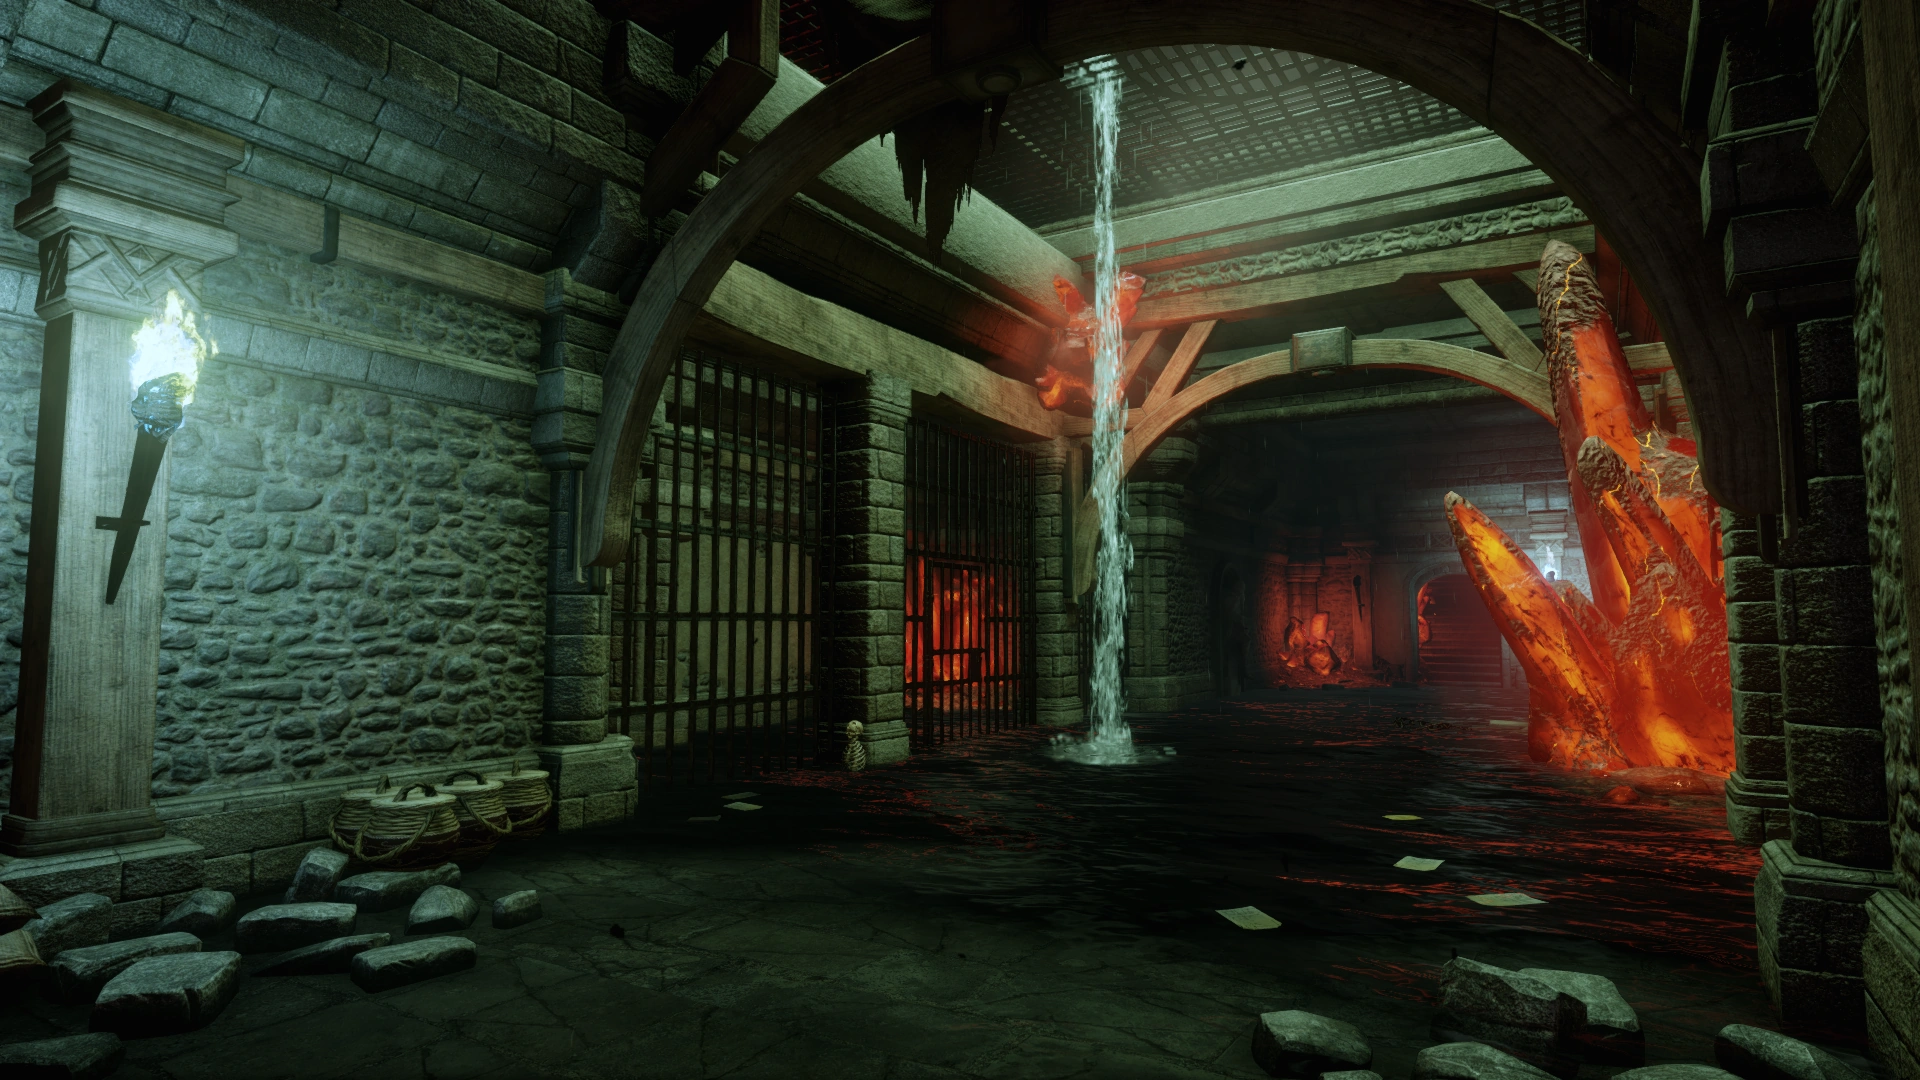
[[File:Hushed Whispers Image.png|right|250px]] |
[[File:Hushed Whispers Image.png|right|250px]] |
||
| − | Upon regaining control, loot the Prison Key that one of the guards will have dropped. |
+ | Upon regaining control, loot the Prison Key that one of the guards will have dropped. Move ahead and up some stairs to a dead end. The stairs to the left lead to a dead end with some loot. Also, Dorian will make a comment on the state of the castle. Return to the intersection and take the other set of stairs. Eventually a larger room will be reached and Lysas will be in the first cell on the right. Approach him for a brief interaction. |
| − | + | Moving on, The Inquisitor and Dorian will end up in a large cavern of sorts. A couple of zealots are blocking the way north and south, and there is a drawbridge to the west that is raised, for the moment. The remaining members of the party can be found in prison cells to the north. Which cell they will be in, depends on the party member. |
|
Head north, down the stairs... |
Head north, down the stairs... |
||
| Line 163: | Line 164: | ||
::*Sera will be in the second cell, trying to remember how a song goes. |
::*Sera will be in the second cell, trying to remember how a song goes. |
||
| − | The first party member rescued will inform The Inquisitor that the Elder One is the real threat, not Alexius. |
+ | The first party member rescued will inform The Inquisitor that the Elder One is the real threat, not Alexius. They will also explain that the Empress of Orlais was assassinated and the Elder One has a demon army at his disposal. |
The second party member rescued will say that they overheard the guards saying that Alexius never leaves the throne room. |
The second party member rescued will say that they overheard the guards saying that Alexius never leaves the throne room. |
||
| − | Exit the cells and head down the southern path. |
+ | Exit the cells and head down the southern path. At the end, the party will find Fiona in a cell and a scene begins. She reveals that they are now in [[Calendar|Harvestmere]] 9:42 [[Dragon Age (time period)|Dragon]], a full year into the future. She also mentions that Leliana is somewhere in the castle. |
=== Find Leliana === |
=== Find Leliana === |
||
| − | Head back upstairs, and the sound of the drawbridge lowering will be heard. |
+ | Head back upstairs, and the sound of the drawbridge lowering will be heard. A group of Venatori will be guarding the newly opened path. There is a [[Supply Cache|supply cache]] just past them, so don't be afraid to use potions if necessary. In fact, there are several supply caches throughout the castle, so don't feel the need to hoard supplies. Head up the stairs to reach the Guard Barracks where you can find the aforementioned supply cache and [[Note: A Prayer to the New God|A Prayer to the New God]] in addition to various items of loot. There is a locked door to the right. Of particular interest is [[Note: A Guard's Journal|A Guard's Journal]] in the left room, which gives some indication of Alexius' paranoia and what life is currently like in Ferelden. |
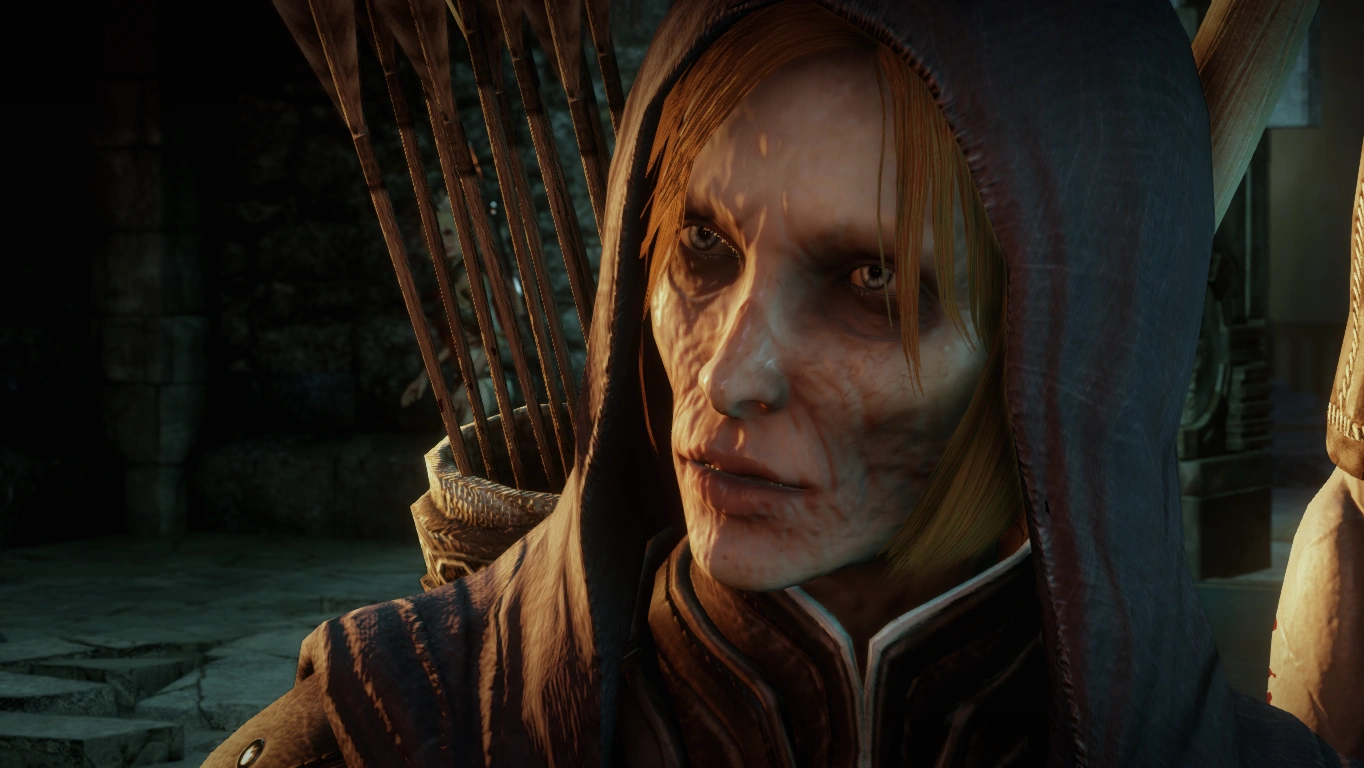
| − | [[File:Leliana (In Hushed Whispers).png|right|250px]]When ready, proceed up the next set of stairs to the Torture Chambers. |
+ | [[File:Leliana (In Hushed Whispers).png|right|250px]]When ready, proceed up the next set of stairs to the Torture Chambers. At the top of the next set of stairs, the party will hear a torturer plying his trade on a victim. The victim's death is scripted, so she cannot be saved. The torturer is named [[Hanley D'Urvain|Hanley]] and is an Elite rank spellbinder so expect a tougher battle. He always drops a {{:Bianca Arms II|style=iconmini}} and the unique dagger {{:Bleeder of Souls|style=iconmini}}, a fantastic upgrade for any dual-wielder. |
| − | Continue down the corridor and as you approach the door on the left another torturer will be heard working on Leliana. |
+ | Continue down the corridor and as you approach the door on the left another torturer will be heard working on Leliana. Open the door to begin a scene. |
=== Find a way back to Alexius' throne room === |
=== Find a way back to Alexius' throne room === |
||
| − | Pick up the Prison Key by the dead torturer. |
+ | Pick up the Prison Key by the dead torturer. Proceed and you'll emerge in the drawbridge room, except much higher up. Enter the next door and the mark will begin to glow, indicating a fade rift is up ahead. After closing the rift, turn the gear to raise the gate and proceed up the stairs to the Docks. |
| − | Move ahead quickly to witness a couple of mages sacrifice themselves for the Elder One, and two lesser shades will spawn in their place. There is another supply cache nearby. |
+ | Move ahead quickly to witness a couple of mages sacrifice themselves for the Elder One, and two lesser shades will spawn in their place. There is another supply cache nearby. Move up more stairs to emerge in the Courtyard. |
After taking in the scenery, proceed up one of the sets of stairs and another fade rift appears. Remember that a mage can use Dispel to prevent any demon from spawning, which certainly helps on higher difficulties. If you have a rogue in your party and don't want to fight at all, you can use [[Stealth (Inquisition)|stealth]], command your followers to disengage and just run through the courtyard. The enemies won't follow you into the castle. |
After taking in the scenery, proceed up one of the sets of stairs and another fade rift appears. Remember that a mage can use Dispel to prevent any demon from spawning, which certainly helps on higher difficulties. If you have a rogue in your party and don't want to fight at all, you can use [[Stealth (Inquisition)|stealth]], command your followers to disengage and just run through the courtyard. The enemies won't follow you into the castle. |
||
| Line 185: | Line 186: | ||
Another rift will be encountered just past the first. |
Another rift will be encountered just past the first. |
||
| − | The party will finally enter another part of the castle, the Upper Royal Wing. |
+ | The party will finally enter another part of the castle, the Upper Royal Wing. Upon entering a corridor, enter the first door on the right. Connor may be here in front of the fireplace, but he will commit suicide to avoid becoming an abomination. A [[Note: Spellbinder's Journal|Spellbinder's Journal]] can be found on a desk here. The journal gives further insight into Alexius' paranoia and behavior. [[Note: Alexius' Journal|Alexius' Journal]] can be found on a desk directly across the corridor, and it hints at what exactly is wrong with Felix. The party will come to a larger room which contains another supply cache. The pyramid shaped loot box contains the Circle of Magi banner. Proceed down the stairs to the Lower Royal Wing. |
| − | The radar will indicate many enemies in the next room, but it's not as bad as it seems. |
+ | The radar will indicate many enemies in the next room, but it's not as bad as it seems. There is a spellbinder and two marksmen inside, as well as a few demons. The demons will attack the marksmen, but won't attack the spellbinder. The marksmen will likely take out 1-2 demons, but will ultimately succumb to them. On the radar, the demons will take up positions in the room once the marksmen are dead. This is the party's cue to move in. A second wave of demons spawns from the fade rift. |
| − | Once all the fighting is done, locate the loot that the spellbinder dropped, as it will contain a red lyrium shard. |
+ | Once all the fighting is done, locate the loot that the spellbinder dropped, as it will contain a red lyrium shard. Approach the shard door to the throne room and the party is denied access, for the time being. Dorian comments and now four more of these will need to be found. |
=== Locate red lyrium shards === |
=== Locate red lyrium shards === |
||
[[File:Redcliffe Castle (In Hushed Whispers).jpg|right|250px]] |
[[File:Redcliffe Castle (In Hushed Whispers).jpg|right|250px]] |
||
| − | The shards are all being held by spellbinders (one of which has already been wiped out), and the quest markers indicate where they are on the map. |
+ | The shards are all being held by spellbinders (one of which has already been wiped out), and the quest markers indicate where they are on the map. There is no proper path to take here, but the following is efficient enough. |
==== Spellbinder 2 ==== |
==== Spellbinder 2 ==== |
||
| − | The second spellbinder is on the current level, in a room off the NW corner. |
+ | The second spellbinder is on the current level, in a room off the NW corner. As the party approaches the room, one of them will remark that the Venatori are too busy praying to be guarding the room. Indeed, all the enemies are facing away from the entrance, allowing the party to get the jump on them. The spellbinder is up a small landing, almost in the middle of the room. He is flanked by two marksmen, and two gladiators guard the entrance. Immediately upon entering the room, there is a ladder that leads to some scaffolding on the right. A stealthed rogue archer can get off a sneak attack on the spellbinder from here. |
==== Spellbinder 3 ==== |
==== Spellbinder 3 ==== |
||
| − | Head back to the main hall and proceed directly across to the other side but don't enter the door. |
+ | Head back to the main hall and proceed directly across to the other side but don't enter the door. Instead turn right and enter the next door on the left. Another supply cache is here. Head upstairs to the Upper Royal Wing and enter the open archway into a corridor. The spellbinder is in the first room on the right, which is a dilapidated library. Upon entering the room turn right and then left and he will be at the end of the walkway. Half a dozen zealots litter the lower area, and there are no marksmen. They're positioned quite a bit away, so the spellbinder could be sneak attacked into oblivion before his help arrives. If not, try to position party members at the top of one set of stairs and use them as a choke point. |
==== Spellbinder 4 ==== |
==== Spellbinder 4 ==== |
||
| − | Proceed down the long corridor to the next room. |
+ | Proceed down the long corridor to the next room. Upon entering, there will be some stone blocking the Venatori from immediately noticing the party, and a party member will mention this. Immediately to the right is a ladder leading to more scaffolding. The spellbinder is behind a desk adjacent to the eastern wall. He is accompanied by two marksmen and three zealots. |
==== Spellbinder 5 ==== |
==== Spellbinder 5 ==== |
||
| − | Both of the other doors in the room will lead to the final spellbinder. |
+ | Both of the other doors in the room will lead to the final spellbinder. The SW door leads to a room with a supply cache, and to a locked door which leads into another corridor. In this corridor you'll face three more doors, and the one on the right is locked. There's no trickery here, as the spellbinder is by himself in the middle room. However, bashing one of the walls to get to him will alert him immediately. So, if a rogue sneak attack is in order, then it is best to just enter through the door directly to his room. A note, [[Note: Studies on the Blight|Studies on the Blight]], can be found on the desk in the spellbinder's room. It describes what Leliana has been subjected to over the past year. |
=== Confront Alexius in his throne room === |
=== Confront Alexius in his throne room === |
||
| − | Proceed down the corridor and there will be a door on either side. |
+ | Proceed down the corridor and there will be a door on either side. A Masterwork Wave Blade schematic can be found on a table in the room on the left. Proceed down the stairs to find yet another supply cache. Enter the main hall and interact with the large door to begin a scene. Regardless of dialogue choices, the party will be forced into battle with Alexius. |
=== Defeat Alexius === |
=== Defeat Alexius === |
||
[[File:Hushed Whipsers Image 2.png|right|250px]] |
[[File:Hushed Whipsers Image 2.png|right|250px]] |
||
| − | Alexius is a mage, level 6-8 with 16000 HP minimum (Nightmare, level 7: 25134 HP). |
+ | Alexius is a mage, level 6-8 with 16000 HP minimum (Nightmare, level 7: 25134 HP). He is immune to all disabling effects (asleep, frozen, paralyzed and stunned) and is Perceptive. However, he is NOT immune to physical effects so he can be panicked, chilled, shocked and knocked down. Keeping him knocked down seems to be the easiest way to victory, so skills like [[Explosive Shot]], [[Payback Strike]], [[Mighty Blow (Inquisition)|Mighty Blow]], and [[Twin Fangs (Inquisition)|Twin Fangs]] to his back will be very useful. His glyphs inflict a large amount of spirit damage and slowdown status. His [[Mind Blast (Inquisition)|Mind Blast]] inflicts spirit damage and has a knockdown effect. He will also occasionally cast [[Barrier (Inquisition)|Barrier]] on himself. |
| − | After he loses about 1/3 of his health, he'll create a [[fade rift]], and move behind an impenetrable shield by the throne. |
+ | After he loses about 1/3 of his health, he'll create a [[fade rift]], and move behind an impenetrable shield by the throne. He will do this again when he loses about 2/3 of his health. The temporal distortions will be present at random spots for both rifts, and the rifts only spawn one wave of [[demons]], unleashing [[Wraith]]s, [[Terror demon]]s and [[Shade]]s. The shield he hides behind will dissipate immediately after a rift is closed. Be sure to grab any rift droppings for loot before the final segment or they will be lost when the cutscene occurs. |
The {{:Staff of Stasis|style=iconmini}} and a {{:Cooldown Amulet|style=iconmini}} are acquired after the battle, and a scene begins. |
The {{:Staff of Stasis|style=iconmini}} and a {{:Cooldown Amulet|style=iconmini}} are acquired after the battle, and a scene begins. |
||
| − | The Inquisitor will need to decide how to receive the rebel mages' aid. '''Unless otherwise noted, the following approval changes take place regardless of whether the companions below are in your party when you decide except for companions which have not yet been recruited.''' |
+ | The Inquisitor will need to decide how to receive the rebel mages' aid. '''Unless otherwise noted, the following approval changes take place regardless of whether the companions below are in your party when you decide except for companions which have not yet been recruited. Also note the points added toward candidates up for [[Divine election]].''' |
'''Fiona: It seems we have little choice but to accept whatever you offer.''' |
'''Fiona: It seems we have little choice but to accept whatever you offer.''' |
||
| Line 225: | Line 226: | ||
::{{Approval3|Solas Greatly Approves}} |
::{{Approval3|Solas Greatly Approves}} |
||
::{{Approval3|Blackwall Approves}} |
::{{Approval3|Blackwall Approves}} |
||
| − | ::{{Approval3|Varric Approves/Disapproves}} (only if he's in the active party. Approves if Hawke sided with mages in [[Dragon Age II]], Disapproves if Hawke sided with templars) |
+ | ::{{Approval3|Varric Approves/Disapproves}} (only if he's in the active party. Approves if Hawke sided with mages in ''[[Dragon Age II]]'', Disapproves if Hawke sided with templars) |
::{{Approval3|Iron Bull Disapproves}} |
::{{Approval3|Iron Bull Disapproves}} |
||
::{{Approval3|Cassandra Greatly Disapproves}} |
::{{Approval3|Cassandra Greatly Disapproves}} |
||
::{{Approval3|Sera Greatly Disapproves}} |
::{{Approval3|Sera Greatly Disapproves}} |
||
| − | ::{{Approval3|Cole Greatly Approves}} |
+ | ::{{Approval3|Cole Greatly Approves}} (occurs even though he is not yet recruited. Not stated in-game) |
| − | ::{{Approval3|Dorian Greatly Approves}} |
+ | ::{{Approval3|Dorian Greatly Approves}} (occurs even though he is not yet recruited. Not stated in-game) |
| + | :: |
||
| + | ::'''Points awarded to candidates for the next Divine''': Leliana +10, Cassandra -5, Vivienne -10 |
||
:You're our prisoners. ''(Conscript the rebel mages into the service of the Inquisition.)'' |
:You're our prisoners. ''(Conscript the rebel mages into the service of the Inquisition.)'' |
||
::{{Approval3|Sera Greatly Approves}} |
::{{Approval3|Sera Greatly Approves}} |
||
::{{Approval3|Iron Bull Greatly Approves}} |
::{{Approval3|Iron Bull Greatly Approves}} |
||
::{{Approval3|Cassandra Approves}} |
::{{Approval3|Cassandra Approves}} |
||
| − | ::{{Approval3|Varric Approves/Disapproves}} (only if he's in the active party. Disapproves if Hawke sided with mages in [[Dragon Age II]], Approves if Hawke sided with templars) |
+ | ::{{Approval3|Varric Approves/Disapproves}} (only if he's in the active party. Disapproves if Hawke sided with mages in ''[[Dragon Age II]]'', Approves if Hawke sided with templars) |
::{{Approval3|Blackwall Disapproves}} |
::{{Approval3|Blackwall Disapproves}} |
||
::{{Approval3|Solas Greatly Disapproves}} |
::{{Approval3|Solas Greatly Disapproves}} |
||
| − | ::{{Approval3|Cole Greatly Disapproves}} (occurs even |
+ | ::{{Approval3|Cole Greatly Disapproves}} (occurs even though he is not yet recruited. Not stated in-game) |
| − | ::{{Approval3|Dorian Greatly Disapproves}} (occurs even |
+ | ::{{Approval3|Dorian Greatly Disapproves}} (occurs even though he is not yet recruited. Not stated in-game) |
| + | :: |
||
| + | ::'''Points awarded to candidates for the next Divine''': Leliana -10, Cassandra +1, Vivienne +10 |
||
| − | Note that during the scene there is no approval change indicated for Vivienne for either decision, even if she was brought for the quest. |
+ | Note that during the scene there is no approval change indicated for Vivienne for either decision, even if she was brought for the quest. Her approval change doesn't occur until the next time The Inquisitor speaks to her in Haven: |
:{{Approval3|Vivienne Greatly Disapproves}} if the mages are made allies |
:{{Approval3|Vivienne Greatly Disapproves}} if the mages are made allies |
||
:{{Approval3|Vivienne Greatly Approves}} if the mages are conscripted |
:{{Approval3|Vivienne Greatly Approves}} if the mages are conscripted |
||
| Line 248: | Line 253: | ||
=== Back in Haven === |
=== Back in Haven === |
||
| − | If the [[Underworld Knowledge]] Perk is active, an additional dialog option will be available in the conversation regarding acquiring 'additional' |
+ | If the [[Underworld Knowledge]] Perk is active, an additional dialog option will be available in the conversation regarding acquiring 'additional' lyrium. The Inquisitor can then choose to recruit Dorian permanently. Praising that Blackwall was heroic after bringing him to Redcliffe Castle yields {{Approval3|Blackwall Approves}} |
The quest ends as preparations to seal the Breach are now underway. |
The quest ends as preparations to seal the Breach are now underway. |
||
| Line 273: | Line 278: | ||
* The war table operation [[The University of Orlais]] or [[Grand Cleric Iona]] become available depending on the outcome of [[The Chantry Remains]] |
* The war table operation [[The University of Orlais]] or [[Grand Cleric Iona]] become available depending on the outcome of [[The Chantry Remains]] |
||
* The war table operation [[Investigate Therinfal Redoubt]] can become available after speaking to [[Cremisius Aclassi|Krem]]. |
* The war table operation [[Investigate Therinfal Redoubt]] can become available after speaking to [[Cremisius Aclassi|Krem]]. |
||
| + | |||
| + | == Notes == |
||
| + | Any [[Codex (Inquisition)|codex entries]] from [[Therinfal Redoubt]] (only accessible by siding with the templars in [[Champions of the Just]]) will be available for purchase from [[Willvan]] in [[Val Royeaux]] with the completion of the quest. |
||
== Notable Items == |
== Notable Items == |
||
=== Loot === |
=== Loot === |
||
| − | *{{:Bianca Arms II|style=iconmini}} - ''dropped by Hanley'' |
+ | *{{:Bianca Arms II|style=iconmini}} - ''dropped by [[Hanley D'Urvain|Hanley]]'' |
*{{:Bleeder of Souls|style=iconmini}} - ''dropped by Hanley'' |
*{{:Bleeder of Souls|style=iconmini}} - ''dropped by Hanley'' |
||
| − | *[[Banners|Circle of Magi |
+ | *[[Banners|Circle of Magi Banner]] - ''from a box in the Upper Royal Wing'' |
*{{:Masterwork Wave Blade Schematic|style=iconmini}} - '' in a room in the Upper Royal Wing (east side)'' |
*{{:Masterwork Wave Blade Schematic|style=iconmini}} - '' in a room in the Upper Royal Wing (east side)'' |
||
*{{:Staff of Stasis|style=iconmini}} - ''after Alexius is defeated'' |
*{{:Staff of Stasis|style=iconmini}} - ''after Alexius is defeated'' |
||
| Line 294: | Line 302: | ||
* Most of the quest names in the main plot refer to specific verses of [[Chant of Light]]. "In hushed whispers" is from the Canticle of Threnodies 5:11. |
* Most of the quest names in the main plot refer to specific verses of [[Chant of Light]]. "In hushed whispers" is from the Canticle of Threnodies 5:11. |
||
* This quest was written by [[Mary Kirby]]. <ref>[http://blog.bioware.com/2014/12/12/the-sound-and-the-fury-what-we-listened-to-while-writing-dragon-age-inquisition/ The Sound and the Fury: What we listened to while writing Dragon Age: Inquisition]</ref> |
* This quest was written by [[Mary Kirby]]. <ref>[http://blog.bioware.com/2014/12/12/the-sound-and-the-fury-what-we-listened-to-while-writing-dragon-age-inquisition/ The Sound and the Fury: What we listened to while writing Dragon Age: Inquisition]</ref> |
||
| − | * The unknown male who is sacrificed upon entering the docks refers to the female as Linnea, the mage you can talk to in The Gull and Lantern who was in favor of allying with Tevinter. |
+ | * The unknown male who is sacrificed upon entering the docks refers to the female as Linnea, the mage you can talk to in The Gull and Lantern who was in favor of allying with Tevinter. In the glimpse of the two mages that is available, the unknown mage appears to resemble Talwyn, who is also available for conversation in The Gull & Lantern. |
| + | * The mission was shown in the beta display of the game. One of the differences between the beta version and the released game was Leliana looked the same in appearance in the beta version, while Leliana had a more skeletal appearance from a year of abuse and malnourishment. |
||
== Bugs == |
== Bugs == |
||
| − | * {{Platforms|xbox360}}If you fall off the edge in the area with the drawbridges you will be revived, but it is possible that when you revive you will be on the very edge and fall off again. This will continue infinitely, and the only solution is to reload a previous save. |
+ | * {{Platforms|xbox360}}{{platforms|PC}}If you fall off the edge in the area with the drawbridges you will be revived, but it is possible that when you revive you will be on the very edge and fall off again. This will continue infinitely, and the only solution is to reload a previous save. If the player is in control of a character that falls, the game will go into an endless, unbreakable loop of falling, dying, reviving and falling again. The only solution is to shut down or terminate the game, opening the game again and reloading a save game. |
* {{platforms|xbox360}}It's possible that after saving Leliana, the door to the next level cannot be interacted with, so no further progress in the quest can be made. The only solution is to reload the game to a point before the quest started. |
* {{platforms|xbox360}}It's possible that after saving Leliana, the door to the next level cannot be interacted with, so no further progress in the quest can be made. The only solution is to reload the game to a point before the quest started. |
||
| − | * {{Platforms|xboxone}} It is possible that if you ride your horse through the gate after defeating the Rift outside of them, that you will be unable to advance the quest. |
+ | * {{Platforms|xboxone}} It is possible that if you ride your horse through the gate after defeating the Rift outside of them, that you will be unable to advance the quest. You will be stuck in an infinite loop of saving/loading, and be unable to continue. |
| − | * {{platforms|PC}}The rift in the Lower Royal Wing in front of the lyrium door drops a typical rift loot sack, but it is beneath the terrain and cannot be interacted with using the mouse. |
+ | * {{platforms|PC}}The rift in the Lower Royal Wing in front of the lyrium door drops a typical rift loot sack, but it is beneath the terrain and cannot be interacted with using the mouse. Use your Interact key to open and loot it. |
* {{platforms|PC|xboxone}} Connor may not be visible at all when the room in the future he is in is entered. |
* {{platforms|PC|xboxone}} Connor may not be visible at all when the room in the future he is in is entered. |
||
== References == |
== References == |
||
<references /> |
<references /> |
||
| + | |||
| + | [[de:Das gedämpfte Flüstern]] |
||
[[pl:Szeptem]] |
[[pl:Szeptem]] |
||
[[Category:Dragon Age: Inquisition quests]] |
[[Category:Dragon Age: Inquisition quests]] |
||
Revision as of 02:44, 21 January 2020
In Hushed Whispers is a main quest in Dragon Age: Inquisition.
Grand Enchanter Fiona, leader of the mage rebellion, has offered an alliance with the rebel mages at Redcliffe.
Acquisition
The quest starts upon attempting to leave Val Royeaux during the quest The Threat Remains. Grand Enchanter Fiona stops The Inquisitor and invites them to meet in Redcliffe. Unlike Champions of the Just, the Inquisition must meet the mages in Redcliffe before the operation becomes available on the war table.
Walkthrough
[Note: Choosing the mages will make it impossible to work with the templars.]
Redcliffe Castle and the mages who could close the Breach are under the control of Magister Gereon Alexius, a Venatori cultist with an unhealthy interest in The Inquisitor and the power to reorder time itself. He has "kindly" invited The Inquisitor to the castle - alone - to negotiate. It's an obvious trap, but Leliana and her agents can infiltrate the castle and remove the Venatori threat while Alexius's attention is diverted. A dangerous game, but it's our best chance.
Recommended Levels: 4 to 7
Return to Haven and discuss Fiona's offer with the advisors
A scene will begin upon returning to the Haven chantry. Everyone bickers about which group to approach for help sealing the Breach. There is a chance for approval from Cassandra.
Cullen: You think the mage rebellion is more united? It could be ten times worse.
- We should meet the mages. -
 Cassandra Slightly Disapproves
 - We should find the templars. - Cassandra Slightly Approves
- You must choose soon. - Cassandra Approves
- We should meet the mages. -
Travel to Redcliffe and make contact with the mages
As the party approaches Redcliffe, a fade rift opens just outside the main gate. This rift will be different from other rifts encountered thus far. In addition to spawning demons, there will be temporal distortions at random spots on the ground, represented by green and yellow circles. Green circles will slow members/enemies down, while yellow circles will speed them up. This includes attack speed and the time it takes to disrupt the rift.
Enter Redcliffe
A party member and The Inquisitor will comment on these distortions after the rift is closed, and the guard will return and open the gate. After passing through the arch, a scene begins in which an Inquisition scout will inform The Inquisitor that no one was expecting them. A mage named Lysas will then arrive and say that a Magister Alexius is in charge, but they can meet with Fiona in the meantime.
Go to The Gull and Lantern to meet Fiona
The Negotiations
On the way to the tavern, the party may encounter Connor near the docks if he survived the events of The Arl of Redcliffe.
- Tell me about what you did. -
 Solas Slightly Approves
- Tell me about what you did. -
Connor: That's me. The boy with Redcliffe's blood on his hands.
- It wasn't your fault. - Blackwall Slightly Approves | Solas Slightly Approves | Cassandra Slightly Disapproves | Sera Slightly Disapproves | Vivienne Disapproves
- I'm surprised you're here. - Sera Slightly Approves | Iron Bull Slightly Approves | Varric Slightly Approves
- They should have killed you. - Vivienne Approves | Cassandra Slightly Approves | Sera Slightly Approves | Blackwall Slightly Disapproves | Solas Slightly Disapproves
- It wasn't your fault. -
Enter the tavern to begin a scene with Fiona (bring Vivienne for some amusing dialogue). She will claim that she hasn't been to Val Royeaux since before The Conclave. She also informs The Inquisitor that the rebel mages have pledged their service to the Tevinter Imperium:
Fiona: As one indentured to a magister, I no longer have the authority to negotiate with you.
- You've made a huge mistake. - Vivienne Approves
- That was fast.
- You're ignoring the Breach?
- Then tell me who does.
- You've made a huge mistake. -
Magister Gereon Alexius will show up at this point, and The Inquisitor begins to negotiate with him to acquire the assistance of the mages. They are interrupted when Alexius' son, Felix, stumbles into the arms of The Inquisitor. But this is merely subterfuge to pass a note to The Inquisitor. Concerned for his son, Alexius leaves with Felix and Fiona, telling The Inquisitor that they will have to continue at a later date. After they leave, The Inquisitor reads the note: "Come to the Chantry. You are in danger."
Meet Felix in the Chantry
Before leaving, a few codex entries can be found in the tavern, as well as Clemence the Tranquil, who can be recruited as an Agent for the Inquisition. There is also a bitter mage named Linnea nearby, if the Inquisitor is a human mage there will be some unique dialogue.
Linnea: We don't need your kind here. Your Inquisition's just templars by another name.
- I want to help the mages. - Cassandra Slightly Disapproves
- The Inquisition's different. - Sera Slightly Approves
- You need me. - Sera Slightly Approves | Blackwall Slightly Approves
- I want to help the mages. -
Upon exiting the tavern, veer to the right and fall down onto the grass. The mage who greeted the party when they first entered Redcliffe, Lysas, will be standing near a column and The Inquisitor can choose to speak to him:
Lysas: Were you really looking to ally with us?
- Yes. Mages should be free. - Cassandra Slightly Disapproves | Vivienne Slightly Disapproves | Sera Disapproves
- You sound doubtful.
- No. You should be contained. - Cassandra Slightly Approves | Sera Slightly Approves | Vivienne Approves
- Yes. Mages should be free. -
Help the strange mage close the Fade rift
Upon entering the Chantry, the party will find a mage fighting off demons, and he asks for assistance closing the rift. The temporal distortions will be present, so the party should use them to their advantage.
Upon closing the rift a scene begins, and the mage introduces himself as Dorian Pavus. Dorian will explain his relationship with Alexius as well as how Alexius managed to arrive before the Inquisition.
Dorian: The magic Alexius is using is wildly unstable, and it's unraveling the world.
- This is a lot to swallow.
- Do you have evidence? - Vivienne Slightly Approves
- I don't trust you.
Felix will arrive and explain that his father is involved with a group of Tevinter supremacists, the Venatori.
Felix: And I can tell you one thing: whatever he's done for them, he's done it to get to you.
- How do we stop him?
- I'm flattered. - Varric Slightly Approves
- He doesn't scare me.
Approach the mages
Back in the war room, choose the operation and a scene will play. Alexius has invited The Inquisitor to Redcliffe Castle to continue their negotiations, and it's obvious to everyone that the invitation is a trap. Leliana recalls the secret passage that leads from the windmill (which is now partially ruined) in Redcliffe Village to the castle (this was used by the Hero of Ferelden during The Arl of Redcliffe). So the Inquisition decides to set a trap of its own, requiring The Inquisitor to distract Alexius, while Leliana's agents infiltrate the castle via the secret passage.
The operation will now be available at the war table. Spend 15 Power to begin. Dorian will be a locked party member, so only two other party members can be chosen.
Note: This is the point of no return with regards to which group you side with. Once you commence this operation the templars are no longer an option. Also, there will not be a chance to equip Dorian before leaving for Redcliffe, so it is useful to have a staff, armor and accessories in inventory to equip him with better than the starting Igneous Staff and Enchanter Coat.
Redcliffe Castle
A lengthy scene begins with The Inquisitor's party arriving at the castle. If you did not add any companion to the active party except Dorian then Varric and Cassandra will be automatically added. Alexius reveals that his motive in all this is to cure his son, as the Elder One promised it could be done. Only Solas, Iron Bull and Sera have approval changes for the conversation.
Alexius: Fiona, you would not have turned your followers over to my care if you did not trust me with their lives.
- Perhaps we should include her. - Solas Slightly Approves
- Because you simply ooze trust. - Iron Bull Slightly Approves
- Let's get to business.
- Perhaps we should include her. -
Alexius: The Inquisition needs mages to close the Breach, and I have them. So, what shall you offer in exchange?
- We have connections. - Sera Slightly Disapproves
- Nothing. - Sera Slightly Approves
- I know you want me dead. - Sera Slightly Approves
- Let's talk about time magic.
- Tell me about the Venatori.
- We have connections. -
Alexius: Felix, what have you done?
- He's concerned about you. - Solas Slightly Approves
- Your trap has already failed. - Iron Bull Slightly Approves
- Why are you really here?
- He's concerned about you. -
Alexius: You're nothing but a mistake.
- What was supposed to happen? - Solas Slightly Approves
- What is the mark? - Solas Slightly Approves
- Who killed the Divine?
- What was supposed to happen? -
Alexius: The Elder One has power you would not believe. He will raise the Imperium from its own ashes.
- Who is the Elder One? - Solas Slightly Approves
- You're a fanatic. - Iron Bull Slightly Approves
- What kind of power?
- Who is the Elder One? -
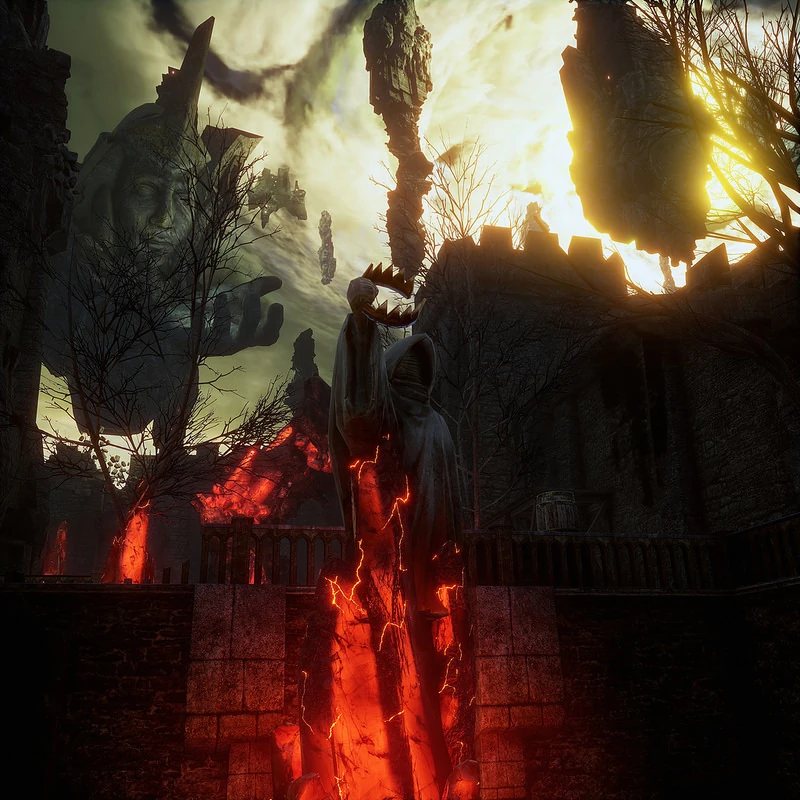
In the end, Alexius uses an amulet to create what appears to be a rift. Dorian attempts to counter the magic, chaos ensues and the scene blacks out.
The Inquisitor and Dorian wind up in a jail cell, which surprises a couple of guards, who will then attack. NOTE: this is the first time the player has control of Dorian, so as soon as the battle starts, open the character record and put points into his abilities and adjust his tactics and behaviors.
A scene begins immediately upon the guards' defeat. Dorian surmises that the rift not only moved them to a different location within the castle, but a different time. Investigate through dialogue to learn more.
Find out what happened
Upon regaining control, loot the Prison Key that one of the guards will have dropped. Move ahead and up some stairs to a dead end. The stairs to the left lead to a dead end with some loot. Also, Dorian will make a comment on the state of the castle. Return to the intersection and take the other set of stairs. Eventually a larger room will be reached and Lysas will be in the first cell on the right. Approach him for a brief interaction.
Moving on, The Inquisitor and Dorian will end up in a large cavern of sorts. A couple of zealots are blocking the way north and south, and there is a drawbridge to the west that is raised, for the moment. The remaining members of the party can be found in prison cells to the north. Which cell they will be in, depends on the party member.
Head north, down the stairs...
- The first set of cells is through the door on the right.
- Varric will be in the first cell on the right, humming to himself.
- Iron Bull will be in the second cell on the left, singing the "Bottles of beer on the wall" song.
- The second set of cells is down the next flight of stairs and through the door on the right.
- Cassandra will be in the first cell on the right, reciting the Chant of Light.
- Vivienne will be in the first cell on the left.
- Solas will be in the second cell on the right.
- The final set of cells is down yet another flight of stairs.
- Blackwall will be in the first cell.
- Sera will be in the second cell, trying to remember how a song goes.
The first party member rescued will inform The Inquisitor that the Elder One is the real threat, not Alexius. They will also explain that the Empress of Orlais was assassinated and the Elder One has a demon army at his disposal.
The second party member rescued will say that they overheard the guards saying that Alexius never leaves the throne room.
Exit the cells and head down the southern path. At the end, the party will find Fiona in a cell and a scene begins. She reveals that they are now in Harvestmere 9:42 Dragon, a full year into the future. She also mentions that Leliana is somewhere in the castle.
Find Leliana
Head back upstairs, and the sound of the drawbridge lowering will be heard. A group of Venatori will be guarding the newly opened path. There is a supply cache just past them, so don't be afraid to use potions if necessary. In fact, there are several supply caches throughout the castle, so don't feel the need to hoard supplies. Head up the stairs to reach the Guard Barracks where you can find the aforementioned supply cache and A Prayer to the New God in addition to various items of loot. There is a locked door to the right. Of particular interest is A Guard's Journal in the left room, which gives some indication of Alexius' paranoia and what life is currently like in Ferelden.
When ready, proceed up the next set of stairs to the Torture Chambers. At the top of the next set of stairs, the party will hear a torturer plying his trade on a victim. The victim's death is scripted, so she cannot be saved. The torturer is named Hanley and is an Elite rank spellbinder so expect a tougher battle. He always drops a ![]() Bianca Arms II and the unique dagger
Bianca Arms II and the unique dagger ![]() Bleeder of Souls, a fantastic upgrade for any dual-wielder.
Bleeder of Souls, a fantastic upgrade for any dual-wielder.
Continue down the corridor and as you approach the door on the left another torturer will be heard working on Leliana. Open the door to begin a scene.
Find a way back to Alexius' throne room
Pick up the Prison Key by the dead torturer. Proceed and you'll emerge in the drawbridge room, except much higher up. Enter the next door and the mark will begin to glow, indicating a fade rift is up ahead. After closing the rift, turn the gear to raise the gate and proceed up the stairs to the Docks.
Move ahead quickly to witness a couple of mages sacrifice themselves for the Elder One, and two lesser shades will spawn in their place. There is another supply cache nearby. Move up more stairs to emerge in the Courtyard.
After taking in the scenery, proceed up one of the sets of stairs and another fade rift appears. Remember that a mage can use Dispel to prevent any demon from spawning, which certainly helps on higher difficulties. If you have a rogue in your party and don't want to fight at all, you can use stealth, command your followers to disengage and just run through the courtyard. The enemies won't follow you into the castle.
Another rift will be encountered just past the first.
The party will finally enter another part of the castle, the Upper Royal Wing. Upon entering a corridor, enter the first door on the right. Connor may be here in front of the fireplace, but he will commit suicide to avoid becoming an abomination. A Spellbinder's Journal can be found on a desk here. The journal gives further insight into Alexius' paranoia and behavior. Alexius' Journal can be found on a desk directly across the corridor, and it hints at what exactly is wrong with Felix. The party will come to a larger room which contains another supply cache. The pyramid shaped loot box contains the Circle of Magi banner. Proceed down the stairs to the Lower Royal Wing.
The radar will indicate many enemies in the next room, but it's not as bad as it seems. There is a spellbinder and two marksmen inside, as well as a few demons. The demons will attack the marksmen, but won't attack the spellbinder. The marksmen will likely take out 1-2 demons, but will ultimately succumb to them. On the radar, the demons will take up positions in the room once the marksmen are dead. This is the party's cue to move in. A second wave of demons spawns from the fade rift.
Once all the fighting is done, locate the loot that the spellbinder dropped, as it will contain a red lyrium shard. Approach the shard door to the throne room and the party is denied access, for the time being. Dorian comments and now four more of these will need to be found.
Locate red lyrium shards
The shards are all being held by spellbinders (one of which has already been wiped out), and the quest markers indicate where they are on the map. There is no proper path to take here, but the following is efficient enough.
Spellbinder 2
The second spellbinder is on the current level, in a room off the NW corner. As the party approaches the room, one of them will remark that the Venatori are too busy praying to be guarding the room. Indeed, all the enemies are facing away from the entrance, allowing the party to get the jump on them. The spellbinder is up a small landing, almost in the middle of the room. He is flanked by two marksmen, and two gladiators guard the entrance. Immediately upon entering the room, there is a ladder that leads to some scaffolding on the right. A stealthed rogue archer can get off a sneak attack on the spellbinder from here.
Spellbinder 3
Head back to the main hall and proceed directly across to the other side but don't enter the door. Instead turn right and enter the next door on the left. Another supply cache is here. Head upstairs to the Upper Royal Wing and enter the open archway into a corridor. The spellbinder is in the first room on the right, which is a dilapidated library. Upon entering the room turn right and then left and he will be at the end of the walkway. Half a dozen zealots litter the lower area, and there are no marksmen. They're positioned quite a bit away, so the spellbinder could be sneak attacked into oblivion before his help arrives. If not, try to position party members at the top of one set of stairs and use them as a choke point.
Spellbinder 4
Proceed down the long corridor to the next room. Upon entering, there will be some stone blocking the Venatori from immediately noticing the party, and a party member will mention this. Immediately to the right is a ladder leading to more scaffolding. The spellbinder is behind a desk adjacent to the eastern wall. He is accompanied by two marksmen and three zealots.
Spellbinder 5
Both of the other doors in the room will lead to the final spellbinder. The SW door leads to a room with a supply cache, and to a locked door which leads into another corridor. In this corridor you'll face three more doors, and the one on the right is locked. There's no trickery here, as the spellbinder is by himself in the middle room. However, bashing one of the walls to get to him will alert him immediately. So, if a rogue sneak attack is in order, then it is best to just enter through the door directly to his room. A note, Studies on the Blight, can be found on the desk in the spellbinder's room. It describes what Leliana has been subjected to over the past year.
Confront Alexius in his throne room
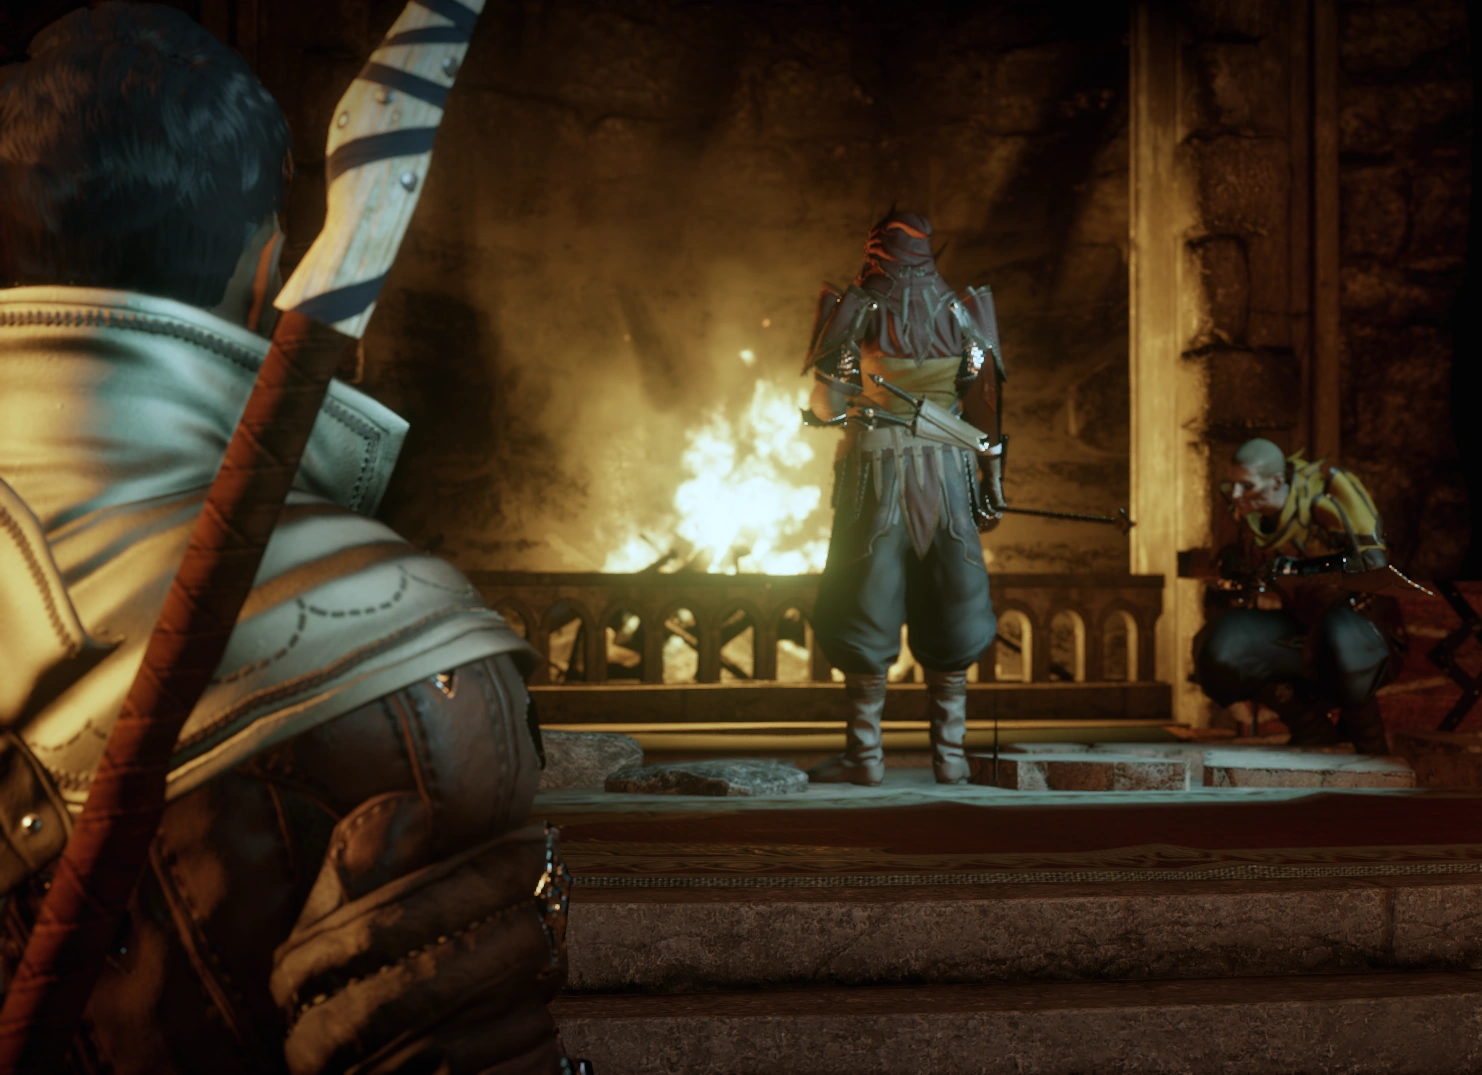
Proceed down the corridor and there will be a door on either side. A Masterwork Wave Blade schematic can be found on a table in the room on the left. Proceed down the stairs to find yet another supply cache. Enter the main hall and interact with the large door to begin a scene. Regardless of dialogue choices, the party will be forced into battle with Alexius.
Defeat Alexius
Alexius is a mage, level 6-8 with 16000 HP minimum (Nightmare, level 7: 25134 HP). He is immune to all disabling effects (asleep, frozen, paralyzed and stunned) and is Perceptive. However, he is NOT immune to physical effects so he can be panicked, chilled, shocked and knocked down. Keeping him knocked down seems to be the easiest way to victory, so skills like Explosive Shot, Payback Strike, Mighty Blow, and Twin Fangs to his back will be very useful. His glyphs inflict a large amount of spirit damage and slowdown status. His Mind Blast inflicts spirit damage and has a knockdown effect. He will also occasionally cast Barrier on himself.
After he loses about 1/3 of his health, he'll create a fade rift, and move behind an impenetrable shield by the throne. He will do this again when he loses about 2/3 of his health. The temporal distortions will be present at random spots for both rifts, and the rifts only spawn one wave of demons, unleashing Wraiths, Terror demons and Shades. The shield he hides behind will dissipate immediately after a rift is closed. Be sure to grab any rift droppings for loot before the final segment or they will be lost when the cutscene occurs.
The ![]() Staff of Stasis and a
Staff of Stasis and a ![]() Cooldown Amulet are acquired after the battle, and a scene begins.
Cooldown Amulet are acquired after the battle, and a scene begins.
The Inquisitor will need to decide how to receive the rebel mages' aid. Unless otherwise noted, the following approval changes take place regardless of whether the companions below are in your party when you decide except for companions which have not yet been recruited. Also note the points added toward candidates up for Divine election.
Fiona: It seems we have little choice but to accept whatever you offer.
- You're our allies. (Offer the rebel mages a full alliance.)
- Solas Greatly Approves
- Blackwall Approves
- Varric Approves/Disapproves (only if he's in the active party. Approves if Hawke sided with mages in Dragon Age II, Disapproves if Hawke sided with templars)
- Iron Bull Disapproves
- Cassandra Greatly Disapproves
- Sera Greatly Disapproves
- Cole Greatly Approves (occurs even though he is not yet recruited. Not stated in-game)
- Dorian Greatly Approves (occurs even though he is not yet recruited. Not stated in-game)
- Points awarded to candidates for the next Divine: Leliana +10, Cassandra -5, Vivienne -10
- You're our prisoners. (Conscript the rebel mages into the service of the Inquisition.)
- Sera Greatly Approves
- Iron Bull Greatly Approves
- Cassandra Approves
- Varric Approves/Disapproves (only if he's in the active party. Disapproves if Hawke sided with mages in Dragon Age II, Approves if Hawke sided with templars)
- Blackwall Disapproves
- Solas Greatly Disapproves
- Cole Greatly Disapproves (occurs even though he is not yet recruited. Not stated in-game)
- Dorian Greatly Disapproves (occurs even though he is not yet recruited. Not stated in-game)
- Points awarded to candidates for the next Divine: Leliana -10, Cassandra +1, Vivienne +10
Note that during the scene there is no approval change indicated for Vivienne for either decision, even if she was brought for the quest. Her approval change doesn't occur until the next time The Inquisitor speaks to her in Haven:
- Vivienne Greatly Disapproves if the mages are made allies
- Vivienne Greatly Approves if the mages are conscripted
See her approval page for more information.
Back in Haven
If the Underworld Knowledge Perk is active, an additional dialog option will be available in the conversation regarding acquiring 'additional' lyrium. The Inquisitor can then choose to recruit Dorian permanently. Praising that Blackwall was heroic after bringing him to Redcliffe Castle yields ![]() Blackwall Approves
Blackwall Approves
The quest ends as preparations to seal the Breach are now underway.
Rewards
Closing the Fade rift outside Redcliffe Village yields
- 177 XP
- 80 Influence
- 1 Power
Closing the Fade rift in the Redcliffe chantry yields
- 177 XP
- 80 Influence
- 1 Power
Completing the quest yields
- 2,658 XP
- 1,600 Influence
- 3 Power
Results
- The Mages are recruited to help seal the Breach, and are saved from their fate as Venatori conscripts
- The Templars are left to their fate
- (Optional) Dorian joins the Inquisition
- The war table operation Answer a Request from Hasmal becomes available
- The war table operation The University of Orlais or Grand Cleric Iona become available depending on the outcome of The Chantry Remains
- The war table operation Investigate Therinfal Redoubt can become available after speaking to Krem.
Notes
Any codex entries from Therinfal Redoubt (only accessible by siding with the templars in Champions of the Just) will be available for purchase from Willvan in Val Royeaux with the completion of the quest.
Notable Items
Loot
- Bianca Arms II - dropped by Hanley
- Bleeder of Souls - dropped by Hanley
- Circle of Magi Banner - from a box in the Upper Royal Wing
- Masterwork Wave Blade Schematic - in a room in the Upper Royal Wing (east side)
- Staff of Stasis - after Alexius is defeated
Codex entries
![]() Codex entry: Magister Gereon Alexius
Codex entry: Magister Gereon Alexius
![]() Codex entry: Dorian Pavus
Codex entry: Dorian Pavus
![]() Codex entry: The Venatori
Codex entry: The Venatori
![]() Spellbinder's Journal
Spellbinder's Journal
![]() Alexius's Journal
Alexius's Journal
![]() Studies on the Blight
Studies on the Blight
![]() A Guard's Journal
A Guard's Journal
Trivia
- Most of the quest names in the main plot refer to specific verses of Chant of Light. "In hushed whispers" is from the Canticle of Threnodies 5:11.
- This quest was written by Mary Kirby. [1]
- The unknown male who is sacrificed upon entering the docks refers to the female as Linnea, the mage you can talk to in The Gull and Lantern who was in favor of allying with Tevinter. In the glimpse of the two mages that is available, the unknown mage appears to resemble Talwyn, who is also available for conversation in The Gull & Lantern.
- The mission was shown in the beta display of the game. One of the differences between the beta version and the released game was Leliana looked the same in appearance in the beta version, while Leliana had a more skeletal appearance from a year of abuse and malnourishment.
Bugs
- If you fall off the edge in the area with the drawbridges you will be revived, but it is possible that when you revive you will be on the very edge and fall off again. This will continue infinitely, and the only solution is to reload a previous save. If the player is in control of a character that falls, the game will go into an endless, unbreakable loop of falling, dying, reviving and falling again. The only solution is to shut down or terminate the game, opening the game again and reloading a save game.
- It's possible that after saving Leliana, the door to the next level cannot be interacted with, so no further progress in the quest can be made. The only solution is to reload the game to a point before the quest started.
- It is possible that if you ride your horse through the gate after defeating the Rift outside of them, that you will be unable to advance the quest. You will be stuck in an infinite loop of saving/loading, and be unable to continue.
- The rift in the Lower Royal Wing in front of the lyrium door drops a typical rift loot sack, but it is beneath the terrain and cannot be interacted with using the mouse. Use your Interact key to open and loot it.
- Connor may not be visible at all when the room in the future he is in is entered.