Here Lies the Abyss is a main quest in Dragon Age: Inquisition. The quest plays out across several locations in Thedas.
Note: Two decision points occur at the end of the quest which have major repercussions.
Varric has a friend named Hawke who fought Corypheus before and who now fears Grey Wardens are under his influence. Hawke has a friend in the Grey Wardens who has been investigating the ancient magister.
Acquisition
This quest is received immediately upon the Inquisition taking up residence in Skyhold. After the coronation, Varric will mention a contact of his who may be able to aid the Inquisitor in thwarting The Elder One's next moves.
Walkthrough
The quest begins when Varric mentions that he has a friend who may be able to aid the Inquisition in its mission to put an end to the machinations of Corypheus. The Inquisitor must venture to the battlements of the fortress and there discovers Varric's friend is none other than Hawke, the former Champion of Kirkwall. As the only other person to have faced the ancient magister--and having thought him dead--Hawke provides the Inquisitor with vital information in the form of a Warden ally who has more information on the nature of Corypheus and what he intends to do. Hawke and the Warden ally worked together to investigate potential corruption in the Grey Warden order and its connection to Corypheus. The quest to locate this ally appears on the War table under the scouting mission Find the Warden in Ferelden, leading to Crestwood.
Crestwood
The Inquisitor must then travel to Crestwood, a village besieged by the undead. Hawke's Grey Warden ally is located in an old smuggler's den on the outskirts of town, near Three Trout Pond camp that can be established. The Inquisitor's party will have to battle through small bands of undead as well as some templars before reaching the location. A group of two Grey Wardens are located in the village and they make mention that they have been tasked with apprehending the Warden ally, now a renegade from the Grey Warden order.
Note: Depending on the player's decisions in Dragon Age: Origins, the Warden ally will be either Stroud, Alistair, or Loghain Mac Tir.
In the smuggler's den, the Inquisitor encounters the Warden ally, who reacts violently at the presence of a stranger. The Warden ally informs the party that the situation is dire: all Wardens have been summoned to Orlais by Warden-Commander Clarel in one last desperate attempt to end all Blights forever. This is because all Wardens in Orlais have simultaneously begun to hear what they believe to be the call of the Archdemon, the precursor to The Calling. Thinking all Wardens will die, Clarel suggested a drastic strategy of using blood magic and demons to make a final stand in the Deep Roads and end Blights forever, before no Wardens are left. The Warden ally too is experiencing this call, and it is implied Blackwall is as well. The ally loudly protested Clarel's course of action and was declared a traitor to the order for speaking out against her. The Warden is now an exile hunted by his former Brothers and Sisters to be captured and possibly killed. The Warden ally, through their investigation, has come to believe that the call is being produced not by an Archdemon, but by Corypheus, in order to command the Wardens.
Note: Blackwall will have special dialogue options with the Warden ally if a member of the party.
The Warden ally says that all Wardens have gathered at a Tevinter ritual tower in the Western approach and asks the Inquisitor's aid in investigating.
Note: Before the Inquisitor can enter the Western Approach they must acquire eight more Power. Until the party is able to travel, the Warden ally will remain at Skyhold, located on the battlements.
Once enough Power has been accumulated, the war table can be accessed for the Investigate the Western Approach operation. Scouts will confirm Wardens massing in the location and it can now be traveled to.
The Western Approach
At the Western Approach the Inquisitor will be able to journey to the ritual tower, encountering a Fade rift near the Lost Spring Canyon camp.
At the tower Hawke and the Warden ally are already present and fear that the Wardens have already begun their blood magic ritual. This proves true as the party discovers Grey Warden being sacrificed in order to bind demons to Grey Warden mages. The ritual is under the command of Tevinter mage, Magister Livius Erimond. It is revealed that the Wardens willingly sacrificed themselves and allowed themselves to be bound to demons in order to wage a war upon darkspawn in the Deep Roads--and beyond that to slay the last remaining Old Gods as they sleep in order to end all Blights. Erimond claims the Wardens are now enslaved to Corypheus and that this was part of his plan to raise a demon army to terrorize Thedas. Erimond also reveals the nature of the Inquisitor's mark, the Anchor: it allows the Inquisitor to pass safely back and forth through The Veil.
Erimond attacks the Inquisitor and is attacked in return. He flees, calling upon the enslaved Wardens and their demons to attack.
Afterward it is noticed that Erimond fled to Adamant Fortress, an abandoned Grey Warden fortress. Hawke and the Warden ally agree to scout ahead and confirm the Warden presence before returning to Skyhold.
Note: Twenty Power will be required to enter Adamant Fortress. On the war table the operation Here Lies the Abyss must be selected.
Adamant Fortress
Note: If Blackwall has not been recruited prior to this point, he cannot be recruited.
Upon entering Adamant the Inquisitor is faced with a massive battle. The Inquisition's forces assault the fortress and batter their way inside. The Inquisitor and their companions enter the fray.
Lower Bailey
The party encounters Shades and a Warden spellbinder. When battle has finished Cullen will announce that the resistance along the walls is preventing the Inquisition from moving forward. The battlements must be cleared. The Inquisitor must head east.
A senior Warden and other Wardens will be engaged here, including archers. Shades will mass on the bridge and must be eliminated in order to progress. Open the door heading west.
Main Bailey
The Inquisitor encounters some resistance to the enslaved Wardens by other Wardens. A Warden spellbinder and shades will attack. After the battle the remaining Wardens can be told to surrender or fall back to safety. If they fall back they will not initiate further conflicts with enemies. Head through the door to the south.
Shades and a Warden archer must be defeated before the stairs can be used to reach the battlements.
Battlements
The Inquisitor must fight past demons and Wardens to reach three siege points, which will allow Inquisition soldiers to gain ground in the fortress (clearing the siege points is not mandatory but results in experience, 150 Influence and two Power). The first siege point is guarded by a Rage demon.
The second siege point is guarded by Warden spellbinders and a Pride demon. Hawke will assist in this fight and afterward can be directed to fight with the party or stay to secure the battlements. Heading south leads to the last siege point.
The last siege point contains several shades and a pride demon.
Afterward, return to the stairs and open three doors ahead, heading west, to enter the main bailey. In the bailey are shades and a rage demon.
Main Courtyard
In the main courtyard Erimond is revealed at last. He is presiding over Clarel's sacrifice to bind a demon to her. She is unaware that he is a Venatori serving Corypheus and asks that he summon a demon to bind to her. This can be interrupted, either by Blackwall, who will convince the Warden warriors to join the Inquisitor, or by the Warden warriors from the main bailey, if they were spared.
Erimond outplays the Inquisitor by summoning Corypheus's dragon to attack. Clarel realizes that she has been betrayed and turns to attack Erimond. She urges her Wardens to assist the Inquisition and pursues Erimond. Nevertheless, a pride demon and Warden spellbinders will attack, as they are enslaved by Corypheus, but the Warden warriors will stand with the Inquisitor. After the battle, head west along the battlements. Demons will be encountered along the way.
Clarel and Erimond are discovered engaged in a duel. Clarel nearly succeeds in slaying Erimond before the dragon attacks, mauling her. Near death, she enacts one last attack to destroy both herself and the dragon. The force of her spell shatters the walkway and all plummet. The Inquisitor and party are saved when the Inquisitor opens a rift and all fall through.
The Fade
The Inquisitor, their party, the Warden ally, and Hawke are trapped physically in the Fade and must now escape. Climbing nearby stairs, the party encounters what appears to be the spirit of Divine Justinia V. It is unclear if the vision is the Divine or a spirit, but the entity knows the truth of the events at the Temple of Sacred Ashes. Slaying demons will help to restore the Inquisitor's memories.
Wraiths will appear that must be defeated, each one releasing a green memory that must be collected, four in total. When all are collected the truth at the Temple is revealed: The Inquisitor interrupted Corypheus's ritual in an effort to save the Divine and touched the mysterious orb in the process. The Anchor was the result of this contact. Most shocking of all, it is revealed that Grey Wardens were collaborating with Corypheus in the ritual.
Following the revelations, more wraiths appear. A table can be interacted with to initiate the optional side quest Fears of the Dreamers, in which each of the Inquisitor's companions must face a fears and make peace with it by solving five riddles. A candle east of the table can be retrieved to be placed on the table. The chair nearby can now be interacted with to gain a magic point.
Shades and wraiths will appear on the path to the first Eluvian in the east. This one will boost magic. Next return to the area where the Divine appeared and descend the stairs, being wary of shades. It leads to a clearing where the Nightmare will begin to taunt the party. A group of wraiths and shades appear. In this area the second Fears of the Dreamers riddle can be solved. A point of constitution can be gained by placing the flowers near the skeleton in the south in the vase to the north. The Eluvian here will also give a dexterity boost.
Next the party will face attack by giant spiders called Fearlings. They have names that may indicate the Inquisitor's own fears or more fears of the companions.
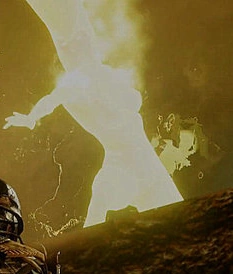
Divine Justinia V, the woman in the Breach.
After the battle the party will encounter the Divine again. She can be questioned further, and needs the Inquisitor to battle more demons to recover more memories. There is a supply chest nearby to restock potions. Wraiths can be battled for further memories, which reveal greater information: It was in fact the Divine and not Andraste who appeared in the Breach. She died as the Inquisitor escaped, slain by demons to make certain the Inquisitor could flee. Therefore, the entity is not the Divine put a benevolent spirit that has taken on her form. Hawke and the Warden ally get into a heated argument about the Warden's culpability in the Divine's death, to which the Inquisitor can agree with either or urge them to put the argument aside for now, as more fearlings appear.
The third Fears of the Dreamers riddle can be completed next by placing the tarot card next to the skeleton in the cauldron in the west. This earns one point of strength.
Next battle more fearlings and a Terror demon. Then examine the Eluvian for a Willpower boost. Conquering the fearlings here allows the spirit to open a barrier to access a clearing. Climbing stairs to the north will face the team with two pride demons. After the fight, search for a stuffed animal to answer the fourth riddle by placing it on the bed to the east. This earns one willpower point.
Descending the steps to a lower area leads to the final riddle and a few demons to fight. In the graveyard to the east each tombstone is engraved with the name of a companion and their fear; searching the stone in the center reveals a vial of darkspawn blood. Take the vial back to the table and earn one point in cunning.
The horrors nearby can be defeated to gain access to the Eluvian. Examining it will grant a strength boost.
Next, fight more fearlings, as well as shades, wraiths and Despair demons. To the north will appear a pride demon. Defeating the demons allows the spirit to open a new barrier to reveal a rift at the end of a cave. If Fears of the Dreamers was completed the reward will be here. A supply cache is here as well.
Nightmare's Lair
The rift ahead leads back to the real world lies ahead at the cave's exit, but it is blocked by a massive spider-like demon. The spirit sacrifices herself to vanquish the demon, asking the Inquisitor to give a farewell message to Leliana before doing so. With the demon temporarily departed, the Aspect of the Nightmare must be fought, a Fear demon. The demon has several fearlings and uses barriers to protect itself. It is resistant to spirit damage but all other spells and status effects can be used. Fearlings and wraiths will appear as the battle rages on and the demon will use barriers frequently.
When the demon is defeated the spider demon reappears, blocking the party's escape. A pivotal decision will have to be made. One of the Inquisitor's allies, either the Warden ally or Hawke, must remain behind in the Fade to fight the massive spider, buying time for escape. Note: Whomever is chosen will likely die.
If Hawke is chosen: Hawke will demand to remain behind to fight the creature as Hawke feels Corypheus is their responsibility and the Warden ally must remain to restore the Grey Warden order. When charging the creature, Hawke will say farewell to Varric and also apologize to their love interest.
If the Warden ally is chosen: The Warden ally, after the revelations about the Warden involvement in the Divine's death, will demand to remain behind to fight the creature. Choosing the Warden ally to sacrifice themself may have impact upon the next pivotal decision made.
Adamant Fortress
Upon returning to the fortress from the Fade, the Inquisitor closes the Fade rift that was opened and destroys the remaining demon--as well as Erimond's hope at creating a demon army. Then the Inquisitor will reveal that one of the companions sacrificed themself to save the rest.
The knowledge of the vulnerability of Grey Wardens to the power of Corypheus, and their culpability in the death of the Divine, makes their presence in Orlais contentious. The Inquisitor must make a decision on the fate of the Wardens in Orlais: whether to exile them from Orlais due to their potential for corruption, or to allow them to remain and fight for the Inquisition. At this time the Warden ally, if alive, is the only remaining senior Warden in Orlais.
If the Wardens are exiled: The Grey Wardens will leave Orlais, thus leaving the Empire without any Warden presence.
If the Wardens join the Inquisition: The Grey Wardens will remain and rebuild their order, joining the forces at Skyhold.
Note: If the Wardens are exiled and Blackwall is in the party, he can be exiled as well.
Results
Related Quests
- Fears of the Dreamers
Bugs
- Upon reaching the Tevinter ritual tower, conversations may freeze and only unlock after a certain time has passed, or the player has somehow triggered the conversation to continue. Portions of conversation may be lost when this occurs.
Notes
- If Alistair was romanced in Dragon Age: Origins and remained with The Hero of Ferelden, he will speak happily of his life with her. He will also reveal that the Hero is on a journey of her own, which prevented her from being present during this quest, to find a way to rescue herself and Alistair--and all Wardens possibly--from The Calling. This leads to a war table mission to send a message to the Hero.
Trivia
- Most of the quest names in the main plot refer to specific verses of Chant of Light. "Here lies the abyss" can be seen in the Canticle of Andraste 14:11.
- Depending on the identity of the Warden ally, Blackwall may comment that he knew and respected Duncan, the Ferelden Warden-Commander in Dragon Age: Origins.