| This page may benefit from additional or higher quality pictures. Help the wiki by uploading one. See here for help on how to do so. If you wish to discuss this, please do so at talk page or add an image and remove the {{pictures wanted}} tag.
|
Heart of the Many is a main quest in the Mark of the Assassin downloadable content for Dragon Age II.
Baiting a Wyvern
The quest begins with your arrival at Chateau Haine. You will meet Duke Prosper, the man who sent you the letter, and take part in a wyvern hunt and will need to kill a wyvern in order to complete it. This part of the quest is best explained in Baiting a Wyvern. You do not have to attract and kill an alpha wyvern to complete the quest, any wyvern will suffice. The minimum number of bait items needed appears to be 2.
After killing the wyvern, you will be attacked by a nobleman named Baron Arlange and his cronies. After the fight, you can choose to kill him, let him go, or let Duke Prosper (who turns up on the scene with his guards) decide. If you choose to kill Baron Arlange, the Duke will order his lackey to do it and you will later be able to loot Baron Arlange's Shield and Baron Arlange's Sword from the corpse. If you let Baron Arlange go, he may turn up and fight you again later in the quest. In that encounter, you will have no choice but to kill him anyway.
Note: Killing Baron Arlange results in the combat ceasing immediately and Duke Prosper appearing on the scene. It may be wise to kill all of Arlange's guards before killing him to maximise XP gain.
The Chateau Courtyard
A party is thrown for Hawke in celebration of his achievement in slaying the first wyvern of the season. Before the party, the four characters in your party will have a quick discussion, where Tallis mentions that she found an unguarded entrance into the Chateau. She says she is unable to pick the lock and Hawke therefore has to find the key. The 2 the non-Tallis companions will leave Hawke and will be unavailable for the rest of this section.
At the start of the party, Hawke is given the Wyvern Hunter's Belt by Duke Prosper. He then has to find a way to obtain the key, which involves a lot of running around the Chateau Courtyard.
Note: Leliana is standing among the guests in the Courtyard. She is probably the Chantry/Seeker Agent mentioned by Cassandra Pentaghast as she speaks to Varric Tethras in the cutscene at the start of the quest.
- The first person Hawke should talk to is one of the Guards. There are 3 guards standing around the Courtyard. Speaking to any of the guards will result in a cutscene where Tallis apparently seduces a guard behind a closed wooden door. When she emerges, she will report that the Guard had given his key to a servant.
- The Elven Servant is standing near the fountain, who offers some "'am that tastes of despair". A cutscene will initiate where Tallis speaks to the servant behind a closed door. When she emerges, she will report that the Servant had given the key to the Duke's son, Lord Cyril.
- When you speak to him, Lord Cyril will give you a caprice, used in the quest Wishing Well. This will then result in a cutscene where Tallis attempts to seduce Lord Cyril, but emerges reporting that she isn't Lord Cyril's type. Lord Cyril turns out to be bisexual and will ask for either male or female Hawke. Hawke then has 3 options:
- 'But not you?' (romantic option). Hawke then kisses Lord Cyril, at the same time picking his pocket and obtaining the key.
- 'No Comment.' Lord Cyril asks Hawke to get him a drink, which can be obtained from the table near the Quartermaster. Tallis will put something in the wine and when Lord Cyril drinks it, he passes out and Hawke takes the key from him.
- 'Nap time.' (violent option) Hawke knocks out Lord Cyril and takes the key while he is unconscious.
Head to the locked door on the northern side of the Courtyard and enter. It leads to a narrow passageway, at the end of which Hawke and Tallis are surprised by a guard in a cutscene. Tallis kills the guard, after which Hawke has the option to choose whether to try and sneak through the Chateau ('I agree') or fight through it ('I prefer a more direct approach'). Fighting through the Chateau is simpler and gives more XP, but sneaking through the Chateau is needed for the Blackjack Subtle achievement.
After making your choice, Tallis and Hawke enter the Chateau.
Chateau Haine
There are 2 paths to complete this segment of the quest, the Sneaky Approach or the Direct Approach.
Direct Approach
If Hawke chooses to take the direct approach, he and Tallis will have to fight through Chateau Haine.
When Hawke enters the Chateau, follow the path into a small room, where can be found Codex entry: The Wine of Chateau Haine. The first fight with the guards occurs there and the adjacent corridor. Continue along the corridor, and just before you reach the end there will be a kitchen along the north wall. This is where the quest Hard to Stomach can be completed for 210 XP. Opposite the kitchen is a locked door (simple) which can be picked for 50 XP.
Continue on heading west and up the staircase. At the end of the staircase is a door that leads to an open-air courtyard, where you will fight the second group of guards, including an Orlesian Assassin, for 731 XP. After the fight, loot a key from one of the bodies and proceed to the locked door at the other end of the courtyard. Move through the corridor to the room at the end, where you will find Codex entry: Uncertainty and (if Aveline had been brought along) the Romantic Poem). Leave the room through the door at the other end of the room.
The path opens up to a balcony overlooking the dining hall. Head directly south along the balcony and kill the 3 guards there for 401 XP in the corridor surrounding a central room. The central room's door is locked by a Complex Lock worth 151 XP and reveals a chest with some junk items. Proceed further south and you will encounter a balcony overlooking a room with many guards standing at parade. Go back to the door you entered the first balcony from and proceed west this time to the next door. Along the way, in an aclove to the side of the balcony, you can examine a statue for Codex entry: Bust of the Outlaw Bearded Beast.
Going through the door brings you through another small balcony where a servant is getting scolded for having dropped a pie. Proceed along the corridor till you enter a room with Codex entry: A Library of Distinction in the bookcases along the western wall. The 4th encouner with the guards occurs here for 441 XP. In the next room, 3 portraits can be examined for Codex entry: Lady Amandine du Val, Codex entry: Portrait of the Dowager and Codex entry: Pride and Rider. Leaving the room through the door on the western wall results in another fight with a group of guards, including a Mage and Guard Captain, for 804 XP. Loot the Guard Captain's body for a key and proceed through the locked door to the Vault.
The Sneaky Approach
Note: This section is a work in progress. Please refrain from adding to it for awhile
The Vault Door
Regardless of which method you chose to move through Chateau Haine, the same strategy is used for this section.
When you enter the vault and as you approach the door at the end, bars drop from the ceiling and seal Tallis and Hawke in a kind of prison. Tallis and Hawke have to stand on switches on the ground to raise specific gates so they can reach the final door.
- Step on the first obvious 2 switches to raise the gates leading up the side staircases.
- Have Tallis climb 1 staircase and Hawke climb the other. Stand on the switches there and the next gates will open. Have Hawke and Tallis move forward and stand on their respective switches again to open the gate to the end of the balcony corridors.
- Have Hawke and Tallis knock down the statutes there to activate the next switch and send them back to the ground floor. Note that the original gate (opened by the ground floor switches) will now be closed, but are openable through the second set of switches and so Tallis/Hawke will have to move quickly to return to the ground floor.
- Have Hawke and Tallis step on the original switches once again. This opens up the gates blocking the stairs and the ones immediately next to them. Have one of the characters stand on one of the newly-revealed switches and the other character ascend the neighbouring staircase to stand on the switch 'next' to the other character. Move both characters forward to allow the one on the ground floor to access the final chest. The original gate blocking the staircase will have fallen again, so have Hawke and Tallis stand on the first set of switches (the same as those at the start of this point) to raise the gate again. Repeat for the other side.
- Note: One or more quest items for the various companion quests will appear on top of the northern chest. A possible bug may occur where the quest items and the chest contents are unobtainable though a quest marker remains on them and the chest continues to glitter. The solution appears to be to unlock the final gates first, upon which the quest items and content of the chest becomes accessible.
- Finally, have Hawke and Tallis stand on the switches in front of the chests to open the final gate to the Vault Door.
Upon entering the Vault Door, a cutscene triggers where Hawke and Tallis enter an empty room and are ambushed by Duke Prospero, his lackey, and a lot of guards. Duke Prospero reveals that Tallis is an Assassin and, surprisingly, Qunari. No matter what Hawke says, Duke Prospero throws them into a dungeon.
The scene then changes to a further conversation between Cassandra and Varric, before moving on to the Dungeon.
The Dungeon 1
The Dungeon begins with a conversation between Hawke and Tallis, where Hawke is given the opportunity to question Tallis and (finally) discover the truth of Tallis' mission at Chateau Haine. Tallis reveals that she was one of the Ben-Hassrath, meaning literally 'Heart of the Many', an order who serves as defenders of Qunari faith and unity. She is there to prevent a Tal-Vashoth named Salit, who recruited her into the Ben-Hassrath, from selling Qunari secrets to Orlais. Though the Ariqun did not feel it worth intervening, Tallis decided to stop Salit of her own volition, knowing that Salit's betrayal will harm many people, not just Qunari. Hawke tells Tallis to wait for the other 2 companions to rescue them, but a cutscene shows that the companions had gotten lost, and eventually Tallis simply picks the lock and releases them from the prison herself. They meet up with the other 2 companions and agree to leave the Chateau, with Hawke suggesting they leave through the palace and Tallis offering another way out through underground tunnels.
Hawke now has a choice; he can:
- Directly ascend through the northern staircase to the vaults,
- Move through the dungeon first before ascending to the vaults through the southern staircase, or
- Move through the dungeon and go straight to the tunnels
Regardless of the choice Hawke makes, he will not be able to leave through the palace and will have to take the tunnel exit out.
Note: It is recommend that option (2) be taken for maximum XP and reward gain, as well as to obtain the achievement The Take. Taking option (3) will result in you not obtaining the achievement and missing out on a large amount of loot.
Hawke and companions begin in the northern arm of the dungeon. A staircase towards the east leads to the northern part of the Vault, inside a treasure room. Hawke has the option to release many other prisoners held in the Dungeons by picking (or having Tallis pick) the locks on their cells. The locks are all simple locks and give 50 XP each.
The room at the western end of the corridor holds a bunch of guards. They raise an alarm before they are killed, which results in another large fight in the southern arm of the dungeon, including a Harlequin. The eastern end of the southern arm has a staircase leading up to the southern part of the Vault.
If option (3) is chosen, please skip directly to The Dungeon 2.
The Vault
The vault contains 5 separate areas, which for the purposes of this guide are named:
- The Audience Room (in the south),
- The Puzzle Rooms, which consist of:
- The Northern Room,
- The Eastern Room, and
- The Western Room.
- The Central Room
If Hawke ascends by the Northern staircase, he appears in the Northern Room.
If Hawke ascends by the Southern staircase, he appears in the Audience Room.
Audience Room
As Hawke enters, he confronts Duke Prospero, XXX and a large company of guards in a cutscene. Duke Prospero then leaves, causing a metal gate to fall behind him and effectively barring Hawke's exit through the palace, and leaves XXX behind to deal with Hawke. XXX orders the guards to attack and runs off to release 'the beast'. The guards, including another Harlequin, then attack Hawke and party.
After defeating the party, move north through a door into a small corridor with a staircase leading down. Just beyond the door, if Aveline is present, lies a Time-Worn Book that begins the quest The Du Lac Sign.
The Puzzle Rooms
The 3 puzzle rooms all contribute towards unlocking the final rewards in the Central Room. The Northern Room and the Western Room contain similar 'seal' puzzles, while the Eastern room contains a logic-type puzzle.
The Northern and Western rooms contain door-opening puzzles. There are 3 elements in these puzzles: Apparatuses, Doors and Mixers.
- Apparatuses are devices which, when clicked on, results in a coloured 'seal' being activated by Hawke. Hawke may only bear 1 seal at a time and the active seal colour is shown as a floating device just above Hawke's head.
- Doors can only be opened when Hawke is bearing the colour of the seal identical to that of the Door.
- Mixers are devices that allow combination of 2 seal colours to form a new colour.
Some of the seals have standard meanings/effect:
- Blue seal: Rune Golem in this room
- Orange seal: Resets all other seals
- Non-primary coloured seal (non-Red, Blue or Yellow): Treasure Chamber
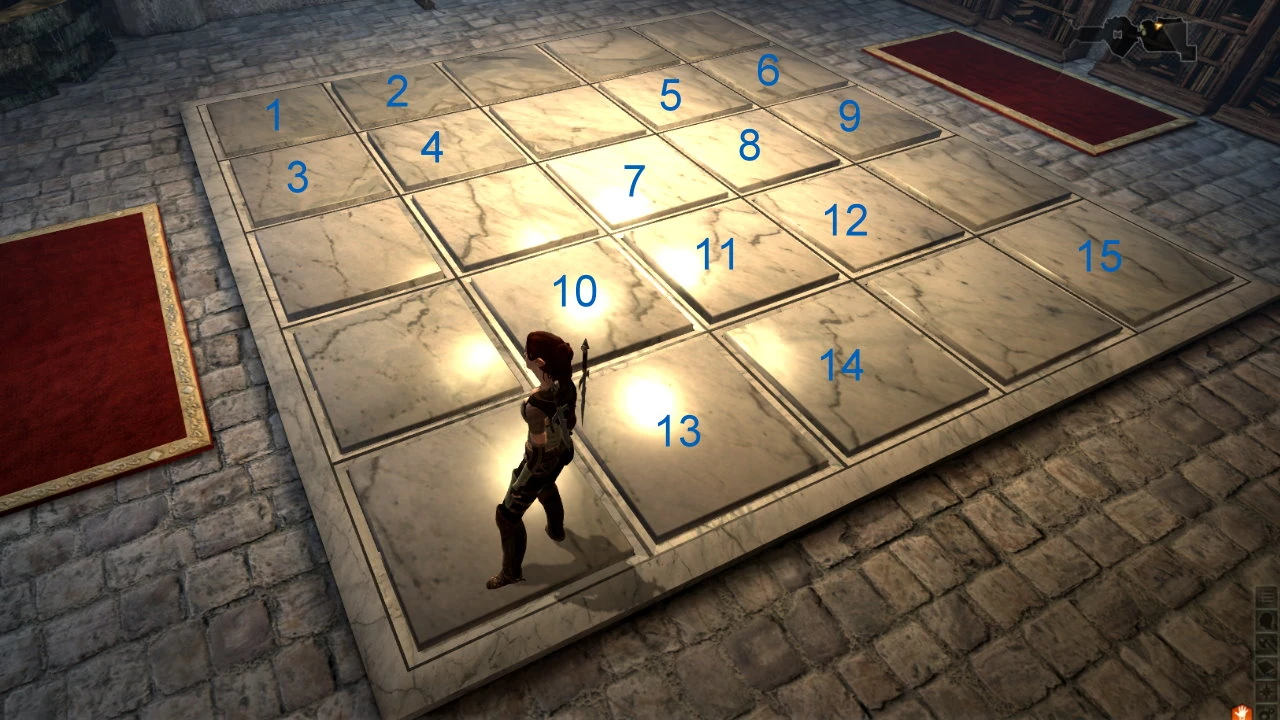
The Eastern room contains a 5x5 tileset on the floor and a lever. Flipping a tile will result in that tile, plus all 4 tiles directly adjacent to the sides of the selected tile to be flipped. The aim of the puzzle is to flip every tile so that the entire picture is revealed at the end. The lever acts as a reset.
Step-by-step guides to all 3 rooms are given below.
Completing each Room results in a painting being revealed, which shows the solution to the puzzle in the Central Room.
The Northern Room
Note: This is where Hawke first appears if he ascends from the dungeons by the northern staircase.
1. Collect Yellow Seal
2. Enter the Yellow Door
3. Place the Yellow Seal in Mixer
4. Collect White Seal
5. Open both White Doors
6. Collect Black Seal
7. Open Black Door
8. Collect Blue Sea
9. Place Blue Seal in Mixer (to make Green Seal)
10. Open Blue Door
11. Kill Rune Golem (Makes painting appear)
12. Collect Green Seal (from Mixer)
13. Open Green Door (gives about 9.5g and random loot from chests)
The Western Room
1. Collect Black Seal
2. Open both Black Doors
3. Collect White Seal
4. Open White Door
5. Collect Blue Seal
6. Place Blue Seal in Mixer
7. Open Blue Door
8. Kill Rune Golem (Makes painting appear)
9. Collect Red Seal
10. Place Red Seal in Mixer (to make Purple Seal)
11. Collect Purple Seal
12. Open Purple Door (gives about 1.5g and random loot from chests)
The Eastern Room
This puzzle's solution is remarkably simple. First, flip the leftmost 2 tiles in the top row (from any perspective). Next, start from the second row and flip any tile which has a blank tile directly above it. Continue down, row by row and moving always from left to right, and the puzzle will be solved in no time.
If confused by the above explanation, a graphical representation is below. Imagine each of the tiles bears a number:
The Puzzle Room
01 02 03 04 05
06 07 08 09 10
11 12 13 14 15
16 17 18 19 20
21 22 23 24 25
The order the tiles have to be flipped in is:
01, 02, 06, 07, 09, 10, 13, 14, 15, 17, 18, 19, 22, 23, 25.
Once the picture is fully revealed, the painting will appear.
The Central Room
The Central Room initially contains a large ring of fire. The puzzles in the Northern, Western and Eastern rooms must first be solved in order to get past the fire.
3 3x5 tiles lie around the Northern, Western and Eastern sides of the room. The tiles have to be flipped in a certain fashion in order to solve the puzzle. Solving each puzzle results in the central fire shrinking by 1 increment, and solving all 3 results in the fire disappearing entirely.
The puzzles in the Northern, Western and Eastern Rooms, once solved, unveil paintings of 3 rows of 5 men. Looking closely at each painting reveals that some of the men are masked while others aren't. The painting corresponds to the tilesets on the ground directly in front of the corresponding rooms, and the masked men represent the tiles that should be flipped face-up to solve the puzzle.
The solutions to each puzzle are show below (1 means face-up, 0 means face-down), from a perspective of Hawke looking over the tiles at the central fire:
North:
1 0 1 0 1
1 1 1 0 1
1 0 1 0 1
West:
0 1 0 1 0
0 1 1 1 0
0 1 0 1 0
East:
1 0 0 0 0
1 1 1 1 1
1 0 0 0 0
Clearing the first ring of flames gives you about 2.25g and either the Orlesian Lancer Boots (Warrior), Boots of the Messenger (Rogue) or Boots of Enchanter Illana (Mage).
Clearing the second ring of flames gives you about 3.5g and either the Orlesian Lancer Gloves (Warrior), Gloves of the Messenger (Rogue) or Gloves of Enchanter Illana (Mage).
Clearing the third and final ring of flames gives you about 6.5g and either the Orlesian Lancer Armor and Orlesian Lancer Helm (Warrior), Coat of the Messenger and Helm of the Messenger (Rogue), or Robes of Enchanter Illana and Headdress of Enchanter Illana (Mage), and grants you the The Take achievement.