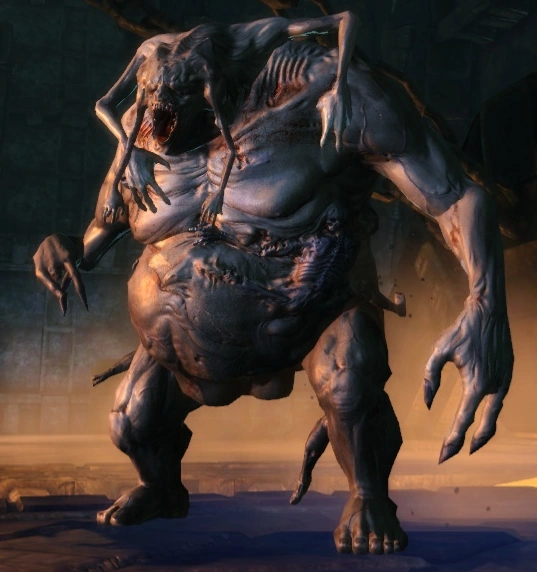
This page contains detailed tips on how to fight the Harvester, the final boss of Dragon Age: Origins – The Golems of Amgarrak.
Statistics[]
Phase One[]
| Level | Health | Stamina | Attack | Defense | Armor |
|---|---|---|---|---|---|
| 36 | 9690 | 735 | 177 | 128 | 8 |
| Physical | Mental | Fire | Cold | Shock | Nature | Spirit | |
|---|---|---|---|---|---|---|---|
| Resistance | 150 | 36 | 25 | 75 | 0 | 0 | 0 |
| Strength | Dexterity | Willpower | Magic | Cunning | Constitution |
|---|---|---|---|---|---|
| 141 | 103 | 67 | 17 | 22 | 123 |
Phase Two[]
| Level | Health | Stamina | Attack | Defense | Armor |
|---|---|---|---|---|---|
| 35 | 3885 | 425 | 134 | 111 | 4 |
| Physical | Mental | Fire | Cold | Shock | Nature | Spirit | |
|---|---|---|---|---|---|---|---|
| Resistance | 119-150 | 27-52 | 25 | 75-85 | 0-50 | 0-50 | 0-50 |
| Strength | Dexterity | Willpower | Magic | Cunning | Constitution |
|---|---|---|---|---|---|
| 103 | 76 | 51 | 15 | 18 | 90 |
- The Harvester is an Elite Boss in the first phase, and a normal boss in the second phase.
- During the second phase, the Harvester's resistances vary.
- The Harvester has no natural spell resistance.
- Both phases end when the Harvester is below 2.5% health - 242 for first phase, 97 for second phase.
Skills[]
Phase One[]
| Activated Range: Personal Activation: 0 Cooldown: 40s |
The Harvester detaches one of its many limbs, and strikes out in a broad arc in front of it. Targets are knocked down and take critical damage unless they pass a physical resistance check. Targets that pass a physical resistance check are knocked back and take normal damage. |
| Activated Range: Touch Activation: 0 Cooldown: 30s |
The Harvester's putrefying organs burst with a jet of corrosive bile, which inflicts massive nature damage on targets in the area of effect. |
| Activated Range: Medium Activation: 0 Cooldown: 30s |
The Harvester draws writhing entrails from its belly and hurls them outward, causing nature and physical damage on creatures within the area of effect, and knocking them down unless they pass a physical resistance check. The thrown entrails then transform into a walking corpse that attacks the Harvester's enemies. |
| Activated Range: Personal Activation: 0 Cooldown: 60s |
The Harvester gains an increase to attack speed and movement speed for a short time. |
| Activated Range: Personal Activation: 0 Cooldown: 30s |
The Harvester slams the ground, damaging creatures around it and knocking them down unless they pass a physical resistance check. |
Phase Two[]
| Activated Range: Medium Activation: 0 Cooldown: 0.5s |
The Harvester leaps to a target point. |
| Activated Range: Personal Activation: 0 Cooldown: 0s |
An aura of vile, pulsating magic surrounds the Harvester. Corpses within the area of effect rise to attack nearby foes. |
Preparation[]
Since release of The Golems of Amgarrak DLC, the Harvester is commonly known to be one of the most - if not the most - difficult fights in the Dragon Age series.
- Note: If the following preparation is not a viable option, but you still want to obtain The Reaper's Cudgel, see the "Decoy Tactics" below.
At higher difficulty levels, the source of your character will play a key role in determining your options for this final battle:
- Creating a new Level 20 character is the most challenging, since you will not benefit from the attribute, skill and ability points from Tomes and the Fade Essences, as well as not being able to import top-quality equipment, potions, poisons, recipes, runes, etc. This almost certainly constricts your class choice to Mage with Spirit Healer and Arcane Warrior specializations. However, it is entirely possible to defeat the Harvester using such a mage and only the items from Golems of Amgarrak on Hard difficulty, thus earning the Grim Reaper achievement.
- Importing from Origins probably produces enough of an edge to make Rogue a viable option, though threat management will be very challenging, and should the Runic Golem fall you will be without Revival options.
- Importing from Awakening makes a non-Mage choice much more solid, opening up the possibility of success with a near-invulnerable Warrior tank (who should have the full Spirit Warrior tree), or Rogue (who should have Legionnaire scout and Duelist) tank as well as further improving the odds for a Mage, who will have an abundance of ability points and top-tier equipment.
- An imported rogue with Twin Strikes + Low Blow + Unending Flurry and a full shadow tree is able to solo this fight, with a couple of stamina potions and health poultices.
- When importing a main character, don't forget to strip the rest of your party in order to import their gear as well. Also, if importing from Awakening, include a couple of Manuals of Focus in your inventory. They will carry over and allow you to set up the Dace brothers as you prefer (for example, turn Jerrik from a melee rogue to an archer or maximize Constitution for Brogan).
- An easy way to defeat the Harvester is to stack as many +% dodge effects on Brogan as possible. Cailan's set gives 20% dodge chance, the spellward 10%, the Partha shield another 5% and 3 evasion runes another 15%, making almost half of the Harvester's hits miss before defence comes into play.
If you wish to fight the Harvester on Hard or Nightmare, the following preparations are recommended:
- Threat management is central to success, regardless of other factors, and should play a key role in the choice of abilities/spells for your character, whatever their source or class.
- Tactics should be carefully reset for each party member before the battle, and disabling tactics entirely for the Runic Golem (manual control only) may be a good idea if you want to keep it alive. Alternatively, you can only disable the attacks that cause friendly fire.
- Jerrik's Bronto, Snug, will be useful (and easily revived as long as Jerrik doesn't fall) as a secondary threat manager to keep corpses off your other characters. His superior speed allows him to run around the room and avoid taking damage while Taunt cools down.
- If using Brogan and/or Jerrik for melee damage, keep their weapons coated with poison. As the skeletons are immune to nature damage, you may want to use fire or spirit damage, and have the golem turn on Flaming Weapons.
- The Runic Golem should be fully upgraded. Ensure you have fully completed Amgarrak's Secrets, otherwise you'll miss out on the XP for the final level-up of your party.
- Ranged attack can be highly effective, using the Accuracy talent. Even a single rogue with a good bow and most of their points in dexterity will make this battle easier. Pull threat with your main character while the rogue shoots the Harvester to death. In many scenarios it is possible to equip both Jerrik and Brogan with good bows and Accuracy, with which they will score regular critical hits of 100-120 and 80-100 (at Level 23), respectively, in both phases of the battle without drawing much threat (apart from proximity).
- If using an Arcane Warrior as the major tank, spells such as Death Cloud, the hexes and Walking Bomb all draw major threat, as well as being useful in their own right. Mind Blast is obligatory to clear the threat table should you get surrounded by skeletons. A mage imported from Awakening should also equip Hale runes to close a key vulnerability gap, particularly since many corpses favor Riposte to stun, which can be easily fatal if surrounded.
- Haste can be a bit of an investment if you're starting from scratch with a Level 20 Mage, but it can make fighting as an Arcane Warrior much easier, especially when Phase Two begins. With a Level 20 party, it's recommended to keep threat focused on the Warden and Brogan, while Jerrik fights respecced as an archer with Accuracy, Rapid Shot, 20 points in strength and the rest in dexterity.
- Party members likely to come under attack from the Harvester itself should be pre-dosed with Greater Nature Salve.
- If a character has the appropriate gear (and, in the case of rogues, the evasion skill), it is easy to achieve a very high level of dodge. It is possible to achieve 100% dodge rate with a character from Awakening, but characters from Origins can achieve near 100% as well. If this is the case, the battle becomes extremely easy, and is possible to solo even on nightmare, as none of the skeletons will be of concern (regardless of their rank or amount), and most of the Harvester's abilities will be easy to out maneuver (except his ground slam form the first form). Easiest to accomplish this with rogues (due to the Dark Passage and Evasion skills), but Arcane Warriors are able as well.
- As an Awakening* rogue with very high dexterity (70 base works from experience, untested with lower) as well as momentum (to keep aggro up), evasion, duelist stance and keen defense as well as the dual weapon specialization, it is possible to have your rogue tank the Harvester as you take almost no hits throughout the entire fight, with Brogan using threaten to pick up the skeletons. (Works on Hard difficulty, untested on Nightmare.)
- As stated above, when the Harvester is low on health (around 5-10%), it is advised to finish Phase One in a red phase with an unused switch. Because this strategic element is not technically supposed to be available in Phase Two, the immediate use of the switch will wipe out any remaining corpses without fail and make Phase Two a cakewalk.
- A mage with around 230 spellpower (not possible with a default Warden) can paralyze the Harvester in both phases. Since the common Paralyze spell has a relatively quick cooldown, his ability to damage the party is greatly diminished.
- A rogue with Master Stealth can enter stealth easily in phase two since the Harvester is only a normal boss in this phase. This allows the rogue to set up traps or wait for abilities to go off cooldown without being harassed by enemies. Setting a trap has a 10% chance to break stealth, however.
Mage strategy[]
- Arcane Warrior is a must-have specialization should the player have a level-capped character imported from Awakening since both defense and armor is far insufficient to withstand attack from skeleton minions, especially lieutenant and boss-ranked ones. As a result, equipment and spells (namely Combat Magic and Arcane Shield with upgrade) that leads to 100% chance to dodge attacks are necessary.
- Max-defense build is viable should the player have a character imported from Origins at around level 22-23, though it is still as difficult as standing toe-to-toe against Cauthrien during Rescue the Queen. The mage is required to increase defense as much as possible from maximized spellpower (via Spell Might and Spell Wisp), spells (Arcane Shield, Glyph of Warding and Heroic Defense) and equipment (The Libertarian's Cowl, The Felon's Coat and Magus War Boots). Spending attribute points on dexterity is optional since defense granted from dexterity suffers a -1,000 penalty if the character was successfully hit by Riposte.
- Even if the character has 100% chance to dodge attacks, some of the Harvester's attacks during phase one are hard to avoid via micro-management and extremely damaging. A Ground Slam followed by Vile Disembowelment may deal over 300 damage if the character does not have proper resistance. Thus Rock Armor, skills/equipment that increase nature resistance (e.g. Master Survival and Andruil's Blessing) and possibly Shimmering Shield need to stay activated during that phase.
- If the player intends to take down the Harvester using melee weapons as Arcane Warrior, it is important to point out that as an enemy, the Harvester has a relatively high defense value especially in phase one that at level 35, the character needs an attack score of around 170-180 to avoid misses at all, which is normally impracticable for Arcane Warriors who have already struggled against poor attack rating at higher levels. There is a solution to the problem, however: as the attack bonus from Combat Magic is calculated when the spell is activated, the character can activate Combat Magic using staff and other accessories (e.g. Toque of the Oblivious and Sash of Forbidden Secrets) / spells (Spell Might and Spell Wisp) that boosts spellpower and switch back to normal sets afterwards. A character imported from Awakening could easily boost spellpower by 100-120 points, which equals 20-24 extra attack bonus. Along with Combat Training, proper investment on dexterity, weapons with +X attack attribute (e.g. Vigilance), Heroic Offense and Miasma an Arcane Warrior is able to make almost every attack count, whose efficiency may even rival that of dual-wield rogues and warriors.
- If the player intends to take down the Harvester using spells and auto-attacks from staves, the situation is trickier as the Harvester possesses extremely high resistance against non-fire elemental damage (the extent of resistances is even higher in phase two, where a Paragon Frost Rune, empowered by Oven Mitts, ~190 spellpower and Vulnerability Hex, could only deal 1-2 points of damage). Thus fire-based staves and spell (Flame Blast) are more efficient options compared to others. Note that while combat tooltips shows that the Harvester is classified as either "golem" or "darkspawn" during each phase, the creature is not immune to nature damage and is subject to damage from both Blood Wound and Blood Control (the caster cannot enthrall it regardless of spellpower, however).
Trap strategy[]
This can be used in conjunction with any of the other strategies. If you have a lot of elemental damage traps, then seeding them throughout the entry area can make the second phase combat quite a bit easier. Allow the harvester and any corpses to chase you around the heavily-trapped area. You will need at least about 50 traps to be effective. Fire and soulrot traps do the most damage.
Low Level Caster Mage Strategy[]
(Tested on nightmare with level 22 Mage import)
- Spells: Waking Nightmare line. Spirit Healer line. Heal line. Crushing Prison line. Hex line. Fire up to Fireball. Frost up to Cone of Cold. Grease.
- Phase one: do NOT draw aggro with the Warden; at this point it will just drag on the phase. With a decently geared mage, you can heal through the tank and the party very easily on this phase. You should be getting through this phase consistently with everyone up.
- Phase two: This is the more tricky phase. Put Jerrik on the Harvester ASAP and leave him on it for as long as you can keep him alive. The only spells that damage the Harvester in this phase are the spirit school, and he is still highly resistant, so you need physical damage.
Keep your party up as long as possible, but once you are overwhelmed keep the skeletons and harvester at a distance by running in circles and only stopping to cast these crowd control spells: Mind Blast, Sleep, Cone of Cold, Crushing Prison (on non boss level skeletons), Force Field, Grease.
If Jerrik is dead, use revive on him and then put him on the Harvester again. He will likely die again, but just revive him as often as possible.
Now here is the main trick: when Harvester is together with the skeletons chasing you, use Waking Nightware. If you are lucky, this will cause the skeletons to attack Harvester for you, and they do massive physical damage. A good roll on Waking Nightware threat will take out a large chunk of Harvester's HP.
Decoy tactics[]
This section introduces a universal tactic for all classes, without having to deal with Harvester at close range.
- Preparation: Any kind of weapon that uses ranged attack, such as longbows, crossbows and staves. The Group Heal upgrade for Golem is also essential unless the main character has at least one healing spell.
- Recommended class type: Rogue (with any kind of bow, but preferably high-tier bows); mage (preferably high-tier staves).
- Note: the high-tier bow, Chasind Arm, can be found on one of the enemies prior to entering the Forge.
- Prior to battle: First, set your party's tactic to, and only to, "Enemy - Rank - Boss or higher - attack (general attack, NOT skills) except your tank. Additionally, set the healer(s) of the party to heal the controlled member, where Runic Golem is viable option. Then, summon Brogan for threat control - you might want to get used to his control, as this strategy bases on his Taunt talent. Finally, "hold" your party via clicking the compass-shaped button, and save the changes.
- Phase one - Golem form: After the Harvester head's rendezvous with its body, quickly move all your party member except Brogan to the corner, preferably to the "button" for controlling the lyrium flow. Then, taunt the Harvester and run around in circles so that Harvester's focus is on Brogan while ranged attackers from your party attack it. Recommended route is to circle around the pillars right next to the party after the short cutscene. Be aware of skeleton summoning; although taunt's cooldown is relatively short, random summoning close to the ranged attackers may result in the death of the summoner and the ranged attackers, causing the last member to be surrounded by hordes of skeletons. It is useful to keep a warrior close by, just in case of possible consequences.
Stay alert and keep your eyes on the red "dots" approaching the party on the mini map - divert their target to Brogan as soon as possible. When the skeleton numbers become uncontrollable, use the buttons to kill the skeletons. If done correctly, although time-consuming and quite boring, this will basically make Harvester become nothing more than walking meat-mash.
- Notice that Brogan is essential for this plan since rangers' summon does not include high threat-gaining ability like taunt - Wolf's Howl only reduces the targets' defense. For mages especially, high-damaging spells draw the threats to your fragile mage, so it's best to use only normal attacks, if not occasional close-range summons of skeletons. Moreover, if too much damage is taken, simple taunt would not distract enemies from the ranged attackers. You can also use warrior for decoy, but it is safe to first use disposable summon and then your warrior for the cooldown.
- Phase two: After defeating the Harvester in golem form, the head crawls out of its body. Since it jumps around the map, it can be rather tricky to taunt it to follow Brogan. However, it goes the same way as the first form: taunt and run as fast as you can without getting yourself surrounded. Since Runic Golem's group heal only provides 40~50ish even with full upgrade - where normal enemies gives 20ish and elite gives 40~60 damage - once Brogan dies, you need to restart the battle unless your tank didn't get knocked unconscious during the first phase. For spirit healers, it is possible to use Revival, where there isn't much chance for the rest of the specializations. If successful, cutscene will play without you even noticing the Harvester's death.
Engagement[]
Phase One[]
The battle will start as the Harvester's head enters its large golem-like body made of flesh. For the duration of this phase, remember that damage is key. There is no limit to the number of times you will have to press the switch or the number of minions the Harvester will summon, so the quicker you take him down the easier it will be. Jerrik needs to focus fire on the Harvester at all times (if respecced into an archer skill-tree).
As the Harvester will always use Vile Disembowelment first, you will want to avoid starting the fight with your party in its range. Start the fight by diverting the Harvester with your tank, making sure to sustain aggro (for those who are playing after Awakening, Air of Insolence is very useful to activate here). Start attacking the Harvester with your party, making sure to keep your golem at a good distance from it whilst also being able to benefit your team with Cleansing Aura. The Harvester's skills are powerful and quick, so keep a close eye on your tank's health; it will drop abruptly multiple times during the fight (for Awakening players: if you find yourself in a position where your tank's health is dropping fast and they're on potion/heal spell cooldown, don't forget to use Carapace to reduce damage).
The mechanics of the fight are organized such that when the Harvester switches from the "normal phase" to the "red phase," a switch on the side of the room will appear. The purpose of this switch is to remove any buff the Harvester gains from switching to the "red phase," whilst also eliminating any summoned skeletons. Do not always use this switch as soon as it appears! Sometimes the tank will do next to no physical damage whilst in the "red phase," in which case you will want to use the switch, but keep in mind that any skeletons that survive coming out of the red phase will be noticeably more powerful and will appear faded red. Sometimes there will be no significant alteration to the Harvester's defense or attack, in which case, you should be saving the switch for incoming skeletons who may be overwhelming you. The rank of the skeleton he summons is generally random. If the skeleton he summons is Normal, it will be mostly harmless and can be ignored or off-tanked by Snug. If it's an Elite skeleton, either take it down as swiftly as possible or immobilize it with an appropriate spell. If it's a Boss-ranked skeleton, you need to be very cautious; Boss-ranked skeletons hit as hard as the Harvester and will easily wipe your party if they are left to stray. Do not bother damaging the Boss skeletons; it is far more effective to focus fire on the Harvester whilst either taunting the orange skeleton with Jerrik's minion or keeping it in place with force field. Be wary that this fight is harder if the Boss skeletons make an appearance later into the fight when things are more chaotic; the idea is that you want to eliminate them by pressing the switch.
Whether you are playing on easy or nightmare mode, the best defense is offense; do not tarry the battle for long attacking the skeletons (although they are named corpses, they are supposed to be named skeletons). It is your best bet to throw everything you have at the Harvester itself. Skeletons will indeed bother you greatly, but if you are a powerful tank or you are also a mage (preferably Arcane Warrior), then it will be possible draw all the attention on you or keep the party alive with healing magic from yourself and the runic golem. Never attack the skeletons unless there are so many of them that you can't keep your party alive or can't reach the Harvester. The Harvester will summon minions faster than you can kill them, so it is not a good idea to kill the skeletons unless you are sure you can deliver large amounts of damage with quick attack. Another method that can be useful if low on health poultices is to set the golem's tactics to group heal when health is below 90% for any ally, and to have whoever the tank may be taunt and run around the room to give more time to get a few more group heals off. This tactic is especially useful if playing hard or nightmare difficulty.
Another useful tactic is to cast both Walking Bomb and Virulent Walking Bomb. This will cause a glitch in the damage check for lasting damage effects which will double the damage of all spells like walking bomb, Stinging Swarm, Curse of Mortality, and the lasting burns from flame spells.
Once you have defeated the first phase of the Harvester, the head will detach from the corpse body and fight with its lizard-like personal body.
- Using Mark of Death and Twin Strikes + Low Blow + Unending Flurry with an imported Rogue AND Jerrik can almost end the first phase instantly on Hard difficulty.
Phase Two[]
Again, in this part of the fight you will want focus fire on the Harvester at all times. Jerrik - with Feign Death and/or Distraction - will be able to keep aggro off him at all times whilst dealing heavy damage to the Harvester. Your golem should try to avoid garnering any attention from the skeletons so it can revive your party if necessary. You may find this fight easier if you are an archer, as the Harvester's speed will not hinder your damage. If you are not a Spirit Healer mage, then unless you are a powerful tank, the battle is essentially hopeless if your runic golem dies (especially if you are playing on hard or nightmare). Make sure the runic golem stays alive, as it will be the only source of healing in case you are not a mage. This fight is something of a perfect challenge because being a mage is extremely useful in this fight for the healing, but at this stage the harvester is all but immune to magic. This can be remedied by using an Arcane Warrior and equipping an ax or a sword.
This part of the fight is significantly harder not because of the Harvester itself, but because of the skeletons. First, the skeletons can no longer be eliminated by a simple press of a switch (although it is possible to kill them if you saved the switch and push it right after you enter the second phase); they stick around for a long time and need to be killed or crowd controlled. If you find it easy to eliminate the skeletons, then you might be able to afford some time to kill them one by one, although you should keep in mind they will still spawn rapidly and randomly. However, once again, the orange skeleton(s) will prove very difficult to handle and you should attempt to either soak up all their damage with your tank or crowd control them for as long as possible. In addition to the skeletons the Harvester will make from the piles, they will still spawn randomly without the Harvester's action. There is a bug here where all your attacks on skeletons will be "miss", unlike attacks on the Harvester. The skeletons are so powerful on Nightmare that unless you respec Brogan it will only take a few seconds for even two normal level skeletons to kill him. Mages are probably better off soloing this fight on nightmare, using Mind Blast to keep the corpses at bay.
Throughout the fight, the Harvester will travel around the entire room with great speed, usually traveling with its skeletons. In addition, the Harvester will switch phase from "normal" to "red," as it did in phase one. The difference this time is that the phasing will only improve the skeletons. Red-phased skeletons - who will glow red and look transparent - are significantly stronger and harder to hit. As soon as the Harvester switches phases, this is the time to control the skeletons or else you risk losing your entire party (for Awakening players: Carapace is invaluable at this part). Eventually, when you get the Harvester to around 20% HP, all the skeletons will die instantly. If you manage to reach this point, then you have a good shot at defeating the Harvester. The harvester will from this point revive slain skeletons and switch rapidly red and normal light; with the current glitch that makes skeletons immortal, with red light activated the fight should prove to be nearly impossible.
BUG: On xbox 360 during the harvester fight the switch will be unable to be activated.
- Note: Four normal ranked skeletons were capable of taking down a 500 health tank with 80 armor and ~200 defense in 3 hits. If all your party falls, and you have a lot of grenades, you may just want to run around the room and chuck grenades to damage the Harvester to 20% health then slaughter it. It seems that Acid grenades do the most damage, whereas fire grenades do little and cold do almost none.
^ the above note may be a bug. I had a tank who did not have the above listed statistics and the character did fine. However, the author of that point makes a good point in the utilization of grenades. Please note that even if frost grenades do minimal damage, they may have value as a last ditch crowd control item as it can still freeze the skeletons to buy you time.