No edit summary Tag: sourceedit |
m (→Walkthrough: Added note saying that when Varric first appears alone in the estate, any sustainables he had turned on while outside are turned off here.) Tag: Visual edit |
||
| (20 intermediate revisions by 10 users not shown) | |||
| Line 2: | Line 2: | ||
|style = {{{style|}}} |
|style = {{{style|}}} |
||
|name = [[Family Matter]] |
|name = [[Family Matter]] |
||
| − | | |
+ | |icon = Quest icon DA2.png |
| − | |image = |
+ | |image = Bartrand Dead.jpg |
| − | |px = |
+ | |px = 270px |
| − | |caption = |
||
|start = [[Varric Tethras|Varric]] |
|start = [[Varric Tethras|Varric]] |
||
|end = [[Varric Tethras|Varric]] |
|end = [[Varric Tethras|Varric]] |
||
| − | | |
+ | |act = 2 |
| − | |location = [[Bartrand's Estate]] |
+ | |location = [[Bartrand's Estate]], [[Hightown]] |
| − | |rewards = |
||
|previous = [[An Update]] |
|previous = [[An Update]] |
||
| − | |next = [[A Story Being Told]] |
+ | |next = [[A Story Being Told]] or [[A Story Being Told|A Rumor Making the Rounds]] |
|appearances = [[Dragon Age II]] |
|appearances = [[Dragon Age II]] |
||
| − | |icon = Quest icon DA2.png |
||
}}</onlyinclude> |
}}</onlyinclude> |
||
| Line 23: | Line 20: | ||
== Walkthrough == |
== Walkthrough == |
||
| − | Visit [[Bartrand |
+ | Visit [[Bartrand's Estate]] in [[Hightown]] at night with Varric in the party. You start off playing alone as Varric, taking on [[Bartrand Tethras|Bartrand]]'s guards all by himself. |
| + | {{Note|All sustaining effects for Varric will have been turned off and will need to be recast.}} |
||
| − | After the intermission, the Crazed Guards offer rather more challenge than before, especially when Hawke faces them in more threatening numbers as the party progresses through the mansion. Proceed through the side rooms of the mansion, saving the large central room for last. After proceeding through the library, the third encounter triggers. This room has a ''standard'' trap (20 ''cunning'' to detect and disarm - 100 XP) and a ''simple'' trap (10 ''cunning'' to detect and disarm - 50 XP). Next you will encounter a large poison gas trap in the northern hallway. It is very hard to detect (''Master'' level, 40 ''cunning'' to detect and disarm - 200 XP) unless a character has invested heavily in cunning and/or is wearing Bonus to disarm traps items. |
||
| + | During this part, Varric's health meter will constantly regenerate and his skills will have very short cooldowns; the guards will also be rather easy to kill. After defeating all enemies, there will be a cutscene revealing that the "epic battle to the death" was the storyteller's typical exaggeration irritating [[Cassandra]] to no end. When the actual scenario starts, the entire party will join Varric inside the mansion, starting from the southeast corner of the map. |
||
| ⚫ | |||
| + | {{Note|Since the party is disbanded and reformed, all sustaining effects for party members except Varric will have been turned off and will need to be recast.}} |
||
| − | After killing enemies in the first room on the left in the northern hallway, more enemies can come pouring out of the next room, giving no time to rest in between encounters. In the most north eastern room, there is a chest with a ''complex'' lock (30 ''cunning'' to open - 150 XP). |
||
| + | Proceed to the southern room for the first battle. The crazed guards offer rather more challenge than before, especially when Hawke faces them in more threatening numbers as the party progresses through the mansion. Proceed through the side rooms of the mansion, stunning the commanders and defeating their subordinates as you go, remembering to prioritize the archers. The enemies are mercenaries, so Nature damage will serve you very well in the form of weapon runes and [[Merrill]]'s [[Wrath of the Elvhen]]. The third encounter has a Standard-ranked trap and a Simple-ranked trap, worth 100 and 50 XP respectively and requiring 20 and 10 Cunning to detect and disarm. Close the doors to break the enemy's line of sight and force them to come to you for an easier fight. |
||
| − | Finally, proceed to the large central room where you will fight two Crazed Commanders and an army of their subordinates. There is a ''standard'' trap (20 ''cunning'' to detect and disarm - 100 XP) straight ahead after entering the room and a ''simple'' trap (10 ''cunning'' to detect and disarm - 50 XP) on the landing of the left staircase. |
||
| + | In the northern hall you'll find a Master-ranked poison trap requiring 40 Cunning to detect and disarm for 200 XP, and more enemies in each room along the northern wall. If you don't have 40 Cunning, you'll need a piece of equipment with the {{ColorPositiveStat|bonus to disarm traps}} perk. With the exception of premium and promotional content, the only pieces of equipment that can do this lie beyond this specific point in the game, namely the [[Boots of Enasalin]], available to rogue Hawkes and obtained in this very mansion. As the perk from such equipment is rendered moot after obtaining 40 Cunning, a more practical use of this trap is to trigger it on purpose, drawing the mercenaries from the northwestern dining hall into its area of effect using its nature element to inflict a great deal of damage on the group of mercenaries in the |
||
| ⚫ | |||
| ⚫ | |||
| ⚫ | * The master trap can be avoided by running into the left wall and moving each character individually into the north western room on the map, while using the hold command. You have to run into the wall enough that the character's body parts clip through it, merely hugging a wall doesn’t give you enough clearance to avoid the trap. |
||
| ⚫ | |||
| − | + | After killing enemies in the first room on the left in the northern hallway, more enemies can come pouring out of the next room over. In the northeasternmost room, there is a Complex-ranked locked chest (30 Cunning, 150 XP), along with the bodies of several servants. |
|
| + | Finally, proceed to the large central room where you will fight two crazed commanders and an army of their subordinates. The best thing to do is to take out the archers and the commander before anyone else, otherwise the second commander will spawn while the first is still alive. If they team up, one commander's aura can heal the other and allow the rank-and-file to double dip, effectively creating a nigh-invulnerable enemy force. The simplest way to deal with this is to grab the first commander's attention and retreat to the northeastern room with the bodies of servants. At the very least you won't aggro the remaining enemies, and in the best case scenario you'll pull the commander and only a token amount of the forces under his command to an easy killing zone. Repeat this to defeat the other one, then clean up the remaining forces |
||
| − | Bartrand's abilities: |
||
| ⚫ | |||
| ⚫ | |||
| − | {{:Twin Fangs (Dragon Age II)|style=iconmini}}{{clrl}} |
||
| − | {{:Rush|style=iconmini}}{{clrl}} |
||
| − | {{:Miasmic Flask|style=iconmini}}{{clrl}} |
||
| − | {{:Fatiguing Fog|style=iconmini}}{{clrl}} |
||
| ⚫ | |||
| + | There is a Standard-ranked trap straight ahead from the northern hallway door and a Simple-ranked trap on the landing of the left staircase. The standard trap on the floor is a "release trap," in that the trap does not trigger until you step off the plate, so daring players might want to use it against the enemy forces, or save it for the following fight. |
||
| − | You must defeat him and more guards to reach a dialogue where you can either tell Varric to kill Bartrand or let him go. |
||
| ⚫ | |||
| − | '''NOTE:''' As soon as you defeat Bartrand the battle ends, regardless of how many guards are remaining. |
||
| ⚫ | When the final enemy falls and the player reaches the top staircase, the party encounters [[Hugin]], the last surviving servant of the household. He tells a tragic story; after Bartrand left Varric and Hawke to die in the [[Primeval Thaig]], he started hearing voices, claiming the [[lyrium idol]] was 'singing' to him. Even after selling it, Bartrand could still hear the idol and was eventually driven mad by its [[red lyrium]]. He tortured the servants by cutting pieces off them to help them 'hear the song'. The [[dwarf]] also fed the guards [[lyrium]], making them go insane. Hugin begs Varric and Hawke to give a quick and merciful death to anything still alive in Bartrand’s study. |
||
| ⚫ | Once Bartrand is defeated, Varric tries to talk to him, but it becomes clear that Bartrand |
||
| + | |||
| ⚫ | Before entering Bartrand’s study, explore the two small side rooms. The room on the left has a chest that contains [[Belt of the Primevals]]. The room on the right has a chest that contains [[Silverite-Reinforced Buckles]], an armor upgrade for Varric. All of the doors are open now, so you're free to leave the mansion to heal injuries or change your party, if the following fight proves too tough. You cannot return without Varric in the active party, however. |
||
| + | |||
| + | Once Hawke opens the door upstairs, combat begins. Bartrand will teleport downstairs in a puff of smoke, so trying to flush him out of stealth with AoE attacks will not work up here. Instead, head downstairs as soon as you open the door and be ready to head off his reinforcements, which spawn at each of the three doors. They consist of four two-handers and two archers, which are annoying, but Bartrand is easily the greatest threat. He is a Boss-ranked Assassin and as such can inflict backstabs powerful enough to take down even [[Aveline Vallen|Aveline]] in one hit. He also resists most weaker stun and crowd control effects, so Horror and Petrify, which guarantee stun on any enemy, are virtual necessities. Bartrand is vulnerable to any element and especially weak to cold. The most important thing to note is that combat ends as soon as Bartrand is defeated, regardless of how many guards remain. |
||
| + | |||
| + | The safest method for Nightmare difficulty, however, is to kite Bartrand while eliminating his support, starting with the archers. Enemy [[assassin]]s are programmed to stop using their backstab when they are the only enemy left, and Bartrand summons no reinforcements aside from these six. With all of the doors open, you can take command of Bartrand's primary target, hopefully Varric or another ranged character, and lure him through the side rooms and up and down the stairs, always keeping one step ahead of the mad dwarf and freeing the other three to attack. As long as nobody actually targets Bartrand he shouldn't change his target, but if he does, switch characters. With the occasional Horror, Petrify, or even a fully powered [[Winter's Blast]], Bartrand can be disabled for about 3 seconds, enough time to let the kite runner contribute to killing an enemy or two before returning to fleeing. Stunned enemies tend to forget who they were targeting and pick whoever is closest upon returning to their senses, so either be ready for this, or don't stun him at all and just keep everyone focused on their targets. If he drops into stealth right before the sixth enemy falls he will attempt one last backstab, but he can be flushed out with an AoE, even a non-damaging one like Mind Blast. Even with his support gone and the backstab disabled, Bartrand still hits hard with his basic dagger strikes, dealing enough damage to inflict knockback on non-warriors, so be careful as you engage him. Aveline should be able to hold Bartrand's attention while Varric and a mage unleash cross-class combos. You can also close each door as you run through them to stop him ever so briefly, allowing you to get an extra step or two ahead of him and slowly build enough of a buffer to turn and fire a spell or Pinning Shot. This is the best way to engage him if he manages to slice through every melee character. |
||
| + | |||
| ⚫ | The battle provides no XP, so in the end it doesn't matter how many of his men you killed. Once Bartrand is defeated, Varric tries to talk to him, but it becomes clear that Bartrand has gone crazy - he recognizes his brother and requests he help him find the idol again before talking to someone or something in his head, explicitly saying 'Stop it, I know I shouldn't have sold the idol. It was a mistake!' If [[Anders]] is present, Hawke can call on their companion to diagnose Bartrand. Anders states that he would suspect a demon at work, however Bartrand is a dwarf. Instead, he determines that 'his mind has been poisoned' by something powerful. He uses his healing arts to bring Bartrand back to his senses but warns that this is only a temporary solution. The temporary healing also changes Varric's stance regarding what to do with his brother, with friendship and rivalry reversed for the decision. |
||
== Result == |
== Result == |
||
| + | [[File:Bartrand - DA Keep.png|thumb|330px|The fate of Bartrand Tethras in ''[[Dragon Age Keep]]'']] |
||
Either Bartrand is killed or spared. If he is not healed, Varric advocates for killing him. If Anders heals Bartrand, Varric wants him to live. Reactions of other companions do not depend on whether he is healed or not. |
Either Bartrand is killed or spared. If he is not healed, Varric advocates for killing him. If Anders heals Bartrand, Varric wants him to live. Reactions of other companions do not depend on whether he is healed or not. |
||
| Line 70: | Line 68: | ||
After the final battle and returning to Hightown a cut scene begins with Varric thanking Hawke for the assistance with his brother. |
After the final battle and returning to Hightown a cut scene begins with Varric thanking Hawke for the assistance with his brother. |
||
| − | If Varric is a friend, [[A Story Being Told]] will be triggered; if Varric is a rival, [[A Rumor Making the Rounds]]. |
+ | If Varric is a friend, [[A Story Being Told]] will be triggered; if Varric is a rival, [[A Story Being Told|A Rumor Making the Rounds]]. |
== Rewards == |
== Rewards == |
||
| − | *{{:Silverite-Reinforced Buckles|style=iconmini}} [[Armor (Dragon Age II)|armor upgrade]] for [[Varric Tethras|Varric]] located in a chest adjacent to the final room. |
+ | * {{:Silverite-Reinforced Buckles|style=iconmini}} [[Armor (Dragon Age II)|armor upgrade]] for [[Varric Tethras|Varric]] located in a chest adjacent to the final room.<br> |
| − | * depending on [[Hawke]]'s [[Classes and specializations (Dragon Age II)|class]] in a chest in the last room where |
+ | * One of the following boots, depending on [[Hawke]]'s [[Classes and specializations (Dragon Age II)|class]]. The boots are located in a chest in the last room where Bartrand is found: |
| ⚫ | |||
| ⚫ | |||
| ⚫ | |||
| ⚫ | |||
| ⚫ | |||
* 1000 XP (quest completion/final fight) and no money (spare or kill Bartrand) |
* 1000 XP (quest completion/final fight) and no money (spare or kill Bartrand) |
||
== Trivia == |
== Trivia == |
||
| + | * During the "bullshit" battle at the beginning, the quest's Journal entry states: "Varric must face his backstabbing brother in an epic battle to the death". Afterwards, the entry becomes less outlandish. |
||
| − | * The opening scene and its dialogue, in which Varric exaggerates his entrance by depicting himself as killing numerous guards single-handedly, firing Bianca off rapidly, is very similar to the ending scene of the 1983 movie [[wikipedia:Scarface (1983 film)|Scarface]]. |
||
== Bugs == |
== Bugs == |
||
| − | * {{platforms|xbox360}} It is possible to have Sebastian join Varric during the "solo" opening sequence. |
+ | * {{platforms|xbox360}} It is possible to have Sebastian join Varric during the "solo" opening sequence. The circumstances surrounding the glitch are unclear, but the trigger appears to be running directly from the Harimann Estate after completing [[Repentance]]. |
| − | |||
* {{platforms|xbox360}} Potential bug: Family Matter will show up in quest log but you will unable to initiate the dialogue for the quest from Varric if his approval is already too high. Potential causes for this is having his Approval rating too high in early Act 2 which activates Varric's Act 2 Questioning Beliefs. If you do Questioning Beliefs BEFORE acquiring Family Update in your journal then it's possible this quest may become broken. This was tested on 3 playthroughs. |
* {{platforms|xbox360}} Potential bug: Family Matter will show up in quest log but you will unable to initiate the dialogue for the quest from Varric if his approval is already too high. Potential causes for this is having his Approval rating too high in early Act 2 which activates Varric's Act 2 Questioning Beliefs. If you do Questioning Beliefs BEFORE acquiring Family Update in your journal then it's possible this quest may become broken. This was tested on 3 playthroughs. |
||
| + | * Xbox One It is possible to have Fenris join Varric during the "solo" opening sequence. A Bitter Pill must be completed beforehand, and then the player returns to the Slaver’s Den at any point with Fenris, running through the map to the end. Fenris will repeat lines in the Den. He will then be locked in the party, unless removed by going to Hawke’s house. During Varric’s solo, Fenris will be invincible and can one-shot enemies. His Tactics remain viable. Returning to Hawke’s house afterward will remove him from locked in the party. |
||
| + | |||
| + | [[de:Familienangelegenheit]] |
||
[[Category:Dragon Age II companion quests]] |
[[Category:Dragon Age II companion quests]] |
||
Revision as of 18:18, 24 September 2019
Family Matter is an Act 2 companion quest for Varric in Dragon Age II.
Acquisition
This quest is acquired by completing the quest An Update with Varric at The Hanged Man.
Walkthrough
Visit Bartrand's Estate in Hightown at night with Varric in the party. You start off playing alone as Varric, taking on Bartrand's guards all by himself.
During this part, Varric's health meter will constantly regenerate and his skills will have very short cooldowns; the guards will also be rather easy to kill. After defeating all enemies, there will be a cutscene revealing that the "epic battle to the death" was the storyteller's typical exaggeration irritating Cassandra to no end. When the actual scenario starts, the entire party will join Varric inside the mansion, starting from the southeast corner of the map.
Proceed to the southern room for the first battle. The crazed guards offer rather more challenge than before, especially when Hawke faces them in more threatening numbers as the party progresses through the mansion. Proceed through the side rooms of the mansion, stunning the commanders and defeating their subordinates as you go, remembering to prioritize the archers. The enemies are mercenaries, so Nature damage will serve you very well in the form of weapon runes and Merrill's Wrath of the Elvhen. The third encounter has a Standard-ranked trap and a Simple-ranked trap, worth 100 and 50 XP respectively and requiring 20 and 10 Cunning to detect and disarm. Close the doors to break the enemy's line of sight and force them to come to you for an easier fight.
In the northern hall you'll find a Master-ranked poison trap requiring 40 Cunning to detect and disarm for 200 XP, and more enemies in each room along the northern wall. If you don't have 40 Cunning, you'll need a piece of equipment with the bonus to disarm traps perk. With the exception of premium and promotional content, the only pieces of equipment that can do this lie beyond this specific point in the game, namely the Boots of Enasalin, available to rogue Hawkes and obtained in this very mansion. As the perk from such equipment is rendered moot after obtaining 40 Cunning, a more practical use of this trap is to trigger it on purpose, drawing the mercenaries from the northwestern dining hall into its area of effect using its nature element to inflict a great deal of damage on the group of mercenaries in the
- The master trap can be avoided by running into the left wall and moving each character individually into the north western room on the map, while using the hold command. You have to run into the wall enough that the character's body parts clip through it, merely hugging a wall doesn’t give you enough clearance to avoid the trap.
After killing enemies in the first room on the left in the northern hallway, more enemies can come pouring out of the next room over. In the northeasternmost room, there is a Complex-ranked locked chest (30 Cunning, 150 XP), along with the bodies of several servants.
Finally, proceed to the large central room where you will fight two crazed commanders and an army of their subordinates. The best thing to do is to take out the archers and the commander before anyone else, otherwise the second commander will spawn while the first is still alive. If they team up, one commander's aura can heal the other and allow the rank-and-file to double dip, effectively creating a nigh-invulnerable enemy force. The simplest way to deal with this is to grab the first commander's attention and retreat to the northeastern room with the bodies of servants. At the very least you won't aggro the remaining enemies, and in the best case scenario you'll pull the commander and only a token amount of the forces under his command to an easy killing zone. Repeat this to defeat the other one, then clean up the remaining forces
There is a Standard-ranked trap straight ahead from the northern hallway door and a Simple-ranked trap on the landing of the left staircase. The standard trap on the floor is a "release trap," in that the trap does not trigger until you step off the plate, so daring players might want to use it against the enemy forces, or save it for the following fight.
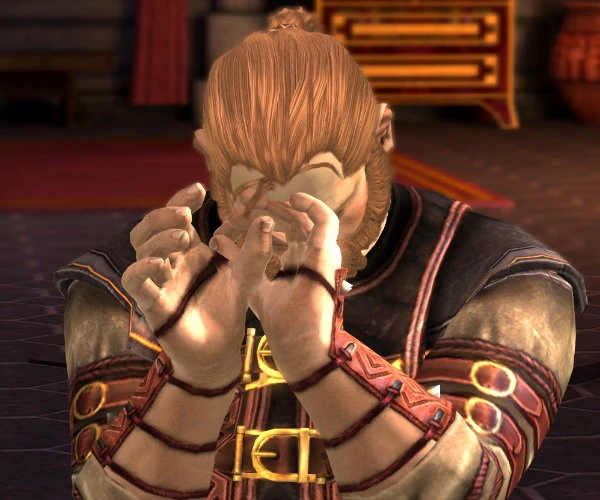
Bartrand driven insane
When the final enemy falls and the player reaches the top staircase, the party encounters Hugin, the last surviving servant of the household. He tells a tragic story; after Bartrand left Varric and Hawke to die in the Primeval Thaig, he started hearing voices, claiming the lyrium idol was 'singing' to him. Even after selling it, Bartrand could still hear the idol and was eventually driven mad by its red lyrium. He tortured the servants by cutting pieces off them to help them 'hear the song'. The dwarf also fed the guards lyrium, making them go insane. Hugin begs Varric and Hawke to give a quick and merciful death to anything still alive in Bartrand’s study.
Before entering Bartrand’s study, explore the two small side rooms. The room on the left has a chest that contains Belt of the Primevals. The room on the right has a chest that contains Silverite-Reinforced Buckles, an armor upgrade for Varric. All of the doors are open now, so you're free to leave the mansion to heal injuries or change your party, if the following fight proves too tough. You cannot return without Varric in the active party, however.
Once Hawke opens the door upstairs, combat begins. Bartrand will teleport downstairs in a puff of smoke, so trying to flush him out of stealth with AoE attacks will not work up here. Instead, head downstairs as soon as you open the door and be ready to head off his reinforcements, which spawn at each of the three doors. They consist of four two-handers and two archers, which are annoying, but Bartrand is easily the greatest threat. He is a Boss-ranked Assassin and as such can inflict backstabs powerful enough to take down even Aveline in one hit. He also resists most weaker stun and crowd control effects, so Horror and Petrify, which guarantee stun on any enemy, are virtual necessities. Bartrand is vulnerable to any element and especially weak to cold. The most important thing to note is that combat ends as soon as Bartrand is defeated, regardless of how many guards remain.
The safest method for Nightmare difficulty, however, is to kite Bartrand while eliminating his support, starting with the archers. Enemy assassins are programmed to stop using their backstab when they are the only enemy left, and Bartrand summons no reinforcements aside from these six. With all of the doors open, you can take command of Bartrand's primary target, hopefully Varric or another ranged character, and lure him through the side rooms and up and down the stairs, always keeping one step ahead of the mad dwarf and freeing the other three to attack. As long as nobody actually targets Bartrand he shouldn't change his target, but if he does, switch characters. With the occasional Horror, Petrify, or even a fully powered Winter's Blast, Bartrand can be disabled for about 3 seconds, enough time to let the kite runner contribute to killing an enemy or two before returning to fleeing. Stunned enemies tend to forget who they were targeting and pick whoever is closest upon returning to their senses, so either be ready for this, or don't stun him at all and just keep everyone focused on their targets. If he drops into stealth right before the sixth enemy falls he will attempt one last backstab, but he can be flushed out with an AoE, even a non-damaging one like Mind Blast. Even with his support gone and the backstab disabled, Bartrand still hits hard with his basic dagger strikes, dealing enough damage to inflict knockback on non-warriors, so be careful as you engage him. Aveline should be able to hold Bartrand's attention while Varric and a mage unleash cross-class combos. You can also close each door as you run through them to stop him ever so briefly, allowing you to get an extra step or two ahead of him and slowly build enough of a buffer to turn and fire a spell or Pinning Shot. This is the best way to engage him if he manages to slice through every melee character.
The battle provides no XP, so in the end it doesn't matter how many of his men you killed. Once Bartrand is defeated, Varric tries to talk to him, but it becomes clear that Bartrand has gone crazy - he recognizes his brother and requests he help him find the idol again before talking to someone or something in his head, explicitly saying 'Stop it, I know I shouldn't have sold the idol. It was a mistake!' If Anders is present, Hawke can call on their companion to diagnose Bartrand. Anders states that he would suspect a demon at work, however Bartrand is a dwarf. Instead, he determines that 'his mind has been poisoned' by something powerful. He uses his healing arts to bring Bartrand back to his senses but warns that this is only a temporary solution. The temporary healing also changes Varric's stance regarding what to do with his brother, with friendship and rivalry reversed for the decision.
Result
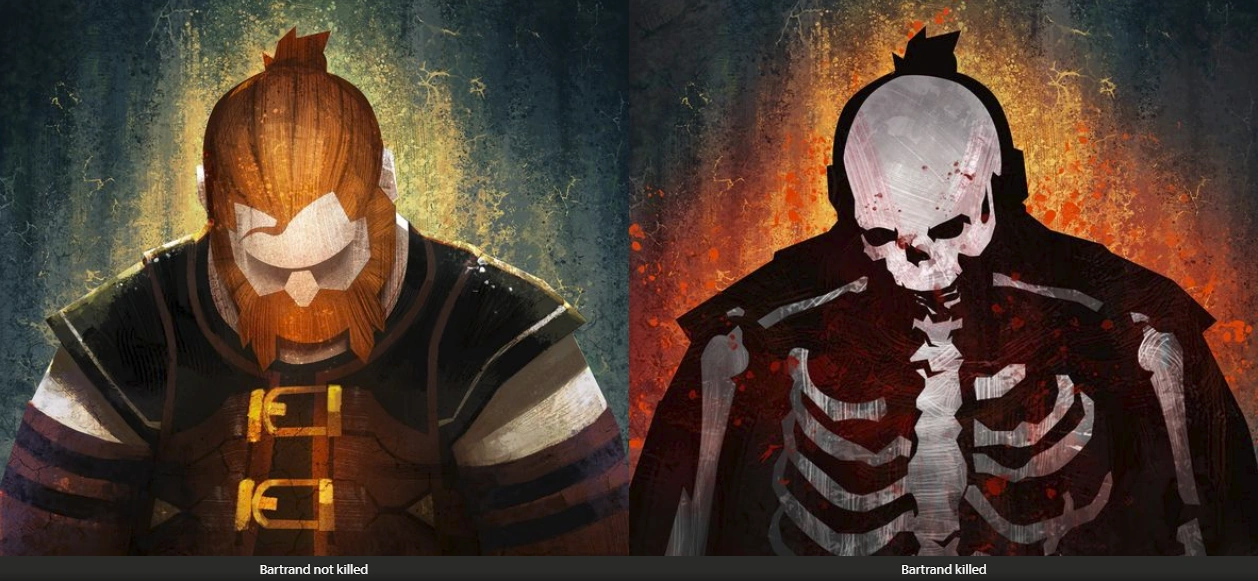
The fate of Bartrand Tethras in Dragon Age Keep
Either Bartrand is killed or spared. If he is not healed, Varric advocates for killing him. If Anders heals Bartrand, Varric wants him to live. Reactions of other companions do not depend on whether he is healed or not.
Killing Bartrand:
 Varric: friendship (+15) without healing,
  Varric: rivalry (+15) with healing
- Aveline: friendship (+5)
- Sebastian: rivalry (+10)
Allowing Bartrand to live:
- Varric: rivalry (+15) without healing, Varric: friendship (+15) with healing
- Aveline: rivalry (+5)
- Sebastian: friendship (+10)
After the final battle and returning to Hightown a cut scene begins with Varric thanking Hawke for the assistance with his brother.
If Varric is a friend, A Story Being Told will be triggered; if Varric is a rival, A Rumor Making the Rounds.
Rewards
- Silverite-Reinforced Buckles armor upgrade for Varric located in a chest adjacent to the final room.
- One of the following boots, depending on Hawke's class. The boots are located in a chest in the last room where Bartrand is found:
- Red Earth Long One is awarded for defeating Bartrand (appears in the players inventory), regardless of how he is dealt with.
- 1000 XP (quest completion/final fight) and no money (spare or kill Bartrand)
Trivia
- During the "bullshit" battle at the beginning, the quest's Journal entry states: "Varric must face his backstabbing brother in an epic battle to the death". Afterwards, the entry becomes less outlandish.
Bugs
- It is possible to have Sebastian join Varric during the "solo" opening sequence. The circumstances surrounding the glitch are unclear, but the trigger appears to be running directly from the Harimann Estate after completing Repentance.
- Potential bug: Family Matter will show up in quest log but you will unable to initiate the dialogue for the quest from Varric if his approval is already too high. Potential causes for this is having his Approval rating too high in early Act 2 which activates Varric's Act 2 Questioning Beliefs. If you do Questioning Beliefs BEFORE acquiring Family Update in your journal then it's possible this quest may become broken. This was tested on 3 playthroughs.
- Xbox One It is possible to have Fenris join Varric during the "solo" opening sequence. A Bitter Pill must be completed beforehand, and then the player returns to the Slaver’s Den at any point with Fenris, running through the map to the end. Fenris will repeat lines in the Den. He will then be locked in the party, unless removed by going to Hawke’s house. During Varric’s solo, Fenris will be invincible and can one-shot enemies. His Tactics remain viable. Returning to Hawke’s house afterward will remove him from locked in the party.