m (→Codex entries: clean up, replaced: Codex Entries → Codex entries) Tag: apiedit |
DaBarkspawn (talk | contribs) (→Archer and Pillar Puzzle: Cardinal directions are unambiguous) |
||
| (28 intermediate revisions by 6 users not shown) | |||
| Line 10: | Line 10: | ||
|appearances = [[Dragon Age: Inquisition]] |
|appearances = [[Dragon Age: Inquisition]] |
||
}}</onlyinclude> |
}}</onlyinclude> |
||
| + | {{Quote|The great stone hand was something of a mystery. One assumes it is a piece broken off from a larger whole. If so, judging by the size of that one hand, I imagine the entire sculpture to be... well, large enough to require the use of obscenities to describe it. Thus I have only one question: ''where is the rest of the statue?'' It is difficult to imagine how something so large could go missing. |
||
| + | — From ''A Journey through the Dales'' by Lord Horace Medford, "Adventurer"<ref>[[Landmarks on the Plains]]</ref>}} |
||
| − | '''The Dead Hand''' is an elven shrine located in the [[Exalted Plains]]. It is of Elven origin, marked outwardly by a giant stone hand that possibly once belonged to a statue in proportion with it. |
||
| + | |||
| + | '''The Dead Hand''' is one of the [[Landmarks on the Plains]] with an elven shrine underneath it. It is located east of the [[Ghilan'nain's Grove]] camp and found by travelling southeast of the camp past the fade rift. |
||
== Archer and Pillar Puzzle == |
== Archer and Pillar Puzzle == |
||
| − | As |
+ | As the party enters the room with the archer, there is a switch to the southeast, which will open a gate on the east side of the room. Move one of the party into that space and have them hold position. Each time a member of the party moves, reissue the hold command. Doing so will keep them in their places while the puzzle is completed. Then, return the switch to its original position, giving the trapped character access to one of the torches and a switch. |
| − | 1. The southwest pillar is already down, so use the switch on the small statue to the north to rotate the archer. |
+ | 1. The southwest pillar is already down, so use the switch twice on the small statue to the north to rotate the archer. |
| − | 2. The northeast side pillar can be lowered by lighting all three of the blue flame torches. One torch is closest to the entrance on the western side, another is behind the gate on the |
+ | [[File:Dead hand torch schematic.png|right|thumb|150x140px|Torch diagram]]2. The northeast side pillar can be lowered by lighting all three of the blue flame torches, see diagram. One torch is closest to the entrance on the western side, another is behind the gate on the east side (near the southeast switch that opens that gate, note that activating this switch lights the torches on either side of the gate) and the last torch is on the north end of the eastern side. This action is timed (albeit generously), so you may want your teammates to hold position close to each torch before lighting (keep someone close to the switch as well). After all the torches are lit, pull the switch to rotate the archer. |
| − | {{Note|It can be difficult to get every team member to hold their positions. The puzzle room is large, and the characters tend to break from their positions if the controlled team member moves too far away from the other group members. As long as the characters are somewhat close to the torches, or at least spread out throughout the room, |
+ | {{Note|It can be difficult to get every team member to hold their positions. Using double-click to move-and-hold each party member tends to work better than the hold command. The puzzle room is large, and the characters tend to break from their positions if the controlled team member moves too far away from the other group members. As long as the characters are somewhat close to the torches, or at least spread out throughout the room, there should be enough time to light all the torches and pull the switch before the pillar goes back to its original position. Sometimes characters will successfully hold their positions if each individual character is commanded to hold position after moving them near their torches or if a clear command is issued and a hold positions command immediately after that. It is most important to have a character near the switch after the torches are lit. If the column descends only partially, it means the timer on one or more of the torches has expired and will need to be relit.}} |
3. The northwest pillar can be lit up by having one character stand on the pressure plate that glows in the northernmost corner of the room, while another character pulls the lever to spin the archer. |
3. The northwest pillar can be lit up by having one character stand on the pressure plate that glows in the northernmost corner of the room, while another character pulls the lever to spin the archer. |
||
| − | 4. The southeast is the most complicated. Have your trapped teammate use the switch they have access to, allowing another |
+ | 4. The southeast is the most complicated. Leave a teammate at the torch behind the gate on the east side. Have a teammate pull the southeast switch, trapping the first teammate. Have your trapped teammate use the switch they have access to, allowing another teammate to go through a gate on the north-western side, where there is a crank. One teammate will need to stay next to the archer rotating switch, as the pillar will go back up quite quickly after the crank is fully turned. Release the trapped teammate by pulling the southwest switch. |
| − | Once all the artifacts have been lit, balls of light emerge (which must be followed for them to move) and light the remaining two artifacts, opening the gate. Enter and loot the crypt, then go into the next room. |
+ | Once all the artifacts have been lit, balls of light emerge (which must be followed for them to move) and light the remaining two artifacts, opening the gate. Enter and loot the crypt, then go into the next room. There will be a [[Revenant]] or an [[Arcane horror]] and several [[Undead]] there. Kill them then loot the room. This battle is repeatable on subsequent visits to the crypt, which is helpful for farming rare crafting materials and creature research items from the undead. |
== Rewards == |
== Rewards == |
||
| Line 35: | Line 38: | ||
== Notes == |
== Notes == |
||
* A {{:Superb Amulet of Cunning|style=iconmini}} is looted from atop a grave in the room north-east of the archer once the puzzle is complete. |
* A {{:Superb Amulet of Cunning|style=iconmini}} is looted from atop a grave in the room north-east of the archer once the puzzle is complete. |
||
| + | * The corpses and arcane horror respawn on revisiting the hallway past the puzzle room. |
||
| + | |||
| + | == Trivia == |
||
| + | * The hand may belong to the large statue of [[Andraste]] found in the Fade during [[Here Lies the Abyss]]. The shrine [[Where Once We Walked|built]] by [[Ameridan]] to both [[Ghilan'nain]] and Andraste inside [[Razikale]]'s reach features the same statue holding two small halla statues, that are in turn identical to halla statues found in the Crow Fens not far from the Dead Hand. Another broken piece of [[Andraste]]'s statue - the head - is found in the Fade during [[the Final Piece]]. |
||
| + | *Another, more likely possibility is that the hand is one of those that the elves of [[Arlathan]] used to hold [[Eluvian|eluvians]] as well as the spherically shaped, metallic trees that seemed to have housed raw magic as witnessed in the Courtyard of the [[Shattered Library]] the first time the Inquisitor enters the area. Several of the exact same model of detached stone hands can be seen doing both of these things when observing the Library. ([http://dragonage.wikia.com/wiki/Dead_Hand#Gallery| See Gallery]) This would also add up with its proximity to the Archer and Pillar puzzle outlined above.}} |
||
== Codex entries == |
== Codex entries == |
||
| Line 42: | Line 50: | ||
== Gallery == |
== Gallery == |
||
<gallery widths="189" captionalign="center"> |
<gallery widths="189" captionalign="center"> |
||
| − | Puzzle1.png|The |
+ | Puzzle1.png|The elven shrine |
| − | Puzzle2.png |
+ | Puzzle2.png| |
| + | Stone hand in the crossroads 3.jpg|Stone hand in the [[Shattered Library]] |
||
| + | Stone hand in the crossroads 2.jpg| |
||
| + | Stone hand in the crossroads 1.jpg| |
||
| + | Shrine to Andraste and Ghilan'nain.png|Shrine in the [[Frostback Basin]] |
||
| + | Here Lies the Abyss - Statue of Andraste2.png|Statue of Andraste - [[Here Lies the Abyss]] |
||
| + | Crow Fens Statues.png|Statues in the Crow Fens |
||
| + | Andraste's head - The Final Piece.png|Andraste's Head - [[The Final Piece]] |
||
</gallery> |
</gallery> |
||
| + | |||
| + | == References == |
||
| + | <references /> |
||
[[Category:Locations]] |
[[Category:Locations]] |
||
[[Category:Orlais]] |
[[Category:Orlais]] |
||
Revision as of 20:47, 30 September 2019
“The great stone hand was something of a mystery. One assumes it is a piece broken off from a larger whole. If so, judging by the size of that one hand, I imagine the entire sculpture to be... well, large enough to require the use of obscenities to describe it. Thus I have only one question: where is the rest of the statue? It is difficult to imagine how something so large could go missing.
— From A Journey through the Dales by Lord Horace Medford, "Adventurer"[1]”
The Dead Hand is one of the Landmarks on the Plains with an elven shrine underneath it. It is located east of the Ghilan'nain's Grove camp and found by travelling southeast of the camp past the fade rift.
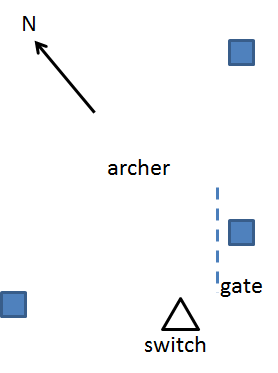
Archer and Pillar Puzzle
As the party enters the room with the archer, there is a switch to the southeast, which will open a gate on the east side of the room. Move one of the party into that space and have them hold position. Each time a member of the party moves, reissue the hold command. Doing so will keep them in their places while the puzzle is completed. Then, return the switch to its original position, giving the trapped character access to one of the torches and a switch.
1. The southwest pillar is already down, so use the switch twice on the small statue to the north to rotate the archer.

Torch diagram
2. The northeast side pillar can be lowered by lighting all three of the blue flame torches, see diagram. One torch is closest to the entrance on the western side, another is behind the gate on the east side (near the southeast switch that opens that gate, note that activating this switch lights the torches on either side of the gate) and the last torch is on the north end of the eastern side. This action is timed (albeit generously), so you may want your teammates to hold position close to each torch before lighting (keep someone close to the switch as well). After all the torches are lit, pull the switch to rotate the archer.
3. The northwest pillar can be lit up by having one character stand on the pressure plate that glows in the northernmost corner of the room, while another character pulls the lever to spin the archer.
4. The southeast is the most complicated. Leave a teammate at the torch behind the gate on the east side. Have a teammate pull the southeast switch, trapping the first teammate. Have your trapped teammate use the switch they have access to, allowing another teammate to go through a gate on the north-western side, where there is a crank. One teammate will need to stay next to the archer rotating switch, as the pillar will go back up quite quickly after the crank is fully turned. Release the trapped teammate by pulling the southwest switch.
Once all the artifacts have been lit, balls of light emerge (which must be followed for them to move) and light the remaining two artifacts, opening the gate. Enter and loot the crypt, then go into the next room. There will be a Revenant or an Arcane horror and several Undead there. Kill them then loot the room. This battle is repeatable on subsequent visits to the crypt, which is helpful for farming rare crafting materials and creature research items from the undead.
Rewards
Solving the archer puzzle inside yields:
- 967 XP
- 200 Influence
- 2 Power
Notes
- A
 Superb Amulet of Cunning is looted from atop a grave in the room north-east of the archer once the puzzle is complete.
 - The corpses and arcane horror respawn on revisiting the hallway past the puzzle room.
Trivia
- The hand may belong to the large statue of Andraste found in the Fade during Here Lies the Abyss. The shrine built by Ameridan to both Ghilan'nain and Andraste inside Razikale's reach features the same statue holding two small halla statues, that are in turn identical to halla statues found in the Crow Fens not far from the Dead Hand. Another broken piece of Andraste's statue - the head - is found in the Fade during the Final Piece.
- Another, more likely possibility is that the hand is one of those that the elves of Arlathan used to hold eluvians as well as the spherically shaped, metallic trees that seemed to have housed raw magic as witnessed in the Courtyard of the Shattered Library the first time the Inquisitor enters the area. Several of the exact same model of detached stone hands can be seen doing both of these things when observing the Library. (See Gallery) This would also add up with its proximity to the Archer and Pillar puzzle outlined above.}}
Codex entries
![]() Codex entry: Falon'Din: Friend of the Dead, the Guide
Codex entry: Falon'Din: Friend of the Dead, the Guide
![]() Codex entry: Dirthamen: Keeper of Secrets
Codex entry: Dirthamen: Keeper of Secrets
Gallery
")
")
")
")
")
")
")
")
")