No edit summary |
|||
| (21 intermediate revisions by 11 users not shown) | |||
| Line 1: | Line 1: | ||
<onlyinclude>{{QuestTransformer |
<onlyinclude>{{QuestTransformer |
||
| − | |style={{{style|}}} |
+ | |style = {{{style|}}} |
| − | |name = [[Chasind Trail Signs]] |
+ | |name = [[Chasind Trail Signs]] |
| − | |image = ChasindTrailSign.jpg |
+ | |image = ChasindTrailSign.jpg |
| − | |px = 270px |
+ | |px = 270px |
| − | |start = [[Korcari Wilds]] |
+ | |start = [[Korcari Wilds]] |
| − | |end = [[Korcari Wilds]] |
+ | |end = [[Korcari Wilds]] |
| ⚫ | |||
| − | |prereqs = Chasind Trail Signs, Rigby's Journal. |
||
| ⚫ | |||
| − | |qcat = Side Quest |
||
| − | |rewards = Axe, [[Chasind Crusher]], [[Thane Helmet]], [[Chasind Robes]]. |
||
|appearances = [[Dragon Age: Origins]] |
|appearances = [[Dragon Age: Origins]] |
||
}}</onlyinclude> |
}}</onlyinclude> |
||
| − | '''Chasind Trail Signs''' is a |
+ | '''Chasind Trail Signs''' is a side quest in ''[[Dragon Age: Origins]]'' that can be found in the [[Korcari Wilds]]. [[The Warden]] will need to look for seven hidden markers ("trail signs") scattered around the Wilds that point to a hidden cache of rare [[Chasind Wilder|Chasind]] equipment and a few items. The quest is not actually unlocked in the journal until all the signs have been found. |
| + | == Walkthrough == |
||
| ⚫ | *First, find the campsite in the northwest region of the Wilds. Dispatch the [[hurlock]]s and [[genlock]]s in the area and then head over to the campfire - you should see a chest between two tents. Open it to receive the [[Mud Idol]] necklace and [[Rigby's Field Journal]]. Now the first Chasind trail sign will be marked just south of the campsite, under the base of a tipped tree which is leaning on the arch. Go toward that X and look for the sign. ({{platforms|pc}}''These are not easy to see, so hold down the Tab key to see where they are located'') Once you have examined it, two new ones will appear on the map. (Each time you examine an X, it will disappear and one or two others will (re)appear. Despite the choices in order that this allows, the following order is recommended, as taking a different order may force you to revisit one or more signs.) For reference, see the markers on the map. |
||
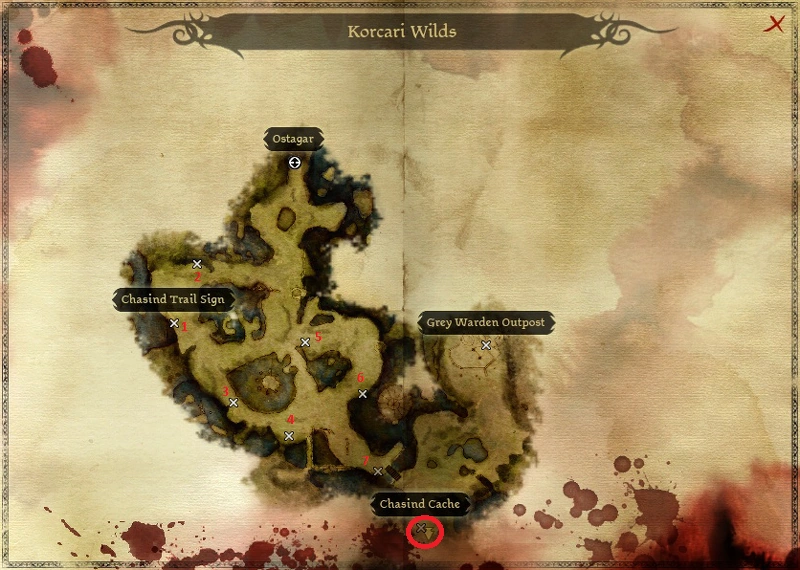
| + | *The second sign is located northeast of the first, at the east end of the ridge overlooking the campsite.[[File:800px-ChasindTrailSignMapNumbered.png|thumb|400px|Signs are marked X and numbered; red circle is where the cache will be found.]] |
||
| + | *The third sign is south and east of the first; follow the narrow path through the marsh. If you didn't originally come from this direction, you'll need to get past more [[Genlock archer]]s and a Hurlock, then an ambush set by [[Genlock rogue]]s. The third sign is near where the rogues set up their ambush (a growl can be heard whenever a party member catches the attention of one of these rogue groups). |
||
| + | *The fourth sign is further east and slightly south of the third, near an Elfroot plant and within sight of another series of arches. (It is also within sight of a wolf pack, which has gathered where Rigby had arranged to meet his son and left a [[The Missionary|cache]] of items. See the '''Note''' below on incorporating the related side quest into this walkthrough.) |
||
| + | *The fifth sign is north of the fourth, on top of the eastern of two hillocks (which appear joined by a fallen tree with three soldiers hanging from it - despite appearances, the tree cannot be used to move from hillock to hillock). Come up from the east side of the eastern hillock (populated by more genlocks and hurlocks, including a rogue ambush); in amongst a large cage and two crates is the fifth sign. |
||
| + | *The sixth sign is near another Elfroot plant, southeast of the fifth sign, past a ridge where (approaching for the first time) a pack of wolves will charge a pair of darkspawn (possibly joined by the eastern hillock's genlock rogues, if the party charges into this fray before taking the hillock). All wolves and darkspawn are viable targets for the party, of course. (Note that this combat might begin while the party is rounding the hillock to get to the fifth trail sign.) On top of this ridge are a locked chest and the corpse of Missionary Rigby (see the '''Note''' below). |
||
| ⚫ | *The seventh and final sign is at another ruined arch beside the bridge where you meet a [[Hurlock emissary]] (and another genlock rogue ambush). After examining this sign, the [[Chasind Trail Signs]] quest will finally appear in the quest journal. To complete the quest, just follow the newest map marker: across the bridge (where more darkspawn and several leghold traps await) and down to the campfire surrounded by logs (where another genlock rogue ambush awaits), then open the Chasind Cache which is in the end of one of said logs. |
||
| − | == |
+ | == Rewards == |
| − | <!---descr="How do you do it."---> |
||
| ⚫ | |||
| − | |||
| − | The second trail sign is located north[[File:800px-ChasindTrailSignMapNumbered.png|thumb|400px|Chasind Train Sign Map - The trails you must find are marked X on the map, with labeled numbers dictating the order. The circle shows the final spot.]] of the camp up on a small hill. |
||
| − | |||
| − | The third sign is south of the first, so follow the marsh like path (it's the small path on the map with ruined arches appearing on the right side a lot and being something of a single curved line between two pools of water) You'll eventually meet a few hurlocks and genlocks once more stationed on a hill - easily get rid of them and then continue on. Shortly enough you'll find a few trees and you'll be ambushed by genlocks that were stealthed. After your dispatch the genlocks you'll find the third sign just by the trees. |
||
| − | |||
| − | The fourth trail sign isn't too far from where the fifth one is in fact it's right down the hill beside and Elfroot plant - and another genlock ambush - from where Rigby's corpse is. |
||
| − | |||
| − | The fifth trail sign is on top of the hill with the cage (the hill that has a tipped tree reaching onto it with three dead soldiers hung from the tree). Make your way up to the hill where you'll dispatch some hurlocks and genlocks again, next to the cage and behind the two wooden (or broken) crates is the fourth sign - now if you want to do the [[Last Will and Testament]] quest you can just run down from the hill and run on until you meet the hurlock that is being attacked by four [[wolves]] with a Genlock firing arrows, get rid of all six of them and then walk onto the ruined temple and loot Missionary Rigby's corpse to get his will, back track to the camp where you got his journal and you'll find his lockbox in the camp fire. |
||
| − | |||
| ⚫ | The |
||
| − | |||
| − | ==Rewards== |
||
| − | <!---descr="What happens as a result of the quest - rewards, events, etc."---> |
||
{{:Barbarian Mace|style=iconmini}}{{clrl}} |
{{:Barbarian Mace|style=iconmini}}{{clrl}} |
||
{{:Chasind Crusher|style=iconmini}}{{clrl}} |
{{:Chasind Crusher|style=iconmini}}{{clrl}} |
||
| Line 39: | Line 29: | ||
And 3 random minerals (topaz, quartz, etc.) |
And 3 random minerals (topaz, quartz, etc.) |
||
| − | ==See also== |
+ | == See also == |
{{:Codex entry: Signs of the Chasind|style=iconmini}}{{clrl}} |
{{:Codex entry: Signs of the Chasind|style=iconmini}}{{clrl}} |
||
| + | |||
| + | == Notes == |
||
| + | *The fifth and sixth signs are the closest to Rigby's corpse, where you may unlock a [[Last Will and Testament|quest]] that directs you to the campsite where ''this'' quest begins. ''If'' you wish to complete all three side quests involving this family, you will have to travel to either this area or the campsite twice (whichever one is visited first), and since this part of the map is more on the way to completing the [[The Grey Wardens' Cache|required]] quest line, it will probably save time to follow this sequence: |
||
| + | *#Search Jogby's body near the Wilds entrance/exit to trigger [[The Missionary]] side quest. |
||
| + | *#Clear the map southward and eastward until you pick up [[Rigby's Last Will and Testament|Rigby's will]] (east of 5 and north of 6 on the marked map provided here). |
||
| + | *#Head for the campsite to pick up Rigby's ''Hidden Cache'' ([[Sealed Lockbox]]). (This completes as much of [[Last Will and Testament]] side quest as is possible before traveling to [[Redcliffe Village]].) |
||
| + | *#Commence the Trail Signs Walkthrough detailed above, examining the first, second and third signs. |
||
| + | *#Just after examining the fourth trail sign, cross the water to the south and clear out the wolf pack. This gives access to a chest which completes [[The Missionary]] side quest. |
||
| + | *From this point the Trail Signs procedure continues as outlined above. |
||
| + | {{-}} |
||
| + | A bug may occur in which the signs will not appear on your map, rendering the quest unable to be completed |
||
| + | |||
| + | [[es:Rastros chasind]] |
||
[[Category:Dragon Age: Origins side quests]] |
[[Category:Dragon Age: Origins side quests]] |
||
| − | [[Category:Korcari Wilds |
+ | [[Category:Korcari Wilds side quests]] |
Revision as of 04:06, 4 February 2019
Chasind Trail Signs is a side quest in Dragon Age: Origins that can be found in the Korcari Wilds. The Warden will need to look for seven hidden markers ("trail signs") scattered around the Wilds that point to a hidden cache of rare Chasind equipment and a few items. The quest is not actually unlocked in the journal until all the signs have been found.
Walkthrough
- First, find the campsite in the northwest region of the Wilds. Dispatch the hurlocks and genlocks in the area and then head over to the campfire - you should see a chest between two tents. Open it to receive the Mud Idol necklace and Rigby's Field Journal. Now the first Chasind trail sign will be marked just south of the campsite, under the base of a tipped tree which is leaning on the arch. Go toward that X and look for the sign. (
 These are not easy to see, so hold down the Tab key to see where they are located) Once you have examined it, two new ones will appear on the map. (Each time you examine an X, it will disappear and one or two others will (re)appear. Despite the choices in order that this allows, the following order is recommended, as taking a different order may force you to revisit one or more signs.) For reference, see the markers on the map.
 - The second sign is located northeast of the first, at the east end of the ridge overlooking the campsite.

Signs are marked X and numbered; red circle is where the cache will be found.
- The third sign is south and east of the first; follow the narrow path through the marsh. If you didn't originally come from this direction, you'll need to get past more Genlock archers and a Hurlock, then an ambush set by Genlock rogues. The third sign is near where the rogues set up their ambush (a growl can be heard whenever a party member catches the attention of one of these rogue groups).
- The fourth sign is further east and slightly south of the third, near an Elfroot plant and within sight of another series of arches. (It is also within sight of a wolf pack, which has gathered where Rigby had arranged to meet his son and left a cache of items. See the Note below on incorporating the related side quest into this walkthrough.)
- The fifth sign is north of the fourth, on top of the eastern of two hillocks (which appear joined by a fallen tree with three soldiers hanging from it - despite appearances, the tree cannot be used to move from hillock to hillock). Come up from the east side of the eastern hillock (populated by more genlocks and hurlocks, including a rogue ambush); in amongst a large cage and two crates is the fifth sign.
- The sixth sign is near another Elfroot plant, southeast of the fifth sign, past a ridge where (approaching for the first time) a pack of wolves will charge a pair of darkspawn (possibly joined by the eastern hillock's genlock rogues, if the party charges into this fray before taking the hillock). All wolves and darkspawn are viable targets for the party, of course. (Note that this combat might begin while the party is rounding the hillock to get to the fifth trail sign.) On top of this ridge are a locked chest and the corpse of Missionary Rigby (see the Note below).
- The seventh and final sign is at another ruined arch beside the bridge where you meet a Hurlock emissary (and another genlock rogue ambush). After examining this sign, the Chasind Trail Signs quest will finally appear in the quest journal. To complete the quest, just follow the newest map marker: across the bridge (where more darkspawn and several leghold traps await) and down to the campfire surrounded by logs (where another genlock rogue ambush awaits), then open the Chasind Cache which is in the end of one of said logs.
Rewards
And 3 random minerals (topaz, quartz, etc.)
See also
![]() Codex entry: Signs of the Chasind
Codex entry: Signs of the Chasind
Notes
- The fifth and sixth signs are the closest to Rigby's corpse, where you may unlock a quest that directs you to the campsite where this quest begins. If you wish to complete all three side quests involving this family, you will have to travel to either this area or the campsite twice (whichever one is visited first), and since this part of the map is more on the way to completing the required quest line, it will probably save time to follow this sequence:
- Search Jogby's body near the Wilds entrance/exit to trigger The Missionary side quest.
- Clear the map southward and eastward until you pick up Rigby's will (east of 5 and north of 6 on the marked map provided here).
- Head for the campsite to pick up Rigby's Hidden Cache (Sealed Lockbox). (This completes as much of Last Will and Testament side quest as is possible before traveling to Redcliffe Village.)
- Commence the Trail Signs Walkthrough detailed above, examining the first, second and third signs.
- Just after examining the fourth trail sign, cross the water to the south and clear out the wolf pack. This gives access to a chest which completes The Missionary side quest.
- From this point the Trail Signs procedure continues as outlined above.
───────
A bug may occur in which the signs will not appear on your map, rendering the quest unable to be completed